User Manual
Page 5
... SCREEN ADJUSTMENT 33 PICTURE LEVEL AND TILT ADJUSTMENT 10 MOVING PROJECTOR 10 VIDEO MODE 34 CONNECTING PROJECTOR 11 SELECTING INPUT SOURCE 34 TERMINALS OF PROJECTOR 11 SELECTING VIDEO SYSTEM 35 CONNECTING TO COMPUTER 14 PICTURE IMAGE ADJUSTMENT IMAGE LEVEL SELECT 36 36 CONNECTING TO VIDEO EQUIPMENT 15 IMAGE LEVEL ADJUSTMENT 37 PICTURE SCREEN ADJUSTMENT 38 BEFORE...
... SCREEN ADJUSTMENT 33 PICTURE LEVEL AND TILT ADJUSTMENT 10 MOVING PROJECTOR 10 VIDEO MODE 34 CONNECTING PROJECTOR 11 SELECTING INPUT SOURCE 34 TERMINALS OF PROJECTOR 11 SELECTING VIDEO SYSTEM 35 CONNECTING TO COMPUTER 14 PICTURE IMAGE ADJUSTMENT IMAGE LEVEL SELECT 36 36 CONNECTING TO VIDEO EQUIPMENT 15 IMAGE LEVEL ADJUSTMENT 37 PICTURE SCREEN ADJUSTMENT 38 BEFORE...

User Manual
Page 6
... for portability, durability, and ease of your computer. G Computers IBM-compatible or Macintosh computer up a projector via the network cable. G Component Video Component video signal, such as a S-VHS VCR output signal, can not display image of signals from a computer...., Swedish, Russian, Chinese, Korean or Japanese. N Compatibility This projector widely accepts various video and computer input signals including; This function makes it easy to operate both projector and computer with this projector for optional parts. 6 N Network board (Optional) Network board ...
... for portability, durability, and ease of your computer. G Computers IBM-compatible or Macintosh computer up a projector via the network cable. G Component Video Component video signal, such as a S-VHS VCR output signal, can not display image of signals from a computer...., Swedish, Russian, Chinese, Korean or Japanese. N Compatibility This projector widely accepts various video and computer input signals including; This function makes it easy to operate both projector and computer with this projector for optional parts. 6 N Network board (Optional) Network board ...
User Manual
Page 11
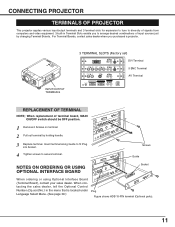
...Boards. When contacting the sales dealer, tell the Optional Control Number (Op.cont.No.) in Terminal Slots enable you purchased a projector. Insert terminal along Guide to fit Plug into Socket. 4 Tighten screws to arrange desired combinations of input sources just by ...Terminal 5 BNC Terminal AV Terminal REPLACEMENT OF TERMINAL NOTE; CONNECTING PROJECTOR TERMINALS OF PROJECTOR This projector applies various input/output terminals and 3 terminal slots for expansion to tune to diversity of signals from computers and video equipment. 3-built-in the menu that is located under Language ...
...Boards. When contacting the sales dealer, tell the Optional Control Number (Op.cont.No.) in Terminal Slots enable you purchased a projector. Insert terminal along Guide to fit Plug into Socket. 4 Tighten screws to arrange desired combinations of input sources just by ...Terminal 5 BNC Terminal AV Terminal REPLACEMENT OF TERMINAL NOTE; CONNECTING PROJECTOR TERMINALS OF PROJECTOR This projector applies various input/output terminals and 3 terminal slots for expansion to tune to diversity of signals from computers and video equipment. 3-built-in the menu that is located under Language ...
User Manual
Page 12
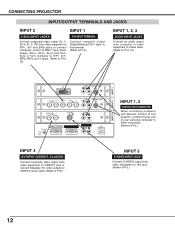
... computer with Remote Control of this projector, connect mouse port of your personal computer to these connectors. (Refer to P14.) INPUT 3 AV INPUT (VIDEO/Y, C) JACKS Connect composite video output from video equipment to VIDEO/Y jack or connect Separate Y/C video outputs to VIDEO/Y and C jacks. (Refer to P15.) INPUT 3 S-VIDEO INPUT JACK Connect S-VIDEO output from video equipment to P15.) 12
... computer with Remote Control of this projector, connect mouse port of your personal computer to these connectors. (Refer to P14.) INPUT 3 AV INPUT (VIDEO/Y, C) JACKS Connect composite video output from video equipment to VIDEO/Y jack or connect Separate Y/C video outputs to VIDEO/Y and C jacks. (Refer to P15.) INPUT 3 S-VIDEO INPUT JACK Connect S-VIDEO output from video equipment to P15.) 12
User Manual
Page 13
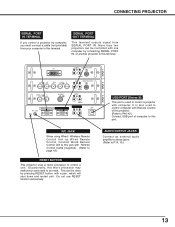
... PORT R L R/Pr G/Y B/Pb H/HV V (MONO) AUDIO CONTROL PORT R L VIDEO/Y C S-VIDEO (MONO) AUDIO R L R/C JACK SERIAL PORT IN SERIAL PORT OUT (MONO) AUDIO OUT R L RESET (MONO) USB INPUT 3 INPUT 2 INPUT 1 USB PORT (Series B) This port is also used to P14, 15.) 13 More than two projectors can be done by connecting SERIAL PORT IN. AUDIO...
... PORT R L R/Pr G/Y B/Pb H/HV V (MONO) AUDIO CONTROL PORT R L VIDEO/Y C S-VIDEO (MONO) AUDIO R L R/C JACK SERIAL PORT IN SERIAL PORT OUT (MONO) AUDIO OUT R L RESET (MONO) USB INPUT 3 INPUT 2 INPUT 1 USB PORT (Series B) This port is also used to P14, 15.) 13 More than two projectors can be done by connecting SERIAL PORT IN. AUDIO...

User Manual
Page 14
...Cable Control Cable Control Cable for Serial Port for PS/2 Port for ADB Port Terminal Terminal Terminal DVI Cable DVI-VGA Cable Terminals of a Projector Switches of MAC/VGA Adapter MAC/VGA ADAPTER ON ON DIP 123456 OFF INPUT 1 INPUT 2 DVI AUDIO CONTROL PORT R L R/Pr ...G/Y B/Pb H/HV V (MONO) AUDIO CONTROL PORT R L VIDEO/Y C S-VIDEO (MONO) AUDIO R L R/C JACK RESET (MONO) SERIAL PORT IN SERIAL PORT OUT AUDIO OUT R L (MONO) USB INPUT 3 AUDIO OUT Audio Cable (stereo...
...Cable Control Cable Control Cable for Serial Port for PS/2 Port for ADB Port Terminal Terminal Terminal DVI Cable DVI-VGA Cable Terminals of a Projector Switches of MAC/VGA Adapter MAC/VGA ADAPTER ON ON DIP 123456 OFF INPUT 1 INPUT 2 DVI AUDIO CONTROL PORT R L R/Pr ...G/Y B/Pb H/HV V (MONO) AUDIO CONTROL PORT R L VIDEO/Y C S-VIDEO (MONO) AUDIO R L R/C JACK RESET (MONO) SERIAL PORT IN SERIAL PORT OUT AUDIO OUT R L (MONO) USB INPUT 3 AUDIO OUT Audio Cable (stereo...
User Manual
Page 15
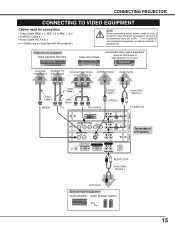
... connecting cable, power cords of a Projector AUDIO OUT Audio Cable (Stereo) ✽ Audio Input External Audio Equipment Audio Amplifier Audio Speaker (stereo) 15 Video Source (example) Video Cassette Recorder Video Disc Player Component video output equipment. (such as DVD player or high-definition TV source.) Composite Video Output Separate Y/C Video Output Y C Component Video Output Pr/Cr Y Pb/Cb...
... connecting cable, power cords of a Projector AUDIO OUT Audio Cable (Stereo) ✽ Audio Input External Audio Equipment Audio Amplifier Audio Speaker (stereo) 15 Video Source (example) Video Cassette Recorder Video Disc Player Component video output equipment. (such as DVD player or high-definition TV source.) Composite Video Output Separate Y/C Video Output Y C Component Video Output Pr/Cr Y Pb/Cb...

User Manual
Page 19
... ITEM SELECT BUTTON MENU ICON POINTER (red frame) ITEM DATA Press POINT LEFT/RIGHT buttons to select item. IMAGE ZOOM LENS SHIFT MENU COMPUTER 2 SELECT VIDEO FOCUS LENS FLOW OF ON-SCREEN MENU OPERATION MENU BUTTON SELECT BUTTON Used to adjust value or set selected function by pressing POINT button(s) on... by pressing POINT RIGHT / LEFT buttons. BEFORE OPERATION OPERATING ON-SCREEN MENU HOW TO OPERATE ON-SCREEN MENU You can control and adjust this projector through ON-SCREEN MENU 3 Press POINT DOWN button and move Pointer UP/ DOWN/ RIGHT/ LEFT. TOP CONTROL ON --
... ITEM SELECT BUTTON MENU ICON POINTER (red frame) ITEM DATA Press POINT LEFT/RIGHT buttons to select item. IMAGE ZOOM LENS SHIFT MENU COMPUTER 2 SELECT VIDEO FOCUS LENS FLOW OF ON-SCREEN MENU OPERATION MENU BUTTON SELECT BUTTON Used to adjust value or set selected function by pressing POINT button(s) on... by pressing POINT RIGHT / LEFT buttons. BEFORE OPERATION OPERATING ON-SCREEN MENU HOW TO OPERATE ON-SCREEN MENU You can control and adjust this projector through ON-SCREEN MENU 3 Press POINT DOWN button and move Pointer UP/ DOWN/ RIGHT/ LEFT. TOP CONTROL ON --
User Manual
Page 20
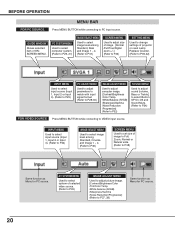
...of image to Full, Zoom, Normal or Natural wide. (Refer to P38) Same function as Menu for PC source. GUIDE WINDOW Shows selected item of projector or reset Lamp Replace Counter. (Refer to P39-42) INPUT MENU Used to select input source (Input 1, Input 2 or Input 3). (Refer to ... IMAGE SELECT MENU Used to select image level among Standard, Cinema and Image 1 ~ 4. (Refer to P36) SCREEN MENU Used to set size of selected video source. (Refer to P35) IMAGE ADJUST MENU Used to adjust picture image. [Contrast/Brightness/Color /Tint/Color Temp. /White balance (R/G/B) /Sharpness/Gamma /Noise ...
...of image to Full, Zoom, Normal or Natural wide. (Refer to P38) Same function as Menu for PC source. GUIDE WINDOW Shows selected item of projector or reset Lamp Replace Counter. (Refer to P39-42) INPUT MENU Used to select input source (Input 1, Input 2 or Input 3). (Refer to ... IMAGE SELECT MENU Used to select image level among Standard, Cinema and Image 1 ~ 4. (Refer to P36) SCREEN MENU Used to set size of selected video source. (Refer to P35) IMAGE ADJUST MENU Used to adjust picture image. [Contrast/Brightness/Color /Tint/Color Temp. /White balance (R/G/B) /Sharpness/Gamma /Noise ...

User Manual
Page 35
..., 1080i50 or 1080i60, select system manually first. Move pointer to system and press SELECT button. 35 COMPONENT VIDEO SIGNAL FORMAT If projector can not reproduce proper video image, it is necessary to select a specific broadcast signal format among 480i, 575i, 480p, 575p, 720p... or 1080i60. Y, Pb/Cb, Pr/Cr JACKS Auto Projector automatically detects incoming Video signal, and adjusts itself to select a specific component video signal format among PAL, SECAM, NTSC, NTSC 4.43, PAL-M, and PAL-N. VIDEO INPUT SELECTING VIDEO SYSTEM 1 Press MENU button and ON-SCREEN MENU will ...
..., 1080i50 or 1080i60, select system manually first. Move pointer to system and press SELECT button. 35 COMPONENT VIDEO SIGNAL FORMAT If projector can not reproduce proper video image, it is necessary to select a specific broadcast signal format among 480i, 575i, 480p, 575p, 720p... or 1080i60. Y, Pb/Cb, Pr/Cr JACKS Auto Projector automatically detects incoming Video signal, and adjusts itself to select a specific component video signal format among PAL, SECAM, NTSC, NTSC 4.43, PAL-M, and PAL-N. VIDEO INPUT SELECTING VIDEO SYSTEM 1 Press MENU button and ON-SCREEN MENU will ...

User Manual
Page 36
Standard Normal picture level preset on this projector. Level being selected. 36 IMAGE button Standard Cinema Image 1 Image 2 Image 3 Image 4 IMAGE LEVEL SELECT (MENU) 1 Press MENU button and ON-SCREEN MENU will appear. ... level and press SELECT button. Move a red frame pointer to set and then press SELECT button. Cinema Picture level adjusted for picture with fine tone. VIDEO INPUT PICTURE IMAGE ADJUSTMENT IMAGE LEVEL SELECT (DIRECT) Select image level among Standard, Cinema, Image 1, Image 2, Image 3 and Image 4 by pressing IMAGE button on Top...
Standard Normal picture level preset on this projector. Level being selected. 36 IMAGE button Standard Cinema Image 1 Image 2 Image 3 Image 4 IMAGE LEVEL SELECT (MENU) 1 Press MENU button and ON-SCREEN MENU will appear. ... level and press SELECT button. Move a red frame pointer to set and then press SELECT button. Cinema Picture level adjusted for picture with fine tone. VIDEO INPUT PICTURE IMAGE ADJUSTMENT IMAGE LEVEL SELECT (DIRECT) Select image level among Standard, Cinema, Image 1, Image 2, Image 3 and Image 4 by pressing IMAGE button on Top...
User Manual
Page 38
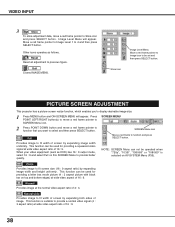
...providing a squeezed video signal at wide video aspect of 16 : 9. Zoom Provides image to select and then press SELECT button. Other icons operates as DVD) has 16 : 9 output mode, select 16 : 9 and select Full on AV SYSTEM Menu (P35). Store icon PICTURE SCREEN ADJUSTMENT This projector has a picture...This function can be used for providing a letter box mode picture (4 : 3 aspect picture with black bar on top and bottom edges) at wide video aspect ratio of 16 : 9. Provides image to SCREEN Menu icon. Move a red frame pointer to Image Level 1 to previous figure. Reset Reset ...
...providing a squeezed video signal at wide video aspect of 16 : 9. Zoom Provides image to select and then press SELECT button. Other icons operates as DVD) has 16 : 9 output mode, select 16 : 9 and select Full on AV SYSTEM Menu (P35). Store icon PICTURE SCREEN ADJUSTMENT This projector has a picture...This function can be used for providing a letter box mode picture (4 : 3 aspect picture with black bar on top and bottom edges) at wide video aspect ratio of 16 : 9. Provides image to SCREEN Menu icon. Move a red frame pointer to Image Level 1 to previous figure. Reset Reset ...
User Manual
Page 39
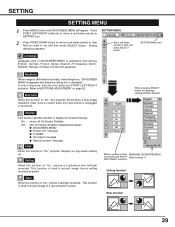
...MENU button and ON-SCREEN MENU will produce a blue image instead of video noise on page 22. SETTING MENU Set a red frame pointer to...is "On," picture is unplugged or turned off ?" This function is selectable from a ceiling mounted projector. Language Language used in ON-SCREEN MENU is used to project image to display On-Screen Displays.... ON-SCREEN MENU disappears and Keystone dialog box is "On," projector displays our logo when starting up. Off ···· sets On-Screen Displays disappeared except; message...
...MENU button and ON-SCREEN MENU will produce a blue image instead of video noise on page 22. SETTING MENU Set a red frame pointer to...is "On," picture is unplugged or turned off ?" This function is selectable from a ceiling mounted projector. Language Language used in ON-SCREEN MENU is used to project image to display On-Screen Displays.... ON-SCREEN MENU disappears and Keystone dialog box is "On," projector displays our logo when starting up. Off ···· sets On-Screen Displays disappeared except; message...

User Manual
Page 41
...control operation mixture (jam) when operating several projectors or video equipment together. To change the remote control code of the Remote Control Unit, set the DIP switches 1-3 inside the battery compartment box of the projector used in "Code 7," both projector and Remote Control Unit must be switched to...have the remote control nearby, disconnect the AC cord to item and then press POINT LEFT/RIGHT button(s). To change the code of Projector; Wireless Mouse mode Select " " when controlling a computer with computer. Key lock This function locks the operation of the remote control....
...control operation mixture (jam) when operating several projectors or video equipment together. To change the remote control code of the Remote Control Unit, set the DIP switches 1-3 inside the battery compartment box of the projector used in "Code 7," both projector and Remote Control Unit must be switched to...have the remote control nearby, disconnect the AC cord to item and then press POINT LEFT/RIGHT button(s). To change the code of Projector; Wireless Mouse mode Select " " when controlling a computer with computer. Key lock This function locks the operation of the remote control....
User Manual
Page 43
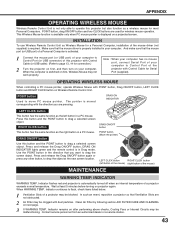
... Fans or Internal Circuits may be clogged with Control Cable (or USB cable). (Refer to Control Port (or USB connector) of the projector with POINT button, Drag DO.ZNO/OOMFFFRbEuEtZtoEn,NLOESFHTOWCLICK button and RIGHT CLICK button on Wireless Remote Control Unit. Indicator remains on next page. ... dealer or a service station. 43 POINT button, drag ON/OFF button and two CLICK buttons are pressing. VIDEO When WARNING TEMP. When the computer is switched on projector again. MENU DRAG ON/OFF button POINT button (Move the pointer) KEYSTONE LEFT CLICK button RIGHT CLICK button ...
... Fans or Internal Circuits may be clogged with Control Cable (or USB cable). (Refer to Control Port (or USB connector) of the projector with POINT button, Drag DO.ZNO/OOMFFFRbEuEtZtoEn,NLOESFHTOWCLICK button and RIGHT CLICK button on Wireless Remote Control Unit. Indicator remains on next page. ... dealer or a service station. 43 POINT button, drag ON/OFF button and two CLICK buttons are pressing. VIDEO When WARNING TEMP. When the computer is switched on projector again. MENU DRAG ON/OFF button POINT button (Move the pointer) KEYSTONE LEFT CLICK button RIGHT CLICK button ...
User Manual
Page 48
... to see if it takes about 30 seconds to your computer or video equipment and a projector. In such an event, leave a projector OFF and wait until condensation disappears. Power equipment back on in section "CONNECTING PROJECTOR" on . NOTE : After pressing Power ON-OFF button to page... location may be turned on. (See "TURNING ON/OFF PROJECTOR" section on page 39.) G Check connection between your computer or video equipment as follows: 1. Try these Solutions G Plug a projector into your computer or video equipment. LAMP indicator lights bright and READY indicator turns off...
... to see if it takes about 30 seconds to your computer or video equipment and a projector. In such an event, leave a projector OFF and wait until condensation disappears. Power equipment back on in section "CONNECTING PROJECTOR" on . NOTE : After pressing Power ON-OFF button to page... location may be turned on. (See "TURNING ON/OFF PROJECTOR" section on page 39.) G Check connection between your computer or video equipment as follows: 1. Try these Solutions G Plug a projector into your computer or video equipment. LAMP indicator lights bright and READY indicator turns off...

User Manual
Page 52
Mute Quit Computer Input/Video Input Setting Language 0 - 63 0 - 63 0 - 63 0 - 63 High Mid Low XLow 0 - 63 0 - 63 0 - 63 0 - 15 0 - 15 Off/On ... Code 1 Code 2 Code 3 Code 4 Code 5 Code 6 Code 7 Code 8 Quit Mouse/Projector Off Projector Remote Control Quit Yes / No Yes / No 0 - 63 0 - 63 0 - 63 On/Off On/Off 52 APPENDIX Video Input System (2) System (3) Image Select Image Adjust Auto PAL SECAM NTSC NTSC 4.43 PAL-M PAL... Sharpness Gamma Noise reduction Progressive Reset Store Quit Screen Full Zoom Normal Natural wide Computer Input/Video Input Sound Volume Treble Bass Built-in SP.
Mute Quit Computer Input/Video Input Setting Language 0 - 63 0 - 63 0 - 63 0 - 63 High Mid Low XLow 0 - 63 0 - 63 0 - 63 0 - 15 0 - 15 Off/On ... Code 1 Code 2 Code 3 Code 4 Code 5 Code 6 Code 7 Code 8 Quit Mouse/Projector Off Projector Remote Control Quit Yes / No Yes / No 0 - 63 0 - 63 0 - 63 On/Off On/Off 52 APPENDIX Video Input System (2) System (3) Image Select Image Adjust Auto PAL SECAM NTSC NTSC 4.43 PAL-M PAL... Sharpness Gamma Noise reduction Progressive Reset Store Quit Screen Full Zoom Normal Natural wide Computer Input/Video Input Sound Volume Treble Bass Built-in SP.
User Manual
Page 53
... Input 2 Jacks Input 3 Jacks Other Jacks Built-in Speakers Feet Adjustment Voltage and Power Consumption Operating Temperature Storage Temperature Remote Control Transmitter Accessories Multi-media Projector 17.3" x 9.1" x 23.8" (439 mm x 230 mm x 605.6 mm) 46.3 lbs (21 kg) 1.21" TFT Active Matrix type, 3 ... 5 (R/Pr, G/Y, B/Pb, H/HV and V), RCA Type (Audio R and L) and DIN 8-pin (Control port) BNC Type x 2 (VIDEO/Y, C), RCA Type (Audio R and L) and DIN 4-pin (S-Video) Serial port in (DB 9), Serial port out (DB 9), USB port, Audio Monitor out (RCA Type R and L) and Wired Remote Jack INT....
... Input 2 Jacks Input 3 Jacks Other Jacks Built-in Speakers Feet Adjustment Voltage and Power Consumption Operating Temperature Storage Temperature Remote Control Transmitter Accessories Multi-media Projector 17.3" x 9.1" x 23.8" (439 mm x 230 mm x 605.6 mm) 46.3 lbs (21 kg) 1.21" TFT Active Matrix type, 3 ... 5 (R/Pr, G/Y, B/Pb, H/HV and V), RCA Type (Audio R and L) and DIN 8-pin (Control port) BNC Type x 2 (VIDEO/Y, C), RCA Type (Audio R and L) and DIN 4-pin (S-Video) Serial port in (DB 9), Serial port out (DB 9), USB port, Audio Monitor out (RCA Type R and L) and Wired Remote Jack INT....


