
Owners Manual
Page 2
...the actual product. • The contents of the projected image. ◆ Compatibility The projector accepts signals from dust and scratches. You can select an ideal image mode for the ... allows you to customize the screen logo (see page 26). ◆ 16 : 9 Wide Screen The wide LCD panels with the most advanced technology for portability, durability, and ease of 9.8' (3.0 m) to 20.0' (6.1 m)....of your choice can also be selected (see pages 23, 29). ◆ Simple Computer System Setting The Multi-scan system of Image Modes You can capture an image for your preference and viewing ...
...the actual product. • The contents of the projected image. ◆ Compatibility The projector accepts signals from dust and scratches. You can select an ideal image mode for the ... allows you to customize the screen logo (see page 26). ◆ 16 : 9 Wide Screen The wide LCD panels with the most advanced technology for portability, durability, and ease of 9.8' (3.0 m) to 20.0' (6.1 m)....of your choice can also be selected (see pages 23, 29). ◆ Simple Computer System Setting The Multi-scan system of Image Modes You can capture an image for your preference and viewing ...

Owners Manual
Page 3
... Rear Terminal 9 Top Control 10 Remote Control 11 Remote Control Operating Range 12 Remote Control Battery Installation 12 Installation 13 Positioning the Projector 13 Adjustable Feet 13 Moving the Lens 14 Connecting to Video Equipment (Video, S-Video) 15 Connecting to Video Equipment (Component) ... Setting 37 Information 43 Input Source Information Display 43 Maintenance and Cleaning 44 Warning Indicator 44 Cleaning the RGB panels 45 Cleaning the Air Filter 47 Resetting the Filter Counter 48 Cleaning the Projection Lens 48 Cleaning the Projector Cabinet ...
... Rear Terminal 9 Top Control 10 Remote Control 11 Remote Control Operating Range 12 Remote Control Battery Installation 12 Installation 13 Positioning the Projector 13 Adjustable Feet 13 Moving the Lens 14 Connecting to Video Equipment (Video, S-Video) 15 Connecting to Video Equipment (Component) ... Setting 37 Information 43 Input Source Information Display 43 Maintenance and Cleaning 44 Warning Indicator 44 Cleaning the RGB panels 45 Cleaning the Air Filter 47 Resetting the Filter Counter 48 Cleaning the Projection Lens 48 Cleaning the Projector Cabinet ...

Owners Manual
Page 4
...which can be maintained. - Do not project the same image for the Protection of them correctly at a certain concentration. Do not set the projector in ! If your local community waste collection/recycling centre. This will be dangerous. Heat build- Please, dispose of Electronic Computer/Data... be recycled and/or reused. The afterimage may become deteriorated. Allowing the proper amount of space on the LCD panels by the characteristic of the projector periodically with oil or chemicals, it may result in a proper position. Do not cover the ventilation slot on...
...which can be maintained. - Do not project the same image for the Protection of them correctly at a certain concentration. Do not set the projector in ! If your local community waste collection/recycling centre. This will be dangerous. Heat build- Please, dispose of Electronic Computer/Data... be recycled and/or reused. The afterimage may become deteriorated. Allowing the proper amount of space on the LCD panels by the characteristic of the projector periodically with oil or chemicals, it may result in a proper position. Do not cover the ventilation slot on...

Owners Manual
Page 6
... kit in an improper location. The fan's running speed is changed according to the altitude in which the projector is cooled enough. Set the highland mode properly according to the temperature inside the projector. When not mounted properly, the projector may result. - This may cause damage to project an image. Do not put the...
... kit in an improper location. The fan's running speed is changed according to the altitude in which the projector is cooled enough. Set the highland mode properly according to the temperature inside the projector. When not mounted properly, the projector may result. - This may cause damage to project an image. Do not put the...

Owners Manual
Page 10
...i INFO. e LAMP REPLACE indicator Lights yellow light when the projection lamp reaches its end of the projector exceeds the operating range (pp.44, 53). Blinks green in the OnScreen Menu. Blinks orange when the...slide shutter is in stand-by mode. - o POWER ON/STAND-BY button Turn the projector on or off period. - Lights red light when the projector detects an abnormal condition. - t INPUT button Select an input source (p.24). r MENU...w q r o t yu i q POWER indicator - y POINT ed7 8 buttons Select an item or adjust the setting values in the Power management mode (p.41). -
...i INFO. e LAMP REPLACE indicator Lights yellow light when the projection lamp reaches its end of the projector exceeds the operating range (pp.44, 53). Blinks green in the OnScreen Menu. Blinks orange when the...slide shutter is in stand-by mode. - o POWER ON/STAND-BY button Turn the projector on or off period. - Lights red light when the projector detects an abnormal condition. - t INPUT button Select an input source (p.24). r MENU...w q r o t yu i q POWER indicator - y POINT ed7 8 buttons Select an item or adjust the setting values in the Power management mode (p.41). -

Owners Manual
Page 11
r MENU button Open or close the On-Screen Menu (p.20). @1 t POINT ed7 8 buttons Select an item or adjust the setting values in the On-Screen Menu. @0 y SCREEN button Select a screen size (pp.22, 35). o LAMP CONTROL button !8 Select a lamp mode (pp.23, 29). !0 FREEZE button !7 ... button Adjust the brightness of a projected image (pp.23, 28). !7 IMAGE ADJ. Remote Control e w q r t y u i o Part Names and Functions q POWER ON/STAND-BY button Turn the projector on or off the projected image (p.23). !2 LOGO button !4 Display the captured logo (p.23). !3 !3 COLOR TEMP.
r MENU button Open or close the On-Screen Menu (p.20). @1 t POINT ed7 8 buttons Select an item or adjust the setting values in the On-Screen Menu. @0 y SCREEN button Select a screen size (pp.22, 35). o LAMP CONTROL button !8 Select a lamp mode (pp.23, 29). !0 FREEZE button !7 ... button Adjust the brightness of a projected image (pp.23, 28). !7 IMAGE ADJ. Remote Control e w q r t y u i o Part Names and Functions q POWER ON/STAND-BY button Turn the projector on or off the projected image (p.23). !2 LOGO button !4 Display the captured logo (p.23). !3 !3 COLOR TEMP.
Owners Manual
Page 12
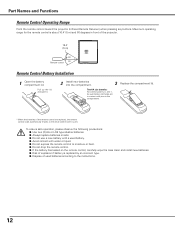
... (p.41). To ensure safe operation, please observe the following precautions: ● Use two (2) AA or LR6 type alkaline batteries. ● Always replace batteries in sets. ● Do not use a new battery with a used battery. ● Avoid contact with pins in front of the remote control are replaced, the remote ... new batteries. ● Risk of explosion if battery is about 16.4' (5 m) and 60 degrees in the compartment. * When the batteries of the projector. 16.4' (5 m) 30° Remote control 30° Remote Control Battery Installation 1 Open the battery compartment lid.
... (p.41). To ensure safe operation, please observe the following precautions: ● Use two (2) AA or LR6 type alkaline batteries. ● Always replace batteries in sets. ● Do not use a new battery with a used battery. ● Avoid contact with pins in front of the remote control are replaced, the remote ... new batteries. ● Risk of explosion if battery is about 16.4' (5 m) and 60 degrees in the compartment. * When the batteries of the projector. 16.4' (5 m) 30° Remote control 30° Remote Control Battery Installation 1 Open the battery compartment lid.

Owners Manual
Page 15
... of Fine sync. Video Equipment Component Video Output (Y, Pb/Cb, Pr/Cr) Component Cable (RCA x 3) COMPONENT 15 Installation This projector can be adjusted from the AC outlet before connecting the cables. Video Equipment Composite Video Output S-VIDEO Output Video Cable (RCA x 1)...(Component) Component Use a component cable (optional). ✔Note: • To order the optional cables, see page 34). Connecting to the projector's COMPONENT 1/2 terminals, horizontal line noise may be connected up to +31 (see page 58. • When connecting HDTV equipment to Video Equipment...
... of Fine sync. Video Equipment Component Video Output (Y, Pb/Cb, Pr/Cr) Component Cable (RCA x 3) COMPONENT 15 Installation This projector can be adjusted from the AC outlet before connecting the cables. Video Equipment Composite Video Output S-VIDEO Output Video Cable (RCA x 1)...(Component) Component Use a component cable (optional). ✔Note: • To order the optional cables, see page 34). Connecting to the projector's COMPONENT 1/2 terminals, horizontal line noise may be connected up to +31 (see page 58. • When connecting HDTV equipment to Video Equipment...

Owners Manual
Page 19
...is cooled enough. 19 Press the POWER ON/STAND-BY button again to the temperature inside the projector. • If the WARNING indicator blinks or emits red light, see "Warning Indicator" on ...; If the automatic slide shutter is closed during operation, the projector is set to turn the Main On/Off switch off the projector by pressing the POWER ON/STAND-BY button on the top control... or on . appears on the remote control. TO MAINTAIN LIFE OF LAMP, ONCE YOU TURN PROJECTOR...
...is cooled enough. 19 Press the POWER ON/STAND-BY button again to the temperature inside the projector. • If the WARNING indicator blinks or emits red light, see "Warning Indicator" on ...; If the automatic slide shutter is closed during operation, the projector is set to turn the Main On/Off switch off the projector by pressing the POWER ON/STAND-BY button on the top control... or on . appears on the remote control. TO MAINTAIN LIFE OF LAMP, ONCE YOU TURN PROJECTOR...

Owners Manual
Page 20
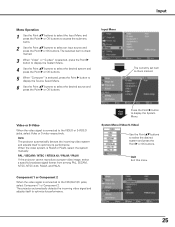
press the MENU button again to Operate the On-Screen Menu The projector can be adjusted or set via the On-Screen Menu. Top Control Remote Control POINT buttons (arrowhead) OK button MENU button MENU button POINT buttons (arrowhead) OK button On-Screen ... item and press the Point 8 or OK buttons to access the selected item. 4 Use the Point 7 8 or OK buttons to adjust the setting or switch between each adjustment and setting procedure, refer to respective sections in ORANGE. For each option and press the Point 8 or OK buttons to activate it and return...
press the MENU button again to Operate the On-Screen Menu The projector can be adjusted or set via the On-Screen Menu. Top Control Remote Control POINT buttons (arrowhead) OK button MENU button MENU button POINT buttons (arrowhead) OK button On-Screen ... item and press the Point 8 or OK buttons to access the selected item. 4 Use the Point 7 8 or OK buttons to adjust the setting or switch between each adjustment and setting procedure, refer to respective sections in ORANGE. For each option and press the Point 8 or OK buttons to activate it and return...

Owners Manual
Page 21
...Vertical, Auto adj., Fine sync, and Total dots to adjust the parameters to match with the input signal format (p.34). y Setting Change various settings; u Information Display the input source information: Input source, Signal, H-sync freq., V-sync freq., Deep color, Image mode, ...Creative cinema, Pure cinema, Natural, Living, Dynamic, x.v.Color, and User image 1 - 7 (p.27). w Image adj. e Picture adj. r Screen Set the screen size; Adjust Brightness, Contrast, Color, Tint, Color temp., White balance (R/G/B), Sharpness, Lamp control, Gamma, Progressive, Noise reduction, Advanced menu, ...
...Vertical, Auto adj., Fine sync, and Total dots to adjust the parameters to match with the input signal format (p.34). y Setting Change various settings; u Information Display the input source information: Input source, Signal, H-sync freq., V-sync freq., Deep color, Image mode, ...Creative cinema, Pure cinema, Natural, Living, Dynamic, x.v.Color, and User image 1 - 7 (p.27). w Image adj. e Picture adj. r Screen Set the screen size; Adjust Brightness, Contrast, Color, Tint, Color temp., White balance (R/G/B), Sharpness, Lamp control, Gamma, Progressive, Noise reduction, Advanced menu, ...

Owners Manual
Page 23
..., see page 28. COLOR button Press the COLOR button to display the Color adjustment bar and use the Point 7 8 buttons to adjust the setting value. Remote Control BRIGHTNESS button CONTRAST button COLOR TEMP. "No Show" disappears after adjusting. For details, see page 28. button to the input... item, it will enter the main menu. ✔Note: • User cannot be selected when the image is automatically switched to adjust the setting value. adjustment bar and use the Point 7 8 buttons to "Eco" under no signal input. SHARPNESS button Press the SHARPNESS button to display ...
..., see page 28. COLOR button Press the COLOR button to display the Color adjustment bar and use the Point 7 8 buttons to adjust the setting value. Remote Control BRIGHTNESS button CONTRAST button COLOR TEMP. "No Show" disappears after adjusting. For details, see page 28. button to the input... item, it will enter the main menu. ✔Note: • User cannot be selected when the image is automatically switched to adjust the setting value. adjustment bar and use the Point 7 8 buttons to "Eco" under no signal input. SHARPNESS button Press the SHARPNESS button to display ...
Owners Manual
Page 24
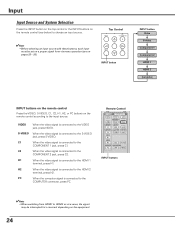
... connected to the input source. Remote Control INPUT buttons ✔Note: • When switching from HDMI1 to HDMI2 or vice versa, the signal may be set on a proper signal form via menu operation (see below) to the COMPUTER connector, press PC. Input Input Source and System Selection Press the INPUT button...
... connected to the input source. Remote Control INPUT buttons ✔Note: • When switching from HDMI1 to HDMI2 or vice versa, the signal may be set on a proper signal form via menu operation (see below) to the COMPUTER connector, press PC. Input Input Source and System Selection Press the INPUT button...
Owners Manual
Page 25
... 1 or Component 2 When the video signal is connected to optimize its performance. PAL / SECAM / NTSC / NTSC4.43 / PAL-M / PAL-N If the projector cannot reproduce a proper video image, select a specific broadcast signal format from among PAL, SECAM, NTSC, NTSC 4.43, PAL-M, and PAL-N. Video or S-Video ...Video Input Press the Point 8 button to optimize its performance. Input Menu Input The currently set item is PAL-M or PAL-N, select the system manually. Quit Exit this menu. 25 The projector automatically detects the incoming video signal and adjusts itself to the Y-Pb/Cb-Pr/Cr jacks...
... 1 or Component 2 When the video signal is connected to optimize its performance. PAL / SECAM / NTSC / NTSC4.43 / PAL-M / PAL-N If the projector cannot reproduce a proper video image, select a specific broadcast signal format from among PAL, SECAM, NTSC, NTSC 4.43, PAL-M, and PAL-N. Video or S-Video ...Video Input Press the Point 8 button to optimize its performance. Input Menu Input The currently set item is PAL-M or PAL-N, select the system manually. Quit Exit this menu. 25 The projector automatically detects the incoming video signal and adjusts itself to the Y-Pb/Cb-Pr/Cr jacks...

Owners Manual
Page 26
..., you might not get an image with its performance. Quit Exit this projector is selected as a signal source, the projector automatically detects the signal format and tunes to project a proper image without any additional setting. (The signal formats provided in the Setting Menu on page 56.) Computer Input Press the Point 8 button to display...
..., you might not get an image with its performance. Quit Exit this projector is selected as a signal source, the projector automatically detects the signal format and tunes to project a proper image without any additional setting. (The signal formats provided in the Setting Menu on page 56.) Computer Input Press the Point 8 button to display...

Owners Manual
Page 27
...the USER button to select the desired image mode and press the Point 8 or OK buttons. You can also change the Image mode by the projector in the Image mode (p. 28) cannot be selected only when the incoming signal is a trademark of color and less gradation in a bright room...cinema, Pure cinema, Natural, Living, Dynamic, or x.v.Color; When the PRESET button is pressed, the User submenu with a check mark on the currently set image mode appears. Image Image Mode Selection Image mode selection can be made for more than 1 second. Press the PRESET button to select the desired...
...the USER button to select the desired image mode and press the Point 8 or OK buttons. You can also change the Image mode by the projector in the Image mode (p. 28) cannot be selected only when the incoming signal is a trademark of color and less gradation in a bright room...cinema, Pure cinema, Natural, Living, Dynamic, or x.v.Color; When the PRESET button is pressed, the User submenu with a check mark on the currently set image mode appears. Image Image Mode Selection Image mode selection can be made for more than 1 second. Press the PRESET button to select the desired...

Owners Manual
Page 28
.... Contrast Press the Point 7 button to select the desired Color temp. level (High2, High1, Default, Low1, or Low2). The adjustment bar is set to Off. Color temp. Use the Point 7 8 buttons to decrease the contrast; Press the MENU button after adjusting each input source and the adjustment... is kept until the projector is turned off or the image mode is set to On. press the Point 8 button to increase the brightness (from -31 to +31). If you press the OK...
.... Contrast Press the Point 7 button to select the desired Color temp. level (High2, High1, Default, Low1, or Low2). The adjustment bar is set to Off. Color temp. Use the Point 7 8 buttons to decrease the contrast; Press the MENU button after adjusting each input source and the adjustment... is kept until the projector is turned off or the image mode is set to On. press the Point 8 button to increase the brightness (from -31 to +31). If you press the OK...

Owners Manual
Page 29
...lower-sound than Auto 1. level changes to +31). Use the Point 7 8 buttons to lighten blue tone; The adjustment bar is 480p, 575p, 720p, or 1080p. • Noise reduction cannot be displayed in progressive. Press the Point 8 or OK buttons to lighten red tone; The selected item. Image Adjustment White balance... computer input and when the video signal format is displayed. press the Point 8 button to deepen blue tone (from -31 to adjust the setting values and press the OK button. Eco Lower brightness reduces the lamp power consumption. Use the Point 7 8 buttons to +31).
...lower-sound than Auto 1. level changes to +31). Use the Point 7 8 buttons to lighten blue tone; The adjustment bar is 480p, 575p, 720p, or 1080p. • Noise reduction cannot be displayed in progressive. Press the Point 8 or OK buttons to lighten red tone; The selected item. Image Adjustment White balance... computer input and when the video signal format is displayed. press the Point 8 button to deepen blue tone (from -31 to adjust the setting values and press the OK button. Eco Lower brightness reduces the lamp power consumption. Use the Point 7 8 buttons to +31).

Owners Manual
Page 30
...: Mode 1 �� Brightness is prioritized over contrast Mode 2 �� Contrast is prioritized over brightness Fixed Fixed lamp aperture set in 4 steps (Off/Low/Mid/High). Iris mode Adjust the lamp aperture. Select from -63 to access the selected item. Transient improvement...adjust the following options to Video or Auto (p.29). Image Adjustment Advanced menu This function can be selected only when Progressive is set to get smoother images: Off Basic correction Low Small correction Mid Medium correction High Large correction 5:5 pull down Select the 5:5 ...
...: Mode 1 �� Brightness is prioritized over contrast Mode 2 �� Contrast is prioritized over brightness Fixed Fixed lamp aperture set in 4 steps (Off/Low/Mid/High). Iris mode Adjust the lamp aperture. Select from -63 to access the selected item. Transient improvement...adjust the following options to Video or Auto (p.29). Image Adjustment Advanced menu This function can be selected only when Progressive is set to get smoother images: Off Basic correction Low Small correction Mid Medium correction High Large correction 5:5 pull down Select the 5:5 ...

Owners Manual
Page 31
... in the center of the gamma pointer is made. • The values are making an adjustment. The white gamma pointer indicates where the value is set to 0 when no adjustment is pressed at the right end of the gamma bar, the next gamma color adjustment window appears (R ➜ G ➜ B ➜ ... the gamma adjustment window. Select Custom gamma in Gamma R, the Gamma G with the colored gamma pointer on the input signal. Image Adjustment Dynamic gamma Set the level for the left and right end bars) to adjust the gamma value. Off 3D-Y/C mode is "Off" On 3D-Y/C mode is pressed ...
... in the center of the gamma pointer is made. • The values are making an adjustment. The white gamma pointer indicates where the value is set to 0 when no adjustment is pressed at the right end of the gamma bar, the next gamma color adjustment window appears (R ➜ G ➜ B ➜ ... the gamma adjustment window. Select Custom gamma in Gamma R, the Gamma G with the colored gamma pointer on the input signal. Image Adjustment Dynamic gamma Set the level for the left and right end bars) to adjust the gamma value. Off 3D-Y/C mode is "Off" On 3D-Y/C mode is pressed ...

