Brochure
Page 1
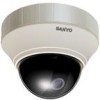
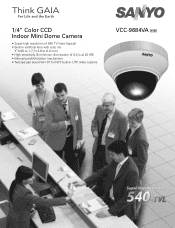
1/4" Color CCD Indoor Mini Dome Camera • Super-high resolution of 540 TV lines (typical) • Built-in varifocal lens with auto iris (F 0.95 to 1.7, f=2.8 to 8.0 mm) • High sensitivity & minimum illumination of 0.2 lx at 20 IRE • Manual pan/tilt/rotation mechanism • Twisted pair board VA-10T for NVT built-in UTP video (option) VCC-9684VA NTSC
1/4" Color CCD Indoor Mini Dome Camera • Super-high resolution of 540 TV lines (typical) • Built-in varifocal lens with auto iris (F 0.95 to 1.7, f=2.8 to 8.0 mm) • High sensitivity & minimum illumination of 0.2 lx at 20 IRE • Manual pan/tilt/rotation mechanism • Twisted pair board VA-10T for NVT built-in UTP video (option) VCC-9684VA NTSC
Brochure
Page 2
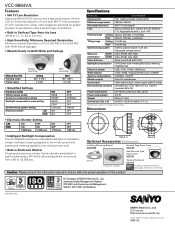
...0.5 lx (F0.95, Gain High) More than 540 TV lines and superior color reproduction. VCC-9684VA Features • 540 TV Line Resolution Featuring SANYO's DSP circuitry and a high performance 1/4-inch CCD for horizontal resolution of more than 50 dB (AGC OFF) OFF/Center-zone ...Dome Cover VCZ-51 Bracket Installation example Twisted Pair Board VA-10T Twisted pair terminal (CAT 5) for video signal: NVT built-in UTP video Caution: Please consult the instruction manual to H - Image sensor Effective image sensor Horizontal resolution Lens VCC-9684VA 1/4" Interline transfer method CCD...
...0.5 lx (F0.95, Gain High) More than 540 TV lines and superior color reproduction. VCC-9684VA Features • 540 TV Line Resolution Featuring SANYO's DSP circuitry and a high performance 1/4-inch CCD for horizontal resolution of more than 50 dB (AGC OFF) OFF/Center-zone ...Dome Cover VCZ-51 Bracket Installation example Twisted Pair Board VA-10T Twisted pair terminal (CAT 5) for video signal: NVT built-in UTP video Caution: Please consult the instruction manual to H - Image sensor Effective image sensor Horizontal resolution Lens VCC-9684VA 1/4" Interline transfer method CCD...
Instruction Manual
Page 1
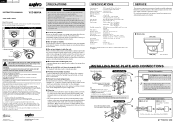
... will not be transmitted correctly. Surface routing*1 In-ceiling routing 104 (4.2) English Français Español INSTRUCTION MANUAL VCC-9684VA Color CCD Camera About this manual Before installing and using an RG-59U (3C-2V) cable, do not let it dangle in a residential installation. ...perform waterproofing for installing the unit. Printed in . Work with the cabinet for help. For repairs, consult your dealer or an Authorized Sanyo Service Center. ■ Dimensions φ151 (6.0) φ100 (4.0) Unit: mm (inch) INSTALLING BASE PLATE AND CONNECTIONS Open the ...
... will not be transmitted correctly. Surface routing*1 In-ceiling routing 104 (4.2) English Français Español INSTRUCTION MANUAL VCC-9684VA Color CCD Camera About this manual Before installing and using an RG-59U (3C-2V) cable, do not let it dangle in a residential installation. ...perform waterproofing for installing the unit. Printed in . Work with the cabinet for help. For repairs, consult your dealer or an Authorized Sanyo Service Center. ■ Dimensions φ151 (6.0) φ100 (4.0) Unit: mm (inch) INSTALLING BASE PLATE AND CONNECTIONS Open the ...
Instruction Manual
Page 2
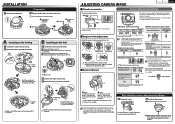
...● Aperture compensation Sharp outline Normal outline ● White balance (color compensation) Manual White Balance Auto-Tracing White balance (ATW) MWB 6 RED BLUE...12 Switch1: MSB Switch2: LSB 12 • Using the high speed electronic shutter indoors with power frequency* LL 6 Internal sync 3 3 ● Backlight compensation Only...Sanyo Service Center. If it clicks. 1 1 For wall installation, securely tighten the screw you need. LENS High (brighter) LEVEL After finishing camera adjustments/settings ... 1 Tighten the screw. 2 Install the dome cover. 1 Push the dome...
...● Aperture compensation Sharp outline Normal outline ● White balance (color compensation) Manual White Balance Auto-Tracing White balance (ATW) MWB 6 RED BLUE...12 Switch1: MSB Switch2: LSB 12 • Using the high speed electronic shutter indoors with power frequency* LL 6 Internal sync 3 3 ● Backlight compensation Only...Sanyo Service Center. If it clicks. 1 1 For wall installation, securely tighten the screw you need. LENS High (brighter) LEVEL After finishing camera adjustments/settings ... 1 Tighten the screw. 2 Install the dome cover. 1 Push the dome...

