Brochure
Page 2
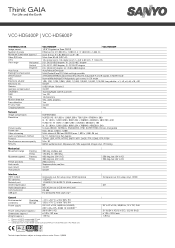
..., UDP, HTTP, HTTPS, SMTP, NTP, DHCP, FTP, DDNS, RTP, RTSP Max. 20 BASIC authentication (ID/password), SSL supported (image only), IP filtering Mechanical Movement range Movement speed Preset positions Auto mode Auto return Auto pursuit Panning Tilting Panning Tilting 360 deg. within 90% RH -20 to +70 °C; VCC-HD5400P | VCC-HD5600P TECHNICAL DATA Image sensor Number of pixels Minimum illumination (approx.) Video S/N ratio Lens View angle Horizontal Vertical Diagonal Auto focus Backlight compensation White balance AGC Electronic shutter...
..., UDP, HTTP, HTTPS, SMTP, NTP, DHCP, FTP, DDNS, RTP, RTSP Max. 20 BASIC authentication (ID/password), SSL supported (image only), IP filtering Mechanical Movement range Movement speed Preset positions Auto mode Auto return Auto pursuit Panning Tilting Panning Tilting 360 deg. within 90% RH -20 to +70 °C; VCC-HD5400P | VCC-HD5600P TECHNICAL DATA Image sensor Number of pixels Minimum illumination (approx.) Video S/N ratio Lens View angle Horizontal Vertical Diagonal Auto focus Backlight compensation White balance AGC Electronic shutter...
User Manual
Page 2
... connecting a LAN cable to it allows video/image compression format, resolution, and other image conditions to -use manner. From the Web browser (Internet Explorer) installed on your PC, you can operate the camera via the network in conjunction with people at ultra-high resolution. Using multi-stream video transmission, it can construct the most advanced network monitoring system. With a 10× built-in optical zoom lens, the camera offers a zoom magnification of up to four video/image streams...
... connecting a LAN cable to it allows video/image compression format, resolution, and other image conditions to -use manner. From the Web browser (Internet Explorer) installed on your PC, you can operate the camera via the network in conjunction with people at ultra-high resolution. Using multi-stream video transmission, it can construct the most advanced network monitoring system. With a 10× built-in optical zoom lens, the camera offers a zoom magnification of up to four video/image streams...
User Manual
Page 8
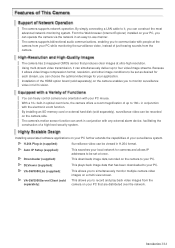
... When recording live video, or simultaneously record the video and sound. Use this jack via an audio cable to the sound while monitoring the live video onto an SD memory card, insert the card into the slot. Perform the following connections, be displayed on the monitor once the camera is no power indicator on . There is turned on the camera. A Power Connection B Network Connection C Control Terminal Connections D Audio Jack Connection E Installing Recording Media Before attempting the following connections according to the camera. By installing an...
... When recording live video, or simultaneously record the video and sound. Use this jack via an audio cable to the sound while monitoring the live video onto an SD memory card, insert the card into the slot. Perform the following connections, be displayed on the monitor once the camera is no power indicator on . There is turned on the camera. A Power Connection B Network Connection C Control Terminal Connections D Audio Jack Connection E Installing Recording Media Before attempting the following connections according to the camera. By installing an...
User Manual
Page 10
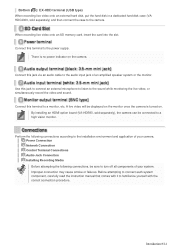
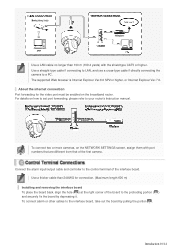
... NETWORK SETTINGS screen, assign them with the shield type CAT5 or higher. Introduction 10/14 For details on the broadband router. Connect the alarm input/output cable and controller to the control terminal of the interface board. The supported Web browser is Internet Explorer Ver.6.0 SP2 or higher, or Internet Explorer Ver.7.0. Use a thicker cable than 100 m (109.4 yards) with port numbers that are different from that of the first camera. To connect alarm...
... NETWORK SETTINGS screen, assign them with the shield type CAT5 or higher. Introduction 10/14 For details on the broadband router. Connect the alarm input/output cable and controller to the control terminal of the interface board. The supported Web browser is Internet Explorer Ver.6.0 SP2 or higher, or Internet Explorer Ver.7.0. Use a thicker cable than 100 m (109.4 yards) with port numbers that are different from that of the first camera. To connect alarm...
User Manual
Page 18
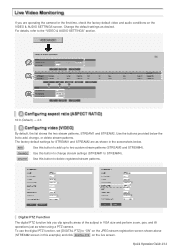
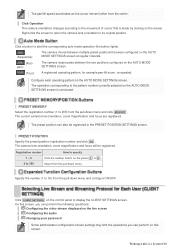
... . Quick Operation Guide 4/14 If you clip specific areas of the subject in this button to delete registered stream patterns. ADD : Use this button to change , or delete stream patterns. Change the default settings as shown in the screenshots below the list to add, change stream settings (STREAM1 to STREAM4). The factory default settings for STREAM1 and STREAM2 are operating the camera for the first time, check the factory default video and audio conditions on the live screen. To use the digital PTZ...
... . Quick Operation Guide 4/14 If you clip specific areas of the subject in this button to delete registered stream patterns. ADD : Use this button to change , or delete stream patterns. Change the default settings as shown in the screenshots below the list to add, change stream settings (STREAM1 to STREAM4). The factory default settings for STREAM1 and STREAM2 are operating the camera for the first time, check the factory default video and audio conditions on the live screen. To use the digital PTZ...
User Manual
Page 23
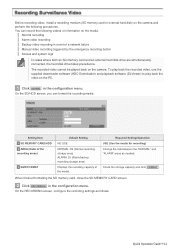
... recorded video, use the supplied downloader software (HDC Downloader) and playback software (DLViewer) to play back the video on the PC. 1 Click SD/HDD in the configuration menu. On the SD/HDD screen, you can record the following procedures. Quick Operation Guide 9/14 Setting Item 1 SD MEMORY CARD/HDD 2 AREA (Ratio of the recording areas) 3 SIZE/FORMAT Default Setting NO USE NORMAL: 80 (Normal recording storage area) ALARM: 20 (Alarm/backup recording storage area) Displays the recording capacity of a network failure Manual video recording...
... recorded video, use the supplied downloader software (HDC Downloader) and playback software (DLViewer) to play back the video on the PC. 1 Click SD/HDD in the configuration menu. On the SD/HDD screen, you can record the following procedures. Quick Operation Guide 9/14 Setting Item 1 SD MEMORY CARD/HDD 2 AREA (Ratio of the recording areas) 3 SIZE/FORMAT Default Setting NO USE NORMAL: 80 (Normal recording storage area) ALARM: 20 (Alarm/backup recording storage area) Displays the recording capacity of a network failure Manual video recording...
User Manual
Page 24
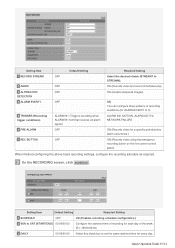
... time of recording for each day of recording conditions (for ALARM EVENT1 to set the same start/end time for a specific period before alarm occurrence.) ON (Records video using the emergency recording button on the live screen control panel) When finished configuring the above basic recording settings, configure the recording schedule as required. 3 On the RECORDING screen, click SCHEDULE . Quick Operation Guide 10/14 ON (Records video and sound simultaneously) ON (Detects tampered images) OFF ALARM IN1 (Triggers recording when ALARM IN1 terminal receives an alarm...
... time of recording for each day of recording conditions (for ALARM EVENT1 to set the same start/end time for a specific period before alarm occurrence.) ON (Records video using the emergency recording button on the live screen control panel) When finished configuring the above basic recording settings, configure the recording schedule as required. 3 On the RECORDING screen, click SCHEDULE . Quick Operation Guide 10/14 ON (Records video and sound simultaneously) ON (Detects tampered images) OFF ALARM IN1 (Triggers recording when ALARM IN1 terminal receives an alarm...
User Manual
Page 26
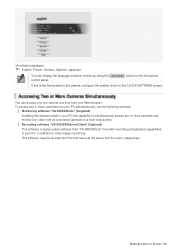
E Auto IP Setup (Utility for automatically setting up to download by date and time or by alarm event. Using the utility's camera search function, you search for monitoring live video as the server and the client. A H.264 Plug-in (Plug-in either the single screen or the 4screen, 9- You can access up IP addresses when two or more new cameras are connected) This utility automatically assigns a unique IP address to display H.264 video on...
E Auto IP Setup (Utility for automatically setting up to download by date and time or by alarm event. Using the utility's camera search function, you search for monitoring live video as the server and the client. A H.264 Plug-in (Plug-in either the single screen or the 4screen, 9- You can access up IP addresses when two or more new cameras are connected) This utility automatically assigns a unique IP address to display H.264 video on...
User Manual
Page 27
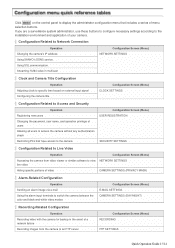
... a series of your camera. Configuration Related to display the administrator configuration menu that have access to the camera Configuration Screen (Menu) USER REGISTRATION SECURITY SETTINGS Configuration Related to Live Video Operation Configuration Screen (Menu) Accessing the camera from video viewer or similar software to view NETWORK SETTINGS live video Hiding specific portions of video CAMERA SETTINGS (PRIVACY MASK) Alarm-Related Configuration Operation Sending an alarm image via e-mail Using the alarm input terminals to switch the camera between the color and black-and-white...
... a series of your camera. Configuration Related to display the administrator configuration menu that have access to the camera Configuration Screen (Menu) USER REGISTRATION SECURITY SETTINGS Configuration Related to Live Video Operation Configuration Screen (Menu) Accessing the camera from video viewer or similar software to view NETWORK SETTINGS live video Hiding specific portions of video CAMERA SETTINGS (PRIVACY MASK) Alarm-Related Configuration Operation Sending an alarm image via e-mail Using the alarm input terminals to switch the camera between the color and black-and-white...
User Manual
Page 31
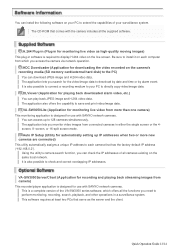
... more cameras from all connected cameras on the live video from your Web browser. Recording software "VA-SW3050Server/Client" (Optional) This software is the first access to video image monitoring. Working with Live Screen 3/18 Monitoring software "VA-SW3050Lite" (Supplied) Installing this is higher-grade software than "VA-SW3050Lite" that serve as the server and the client, respectively. To access two or more cameras and monitor live screen control panel. If this software adds to your PC, in addition to the camera, configure...
... more cameras from all connected cameras on the live video from your Web browser. Recording software "VA-SW3050Server/Client" (Optional) This software is the first access to video image monitoring. Working with Live Screen 3/18 Monitoring software "VA-SW3050Lite" (Supplied) Installing this is higher-grade software than "VA-SW3050Lite" that serve as the server and the client, respectively. To access two or more cameras and monitor live screen control panel. If this software adds to your PC, in addition to the camera, configure...
User Manual
Page 36
... pan): The camera reciprocates between multiple preset positions that is made by clicking on the AUTO MODE SETTINGS screen. (Tour): A registered operating pattern, for example pan-tilt-zoom, is conducted. Specify the number (1 to display the CLIENT SETTINGS screen. On this screen, you can perform the following operations: A Configuring the video stream displayed on the live screen B Configuring the audio C Changing your password Some administrator configuration screen settings may limit the operations you can also be registered. Working with Live Screen 8/18 The pan/tilt speed...
... pan): The camera reciprocates between multiple preset positions that is made by clicking on the AUTO MODE SETTINGS screen. (Tour): A registered operating pattern, for example pan-tilt-zoom, is conducted. Specify the number (1 to display the CLIENT SETTINGS screen. On this screen, you can perform the following operations: A Configuring the video stream displayed on the live screen B Configuring the audio C Changing your password Some administrator configuration screen settings may limit the operations you can also be registered. Working with Live Screen 8/18 The pan/tilt speed...
User Manual
Page 40
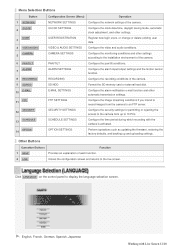
...panel to the live screen. Menu Selection Buttons Button 1 NETWORK CLOCK 2 USER 3 4 VIDEO/AUDIO CAMERA 5 6 PAN/TILT ALARM 7 8 RECORDING 9 SD/HDD E-MAIL 10 FTP 11 SECURITY 12 SCHEDULE 13 OPTION 14 Configuration Screen (Menu) Operation NETWORK SETTINGS Configure the network settings of each function. PAN/TILT Configure the pan/tilt conditions. Closes the configuration screen and returns to display the language selection screen. SD/HDD Format the SD memory card or external hard disk. ALARM SETTINGS Configure the alarm input/output settings and the motion sensor function...
...panel to the live screen. Menu Selection Buttons Button 1 NETWORK CLOCK 2 USER 3 4 VIDEO/AUDIO CAMERA 5 6 PAN/TILT ALARM 7 8 RECORDING 9 SD/HDD E-MAIL 10 FTP 11 SECURITY 12 SCHEDULE 13 OPTION 14 Configuration Screen (Menu) Operation NETWORK SETTINGS Configure the network settings of each function. PAN/TILT Configure the pan/tilt conditions. Closes the configuration screen and returns to display the language selection screen. SD/HDD Format the SD memory card or external hard disk. ALARM SETTINGS Configure the alarm input/output settings and the motion sensor function...
User Manual
Page 58
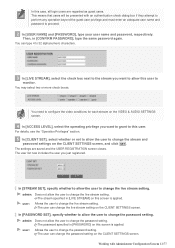
You need to configure the video conditions for each stream on the VIDEO & AUDIO SETTINGS screen. 4 In [ACCESS LEVEL], select the operating privilege you want to allow the user to change the live stream setting on the CLIENT SETTINGS screen. In [PASSWORD SET], specify whether to allow the user to change the live stream setting. You may select two or more check boxes. user: Allows the user to proceed. 2 In [USER NAME] and [PASSWORD], type your user name and password, respectively...
You need to configure the video conditions for each stream on the VIDEO & AUDIO SETTINGS screen. 4 In [ACCESS LEVEL], select the operating privilege you want to allow the user to change the live stream setting on the CLIENT SETTINGS screen. In [PASSWORD SET], specify whether to allow the user to change the live stream setting. You may select two or more check boxes. user: Allows the user to proceed. 2 In [USER NAME] and [PASSWORD], type your user name and password, respectively...
User Manual
Page 67
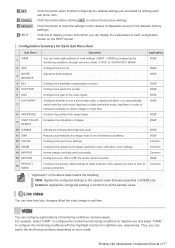
.... VIEW Configure the lens focus settings. Common Inverts images vertically and horizontally. Configuration Summary for nighttime use and select "CAM2" to configure the monitoring conditions with Administrator Configuration Screens 21/77 CAM8) by clicking each sub menu item. 2 CANCEL : Click this button before clicking SET to restore the previous settings. 3 DEFAULT : Click this button to reset the settings on the camera configuration screen to the defaults (factory settings). 4 HELP: Click this to display a menu from the color mode (daytime) to black-and-white mode...
.... VIEW Configure the lens focus settings. Common Inverts images vertically and horizontally. Configuration Summary for nighttime use and select "CAM2" to configure the monitoring conditions with Administrator Configuration Screens 21/77 CAM8) by clicking each sub menu item. 2 CANCEL : Click this button before clicking SET to restore the previous settings. 3 DEFAULT : Click this button to reset the settings on the camera configuration screen to the defaults (factory settings). 4 HELP: Click this to display a menu from the color mode (daytime) to black-and-white mode...
User Manual
Page 78
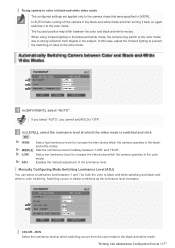
... video mode is switched and click SET . Working with Administrator Configuration Screens 32/77 In AUTO mode, turning off the camera in [VIEW]. MIDDLE: Sets the luminance level to halfway between 1 and 7 for both the color to black-and-white switching and black-andwhite to the color mode. 1 In [DAY/NIGHT], select "AUTO". Enables the manual adjustment of video to color switching. COLOR→B/W Select the luminance level at which switching occurs from objects in the color mode). The focused position may switch...
... video mode is switched and click SET . Working with Administrator Configuration Screens 32/77 In AUTO mode, turning off the camera in [VIEW]. MIDDLE: Sets the luminance level to halfway between 1 and 7 for both the color to black-and-white switching and black-andwhite to the color mode. 1 In [DAY/NIGHT], select "AUTO". Enables the manual adjustment of video to color switching. COLOR→B/W Select the luminance level at which switching occurs from objects in the color mode). The focused position may switch...
User Manual
Page 104
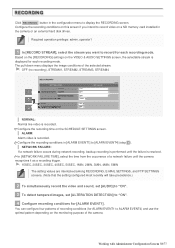
... simultaneously record the video and sound, set [AUDIO] to "ON". 3 To detect tampered images, set [ALTERATION DETECTION] to record video on this screen if you want to ALARM EVENT4) and use the optimal pattern depending on the monitoring purpose of the selected stream. Configure the recording conditions on a SD memory card installed in the camera or an external hard disk drives. Configure the recording conditions in [ALARM EVENT1] to display the RECORDING screen. ALARM: Alarm video is recorded. Click RECORDING button in the configuration menu to [ALARM...
... simultaneously record the video and sound, set [AUDIO] to "ON". 3 To detect tampered images, set [ALTERATION DETECTION] to record video on this screen if you want to ALARM EVENT4) and use the optimal pattern depending on the monitoring purpose of the selected stream. Configure the recording conditions on a SD memory card installed in the camera or an external hard disk drives. Configure the recording conditions in [ALARM EVENT1] to display the RECORDING screen. ALARM: Alarm video is recorded. Click RECORDING button in the configuration menu to [ALARM...
User Manual
Page 121
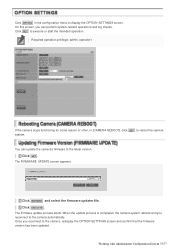
... the camera system. The FIRMWARE UPDATE screen appears. 2 Click BROWSE and select the firmware updater file. 3 Click EXECUTE . Working with Administrator Configuration Screens 75/77 On this screen, you reconnect to the latest version. 1 Click SET . Required operation privilege: admin, operator1 If the camera stops functioning for some reason or other, in the configuration menu to execute or start the intended operation. You can perform system-related operations and...
... the camera system. The FIRMWARE UPDATE screen appears. 2 Click BROWSE and select the firmware updater file. 3 Click EXECUTE . Working with Administrator Configuration Screens 75/77 On this screen, you reconnect to the latest version. 1 Click SET . Required operation privilege: admin, operator1 If the camera stops functioning for some reason or other, in the configuration menu to execute or start the intended operation. You can perform system-related operations and...
User Manual
Page 126
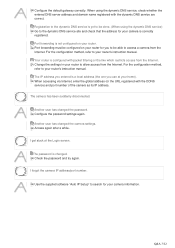
... camera IP address/port number. Port forwarding must be configured on your router's instruction manual. 4 Your router is configured with the DDNS service) and port number of the camera as its IP address. When accessing via Internet, enter the global address (or the URL registered with packet filtering or the like which restricts access from the Internet. Access again after a while. I get stuck at your home). Configure the default gateway correctly. Configure the password settings again. 2 Another user has changed the password. Use the supplied software "Auto IP Setup...
... camera IP address/port number. Port forwarding must be configured on your router's instruction manual. 4 Your router is configured with the DDNS service) and port number of the camera as its IP address. When accessing via Internet, enter the global address (or the URL registered with packet filtering or the like which restricts access from the Internet. Access again after a while. I get stuck at your home). Configure the default gateway correctly. Configure the password settings again. 2 Another user has changed the password. Use the supplied software "Auto IP Setup...

User Manual
Page 129
... the Internet via proxy server. An error code appears and no LIVE video is displayed. 1 The configured IP address or domain name is correct, then the network connection has timed out. I cannot install the "H.264 Plug-In" included in the supplied CD-ROM. 1 The OS of the installed ActiveX control is network congestion. The message "THE UNIT IS BUSY" appears on the screen if the number of simultaneously accessible users is already reached. 3 The version...
... the Internet via proxy server. An error code appears and no LIVE video is displayed. 1 The configured IP address or domain name is correct, then the network connection has timed out. I cannot install the "H.264 Plug-In" included in the supplied CD-ROM. 1 The OS of the installed ActiveX control is network congestion. The message "THE UNIT IS BUSY" appears on the screen if the number of simultaneously accessible users is already reached. 3 The version...
User Manual
Page 135
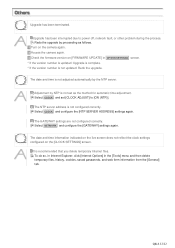
... not set [CLOCK ADJUST] to power off, network fault, or other problem during the process. Select CLOCK and set as follows. 1 Turn on the camera again. 2 Access the camera again. 3 Check the firmware version on the [CLOCK SETTINGS] screen. The date and time information indicated on the live screen does not reflect the clock settings configured on [FIRMWARE UPDATE] in the [Tools] menu and then delete temporary files, history, cookies, saved passwords, and web...
... not set [CLOCK ADJUST] to power off, network fault, or other problem during the process. Select CLOCK and set as follows. 1 Turn on the camera again. 2 Access the camera again. 3 Check the firmware version on the [CLOCK SETTINGS] screen. The date and time information indicated on the live screen does not reflect the clock settings configured on [FIRMWARE UPDATE] in the [Tools] menu and then delete temporary files, history, cookies, saved passwords, and web...


