
User Manual
Page 28
Optional Configuration Operation Updating the camera's firmware to the latest version. Restoring the factory default settings Backing up or uploading settings Viewing the access log, system log, and operation log Configuration Screen (Menu) OPTION SETTINGS (FIRMWARE UPDATE) OPTION SETTINGS (FACTORY DEFAULT) OPTION SETTINGS (MENU BACKUP/MENU UPLOAD) OPTION SETTINGS (LOG) Quick Operation Guide 14/14
Optional Configuration Operation Updating the camera's firmware to the latest version. Restoring the factory default settings Backing up or uploading settings Viewing the access log, system log, and operation log Configuration Screen (Menu) OPTION SETTINGS (FIRMWARE UPDATE) OPTION SETTINGS (FACTORY DEFAULT) OPTION SETTINGS (MENU BACKUP/MENU UPLOAD) OPTION SETTINGS (LOG) Quick Operation Guide 14/14
User Manual
Page 40
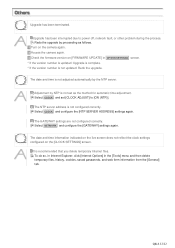
... delete existing user data. ALARM SETTINGS Configure the alarm input/output settings and the motion sensor function. OPTION SETTINGS Perform operations such as updating the firmware, restoring the factory defaults, and backing up to the installation environment of the camera. Closes the configuration screen and returns to an FTP server. SD...
... delete existing user data. ALARM SETTINGS Configure the alarm input/output settings and the motion sensor function. OPTION SETTINGS Perform operations such as updating the firmware, restoring the factory defaults, and backing up to the installation environment of the camera. Closes the configuration screen and returns to an FTP server. SD...
User Manual
Page 121
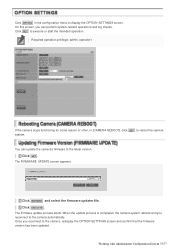
... file. 3 Click EXECUTE . When the update process is completed, the camera system reboots and you can update the camera's firmware to reboot the camera system. On this screen, you reconnect to display the OPTION SETTINGS screen. Required operation privilege: admin, operator1 If the camera... you reconnect to execute or start the intended operation. Click SET to the camera, redisplay the OPTION SETTINGS screen and confirm that the firmware version has been updated. The firmware update process starts. Click OPTION in [CAMERA REBOOT], click SET to the latest version. 1 Click SET .
... file. 3 Click EXECUTE . When the update process is completed, the camera system reboots and you can update the camera's firmware to reboot the camera system. On this screen, you reconnect to display the OPTION SETTINGS screen. Required operation privilege: admin, operator1 If the camera... you reconnect to execute or start the intended operation. Click SET to the camera, redisplay the OPTION SETTINGS screen and confirm that the firmware version has been updated. The firmware update process starts. Click OPTION in [CAMERA REBOOT], click SET to the latest version. 1 Click SET .
User Manual
Page 122
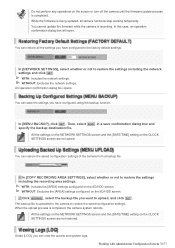
... are not saved. Under [LOG], you want to restore the settings including the network settings and click SET . You cannot update the firmware while the camera is uploaded to the camera to restore the settings including the recording area settings. In [NETWORK SETTINGS], select whether or ... process is completed. Do not perform any operations on the screen or turn off the camera until the firmware update process is completed, the camera system reboots. While the firmware is being updated, all the settings you have configured to the factory default settings. WITH: Includes the ...
... are not saved. Under [LOG], you want to restore the settings including the network settings and click SET . You cannot update the firmware while the camera is uploaded to the camera to restore the settings including the recording area settings. In [NETWORK SETTINGS], select whether or ... process is completed. Do not perform any operations on the screen or turn off the camera until the firmware update process is completed, the camera system reboots. While the firmware is being updated, all the settings you have configured to the factory default settings. WITH: Includes the ...
User Manual
Page 135
...method for automatic time adjustment. Select CLOCK and set as follows. 1 Turn on the camera again. 2 Access the camera again. 3 Check the firmware version on the [CLOCK SETTINGS] screen. To do so, in Internet Explorer, click [Internet Options] in OPTION SETTINGS screen. * If the ... GATEWAY settings are not configured correctly. The date and time information indicated on the live screen does not reflect the clock settings configured on [FIRMWARE UPDATE] in the [Tools] menu and then delete temporary files, history, cookies, saved passwords, and web form information from the [General]...
...method for automatic time adjustment. Select CLOCK and set as follows. 1 Turn on the camera again. 2 Access the camera again. 3 Check the firmware version on the [CLOCK SETTINGS] screen. To do so, in Internet Explorer, click [Internet Options] in OPTION SETTINGS screen. * If the ... GATEWAY settings are not configured correctly. The date and time information indicated on the live screen does not reflect the clock settings configured on [FIRMWARE UPDATE] in the [Tools] menu and then delete temporary files, history, cookies, saved passwords, and web form information from the [General]...
