Brochure
Page 2
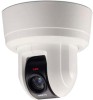
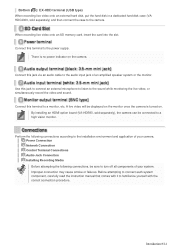
... 192 x 181 mm 1.90 kg * Please use SANYO recommended SD card ** Please use SANYO recommended HDD *** Combination with IR cut filter Yes,... degree; (4 : 3) 3.9-37 degree (16 : 9) 6.2-57 degree; (4 : 3) 6.5-58.8 degree Auto/Manual/One-push Multi/Center/Face/Off, Mask settings possible ATW/AWC/MWB/Outdoor/Indoor/Fluorescent Adjustable R and B signals in... Electronic iris Gamma Aperture compensation Day/Night DNR Title Motion detection Face detection Privacy mask Cropping function VCC-HD5600P VCC-HD5400P 1/2.5" Progressive Scan CMOS Effective 16 : 9 1,920 (H) x 1,080 (V) 4 : ...
... 192 x 181 mm 1.90 kg * Please use SANYO recommended SD card ** Please use SANYO recommended HDD *** Combination with IR cut filter Yes,... degree; (4 : 3) 3.9-37 degree (16 : 9) 6.2-57 degree; (4 : 3) 6.5-58.8 degree Auto/Manual/One-push Multi/Center/Face/Off, Mask settings possible ATW/AWC/MWB/Outdoor/Indoor/Fluorescent Adjustable R and B signals in... Electronic iris Gamma Aperture compensation Day/Night DNR Title Motion detection Face detection Privacy mask Cropping function VCC-HD5600P VCC-HD5400P 1/2.5" Progressive Scan CMOS Effective 16 : 9 1,920 (H) x 1,080 (V) 4 : ...
User Manual
Page 3
...-and-white, alarm input switching Auto (ATW), one push (AWC), manual (R/B gain adjustable), indoor, outdoor, fluorescent Multi-spot evaluative metering, center-weighted evaluative metering, masking, face detection Auto (32× max) or Off VCC-HD5600P: 1/25, 1/50, 1/120, 1/250, 1/500, 1/1000, 1/2000, 1/4000, 1/10000 VCC-HD5600: 1/30, 1/60, 1/100, 1/250, 1/500, 1/1000, 1/2000, 1/4000...
...-and-white, alarm input switching Auto (ATW), one push (AWC), manual (R/B gain adjustable), indoor, outdoor, fluorescent Multi-spot evaluative metering, center-weighted evaluative metering, masking, face detection Auto (32× max) or Off VCC-HD5600P: 1/25, 1/50, 1/120, 1/250, 1/500, 1/1000, 1/2000, 1/4000, 1/10000 VCC-HD5600: 1/30, 1/60, 1/100, 1/250, 1/500, 1/1000, 1/2000, 1/4000...
User Manual
Page 6
Refer to the table "Target size and recording time" in the electronic manual. This table is displayed using a browser-specific function and therefore not displayed on the PDF manual. Refer to the table "Target size and recording time" in the electronic manual. This table is displayed using a browser-specific function and therefore not displayed on the PDF manual. Introduction 6/14
Refer to the table "Target size and recording time" in the electronic manual. This table is displayed using a browser-specific function and therefore not displayed on the PDF manual. Refer to the table "Target size and recording time" in the electronic manual. This table is displayed using a browser-specific function and therefore not displayed on the PDF manual. Introduction 6/14
User Manual
Page 8
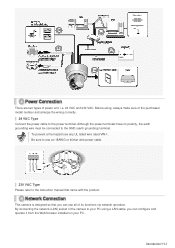
... attempting the following connections according to the installation environment and application of your system. Before attempting to connect each system component, carefully read the instruction manual that comes with it to the power supply. Connect this terminal to familiarize yourself with the correct connection procedure. When recording live video, or simultaneously...
... attempting the following connections according to the installation environment and application of your system. Before attempting to connect each system component, carefully read the instruction manual that comes with it to the power supply. Connect this terminal to familiarize yourself with the correct connection procedure. When recording live video, or simultaneously...
User Manual
Page 9
Be sure to use an 18AWG or thicker wire power cable. 230 VAC Type Please refer to the instruction manual that you can use any UL listed wire rated VW-1. By connecting the network (LAN) socket of its functions via network operation. This camera is ...
Be sure to use an 18AWG or thicker wire power cable. 230 VAC Type Please refer to the instruction manual that you can use any UL listed wire rated VW-1. By connecting the network (LAN) socket of its functions via network operation. This camera is ...
User Manual
Page 10
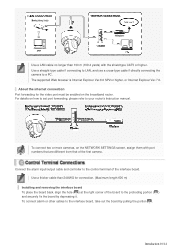
... the board back, align the hole ( A ) at the right corner of the board to a PC. To connect alarm or other cables to your router's Instruction manual. For details on how to set port forwarding, please refer to the interface board, take out the board by depressing it. Connect the alarm input...
... the board back, align the hole ( A ) at the right corner of the board to a PC. To connect alarm or other cables to your router's Instruction manual. For details on how to set port forwarding, please refer to the interface board, take out the board by depressing it. Connect the alarm input...
User Manual
Page 21
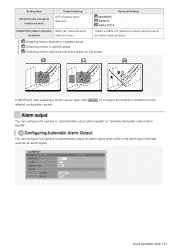
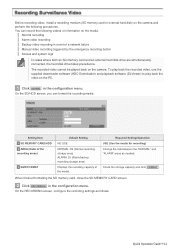
... camera to configure the detection conditions on the screen In [MOTION], after selecting a motion sensor type, click DETAIL to "automatically output alarm signals" or "remotely (manually) output alarm signals".
... camera to configure the detection conditions on the screen In [MOTION], after selecting a motion sensor type, click DETAIL to "automatically output alarm signals" or "remotely (manually) output alarm signals".
User Manual
Page 23
.../FORMAT Default Setting NO USE NORMAL: 80 (Normal recording storage area) ALARM: 20 (Alarm/backup recording storage area) Displays the recording capacity of a network failure Manual video recording triggered by the emergency recording button Access and system logs In cases where both an SD memory card and an external hard disk...
.../FORMAT Default Setting NO USE NORMAL: 80 (Normal recording storage area) ALARM: 20 (Alarm/backup recording storage area) Displays the recording capacity of a network failure Manual video recording triggered by the emergency recording button Access and system logs In cases where both an SD memory card and an external hard disk...
User Manual
Page 43
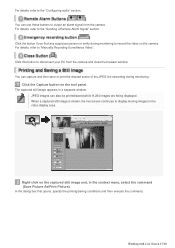
... desired scene of the JPEG live screen continues to output an alarm signal from the camera and close the browser window. For details, refer to "Manually Recording Surveillance Video".
... desired scene of the JPEG live screen continues to output an alarm signal from the camera and close the browser window. For details, refer to "Manually Recording Surveillance Video".
User Manual
Page 45
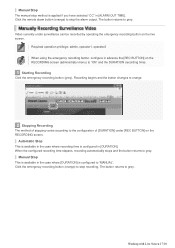
...currently under [REC BUTTON] on the live screen. When the configured recording time elapses, recording automatically stops and the button returns to "MANUAL". Manual Stop This is available in the case where [DURATION] is configured to grey. The button returns to grey. The button returns to ...] under surveillance can be recorded by operating the emergency recording button on the RECORDING screen. Working with Live Screen 17/18 Manual Stop The manual stop method is configured in [DURATION]. Click the remote alarm button (orange) to the configuration of stopping varies according to ...
...currently under [REC BUTTON] on the live screen. When the configured recording time elapses, recording automatically stops and the button returns to "MANUAL". Manual Stop This is available in the case where [DURATION] is configured to grey. The button returns to grey. The button returns to ...] under surveillance can be recorded by operating the emergency recording button on the RECORDING screen. Working with Live Screen 17/18 Manual Stop The manual stop method is configured in [DURATION]. Click the remote alarm button (orange) to the configuration of stopping varies according to ...
User Manual
Page 49
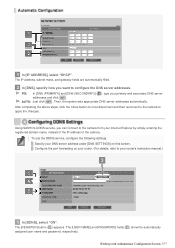
...: Just click SET . Specify your primary and secondary DNS server addresses and click SET . 1 In [IP ADDRESS], select "DHCP". Using SANYO's DDNS service, you want to the camera from your router's instruction manual.) 1 In [DDNS], select "ON". The [REGISTER] button ( 3 ) appears. Working with Administrator Configuration Screens 3/77 The IP address, subnet mask...
...: Just click SET . Specify your primary and secondary DNS server addresses and click SET . 1 In [IP ADDRESS], select "DHCP". Using SANYO's DDNS service, you want to the camera from your router's instruction manual.) 1 In [DDNS], select "ON". The [REGISTER] button ( 3 ) appears. Working with Administrator Configuration Screens 3/77 The IP address, subnet mask...
User Manual
Page 55
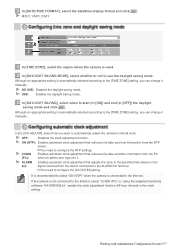
... is used. 2 In [DAYLIGHT SAVING MODE], select whether or not to the [TIME ZONE] setting, you can change it manually. OFF: Disables the clock adjustment function. LOGIN Enables automatic clock adjustment that retrieves the date and time information from the PC ...(PC): when an admin user logs into it manually. Working with Administrator Configuration Screens 9/77 3 In [DATE/TIME FORMAT], select the date/time display format and click SET . M/D/Y, Y/M/D, D/M/Y...
... is used. 2 In [DAYLIGHT SAVING MODE], select whether or not to the [TIME ZONE] setting, you can change it manually. OFF: Disables the clock adjustment function. LOGIN Enables automatic clock adjustment that retrieves the date and time information from the PC ...(PC): when an admin user logs into it manually. Working with Administrator Configuration Screens 9/77 3 In [DATE/TIME FORMAT], select the date/time display format and click SET . M/D/Y, Y/M/D, D/M/Y...
User Manual
Page 68
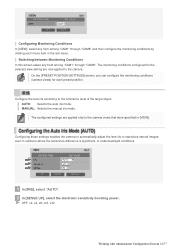
... to the luminance level of the target object. The monitoring conditions configured for each menu item in [VIEW]. AUTO: Selects the auto iris mode. MANUAL: Selects the manual iris mode. Switching between Monitoring Conditions In this screen select any from among "CAM1" through "CAM8". The configured settings are now applied to the...
... to the luminance level of the target object. The monitoring conditions configured for each menu item in [VIEW]. AUTO: Selects the auto iris mode. MANUAL: Selects the manual iris mode. Switching between Monitoring Conditions In this screen select any from among "CAM1" through "CAM8". The configured settings are now applied to the...
User Manual
Page 69
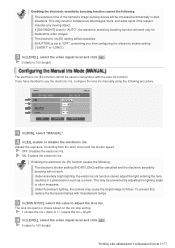
..., replace the fluorescent lamps with incandescent lamps. 3 In [IRIS STOP], select the value to use the electronic iris, configure the lens iris manually using the following procedure. 1 In [IRIS], select "MANUAL". 2 In [EI], enable or disable the electronic iris. This may result in a phenomenon such as a smear. OFF: Disables the electronic iris...
..., replace the fluorescent lamps with incandescent lamps. 3 In [IRIS STOP], select the value to use the electronic iris, configure the lens iris manually using the following procedure. 1 In [IRIS], select "MANUAL". 2 In [EI], enable or disable the electronic iris. This may result in a phenomenon such as a smear. OFF: Disables the electronic iris...
User Manual
Page 70
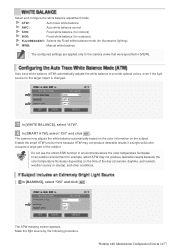
... . Auto trace white balance (ATW) automatically adjusts the white balance to the camera views that were specified in environments where the color temperature fluctuates. MWB: Manual white balance The configured settings are applied only to provide optimal colors, even if the light source for the target object is changed. 1 In [WHITE...
... . Auto trace white balance (ATW) automatically adjusts the white balance to the camera views that were specified in environments where the color temperature fluctuates. MWB: Manual white balance The configured settings are applied only to provide optimal colors, even if the light source for the target object is changed. 1 In [WHITE...

User Manual
Page 72
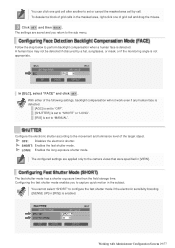
... procedure to the camera views that were specified in [VIEW]. FACE: Selects the face detection backlight compensation mode. The configured settings are applied only to manually adjust the gain values for the red and blue signals. 1 In [WHITE BALANCE], select "MWB". 2 In [RED] and [BLUE], specify the gain values for the...
... procedure to the camera views that were specified in [VIEW]. FACE: Selects the face detection backlight compensation mode. The configured settings are applied only to manually adjust the gain values for the red and blue signals. 1 In [WHITE BALANCE], select "MWB". 2 In [RED] and [BLUE], specify the gain values for the...
User Manual
Page 75
... to "SHORT" or "LONG". [IRIS] is enabled. SHORT: Enables the fast shutter mode. Working with Administrator Configuration Screens 29/77 Follow the step below to "MANUAL". To deselect a block of grid cells in [IRIS]) is set or cancel the masked area cell by a hat, sunglasses, or mask, or if the monitoring...
... to "SHORT" or "LONG". [IRIS] is enabled. SHORT: Enables the fast shutter mode. Working with Administrator Configuration Screens 29/77 Follow the step below to "MANUAL". To deselect a block of grid cells in [IRIS]) is set or cancel the masked area cell by a hat, sunglasses, or mask, or if the monitoring...
User Manual
Page 76
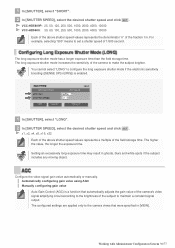
...manually. Working with Administrator Configuration Screens 30/77 For example, selecting "500" means to configure the long exposure shutter mode if the electronic sensitivity boosting ([SENSE UP] in [IRIS]) is a function that were specified in ghosts, blurs and white spots if the subject includes any moving object. VCC-HD5600P...: 25, 50, 120, 250, 500, 1000, 2000, 4000, 10000 VCC-HD5600: 30, 60, 100, 250, 500, 1000, 2000, 4000, 10000 Each of the above shutter speed...
...manually. Working with Administrator Configuration Screens 30/77 For example, selecting "500" means to configure the long exposure shutter mode if the electronic sensitivity boosting ([SENSE UP] in [IRIS]) is a function that were specified in ghosts, blurs and white spots if the subject includes any moving object. VCC-HD5600P...: 25, 50, 120, 250, 500, 1000, 2000, 4000, 10000 VCC-HD5600: 30, 60, 100, 250, 500, 1000, 2000, 4000, 10000 Each of the above shutter speed...
User Manual
Page 78
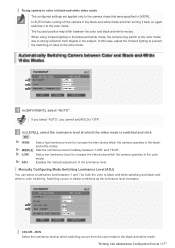
If you select "AUTO", you cannot set [AGC] to the color mode. 1 In [DAY/NIGHT], select "AUTO". Enables the manual adjustment of video to "OFF". 2 In [LEVEL], select the luminance level at which the camera operates in the color mode). Working with Administrator ...mode is switched and click SET . LOW: ADJ: Sets a low luminance level (to increase the time during which switching occurs from objects in [VIEW]. Manually Configuring Mode-Switching Luminance Level (ADJ) You can select a luminance level between 1 and 7 for both the color to black-and-white switching and black-...
If you select "AUTO", you cannot set [AGC] to the color mode. 1 In [DAY/NIGHT], select "AUTO". Enables the manual adjustment of video to "OFF". 2 In [LEVEL], select the luminance level at which the camera operates in the color mode). Working with Administrator ...mode is switched and click SET . LOW: ADJ: Sets a low luminance level (to increase the time during which switching occurs from objects in [VIEW]. Manually Configuring Mode-Switching Luminance Level (ADJ) You can select a luminance level between 1 and 7 for both the color to black-and-white switching and black-...
User Manual
Page 81
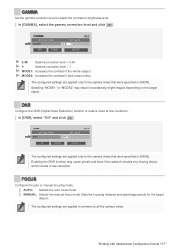
... camera views. AUTO: Selects the auto focus mode. In [DNR], select "ON" and click SET . Configure the auto or manual focusing mode. Working with Administrator Configuration Screens 35/77 MANUAL: Selects the manual focus mode (Sets the focusing distance and speed appropriate for the target object). The configured settings are applied only to...
... camera views. AUTO: Selects the auto focus mode. In [DNR], select "ON" and click SET . Configure the auto or manual focusing mode. Working with Administrator Configuration Screens 35/77 MANUAL: Selects the manual focus mode (Sets the focusing distance and speed appropriate for the target object). The configured settings are applied only to...

