User Manual
Page 2
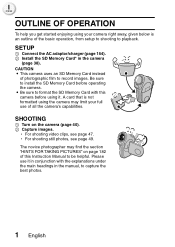
... Memory Card with the explanations under the main headings in the camera (page 38). i Be sure to playback. h For shooting still photos, see page 47. I index OUTLINE OF OPERATION To help you get started enjoying using your full use it . SETUP 1 Connect the AC adaptor/charger (page 154). 2 Install the SD Memory Card* in the manual, to record images. A card that is an outline of photographic film to capture the best photos. 1 English h For shooting video...
... Memory Card with the explanations under the main headings in the camera (page 38). i Be sure to playback. h For shooting still photos, see page 47. I index OUTLINE OF OPERATION To help you get started enjoying using your full use it . SETUP 1 Connect the AC adaptor/charger (page 154). 2 Install the SD Memory Card* in the manual, to record images. A card that is an outline of photographic film to capture the best photos. 1 English h For shooting video...
User Manual
Page 5
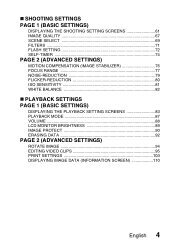
...; SHOOTING SETTINGS PAGE 1 (BASIC SETTINGS) DISPLAYING THE SHOOTING SETTING SCREENS 61 IMAGE QUALITY 67 SCENE SELECT 69 FILTERS 71 FLASH SETTING 72 SELF-TIMER 74 PAGE 2 (ADVANCED SETTINGS) MOTION COMPENSATION (IMAGE STABILIZER 76 FOCUS RANGE 77 NOISE-REDUCTION 79 FLICKER-REDUCTION 80 ISO SENSITIVITY 81 WHITE BALANCE 82 „ PLAYBACK SETTINGS PAGE 1 (BASIC SETTINGS) DISPLAYING THE PLAYBACK SETTING SCREENS 83 PLAYBACK MODE 87 VOLUME 88 LCD MONITOR BRIGHTNESS 89 IMAGE PROTECT 90 ERASING DATA 92 PAGE 2 (ADVANCED SETTINGS) ROTATE IMAGE 94 EDITING VIDEO...
...; SHOOTING SETTINGS PAGE 1 (BASIC SETTINGS) DISPLAYING THE SHOOTING SETTING SCREENS 61 IMAGE QUALITY 67 SCENE SELECT 69 FILTERS 71 FLASH SETTING 72 SELF-TIMER 74 PAGE 2 (ADVANCED SETTINGS) MOTION COMPENSATION (IMAGE STABILIZER 76 FOCUS RANGE 77 NOISE-REDUCTION 79 FLICKER-REDUCTION 80 ISO SENSITIVITY 81 WHITE BALANCE 82 „ PLAYBACK SETTINGS PAGE 1 (BASIC SETTINGS) DISPLAYING THE PLAYBACK SETTING SCREENS 83 PLAYBACK MODE 87 VOLUME 88 LCD MONITOR BRIGHTNESS 89 IMAGE PROTECT 90 ERASING DATA 92 PAGE 2 (ADVANCED SETTINGS) ROTATE IMAGE 94 EDITING VIDEO...

User Manual
Page 28
When not using the lens cap, remove the protective film. CHECKING THE INCLUDED ACCESSORIES k Neckstrap k Lens cap k Soft case Before using the camera, keep it in the soft case for protection. 27 English
When not using the lens cap, remove the protective film. CHECKING THE INCLUDED ACCESSORIES k Neckstrap k Lens cap k Soft case Before using the camera, keep it in the soft case for protection. 27 English
User Manual
Page 30
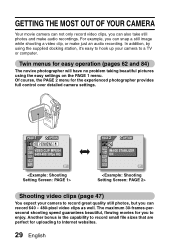
... 2 menu for uploading to record small file sizes that are perfect for the experienced photographer provides full control over detailed camera settings. Another bonus is the capability to Internet websites. 29 English In addition, by using the easy settings on the PAGE 1 menu. VIDEO CLIP IMAGE STABILIZER ON Shooting video clips (page 47) You expect your camera to enjoy. The maximum 30-frames-persecond shooting speed guarantees beautiful, flowing movies...
... 2 menu for uploading to record small file sizes that are perfect for the experienced photographer provides full control over detailed camera settings. Another bonus is the capability to Internet websites. 29 English In addition, by using the easy settings on the PAGE 1 menu. VIDEO CLIP IMAGE STABILIZER ON Shooting video clips (page 47) You expect your camera to enjoy. The maximum 30-frames-persecond shooting speed guarantees beautiful, flowing movies...
User Manual
Page 41
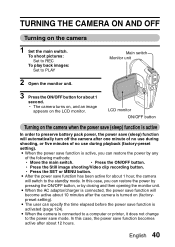
... power save function is active, you can restore the power by pressing the ON/OFF button, or by any of no use during shooting, or five minutes of the following methods: h Move the main switch. English 40 To shoot pictures: Set to REC To play back images: Set to preserve battery pack power, the power save mode. h Press the Still image shooting/Video clip recording button. i When the AC adaptor/charger is active In order to PLAY Main switch...
... power save function is active, you can restore the power by pressing the ON/OFF button, or by any of no use during shooting, or five minutes of the following methods: h Move the main switch. English 40 To shoot pictures: Set to REC To play back images: Set to preserve battery pack power, the power save mode. h Press the Still image shooting/Video clip recording button. i When the AC adaptor/charger is active In order to PLAY Main switch...
User Manual
Page 47
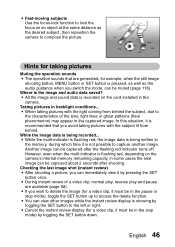
... SET button once. i Cancel the instant review display (for a video clip, it is recorded on the camera's internal memory remaining capacity, in the camera. Taking pictures in the stop mode), toggle the SET button up to access the delete function. Checking the last image shot (instant review) i After shooting a picture, you avoid taking pictures Muting the operation sounds i The operation sounds that you can be muted (page 116). i You can view other images while the instant review display is flashing red, depending on the card installed...
... SET button once. i Cancel the instant review display (for a video clip, it is recorded on the camera's internal memory remaining capacity, in the camera. Taking pictures in the stop mode), toggle the SET button up to access the delete function. Checking the last image shot (instant review) i After shooting a picture, you avoid taking pictures Muting the operation sounds i The operation sounds that you can be muted (page 116). i You can view other images while the instant review display is flashing red, depending on the card installed...
User Manual
Page 48
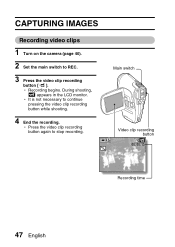
h It is not necessary to stop recording. h Press the video clip recording button again to continue pressing the video clip recording button while shooting. 4 End the recording. h Recording begins. Main switch Video clip recording button 00 : 00 :15 Recording time 47 English During shooting, X appears in the LCD monitor. CAPTURING IMAGES Recording video clips 1 Turn on the camera (page 40). 2 Set the main switch to REC. 3 Press the video clip recording button [R].
h It is not necessary to stop recording. h Press the video clip recording button again to continue pressing the video clip recording button while shooting. 4 End the recording. h Recording begins. Main switch Video clip recording button 00 : 00 :15 Recording time 47 English During shooting, X appears in the LCD monitor. CAPTURING IMAGES Recording video clips 1 Turn on the camera (page 40). 2 Set the main switch to REC. 3 Press the video clip recording button [R].
User Manual
Page 49
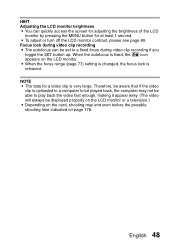
HINT Adjusting the LCD monitor brightness i You can be displayed properly on the LCD monitor or a television.) i Depending on the card, shooting may not be able to play back the video fast enough, making it appear jerky. (The video will always be set to a fixed focus during video clip recording i The autofocus can quickly access the screen for adjusting the brightness of the LCD monitor by pressing the MENU button for a video clip...
HINT Adjusting the LCD monitor brightness i You can be displayed properly on the LCD monitor or a television.) i Depending on the card, shooting may not be able to play back the video fast enough, making it appear jerky. (The video will always be set to a fixed focus during video clip recording i The autofocus can quickly access the screen for adjusting the brightness of the LCD monitor by pressing the MENU button for a video clip...
User Manual
Page 51
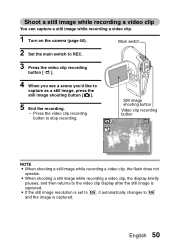
... image shooting button Video clip recording button 00 : 00 : 25 NOTE i When shooting a still image while recording a video clip, the flash does not operate. Main switch 2 Set the main switch to REC. 3 Press the video clip recording button [R]. 4 When you see a scene you'd like to stop recording. i When shooting a still image while recording a video clip, the display briefly pauses, and then returns to W and the image is captured. English 50 i If the still image resolution is set to X, it automatically changes to the video...
... image shooting button Video clip recording button 00 : 00 : 25 NOTE i When shooting a still image while recording a video clip, the flash does not operate. Main switch 2 Set the main switch to REC. 3 Press the video clip recording button [R]. 4 When you see a scene you'd like to stop recording. i When shooting a still image while recording a video clip, the display briefly pauses, and then returns to W and the image is captured. English 50 i If the still image resolution is set to X, it automatically changes to the video...
User Manual
Page 61
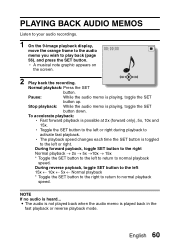
... normal playback speed. English 60 To accelerate playback: h Fast forward playback is playing, toggle the SET button up. During reverse payback, toggle SET button to the left to return to the left or right. Pause: While the audio memo is possible at 2x (forward only), 5x, 10x and 15x. h The playback speed changes each time the SET button is heard... PLAYING BACK AUDIO MEMOS Listen to your audio recordings. 1 On the 9-image playback display, move...
... normal playback speed. English 60 To accelerate playback: h Fast forward playback is playing, toggle the SET button up. During reverse payback, toggle SET button to the left to return to the left or right. Pause: While the audio memo is possible at 2x (forward only), 5x, 10x and 15x. h The playback speed changes each time the SET button is heard... PLAYING BACK AUDIO MEMOS Listen to your audio recordings. 1 On the 9-image playback display, move...
User Manual
Page 90
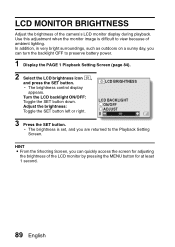
... control display appears. LCD BRIGHTNESS LCD BACKLIGHT ON/OFF ADJUST 0 3 Press the SET button. LCD MONITOR BRIGHTNESS Adjust the brightness of ambient lighting. In addition, in very bright surroundings, such as outdoors on a sunny day, you are returned to preserve battery power. 1 Display the PAGE 1 Playback Setting Screen (page 84). 2 Select the LCD brightness icon r, and press the SET button. Use this adjustment when the monitor image is set, and you can quickly access the screen...
... control display appears. LCD BRIGHTNESS LCD BACKLIGHT ON/OFF ADJUST 0 3 Press the SET button. LCD MONITOR BRIGHTNESS Adjust the brightness of ambient lighting. In addition, in very bright surroundings, such as outdoors on a sunny day, you are returned to preserve battery power. 1 Display the PAGE 1 Playback Setting Screen (page 84). 2 Select the LCD brightness icon r, and press the SET button. Use this adjustment when the monitor image is set, and you can quickly access the screen...
User Manual
Page 111
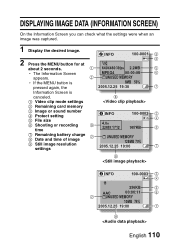
DISPLAYING IMAGE DATA (INFORMATION SCREEN) On the Information Screen you can check what the settings were when an image was captured. 1 Display the desired image. 2 Press the MENU button for at about 2 seconds. h The Information Screen appears. h If the MENU button is pressed again, the Information Screen is canceled. 1 Video clip mode settings 2 Remaining card memory 3 Image or sound number 4 Protect setting 5 File size 6 Shooting or recording time 7 Remaining battery charge 8 Date and time of image 9 Still image resolution settings INFO 100-0001 640 480 30fps 2.2MB MPEG4 00...
DISPLAYING IMAGE DATA (INFORMATION SCREEN) On the Information Screen you can check what the settings were when an image was captured. 1 Display the desired image. 2 Press the MENU button for at about 2 seconds. h The Information Screen appears. h If the MENU button is pressed again, the Information Screen is canceled. 1 Video clip mode settings 2 Remaining card memory 3 Image or sound number 4 Protect setting 5 File size 6 Shooting or recording time 7 Remaining battery charge 8 Date and time of image 9 Still image resolution settings INFO 100-0001 640 480 30fps 2.2MB MPEG4 00...
User Manual
Page 113
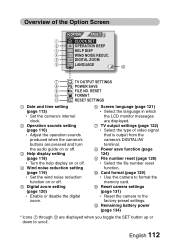
... the file number reset function. 0 Card format (page 129) h Use the camera to format the memory card. English 112 RESET FORMAT RESET SETTINGS 1 Date and time setting (page 113) h Set the camera's internal clock. 2 Operation sounds setting (page 116) h Adjust the operation sounds produced when the camera's buttons are pressed and turn the audio guide on or off. 3 Help display setting (page 118) h Turn the help display on or off. 4 Wind noise reduction setting (page 119) h Set the wind noise reduction function on or off. 5 Digital zoom setting (page 120) h Enable or disable the digital zoom...
... the file number reset function. 0 Card format (page 129) h Use the camera to format the memory card. English 112 RESET FORMAT RESET SETTINGS 1 Date and time setting (page 113) h Set the camera's internal clock. 2 Operation sounds setting (page 116) h Adjust the operation sounds produced when the camera's buttons are pressed and turn the audio guide on or off. 3 Help display setting (page 118) h Turn the help display on or off. 4 Wind noise reduction setting (page 119) h Set the wind noise reduction function on or off. 5 Digital zoom setting (page 120) h Enable or disable the digital zoom...
User Manual
Page 130
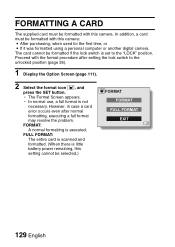
... 26). 1 Display the Option Screen (page 111). 2 Select the format icon 1, and press the SET button. The card cannot be formatted if the lock switch is little battery power remaining, this camera: i After purchasing, when used for the first time, or i If it was formatted using a personal computer or another digital camera. FORMATTING A CARD The supplied card must be formatted with this camera. However, in case a card error occurs even after setting the lock switch to...
... 26). 1 Display the Option Screen (page 111). 2 Select the format icon 1, and press the SET button. The card cannot be formatted if the lock switch is little battery power remaining, this camera: i After purchasing, when used for the first time, or i If it was formatted using a personal computer or another digital camera. FORMATTING A CARD The supplied card must be formatted with this camera. However, in case a card error occurs even after setting the lock switch to...
User Manual
Page 155
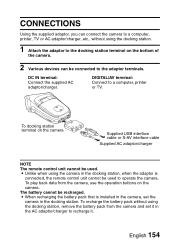
... the camera. 2 Various devices can connect the camera to a computer, printer, TV or AC adaptor/charger, etc., without using the docking station, remove the battery pack from the camera, use the operation buttons on the camera. i Unlike when using the camera in the docking station, when the adaptor is installed in the camera, set it . i When recharging the battery pack that is connected, the remote control unit cannot be recharged. English 154 CONNECTIONS Using the...
... the camera. 2 Various devices can connect the camera to a computer, printer, TV or AC adaptor/charger, etc., without using the docking station, remove the battery pack from the camera, use the operation buttons on the camera. i Unlike when using the camera in the docking station, when the adaptor is installed in the camera, set it . i When recharging the battery pack that is connected, the remote control unit cannot be recharged. English 154 CONNECTIONS Using the...
User Manual
Page 161
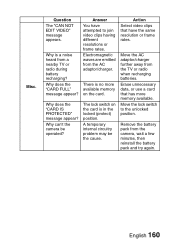
... video clips that has more available memory on the card is a noise heard from the camera, wait a few minutes, then reinstall the battery pack and try again. Question The "CAN NOT EDIT VIDEO" message appears. There is no more memory available. English 160 Why can't the camera be the cause. Erase unnecessary data, or use a card that have attempted to the unlocked position. Remove the battery...
... video clips that has more available memory on the card is a noise heard from the camera, wait a few minutes, then reinstall the battery pack and try again. Question The "CAN NOT EDIT VIDEO" message appears. There is no more memory available. English 160 Why can't the camera be the cause. Erase unnecessary data, or use a card that have attempted to the unlocked position. Remove the battery...
User Manual
Page 165
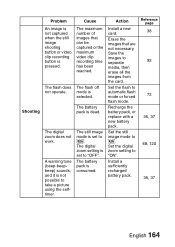
... Install a new card. The digital zoom does not work. Cause The maximum number of images that are not necessary. The battery pack is selected. Erase the images that can be captured or the maximum video clip recording time has been reached. The flash off mode is consumed. The battery pack is pressed. Save the images to "ON". The flash does not operate. Recharge the battery pack, or replace with a new battery pack. Set the digital zoom setting to...
... Install a new card. The digital zoom does not work. Cause The maximum number of images that are not necessary. The battery pack is selected. Erase the images that can be captured or the maximum video clip recording time has been reached. The flash off mode is consumed. The battery pack is pressed. Save the images to "ON". The flash does not operate. Recharge the battery pack, or replace with a new battery pack. Set the digital zoom setting to...
User Manual
Page 168
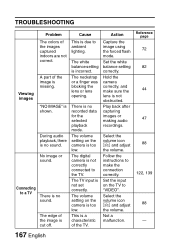
... ambient lighting. TROUBLESHOOTING Problem The colors of the TV. The digital camera is incorrect. Action Capture the image using the forced flash mode. Follow the instructions to the TV. Select the volume icon Z and adjust the volume. Reference page 72 82 44 47 88 122, 139 88 - 167 English The white balance setting is not correctly connected to make sure the lens is no recorded data for the selected playback mode. "NO IMAGE" is no sound. During audio playback...
... ambient lighting. TROUBLESHOOTING Problem The colors of the TV. The digital camera is incorrect. Action Capture the image using the forced flash mode. Follow the instructions to the TV. Select the volume icon Z and adjust the volume. Reference page 72 82 44 47 88 122, 139 88 - 167 English The white balance setting is not correctly connected to make sure the lens is no recorded data for the selected playback mode. "NO IMAGE" is no sound. During audio playback...

User Manual
Page 169
... in the AC adaptor/ charger. The battery pack is not correctly connected to the docking station. Action Cancel the protect mode. Position the battery pack correctly in the AC adaptor/ charger, but the installed battery is secure. Reference page 90 37 136 137 English 168 Image editing Charging Problem Cause You cannot edit or rotate an image. The camera is set in the docking station...
... in the AC adaptor/ charger. The battery pack is not correctly connected to the docking station. Action Cancel the protect mode. Position the battery pack correctly in the AC adaptor/ charger, but the installed battery is secure. Reference page 90 37 136 137 English 168 Image editing Charging Problem Cause You cannot edit or rotate an image. The camera is set in the docking station...
User Manual
Page 177
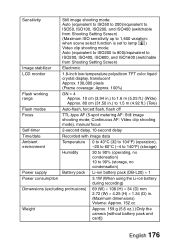
Continuous AF: Video clip shooting mode), manual focus Self-timer 2-second delay, 10-second delay Time/date Recorded with image data Ambient environment Temperature 0 to 40°C (32 to 104°F) (operation), -20 to 60°C (-4 to 140°F) (storage) Humidity 30 to 90% (operating, no condensation) 10 to 1.5 m (4.92 ft.) (Tele) Flash modes Auto-flash, forced flash, flash off Focus TTL-type AF (5-spot metering AF: Still image shooting mode; Sensitivity Still image shooting mode: Auto (equivalent...
Continuous AF: Video clip shooting mode), manual focus Self-timer 2-second delay, 10-second delay Time/date Recorded with image data Ambient environment Temperature 0 to 40°C (32 to 104°F) (operation), -20 to 60°C (-4 to 140°F) (storage) Humidity 30 to 90% (operating, no condensation) 10 to 1.5 m (4.92 ft.) (Tele) Flash modes Auto-flash, forced flash, flash off Focus TTL-type AF (5-spot metering AF: Still image shooting mode; Sensitivity Still image shooting mode: Auto (equivalent...


