
VPC-E2BL Owners Manual English
Page 6
.../PLAY button. SAVE Arrow buttons PLAY Video clip pattern When you wish to play back. SHOOT, PLAY BACK AND SAVE Playback kVideo clip playback 1 Press the REC/PLAY button. h Press the [G] or [H] button to the Playback Screen. SET button REC/PLAY button kStill image playback 1 Press the REC/PLAY button. v English Press the ON/OFF button for at least 1 second to the Playback Screen. h Playback of the screen. 2 Press the SET button. h To view other images, press the [G] or [H] button. h The display switches to turn the camera off. h Video clips are finished using...
.../PLAY button. SAVE Arrow buttons PLAY Video clip pattern When you wish to play back. SHOOT, PLAY BACK AND SAVE Playback kVideo clip playback 1 Press the REC/PLAY button. h Press the [G] or [H] button to the Playback Screen. SET button REC/PLAY button kStill image playback 1 Press the REC/PLAY button. v English Press the ON/OFF button for at least 1 second to the Playback Screen. h Playback of the screen. 2 Press the SET button. h To view other images, press the [G] or [H] button. h The display switches to turn the camera off. h Video clips are finished using...

VPC-E2BL Owners Manual English
Page 8
Copy data from your computer's DVD drive. h When the installation window closes, a dialog box to connect to the website introducing Kodak's online service appears. h Remove the DVD-ROM from your camera to the computer Connect your camera to a computer, and copy the desired data to the computer. 1 Turn on [Finish]. h The USB Connection Screen appears on the camera (page 30). h Connect the cable between the camera's USB/AV terminal and the computer's USB connector. 2 Turn on the camera's monitor. Check the...
Copy data from your computer's DVD drive. h When the installation window closes, a dialog box to connect to the website introducing Kodak's online service appears. h Remove the DVD-ROM from your camera to the computer Connect your camera to a computer, and copy the desired data to the computer. 1 Turn on [Finish]. h The USB Connection Screen appears on the camera (page 30). h Connect the cable between the camera's USB/AV terminal and the computer's USB connector. 2 Turn on the camera's monitor. Check the...

VPC-E2BL Owners Manual English
Page 18
...; SETUP PARTS NAMES 21 CHARGING THE BATTERY PACK 23 Recharging the battery pack 24 INSTALLING THE BATTERY PACK AND CARD 25 Install the battery pack 25 Install the card 28 Warning concerning battery pack temperature 29 TURNING THE CAMERA ON AND OFF 30 Turning on the camera 30 Turning on the camera when the power save (sleep) function is active 30 Turning off the camera 31 DATE AND TIME SETTING 32 SWITCHING BETWEEN THE SHOOTING MODE AND PLAYBACK MODE 35 SWITCHING THE OPERATING MODE 36 Switching...
...; SETUP PARTS NAMES 21 CHARGING THE BATTERY PACK 23 Recharging the battery pack 24 INSTALLING THE BATTERY PACK AND CARD 25 Install the battery pack 25 Install the card 28 Warning concerning battery pack temperature 29 TURNING THE CAMERA ON AND OFF 30 Turning on the camera 30 Turning on the camera when the power save (sleep) function is active 30 Turning off the camera 31 DATE AND TIME SETTING 32 SWITCHING BETWEEN THE SHOOTING MODE AND PLAYBACK MODE 35 SWITCHING THE OPERATING MODE 36 Switching...

VPC-E2BL Owners Manual English
Page 19
... recording size 56 Select the focus setting 57 Hints for taking pictures 58 VIDEO CLIP RECORDING 59 SHOOTING SINGLE SHOTS 60 Using the flash 62 SHOOT A STILL IMAGE WHILE RECORDING A VIDEO CLIP ..........64 MACRO-PHOTOGRAPHY (ZOOM 66 AFTER USING THE CAMERA IN WATER 67 PLAYBACK PLAYING BACK VIDEO CLIPS AND STILL IMAGES 69 How to save one frame from a video clip as a still image 71 SLIDESHOW PLAYBACK 72 PLAYBACK VOLUME 73 DELETING FILES 74 PLAYBACK MODES 76 Multi-image display 76 Selecting the playback...
... recording size 56 Select the focus setting 57 Hints for taking pictures 58 VIDEO CLIP RECORDING 59 SHOOTING SINGLE SHOTS 60 Using the flash 62 SHOOT A STILL IMAGE WHILE RECORDING A VIDEO CLIP ..........64 MACRO-PHOTOGRAPHY (ZOOM 66 AFTER USING THE CAMERA IN WATER 67 PLAYBACK PLAYING BACK VIDEO CLIPS AND STILL IMAGES 69 How to save one frame from a video clip as a still image 71 SLIDESHOW PLAYBACK 72 PLAYBACK VOLUME 73 DELETING FILES 74 PLAYBACK MODES 76 Multi-image display 76 Selecting the playback...

VPC-E2BL Owners Manual English
Page 20
... Movies 79 Still images 80 Sequential shots 81 Audio recording 82 SCENE SELECT 85 FILTERS 87 FLASH OPERATION 88 SELF-TIMER 89 MOTION COMPENSATION (IMAGE STABILIZER 91 Compensate for camera shake during video clip recording .......... 91 Compensate for camera shake during still image shooting .......... 91 FOCUS RANGE 94 How to use the manual focus 95 FOCUS MODE 96 LIGHT-MEASURING MODE SETTING 97 ISO SENSITIVITY 98 WHITE BALANCE 99 FACE CHASER 100 HIGH SENSITIVITY MODE 101 DIGITAL ZOOM SETTING...
... Movies 79 Still images 80 Sequential shots 81 Audio recording 82 SCENE SELECT 85 FILTERS 87 FLASH OPERATION 88 SELF-TIMER 89 MOTION COMPENSATION (IMAGE STABILIZER 91 Compensate for camera shake during video clip recording .......... 91 Compensate for camera shake during still image shooting .......... 91 FOCUS RANGE 94 How to use the manual focus 95 FOCUS MODE 96 LIGHT-MEASURING MODE SETTING 97 ISO SENSITIVITY 98 WHITE BALANCE 99 FACE CHASER 100 HIGH SENSITIVITY MODE 101 DIGITAL ZOOM SETTING...

VPC-E2BL Owners Manual English
Page 21
... FUNCTION 137 ADJUST THE IMAGE QUALITY 138 FLICKER-REDUCTION 139 MONITOR BRIGHTNESS 140 SCREEN LANGUAGE 141 TV SYSTEM SETTING 142 POWER SAVE FUNCTION 143 FILE NO. PLAYBACK SLIDESHOW PLAYBACK 105 FILE PROTECT 107 ROTATE STILL IMAGE 108 REDUCE STILL IMAGE SIZE (RESIZE 109 CORRECTING THE RED-EYE EFFECT AND IMAGE BLUR 110 EDITING VIDEO CLIPS 112 Procedure to cut (extract) a portion of images and video recording time 151 For audio recordings 151 CHECKING THE REMAINING BATTERY PACK CHARGE...
... FUNCTION 137 ADJUST THE IMAGE QUALITY 138 FLICKER-REDUCTION 139 MONITOR BRIGHTNESS 140 SCREEN LANGUAGE 141 TV SYSTEM SETTING 142 POWER SAVE FUNCTION 143 FILE NO. PLAYBACK SLIDESHOW PLAYBACK 105 FILE PROTECT 107 ROTATE STILL IMAGE 108 REDUCE STILL IMAGE SIZE (RESIZE 109 CORRECTING THE RED-EYE EFFECT AND IMAGE BLUR 110 EDITING VIDEO CLIPS 112 Procedure to cut (extract) a portion of images and video recording time 151 For audio recordings 151 CHECKING THE REMAINING BATTERY PACK CHARGE...

VPC-E2BL Owners Manual English
Page 22
... Images/Possible Shooting Time/ Possible Recording Time 189 Concerning the multi-indicator 190 Supplied battery pack charger 191 Supplied Li-ion battery pack 191 Others 192 Before capturing those important shots, be sure to first take a test shot to confirm that your camera is set up and ready to printing instructions (requested images 162 Changing the printer settings 163 „ APPENDICES COMMONLY ASKED QUESTIONS 165 TROUBLESHOOTING 172 Camera...
... Images/Possible Shooting Time/ Possible Recording Time 189 Concerning the multi-indicator 190 Supplied battery pack charger 191 Supplied Li-ion battery pack 191 Others 192 Before capturing those important shots, be sure to first take a test shot to confirm that your camera is set up and ready to printing instructions (requested images 162 Changing the printer settings 163 „ APPENDICES COMMONLY ASKED QUESTIONS 165 TROUBLESHOOTING 172 Camera...

VPC-E2BL Owners Manual English
Page 23
... 139 Set the camera's color/contrast characteristics • "ADJUST THE IMAGE QUALITY" on page 32 Zoom in the following table. Shooting/recording Basic operation Convenient functions Additional functions Getting started shooting/recording • "VIDEO CLIP RECORDING" on page 59 • "SHOOTING SINGLE SHOTS" on page 60 • "Sequential shots" on page 81 • "Audio recording" on page 82 Optimize the photo quality • "Select the recording size" on page 56 • "RECORDING SIZE...
... 139 Set the camera's color/contrast characteristics • "ADJUST THE IMAGE QUALITY" on page 32 Zoom in the following table. Shooting/recording Basic operation Convenient functions Additional functions Getting started shooting/recording • "VIDEO CLIP RECORDING" on page 59 • "SHOOTING SINGLE SHOTS" on page 60 • "Sequential shots" on page 81 • "Audio recording" on page 82 Optimize the photo quality • "Select the recording size" on page 56 • "RECORDING SIZE...

VPC-E2BL Owners Manual English
Page 27
... in the Xacti Software DVD INSTRUCTION MANUAL Copy data from your camera to a computer • "Copy data from your camera to the computer" on page vii • "OPERATING ENVIRONMENT" on page 5 in the Xacti Software DVD INSTRUCTION MANUAL • "SETTING THE CONNECTION MODE" on page 9 in the Xacti Software DVD INSTRUCTION MANUAL Using with Windows Vista • "SETTING THE CONNECTION MODE" on page 9 in the Xacti Software DVD INSTRUCTION MANUAL Playback • "About video clip files recorded with this camera" on page 8 in the Xacti Software DVD INSTRUCTION MANUAL • "INSTALLING THE...
... in the Xacti Software DVD INSTRUCTION MANUAL Copy data from your camera to a computer • "Copy data from your camera to the computer" on page vii • "OPERATING ENVIRONMENT" on page 5 in the Xacti Software DVD INSTRUCTION MANUAL • "SETTING THE CONNECTION MODE" on page 9 in the Xacti Software DVD INSTRUCTION MANUAL Using with Windows Vista • "SETTING THE CONNECTION MODE" on page 9 in the Xacti Software DVD INSTRUCTION MANUAL Playback • "About video clip files recorded with this camera" on page 8 in the Xacti Software DVD INSTRUCTION MANUAL • "INSTALLING THE...

VPC-E2BL Owners Manual English
Page 82
..., the flash does not operate. If you intend to G and the image is captured. 65 English About the recording size of the remaining video recording time. i When the remaining video recording time becomes approximately 50 seconds, it is suggested that you take note of still images i The still image shooting size automatically changes to capture a still image while recording a video clip, it will differ depending on the subject and on the video clip mode setting...
..., the flash does not operate. If you intend to G and the image is captured. 65 English About the recording size of the remaining video recording time. i When the remaining video recording time becomes approximately 50 seconds, it is suggested that you take note of still images i The still image shooting size automatically changes to capture a still image while recording a video clip, it will differ depending on the subject and on the video clip mode setting...

VPC-E2BL Owners Manual English
Page 90
h The playback volume is set the volume, and press the SET button. h The volume control bar appears. PLAY VOLUME 2 Press the [G] or [H] button to set , and the display returns to the SIMPLE Mode Playback Menu. 4 VOLUME SETTING HINT In the NORMAL mode i When you select "PLAY VOLUME" from the NORMAL Mode Playback Menu and press the SET button, the volume control bar appears. 73 English PLAYBACK VOLUME Adjust the playback volume for video clips and audio files. 1 Display the SIMPLE Mode Playback Menu (page 37), select the playback volume setting, and press the SET button.
h The playback volume is set the volume, and press the SET button. h The volume control bar appears. PLAY VOLUME 2 Press the [G] or [H] button to set , and the display returns to the SIMPLE Mode Playback Menu. 4 VOLUME SETTING HINT In the NORMAL mode i When you select "PLAY VOLUME" from the NORMAL Mode Playback Menu and press the SET button, the volume control bar appears. 73 English PLAYBACK VOLUME Adjust the playback volume for video clips and audio files. 1 Display the SIMPLE Mode Playback Menu (page 37), select the playback volume setting, and press the SET button.

VPC-E2BL Owners Manual English
Page 100
... a new file. (These 4 GB segments are automatically created. When recording a video clip whose resolution setting is d exceeds about 7 hours, the recorded file is saved once, and the recording continues in the still image mode automatically changes to G and the image is being saved.) Audio playback 1 Display the desired audio file. 00:00:00 2008.12.24 PLAY 83 English The recording session continues until you stop recording. h Press the [ ] button again to capture a still image. RECORDING SIZE 4 End the recording.
... a new file. (These 4 GB segments are automatically created. When recording a video clip whose resolution setting is d exceeds about 7 hours, the recorded file is saved once, and the recording continues in the still image mode automatically changes to G and the image is being saved.) Audio playback 1 Display the desired audio file. 00:00:00 2008.12.24 PLAY 83 English The recording session continues until you stop recording. h Press the [ ] button again to capture a still image. RECORDING SIZE 4 End the recording.

VPC-E2BL Owners Manual English
Page 101
... normal playback Press the SET button. English 84 NORMAL/SHOOTING 2 Play back the recording. Stop playback Press the [W/P] button. Fast forward During playback, press the [H] button. If the [H] button is pressed during fast reverse, the speed decreases. If the [G] button is pressed during fast forward, the speed decreases. Press the [T/]] button. i The audio is not played back when the audio recording is pressed, the speed increases. Normal playback Pause Press the SET button. Each time the [H] button is played...
... normal playback Press the SET button. English 84 NORMAL/SHOOTING 2 Play back the recording. Stop playback Press the [W/P] button. Fast forward During playback, press the [H] button. If the [H] button is pressed during fast reverse, the speed decreases. If the [G] button is pressed during fast forward, the speed decreases. Press the [T/]] button. i The audio is not played back when the audio recording is pressed, the speed increases. Normal playback Pause Press the SET button. Each time the [H] button is played...

VPC-E2BL Owners Manual English
Page 115
... ISO sensitivity setting. v: Sets sensitivity to flicker when recording a video clip? i By assigning an operation shortcut to an arrow button (page 135), you can set to w or higher, a noticeable flicker may appear in the captured images may increase or the images may be set to a fixed setting. 1 Display the NORMAL Mode Shooting Menu (page 37), select "ISO", and press the SET button. =: The ISO sensitivity is the standard output sensitivity...
... ISO sensitivity setting. v: Sets sensitivity to flicker when recording a video clip? i By assigning an operation shortcut to an arrow button (page 135), you can set to w or higher, a noticeable flicker may appear in the captured images may increase or the images may be set to a fixed setting. 1 Display the NORMAL Mode Shooting Menu (page 37), select "ISO", and press the SET button. =: The ISO sensitivity is the standard output sensitivity...
VPC-E2BL Owners Manual English
Page 140
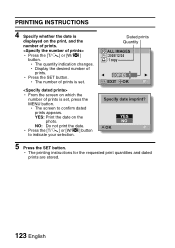
... the print, and the number of prints. YES NO OK 5 Press the SET button. h The printing instructions for the requested print quantities and dated prints are stored. 123 English YES: Print the date on the photo. h Press the [T/]] or [W/P] button. h The screen to indicate your selection. h The quantity indication changes. Dated prints Quantity ALL IMAGES :2008/12/24 :1 copy COPIES 1 EXIT OK Specify date imprint? h Press the SET button.
... the print, and the number of prints. YES NO OK 5 Press the SET button. h The printing instructions for the requested print quantities and dated prints are stored. 123 English YES: Print the date on the photo. h Press the [T/]] or [W/P] button. h The screen to indicate your selection. h The quantity indication changes. Dated prints Quantity ALL IMAGES :2008/12/24 :1 copy COPIES 1 EXIT OK Specify date imprint? h Press the SET button.

VPC-E2BL Owners Manual English
Page 143
CARD INT MEM: Copy files from the card to the internal memory. 1 Insert the card in the camera (page 28). 2 Display the NORMAL Mode Playback Menu (page 37). 3 Select "COPY", and press the SET button. COPY FILES Images and audio files recorded in the camera's internal memory can be copied to the card, and likewise from the card to the internal memory. INT MEM CARD: Copy files from the internal memory to copy files appears. 4 Select the copy direction. NORMAL/PLAYBACK English 126 h The screen to the card. COPY INT MEM CARD CARD INT MEM OK...
CARD INT MEM: Copy files from the card to the internal memory. 1 Insert the card in the camera (page 28). 2 Display the NORMAL Mode Playback Menu (page 37). 3 Select "COPY", and press the SET button. COPY FILES Images and audio files recorded in the camera's internal memory can be copied to the card, and likewise from the card to the internal memory. INT MEM CARD: Copy files from the internal memory to copy files appears. 4 Select the copy direction. NORMAL/PLAYBACK English 126 h The screen to the card. COPY INT MEM CARD CARD INT MEM OK...
VPC-E2BL Owners Manual English
Page 145
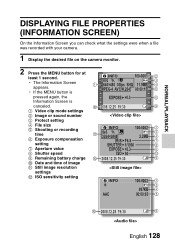
...PLAYBACK DISPLAYING FILE PROPERTIES (INFORMATION SCREEN) On the Information Screen you can check what the settings were when a file was recorded with your camera. 1 Display the desired file on the camera monitor. 2 Press the MENU button for at least 1 second. h The Information Screen appears. h If the MENU button is pressed again, the Information Screen is canceled. 1 Video clip mode settings 2 Image or sound number 3 Protect setting 4 File size 5 Shooting or recording time 6 Exposure compensation setting 7 Aperture value 8 Shutter speed 9 Remaining battery charge 0 Date and time of image...
...PLAYBACK DISPLAYING FILE PROPERTIES (INFORMATION SCREEN) On the Information Screen you can check what the settings were when a file was recorded with your camera. 1 Display the desired file on the camera monitor. 2 Press the MENU button for at least 1 second. h The Information Screen appears. h If the MENU button is pressed again, the Information Screen is canceled. 1 Video clip mode settings 2 Image or sound number 3 Protect setting 4 File size 5 Shooting or recording time 6 Exposure compensation setting 7 Aperture value 8 Shutter speed 9 Remaining battery charge 0 Date and time of image...

VPC-E2BL Owners Manual English
Page 190
... battery pack. Action Install a new card. Delete the images that can be captured or the maximum video clip recording time has been reached. Cause The maximum number of images that are not necessary. The still image is selected. Set the still image to "OFF". Reference page 28 74 62, 88 23, 25 80, 102 173 English The digital zoom does not work. TROUBLESHOOTING Shooting Problem An image is not captured when the [ ] button or [ ] button...
... battery pack. Action Install a new card. Delete the images that can be captured or the maximum video clip recording time has been reached. Cause The maximum number of images that are not necessary. The still image is selected. Set the still image to "OFF". Reference page 28 74 62, 88 23, 25 80, 102 173 English The digital zoom does not work. TROUBLESHOOTING Shooting Problem An image is not captured when the [ ] button or [ ] button...

VPC-E2BL Owners Manual English
Page 198
Normal change occurring with a new battery pack. If the battery quickly becomes depleted, for the card. Replace it with battery use of the lithium-ion battery, it has a tendency to swell as the number of charge and discharge cycles adds up and it has reached the end of Images/ Possible Shooting Time/ Possible Recording Time" (page 189). The recording capacity is set to the instructions that indicated in the section...
Normal change occurring with a new battery pack. If the battery quickly becomes depleted, for the card. Replace it with battery use of the lithium-ion battery, it has a tendency to swell as the number of charge and discharge cycles adds up and it has reached the end of Images/ Possible Shooting Time/ Possible Recording Time" (page 189). The recording capacity is set to the instructions that indicated in the section...
VPC-E2BL Owners Manual English
Page 206
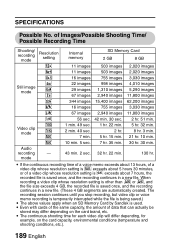
... file size exceeds 4 GB, the recorded file is used. i Even with cards of the same capacity, the amount of Images/Possible Shooting Time/ Possible Recording Time Shooting/ recording mode Still image mode Video clip mode Resolution setting I U V ] W t [ R t T ) B l d Internal memory SD Memory Card 2 GB 8 GB 11 images 11 images 16 images 22 images 29 images 67 images 344 images 16 images 67 images 56 sec. 1 min. 49 sec. 2 min. 40 sec. 7 min. 10 min. 5 sec. 503 images 503 images 755 images 998 images 1,310 images 2,940 images 15,400 images...
... file size exceeds 4 GB, the recorded file is used. i Even with cards of the same capacity, the amount of Images/Possible Shooting Time/ Possible Recording Time Shooting/ recording mode Still image mode Video clip mode Resolution setting I U V ] W t [ R t T ) B l d Internal memory SD Memory Card 2 GB 8 GB 11 images 11 images 16 images 22 images 29 images 67 images 344 images 16 images 67 images 56 sec. 1 min. 49 sec. 2 min. 40 sec. 7 min. 10 min. 5 sec. 503 images 503 images 755 images 998 images 1,310 images 2,940 images 15,400 images...


