
Instruction Manual, VPC-HD1010EX
Page 6
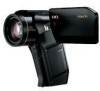
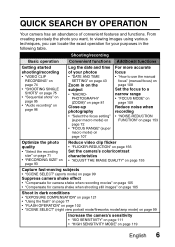
... to turn the camera on. Shooting 1 Set the REC/PLAY switch to REC. 2 Press the ON/OFF button for recorded contents etc. SHOOT, PLAY BACK AND SAVE Before capturing those important shots, be sure to first take a photo: h Press the [ ] button. For how to begin recording a video clip. h A still image is set the date and time, see page 43. in case of photographing or recording failure due to REC [ ] button [ ] button ON/OFF button 3 Record. REC/PLAY switch Set to a chance camera or card flaw...
... to turn the camera on. Shooting 1 Set the REC/PLAY switch to REC. 2 Press the ON/OFF button for recorded contents etc. SHOOT, PLAY BACK AND SAVE Before capturing those important shots, be sure to first take a photo: h Press the [ ] button. For how to begin recording a video clip. h A still image is set the date and time, see page 43. in case of photographing or recording failure due to REC [ ] button [ ] button ON/OFF button 3 Record. REC/PLAY switch Set to a chance camera or card flaw...
Instruction Manual, VPC-HD1010EX
Page 7
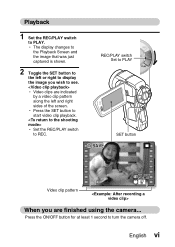
h Set the REC/PLAY switch to PLAY. Playback 1 Set the REC/PLAY switch to REC. h The display changes to the Playback Screen and the image that was just captured is shown. 2 Toggle the SET button to the left and right sides of the screen. h Press the SET button to PLAY SAVE SET button PLAY Video clip pattern When you are indicated by a video clip pattern along the left or right to display the image you wish to turn the camera off. English vi REC/PLAY switch Set to start...
h Set the REC/PLAY switch to PLAY. Playback 1 Set the REC/PLAY switch to REC. h The display changes to the Playback Screen and the image that was just captured is shown. 2 Toggle the SET button to the left and right sides of the screen. h Press the SET button to PLAY SAVE SET button PLAY Video clip pattern When you are indicated by a video clip pattern along the left or right to display the image you wish to turn the camera off. English vi REC/PLAY switch Set to start...
Instruction Manual, VPC-HD1010EX
Page 21
... VIDEO CLIP RECORDING 74 SHOOTING SINGLE SHOTS 75 Using the flash 77 SHOOT A STILL IMAGE WHILE RECORDING A VIDEO CLIP ..........79 MACRO-PHOTOGRAPHY (ZOOM 81 PLAYBACK SHOOTING AND PLAYBACK WITH THE REMOTE CONTROL UNIT 82 PLAYING BACK VIDEO CLIPS AND STILL IMAGES 83 How to save one frame from a video clip as a still image 85 SLIDESHOW PLAYBACK 86 PLAYBACK VOLUME 87 DELETING FILES 88 PLAYBACK MODES 90 9-image display playback 90 Selecting the playback folder 91 Magnifying (zooming in) the image 92 „ NORMAL SHOOTING RECORDING SIZE 93 Movies...
... VIDEO CLIP RECORDING 74 SHOOTING SINGLE SHOTS 75 Using the flash 77 SHOOT A STILL IMAGE WHILE RECORDING A VIDEO CLIP ..........79 MACRO-PHOTOGRAPHY (ZOOM 81 PLAYBACK SHOOTING AND PLAYBACK WITH THE REMOTE CONTROL UNIT 82 PLAYING BACK VIDEO CLIPS AND STILL IMAGES 83 How to save one frame from a video clip as a still image 85 SLIDESHOW PLAYBACK 86 PLAYBACK VOLUME 87 DELETING FILES 88 PLAYBACK MODES 90 9-image display playback 90 Selecting the playback folder 91 Magnifying (zooming in) the image 92 „ NORMAL SHOOTING RECORDING SIZE 93 Movies...
Instruction Manual, VPC-HD1010EX
Page 22
... Compensate for camera shake when recording movies 105 Compensate for camera shake when shooting still images ........ 105 FOCUS RANGE 107 How to use the manual focus 108 FOCUS MODE 109 LIGHT-MEASURING MODE SETTING 110 ISO SENSITIVITY 111 WHITE BALANCE 113 EXPOSURE SETTING 114 FACE CHASER 116 PHOTO WIDE D-RANGE 117 HIGH SENSITIVITY MODE 119 DIGITAL ZOOM SETTING 120 EXPOSURE COMPENSATION 121 PLAYBACK SLIDESHOW PLAYBACK 122 FILE PROTECT 124 PRINTING INSTRUCTIONS 125 Display the Printing Instructions Screen 125 Specifying date imprinting...
... Compensate for camera shake when recording movies 105 Compensate for camera shake when shooting still images ........ 105 FOCUS RANGE 107 How to use the manual focus 108 FOCUS MODE 109 LIGHT-MEASURING MODE SETTING 110 ISO SENSITIVITY 111 WHITE BALANCE 113 EXPOSURE SETTING 114 FACE CHASER 116 PHOTO WIDE D-RANGE 117 HIGH SENSITIVITY MODE 119 DIGITAL ZOOM SETTING 120 EXPOSURE COMPENSATION 121 PLAYBACK SLIDESHOW PLAYBACK 122 FILE PROTECT 124 PRINTING INSTRUCTIONS 125 Display the Printing Instructions Screen 125 Specifying date imprinting...

Instruction Manual, VPC-HD1010EX
Page 23
MEMORY 167 FORMATTING A CARD 170 RESETTING THE CAMERA SETTINGS 172 CHECKING THE REMAINING CARD MEMORY 173 Checking the remaining number of images and video recording time 173 For audio recordings 173 CHECKING THE REMAINING BATTERY PACK CHARGE 175 „ OTHER DEVICES AND CONNECTIONS CONNECTING TO A TV CONNECTING TO A STANDARD VIDEO INPUT TERMINAL ..........177 ENJOY HIGHER IMAGE QUALITY 178 Connect to the S-VIDEO terminal 178 Connect to the 480p/720p/1080i terminal 179 Connecting to the HDMI terminal 180 PLAYING BACK ON A TV 181 Xacti Library...
MEMORY 167 FORMATTING A CARD 170 RESETTING THE CAMERA SETTINGS 172 CHECKING THE REMAINING CARD MEMORY 173 Checking the remaining number of images and video recording time 173 For audio recordings 173 CHECKING THE REMAINING BATTERY PACK CHARGE 175 „ OTHER DEVICES AND CONNECTIONS CONNECTING TO A TV CONNECTING TO A STANDARD VIDEO INPUT TERMINAL ..........177 ENJOY HIGHER IMAGE QUALITY 178 Connect to the S-VIDEO terminal 178 Connect to the 480p/720p/1080i terminal 179 Connecting to the HDMI terminal 180 PLAYING BACK ON A TV 181 Xacti Library...
Instruction Manual, VPC-HD1010EX
Page 25
...; "ADJUST THE IMAGE QUALITY" on page 155 Capture fast-moving subjects • "SCENE SELECT" (sports mode) on page 99 Suppress camera shake effect • "Compensate for camera shake when recording movies" on page 105 • "Compensate for your photos • "DATE AND TIME SETTING" on page 43 Zoom in dark conditions • "EXPOSURE COMPENSATION" on page 121 • "Using the flash" on page 77 • "FLASH OPERATION...
...; "ADJUST THE IMAGE QUALITY" on page 155 Capture fast-moving subjects • "SCENE SELECT" (sports mode) on page 99 Suppress camera shake effect • "Compensate for camera shake when recording movies" on page 105 • "Compensate for your photos • "DATE AND TIME SETTING" on page 43 Zoom in dark conditions • "EXPOSURE COMPENSATION" on page 121 • "Using the flash" on page 77 • "FLASH OPERATION...

Instruction Manual, VPC-HD1010EX
Page 53
SETUP 2 Insert the battery pack. Battery pack English 34 h Raise the edge of the battery pack to remove it is positioned correctly. 3 Replace the battery cover. h Take care that it . 4 Prepare the docking station (page 29).
SETUP 2 Insert the battery pack. Battery pack English 34 h Raise the edge of the battery pack to remove it is positioned correctly. 3 Replace the battery cover. h Take care that it . 4 Prepare the docking station (page 29).
Instruction Manual, VPC-HD1010EX
Page 59
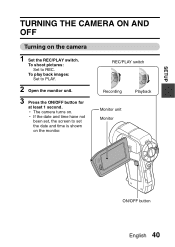
REC/PLAY switch Recording Playback Monitor unit Monitor ON/OFF button English 40 SETUP TURNING THE CAMERA ON AND OFF Turning on . h If the date and time have not been set the date and time is shown on the monitor. To play back images: Set to set , the screen to PLAY. 2 Open the monitor unit. 3 Press the ON/OFF button for at least 1 second. To shoot pictures: Set to REC. h The camera turns on the camera 1 Set the REC/PLAY switch.
REC/PLAY switch Recording Playback Monitor unit Monitor ON/OFF button English 40 SETUP TURNING THE CAMERA ON AND OFF Turning on . h If the date and time have not been set the date and time is shown on the monitor. To play back images: Set to set , the screen to PLAY. 2 Open the monitor unit. 3 Press the ON/OFF button for at least 1 second. To shoot pictures: Set to REC. h The camera turns on the camera 1 Set the REC/PLAY switch.

Instruction Manual, VPC-HD1010EX
Page 92
... multi-indicator is flashing red, the image files are being written to the memory, during which time it by toggling the SET button down. 73 English Checking the last image shot (instant review) i After shooting a picture, you can immediately view it is recommended that sounds when you operate the camera can be captured about 2 seconds after the flashing red indicator turns off. Another image can be muted (page 147). Taking pictures in some cases...
... multi-indicator is flashing red, the image files are being written to the memory, during which time it by toggling the SET button down. 73 English Checking the last image shot (instant review) i After shooting a picture, you can immediately view it is recommended that sounds when you operate the camera can be captured about 2 seconds after the flashing red indicator turns off. Another image can be muted (page 147). Taking pictures in some cases...
Instruction Manual, VPC-HD1010EX
Page 99
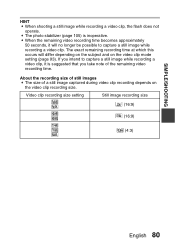
SIMPLE/SHOOTING HINT i When shooting a still image while recording a video clip, the flash does not operate. If you take note of a still image captured during video clip recording depends on the video clip mode setting (page 93). About the recording size of still images i The size of the remaining video recording time. i When the remaining video recording time becomes approximately 50 seconds, it is inoperative. The exact remaining recording time at which this occurs will no longer...
SIMPLE/SHOOTING HINT i When shooting a still image while recording a video clip, the flash does not operate. If you take note of a still image captured during video clip recording depends on the video clip mode setting (page 93). About the recording size of still images i The size of the remaining video recording time. i When the remaining video recording time becomes approximately 50 seconds, it is inoperative. The exact remaining recording time at which this occurs will no longer...
Instruction Manual, VPC-HD1010EX
Page 106
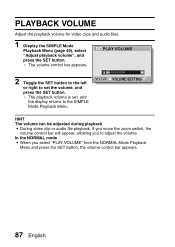
... to the SIMPLE Mode Playback Menu. 14 VOLUME SETTING HINT The volume can be adjusted during playback i During video clip or audio file playback, if you move the zoom switch, the volume control bar will appear, allowing you select "PLAY VOLUME" from the NORMAL Mode Playback Menu and press the SET button, the volume control bar appears. 87 English PLAYBACK VOLUME Adjust the playback volume for video clips and audio files. 1 Display the SIMPLE Mode Playback Menu (page 49), select "Adjust playback volume", and press the SET button. PLAY VOLUME 2 Toggle the SET button to the left...
... to the SIMPLE Mode Playback Menu. 14 VOLUME SETTING HINT The volume can be adjusted during playback i During video clip or audio file playback, if you move the zoom switch, the volume control bar will appear, allowing you select "PLAY VOLUME" from the NORMAL Mode Playback Menu and press the SET button, the volume control bar appears. 87 English PLAYBACK VOLUME Adjust the playback volume for video clips and audio files. 1 Display the SIMPLE Mode Playback Menu (page 49), select "Adjust playback volume", and press the SET button. PLAY VOLUME 2 Toggle the SET button to the left...
Instruction Manual, VPC-HD1010EX
Page 116
... a video clip whose resolution setting is other than l, and the file size exceeds 4 GB, the recorded file is not necessary to capture a [ still image. RECORDING SIZE 3 Press the [ ] button. It is saved once, and the recording continues in a new file. (These 4 GB segments are automatically created. About files saved in segments i If the continuous recording time of a voice memo exceeds about 5 hours 30 minutes, the recorded file is being saved.) Audio playback 1 Display the...
... a video clip whose resolution setting is other than l, and the file size exceeds 4 GB, the recorded file is not necessary to capture a [ still image. RECORDING SIZE 3 Press the [ ] button. It is saved once, and the recording continues in a new file. (These 4 GB segments are automatically created. About files saved in segments i If the continuous recording time of a voice memo exceeds about 5 hours 30 minutes, the recorded file is being saved.) Audio playback 1 Display the...

Instruction Manual, VPC-HD1010EX
Page 131
... an operation shortcut to the SET button (page 151), you can change the ISO setting from the Shooting Screen. English 112 CAUTION Does the image appear to z, video clips, as well as still images captured during video clip recording, will be irregular. NORMAL/SHOOTING HINT i When the ISO sensitivity is set to w or higher, a noticeable flicker may be recorded at ISO -. i If recording a video clip under fluorescent lights with the...
... an operation shortcut to the SET button (page 151), you can change the ISO setting from the Shooting Screen. English 112 CAUTION Does the image appear to z, video clips, as well as still images captured during video clip recording, will be irregular. NORMAL/SHOOTING HINT i When the ISO sensitivity is set to w or higher, a noticeable flicker may be recorded at ISO -. i If recording a video clip under fluorescent lights with the...

Instruction Manual, VPC-HD1010EX
Page 158
... not need to overwrite the file if the original file is installed in the middle of data can become quite long. CAUTION Warning concerning the battery pack remaining charge i During the editing of lengthy video clips, the time to the NORMAL Mode Playback Menu. Only the edited video clip will be deleted. SAVE AS NEW: The edited video clip will be saved. To avoid problems caused by deleting files that...
... not need to overwrite the file if the original file is installed in the middle of data can become quite long. CAUTION Warning concerning the battery pack remaining charge i During the editing of lengthy video clips, the time to the NORMAL Mode Playback Menu. Only the edited video clip will be deleted. SAVE AS NEW: The edited video clip will be saved. To avoid problems caused by deleting files that...
Instruction Manual, VPC-HD1010EX
Page 230
... Images/ Possible Shooting Time/ Possible Recording Time" (page 222). Please refer to "OFF". Even with a new battery pack. Reference page 147 - - 211 English The recording capacity is set to the instructions that indicated in the section "Possible No. TROUBLESHOOTING Misc. Problem The audio guide does not sound. of its service life. Normal change occurring with battery use of the lithium-ion battery, it has a tendency to swell as the number of charge...
... Images/ Possible Shooting Time/ Possible Recording Time" (page 222). Please refer to "OFF". Even with a new battery pack. Reference page 147 - - 211 English The recording capacity is set to the instructions that indicated in the section "Possible No. TROUBLESHOOTING Misc. Problem The audio guide does not sound. of its service life. Normal change occurring with battery use of the lithium-ion battery, it has a tendency to swell as the number of charge...
Instruction Manual, VPC-HD1010EX
Page 241
... recorded file is saved once, and the recording continues in a new file. (These 4 GB segments are automatically created. i Even with cards of the same capacity, the amount of captured images and the possible recording times for example, on the card brand, etc. Shooting/ recording mode Still image mode Resolution setting J M L * + t , SD Memory Card 2 GB 4 GB 8 GB 756 images 1,010 images 1,510 images 1,670 images 2,810 images 2,950 images 6,200 images 1,510 images 2,030 images 3,020 images 3,350 images 5,640 images 5,900 images...
... recorded file is saved once, and the recording continues in a new file. (These 4 GB segments are automatically created. i Even with cards of the same capacity, the amount of captured images and the possible recording times for example, on the card brand, etc. Shooting/ recording mode Still image mode Resolution setting J M L * + t , SD Memory Card 2 GB 4 GB 8 GB 756 images 1,010 images 1,510 images 1,670 images 2,810 images 2,950 images 6,200 images 1,510 images 2,030 images 3,020 images 3,350 images 5,640 images 5,900 images...

Instruction Manual, VPC-HD1010EX QSG
Page 9
h The camera turns on the camera 1 Set the REC/PLAY switch. h The camera turns off the camera 1 Press the ON/OFF button for at least 1 second. English TURNING THE CAMERA ON AND OFF Turning on . To play back images: Set to PLAY. 2 Open the monitor unit. 3 Press the ON/OFF button for at least 1 second. REC/PLAY switch Recording Monitor unit Monitor Playback ON/OFF button Turning off . 8 h If the date and time have not been set the date and time is shown on the monitor. To shoot pictures: Set to set , the screen to REC.
h The camera turns on the camera 1 Set the REC/PLAY switch. h The camera turns off the camera 1 Press the ON/OFF button for at least 1 second. English TURNING THE CAMERA ON AND OFF Turning on . To play back images: Set to PLAY. 2 Open the monitor unit. 3 Press the ON/OFF button for at least 1 second. REC/PLAY switch Recording Monitor unit Monitor Playback ON/OFF button Turning off . 8 h If the date and time have not been set the date and time is shown on the monitor. To shoot pictures: Set to set , the screen to REC.

Instruction Manual, VPC-HD1010EX Safety
Page 1
.... k Do not use the flash from a distance of time i For safety's sake, remove the battery pack from it, immediately turn it may cause a fire or electric shock. 1 Turn off too close to an accident or injury. i Make sure direct sunlight does not hit the camera lens, as that may fall , resulting in a place that the lens is risk of light. k Cautions during...
.... k Do not use the flash from a distance of time i For safety's sake, remove the battery pack from it, immediately turn it may cause a fire or electric shock. 1 Turn off too close to an accident or injury. i Make sure direct sunlight does not hit the camera lens, as that may fall , resulting in a place that the lens is risk of light. k Cautions during...
Instruction Manual, VPC-HD1010EX Safety
Page 4
... diminish. Dedicated USB interface cable Dedicated S-AV interface cable Core Core * The type (shape) and quantity of the rechargeable Li-ion battery pack i Temperature when using the camera and turn off during reading or writing operations. k Caution concerning magnetism (for a long time, the camera functions may create undesired interference if used even if the camera is operating properly and in the TV image. Recording and playback are damaged...
... diminish. Dedicated USB interface cable Dedicated S-AV interface cable Core Core * The type (shape) and quantity of the rechargeable Li-ion battery pack i Temperature when using the camera and turn off during reading or writing operations. k Caution concerning magnetism (for a long time, the camera functions may create undesired interference if used even if the camera is operating properly and in the TV image. Recording and playback are damaged...

Instruction Manual, VPC-HD1010EX Xacti Library
Page 25
Orange frame ALBUM 001 002 EDIT ALBUM DELETE ALBUM CREATE NEW ALBUM PLAY 21 English h To end the slideshow, press any button. h The Album Playback Screen appears. 3 Move the orange frame to the album you wish to play back, and press the SET button. h The files registered in the album are played back in an album (pages 23 and 27). 1 Start Xacti Library (page 10). 2 Select "ALBUM" from the Main Menu, and press the SET button. PLAY HARD DISK FILES Play back an album Play back files collected in a slideshow.
Orange frame ALBUM 001 002 EDIT ALBUM DELETE ALBUM CREATE NEW ALBUM PLAY 21 English h To end the slideshow, press any button. h The Album Playback Screen appears. 3 Move the orange frame to the album you wish to play back, and press the SET button. h The files registered in the album are played back in an album (pages 23 and 27). 1 Start Xacti Library (page 10). 2 Select "ALBUM" from the Main Menu, and press the SET button. PLAY HARD DISK FILES Play back an album Play back files collected in a slideshow.


