
Instruction Manual, VPC-HD1010EX
Page 6
... 1 Set the REC/PLAY switch to REC. 2 Press the ON/OFF button for recorded contents etc. h A still image is set up and ready to go i Sanyo declines any claim for compensation for at least 1 second to end the recording. h If the screen to set the date and time, see page 43...: Monitor h Press the [ ] button to a chance camera or card flaw. in case of photographing or recording failure due to begin recording a video clip. SHOOT, PLAY BACK AND SAVE Before capturing those important shots, be sure to first take a photo: h Press the [ ] button. REC/PLAY switch Set to ...
... 1 Set the REC/PLAY switch to REC. 2 Press the ON/OFF button for recorded contents etc. h A still image is set up and ready to go i Sanyo declines any claim for compensation for at least 1 second to end the recording. h If the screen to set the date and time, see page 43...: Monitor h Press the [ ] button to a chance camera or card flaw. in case of photographing or recording failure due to begin recording a video clip. SHOOT, PLAY BACK AND SAVE Before capturing those important shots, be sure to first take a photo: h Press the [ ] button. REC/PLAY switch Set to ...
Instruction Manual, VPC-HD1010EX
Page 7
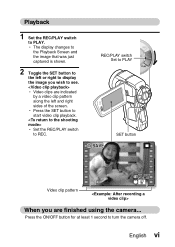
REC/PLAY switch Set to PLAY SAVE SET button PLAY Video clip pattern When you are indicated by a video clip pattern along the left or right to display the image you wish to the left and right sides of the screen. h The display changes ...to the Playback Screen and the image that was just captured is shown. 2 Toggle the SET button to see. English vi h Video clips are finished using the camera... Playback 1 Set the REC/PLAY switch to REC. h Set the REC/PLAY switch to PLAY. h Press the SET button...
REC/PLAY switch Set to PLAY SAVE SET button PLAY Video clip pattern When you are indicated by a video clip pattern along the left or right to display the image you wish to the left and right sides of the screen. h The display changes ...to the Playback Screen and the image that was just captured is shown. 2 Toggle the SET button to see. English vi h Video clips are finished using the camera... Playback 1 Set the REC/PLAY switch to REC. h Set the REC/PLAY switch to PLAY. h Press the SET button...

Instruction Manual, VPC-HD1010EX
Page 8
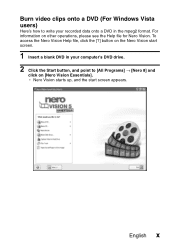
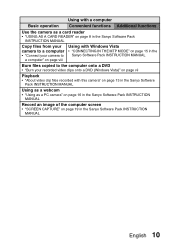
... window opens. 2 Click on the [OK] button. vii English Detailed information about the Sanyo Software Pack can store your computer's DVD drive. Install application programs 1 Set the supplied CD-ROM in the Sanyo Software Pack INSTRUCTION MANUAL. h When the installation window closes, a dialog box to connect to... Check the [No thanks!] option button, and then click on [Nero 8 Essentials]. SHOOT, PLAY BACK AND SAVE Burn your recorded video clips onto a DVD (Windows Vista) Using the supplied CD-ROM (Sanyo Software Pack), you can be found on page 4 in your captured images on a DVD.
... window opens. 2 Click on the [OK] button. vii English Detailed information about the Sanyo Software Pack can store your computer's DVD drive. Install application programs 1 Set the supplied CD-ROM in the Sanyo Software Pack INSTRUCTION MANUAL. h When the installation window closes, a dialog box to connect to... Check the [No thanks!] option button, and then click on [Nero 8 Essentials]. SHOOT, PLAY BACK AND SAVE Burn your recorded video clips onto a DVD (Windows Vista) Using the supplied CD-ROM (Sanyo Software Pack), you can be found on page 4 in your captured images on a DVD.
Instruction Manual, VPC-HD1010EX
Page 11
English x h Nero Vision starts up, and the start screen. 1 Insert a blank DVD in your recorded data onto a DVD in the mpeg2 format. Burn video clips onto a DVD (For Windows Vista users) Here's how to write your computer's DVD drive. 2 Click the Start button, and point to [All Programs] → [Nero 8] and click on [Nero Vision Essentials]. For information on the Nero Vision start screen appears. To access the Nero Vision Help file, click the [?] button on other operations, please see the Help file for Nero Vision.
English x h Nero Vision starts up, and the start screen. 1 Insert a blank DVD in your recorded data onto a DVD in the mpeg2 format. Burn video clips onto a DVD (For Windows Vista users) Here's how to write your computer's DVD drive. 2 Click the Start button, and point to [All Programs] → [Nero 8] and click on [Nero Vision Essentials]. For information on the Nero Vision start screen appears. To access the Nero Vision Help file, click the [?] button on other operations, please see the Help file for Nero Vision.
Instruction Manual, VPC-HD1010EX
Page 12
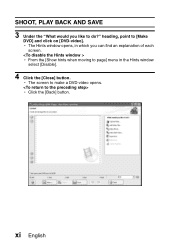
heading, point to do?" h The Hints window opens, in the Hints window select [Disable]. 4 Click the [Close] button. h From the [Show hints when moving to make a DVD-video opens. h Click the [Back] button. xi English SHOOT, PLAY BACK AND SAVE 3 Under the "What would you can find an explanation of each screen. h The screen to page] menu in which you like to [Make DVD] and click on [DVD-video].
heading, point to do?" h The Hints window opens, in the Hints window select [Disable]. 4 Click the [Close] button. h From the [Show hints when moving to make a DVD-video opens. h Click the [Back] button. xi English SHOOT, PLAY BACK AND SAVE 3 Under the "What would you can find an explanation of each screen. h The screen to page] menu in which you like to [Make DVD] and click on [DVD-video].

Instruction Manual, VPC-HD1010EX
Page 13
h Click on a file to burn to DVD. h The selected files are shown in the "Content" field. 5 Under the "What would you like to DVD opens. 6 Click on the files while holding down the [Ctrl] key. 7 Click the [Open] button. h The window to select files to burn to do?" English xii heading, click [Add video files].
h Click on a file to burn to DVD. h The selected files are shown in the "Content" field. 5 Under the "What would you like to DVD opens. 6 Click on the files while holding down the [Ctrl] key. 7 Click the [Open] button. h The window to select files to burn to do?" English xii heading, click [Add video files].
Instruction Manual, VPC-HD1010EX
Page 21
... Select the recording size 71 Select the focus setting 72 Hints for taking pictures 73 VIDEO CLIP RECORDING 74 SHOOTING SINGLE SHOTS 75 Using the flash 77 SHOOT A STILL IMAGE WHILE RECORDING A VIDEO CLIP ..........79 MACRO-PHOTOGRAPHY (ZOOM 81 PLAYBACK SHOOTING AND PLAYBACK WITH THE REMOTE CONTROL ...UNIT 82 PLAYING BACK VIDEO CLIPS AND STILL IMAGES 83 How to save one frame from a video clip as a still image 85 SLIDESHOW PLAYBACK 86 PLAYBACK VOLUME 87 DELETING FILES 88 PLAYBACK MODES 90 ...
... Select the recording size 71 Select the focus setting 72 Hints for taking pictures 73 VIDEO CLIP RECORDING 74 SHOOTING SINGLE SHOTS 75 Using the flash 77 SHOOT A STILL IMAGE WHILE RECORDING A VIDEO CLIP ..........79 MACRO-PHOTOGRAPHY (ZOOM 81 PLAYBACK SHOOTING AND PLAYBACK WITH THE REMOTE CONTROL ...UNIT 82 PLAYING BACK VIDEO CLIPS AND STILL IMAGES 83 How to save one frame from a video clip as a still image 85 SLIDESHOW PLAYBACK 86 PLAYBACK VOLUME 87 DELETING FILES 88 PLAYBACK MODES 90 ...
Instruction Manual, VPC-HD1010EX
Page 22
... ROTATE STILL IMAGE 131 REDUCE STILL IMAGE SIZE (RESIZE 132 CORRECTING THE CONTRAST 133 EDITING VIDEO CLIPS 135 Procedure to cut (extract) a portion of a video clip 135 Procedure to join video clips 136 Video clip cutting (extracting 137 Joining video clips 140 DISPLAYING FILE PROPERTIES (INFORMATION SCREEN) ........ 143 „ OPTION SETTINGS DISPLAY THE OPTION SETTING...
... ROTATE STILL IMAGE 131 REDUCE STILL IMAGE SIZE (RESIZE 132 CORRECTING THE CONTRAST 133 EDITING VIDEO CLIPS 135 Procedure to cut (extract) a portion of a video clip 135 Procedure to join video clips 136 Video clip cutting (extracting 137 Joining video clips 140 DISPLAYING FILE PROPERTIES (INFORMATION SCREEN) ........ 143 „ OPTION SETTINGS DISPLAY THE OPTION SETTING...

Instruction Manual, VPC-HD1010EX
Page 23
... DEVICES AND CONNECTIONS CONNECTING TO A TV CONNECTING TO A STANDARD VIDEO INPUT TERMINAL ..........177 ENJOY HIGHER IMAGE QUALITY 178 Connect to the S-VIDEO terminal 178 Connect to the 480p/720p/1080i terminal 179 Connecting to the HDMI terminal 180 PLAYING BACK ON A TV 181 Xacti Library 182 CONNECTING TO A PRINTER PictBridge MODE 183 PRINTING 185...
... DEVICES AND CONNECTIONS CONNECTING TO A TV CONNECTING TO A STANDARD VIDEO INPUT TERMINAL ..........177 ENJOY HIGHER IMAGE QUALITY 178 Connect to the S-VIDEO terminal 178 Connect to the 480p/720p/1080i terminal 179 Connecting to the HDMI terminal 180 PLAYING BACK ON A TV 181 Xacti Library 182 CONNECTING TO A PRINTER PictBridge MODE 183 PRINTING 185...
Instruction Manual, VPC-HD1010EX
Page 25
..." on page 153 Optimize the photo quality • "Select the recording size" on page 71 • "RECORDING SIZE" on page 93 Reduce video clip flicker • "FLICKER-REDUCTION" on page 156 Set the camera's color/contrast characteristics • "ADJUST THE IMAGE QUALITY" on page 155... on page 43 Zoom in on the subject • "MACRO- Shooting/recording Basic operation Convenient functions Additional functions Getting started shooting/recording • "VIDEO CLIP RECORDING" on page 74 • "SHOOTING SINGLE SHOTS" on page 75 • "Sequential shots" on page 95 • "Audio recording"...
..." on page 153 Optimize the photo quality • "Select the recording size" on page 71 • "RECORDING SIZE" on page 93 Reduce video clip flicker • "FLICKER-REDUCTION" on page 156 Set the camera's color/contrast characteristics • "ADJUST THE IMAGE QUALITY" on page 155... on page 43 Zoom in on the subject • "MACRO- Shooting/recording Basic operation Convenient functions Additional functions Getting started shooting/recording • "VIDEO CLIP RECORDING" on page 74 • "SHOOTING SINGLE SHOTS" on page 75 • "Sequential shots" on page 95 • "Audio recording"...

Instruction Manual, VPC-HD1010EX
Page 27
Playback Basic operation Convenient functions Additional functions Getting started viewing images • "PLAYING BACK VIDEO CLIPS AND STILL IMAGES" on page 83 Adjust the speaker volume • "PLAYBACK VOLUME" on page 87 Search for image/ audio files • "9-image display ... Playback on a TV • "PLAYING BACK ON A TV" on page 181 Set the TV system • "TV OUTPUT SETTING" on page 160 How to use Xacti Library • "Xacti Library" on page 182 English 8
Playback Basic operation Convenient functions Additional functions Getting started viewing images • "PLAYING BACK VIDEO CLIPS AND STILL IMAGES" on page 83 Adjust the speaker volume • "PLAYBACK VOLUME" on page 87 Search for image/ audio files • "9-image display ... Playback on a TV • "PLAYING BACK ON A TV" on page 181 Set the TV system • "TV OUTPUT SETTING" on page 160 How to use Xacti Library • "Xacti Library" on page 182 English 8
Instruction Manual, VPC-HD1010EX
Page 28
... Protect files from accidental erasure • "FILE PROTECT" on page 124 Format a card • "FORMATTING A CARD" on page 170 Delete a part of a video clip and join video clips • "EDITING VIDEO CLIPS" on page 135 Specify the number of prints, index print, and date imprint • "PRINTING INSTRUCTIONS" on page 125 View the...
... Protect files from accidental erasure • "FILE PROTECT" on page 124 Format a card • "FORMATTING A CARD" on page 170 Delete a part of a video clip and join video clips • "EDITING VIDEO CLIPS" on page 135 Specify the number of prints, index print, and date imprint • "PRINTING INSTRUCTIONS" on page 125 View the...
Instruction Manual, VPC-HD1010EX
Page 29
...CONNECTING IN THE MTP MODE" on page 15 in the Sanyo Software Pack INSTRUCTION MANUAL Burn files copied to the computer onto a DVD • "Burn your recorded video clips onto a DVD (Windows Vista)" on page vii Playback • "About video clip files recorded with this camera" on page 13 in ...the Sanyo Software Pack INSTRUCTION MANUAL Using as a webcam • "Using as a PC camera...
...CONNECTING IN THE MTP MODE" on page 15 in the Sanyo Software Pack INSTRUCTION MANUAL Burn files copied to the computer onto a DVD • "Burn your recorded video clips onto a DVD (Windows Vista)" on page vii Playback • "About video clip files recorded with this camera" on page 13 in ...the Sanyo Software Pack INSTRUCTION MANUAL Using as a webcam • "Using as a PC camera...

Instruction Manual, VPC-HD1010EX
Page 36
...high definition (full HD) 1920 × 1080-pixel, 60 fields/s video clips. You get both compact file size and high picture quality in one high-performance camera. * "Full High Definition" by SANYO Digital Movie Camera signifies recording at a resolution of 1920 pixels horizontally ...×1080 pixels vertically (when recording in Full High Definition*. High-quality images with the "Xacti Library" feature for formatting video files. In addition, it comes with "...
...high definition (full HD) 1920 × 1080-pixel, 60 fields/s video clips. You get both compact file size and high picture quality in one high-performance camera. * "Full High Definition" by SANYO Digital Movie Camera signifies recording at a resolution of 1920 pixels horizontally ...×1080 pixels vertically (when recording in Full High Definition*. High-quality images with the "Xacti Library" feature for formatting video files. In addition, it comes with "...

Instruction Manual, VPC-HD1010EX
Page 37
... two shooting/playback modes: the "SIMPLE mode" for users new to capture a fast-moving subject or zoom in on board. Image stabilizer functions for both video clip recording and still image shots are on a subject.
... two shooting/playback modes: the "SIMPLE mode" for users new to capture a fast-moving subject or zoom in on board. Image stabilizer functions for both video clip recording and still image shots are on a subject.

Instruction Manual, VPC-HD1010EX
Page 73
... item appears. h The Setting Screen for which the selected setting is effective. : This setting is effective during still image shooting. : This setting is effective during video clip recording. : This setting is effective during still image shooting and video clip recording. SETUP Select an item to the Menu Screen, press the MENU button.
... item appears. h The Setting Screen for which the selected setting is effective. : This setting is effective during still image shooting. : This setting is effective during video clip recording. : This setting is effective during still image shooting and video clip recording. SETUP Select an item to the Menu Screen, press the MENU button.
Instruction Manual, VPC-HD1010EX
Page 75
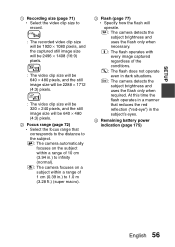
SETUP 1 Recording size (page 71) h Select the video clip size to 1.0 m (3.28 ft.) (super macro). 3 Flash (page 77) h Specify how the flash ... of the conditions. ;: The flash does not operate even in .) to record. 4 : The recorded video clip size will be 2496 × 1408 (16:9) pixels. b : The video clip size will be 640 × 480 pixels, and the still image size will be 2288 ×... 1712 (4:3) pixels. 6 : The video clip size will be 320 × 240 pixels, and the still image size will be 640 × 480 (4:3) pixels...
SETUP 1 Recording size (page 71) h Select the video clip size to 1.0 m (3.28 ft.) (super macro). 3 Flash (page 77) h Specify how the flash ... of the conditions. ;: The flash does not operate even in .) to record. 4 : The recorded video clip size will be 2496 × 1408 (16:9) pixels. b : The video clip size will be 640 × 480 pixels, and the still image size will be 2288 ×... 1712 (4:3) pixels. 6 : The video clip size will be 320 × 240 pixels, and the still image size will be 640 × 480 (4:3) pixels...
Instruction Manual, VPC-HD1010EX
Page 77
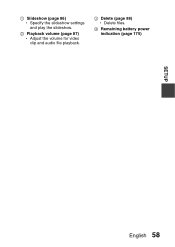
1 Slideshow (page 86) h Specify the slideshow settings and play the slideshow. 2 Playback volume (page 87) h Adjust the volume for video clip and audio file playback. 3 Delete (page 88) h Delete files. 4 Remaining battery power indication (page 175) SETUP English 58
1 Slideshow (page 86) h Specify the slideshow settings and play the slideshow. 2 Playback volume (page 87) h Adjust the volume for video clip and audio file playback. 3 Delete (page 88) h Delete files. 4 Remaining battery power indication (page 175) SETUP English 58
Instruction Manual, VPC-HD1010EX
Page 79
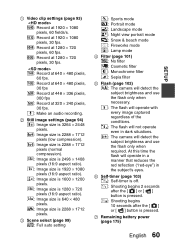
... flash will operate in a manner that reduces the red reflection ("red-eye") in dark situations. x: Shooting begins 10 seconds after the [ ] or [ ] button is pressed. 1 Video clip settings (page 93) !: Record at 1920 × 1080 pixels, 30 fps. n: The camera will detect the subject brightness and use the flash only when...
... flash will operate in a manner that reduces the red reflection ("red-eye") in dark situations. x: Shooting begins 10 seconds after the [ ] or [ ] button is pressed. 1 Video clip settings (page 93) !: Record at 1920 × 1080 pixels, 30 fps. n: The camera will detect the subject brightness and use the flash only when...

Instruction Manual, VPC-HD1010EX
Page 81
...to ISO 200 w: Sets sensitivity to ISO 400 6: Sets sensitivity to ISO 800 -: Sets sensitivity to ISO 1600 z: Sets sensitivity to ISO 3200 (video clip recording: ISO 1600) * The indicated ISO value is set manually. +: The camera focuses on the subject within a range of 10 cm ...(total range). *: The camera automatically focuses on the subject within a range of 1 cm (0.39 in .) to infinity (normal). -: The focus can be set automatically (video clip recording: ISO 50 to 1.0 m (3.28 ft.) (super macro). 4 Focus area (page 109) B: 9-point range finder focus C: Spot focus 5 Light-measuring mode...
...to ISO 200 w: Sets sensitivity to ISO 400 6: Sets sensitivity to ISO 800 -: Sets sensitivity to ISO 1600 z: Sets sensitivity to ISO 3200 (video clip recording: ISO 1600) * The indicated ISO value is set manually. +: The camera focuses on the subject within a range of 10 cm ...(total range). *: The camera automatically focuses on the subject within a range of 1 cm (0.39 in .) to infinity (normal). -: The focus can be set automatically (video clip recording: ISO 50 to 1.0 m (3.28 ft.) (super macro). 4 Focus area (page 109) B: 9-point range finder focus C: Spot focus 5 Light-measuring mode...


