Instruction Manual
Page 6
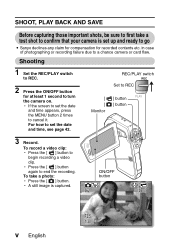
... the MENU button 2 times to REC [ [ Monitor ] button ] button 3 Record. h Press the [ ] button again to set the date and time, see page 42. For how to end the recording. Shooting 1 Set the REC/PLAY switch to REC. 2 Press the ON/OFF button for at least 1 second to go i Sanyo declines any claim for compensation for recorded contents etc. SHOOT, PLAY BACK AND SAVE Before capturing those important shots, be sure to first take a photo: button h Press the [ ] button. To record a video...
... the MENU button 2 times to REC [ [ Monitor ] button ] button 3 Record. h Press the [ ] button again to set the date and time, see page 42. For how to end the recording. Shooting 1 Set the REC/PLAY switch to REC. 2 Press the ON/OFF button for at least 1 second to go i Sanyo declines any claim for compensation for recorded contents etc. SHOOT, PLAY BACK AND SAVE Before capturing those important shots, be sure to first take a photo: button h Press the [ ] button. To record a video...
Instruction Manual
Page 7
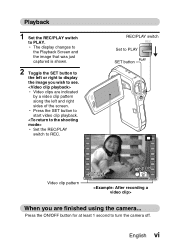
h Press the SET button to REC. h Set the REC/PLAY switch to start video clip playback. Playback 1 Set the REC/PLAY switch to turn the camera off. h The display changes to the Playback Screen and the image that was just captured is shown. 2 Toggle the SET button to see. REC/PLAY switch Set to PLAY SET button Video clip pattern 2007.12.24 PLAY When you are indicated by a video clip pattern along the left or right to display the image you wish to the left and...
h Press the SET button to REC. h Set the REC/PLAY switch to start video clip playback. Playback 1 Set the REC/PLAY switch to turn the camera off. h The display changes to the Playback Screen and the image that was just captured is shown. 2 Toggle the SET button to see. REC/PLAY switch Set to PLAY SET button Video clip pattern 2007.12.24 PLAY When you are indicated by a video clip pattern along the left or right to display the image you wish to the left and...
Instruction Manual
Page 16
... THE REMOTE CONTROL UNIT 29 Prepare the battery 29 How to use the remote control unit 30 PREPARING THE POWER 32 Charging the battery pack 32 When using a power outlet 36 About recharging 38 TURNING THE CAMERA ON AND OFF 39 Turning on the camera 39 Turning on the camera when the power save (sleep) mode is active 40 Turning off the camera 40 DATE AND TIME SETTING 42 SWITCHING BETWEEN THE SHOOTING MODE AND PLAYBACK MODE 45 SIMPLE MODE/NORMAL MODE...
... THE REMOTE CONTROL UNIT 29 Prepare the battery 29 How to use the remote control unit 30 PREPARING THE POWER 32 Charging the battery pack 32 When using a power outlet 36 About recharging 38 TURNING THE CAMERA ON AND OFF 39 Turning on the camera 39 Turning on the camera when the power save (sleep) mode is active 40 Turning off the camera 40 DATE AND TIME SETTING 42 SWITCHING BETWEEN THE SHOOTING MODE AND PLAYBACK MODE 45 SIMPLE MODE/NORMAL MODE...
Instruction Manual
Page 17
... the recording size 71 Select the focus setting 72 Hints for taking pictures 73 VIDEO CLIP RECORDING 74 SHOOTING SINGLE SHOTS 75 Using the flash 77 SHOOT A STILL IMAGE WHILE RECORDING A VIDEO CLIP ..........78 MACRO-PHOTOGRAPHY (ZOOM 80 SHOOTING AND PLAYBACK WITH THE REMOTE CONTROL UNIT 81 PLAYBACK PLAYING BACK VIDEO CLIPS AND STILL IMAGES 82 SLIDESHOW PLAYBACK 85 PLAYBACK VOLUME 86 DELETING FILES 87 PLAYBACK MODES 89 9-image display playback 89 Selecting the playback folder 90 Magnifying (zooming in) the image 91 „ NORMAL SHOOTING RECORDING SIZE 92 Movies...
... the recording size 71 Select the focus setting 72 Hints for taking pictures 73 VIDEO CLIP RECORDING 74 SHOOTING SINGLE SHOTS 75 Using the flash 77 SHOOT A STILL IMAGE WHILE RECORDING A VIDEO CLIP ..........78 MACRO-PHOTOGRAPHY (ZOOM 80 SHOOTING AND PLAYBACK WITH THE REMOTE CONTROL UNIT 81 PLAYBACK PLAYING BACK VIDEO CLIPS AND STILL IMAGES 82 SLIDESHOW PLAYBACK 85 PLAYBACK VOLUME 86 DELETING FILES 87 PLAYBACK MODES 89 9-image display playback 89 Selecting the playback folder 90 Magnifying (zooming in) the image 91 „ NORMAL SHOOTING RECORDING SIZE 92 Movies...
Instruction Manual
Page 18
... Procedure to join video clips 134 Video clip cutting (extracting 135 Joining video clips 138 DISPLAYING FILE PROPERTIES (INFORMATION SCREEN) ........ 141 „ OPTION SETTINGS DISPLAY THE OPTION SETTING MENU 142 SCREEN DISPLAY 143 SELECT THE STARTUP DISPLAY 144 OPERATION SOUNDS 145 POST-VIEW DISPLAY SETTING 147 SPECIFY A FOLDER TO SAVE FILES 148 ASSIGN SET BUTTON FUNCTIONS 149 NOISE-REDUCTION FUNCTION 151 ADJUST THE IMAGE QUALITY 152 FLICKER-REDUCTION 153 MONITOR BRIGHTNESS 154 SCREEN LANGUAGE 155 TV OUTPUT SETTING 156 POWER SAVE FUNCTION 160 3 English
... Procedure to join video clips 134 Video clip cutting (extracting 135 Joining video clips 138 DISPLAYING FILE PROPERTIES (INFORMATION SCREEN) ........ 141 „ OPTION SETTINGS DISPLAY THE OPTION SETTING MENU 142 SCREEN DISPLAY 143 SELECT THE STARTUP DISPLAY 144 OPERATION SOUNDS 145 POST-VIEW DISPLAY SETTING 147 SPECIFY A FOLDER TO SAVE FILES 148 ASSIGN SET BUTTON FUNCTIONS 149 NOISE-REDUCTION FUNCTION 151 ADJUST THE IMAGE QUALITY 152 FLICKER-REDUCTION 153 MONITOR BRIGHTNESS 154 SCREEN LANGUAGE 155 TV OUTPUT SETTING 156 POWER SAVE FUNCTION 160 3 English
Instruction Manual
Page 19
FILE NO. MEMORY 162 FORMATTING A CARD 165 RESETTING THE CAMERA SETTINGS 167 CHECKING THE REMAINING CARD MEMORY 168 Checking the remaining number of Images/Possible Shooting Time/ Possible Recording Time 216 English 4 of images and video recording time 168 For audio recordings 168 CHECKING THE REMAINING BATTERY PACK CHARGE 170 „ OTHER DEVICES AND CONNECTIONS CONNECTING TO A TV CONNECTING TO A STANDARD VIDEO INPUT TERMINAL ..........172 ENJOY HIGHER IMAGE QUALITY 173 Connect to the S-VIDEO terminal 173 Connect to the 480p/720p terminal 174 Connecting to the HDMI terminal 175...
FILE NO. MEMORY 162 FORMATTING A CARD 165 RESETTING THE CAMERA SETTINGS 167 CHECKING THE REMAINING CARD MEMORY 168 Checking the remaining number of Images/Possible Shooting Time/ Possible Recording Time 216 English 4 of images and video recording time 168 For audio recordings 168 CHECKING THE REMAINING BATTERY PACK CHARGE 170 „ OTHER DEVICES AND CONNECTIONS CONNECTING TO A TV CONNECTING TO A STANDARD VIDEO INPUT TERMINAL ..........172 ENJOY HIGHER IMAGE QUALITY 173 Connect to the S-VIDEO terminal 173 Connect to the 480p/720p terminal 174 Connecting to the HDMI terminal 175...
Instruction Manual
Page 21
...; "MOVIE MOTION COMPENSATION (IMAGE STABILIZER)" on page 104 • "CORRECTING CAMERA SHAKE AND RED-EYE EFFECT" on page 130 Shoot in on page 117 English 6 From creating precisely the photo you can locate the exact operation for your photos • "DATE AND TIME SETTING" on page 42 Zoom in dark conditions • "EXPOSURE COMPENSATION" on page 118 • "Using the flash" on page 77 • "FLASH OPERATION" on...
...; "MOVIE MOTION COMPENSATION (IMAGE STABILIZER)" on page 104 • "CORRECTING CAMERA SHAKE AND RED-EYE EFFECT" on page 130 Shoot in on page 117 English 6 From creating precisely the photo you can locate the exact operation for your photos • "DATE AND TIME SETTING" on page 42 Zoom in dark conditions • "EXPOSURE COMPENSATION" on page 118 • "Using the flash" on page 77 • "FLASH OPERATION" on...

Instruction Manual
Page 25
...; "CONNECTING IN THE MTP MODE" on page 14 in the Xacti Software DVD INSTRUCTION MANUAL Burn files copied to the computer onto a DVD • "Burn your recorded video clips onto a DVD (Windows XP)" on page vii Playback • "About video clip files recorded with this camera" on page 13 in the Xacti Software DVD INSTRUCTION MANUAL Using as a webcam • "Using as a PC camera" on page 16 in the Xacti Software DVD INSTRUCTION MANUAL Record an image of the computer screen • "SCREEN CAPTURE...
...; "CONNECTING IN THE MTP MODE" on page 14 in the Xacti Software DVD INSTRUCTION MANUAL Burn files copied to the computer onto a DVD • "Burn your recorded video clips onto a DVD (Windows XP)" on page vii Playback • "About video clip files recorded with this camera" on page 13 in the Xacti Software DVD INSTRUCTION MANUAL Using as a webcam • "Using as a PC camera" on page 16 in the Xacti Software DVD INSTRUCTION MANUAL Record an image of the computer screen • "SCREEN CAPTURE...
Instruction Manual
Page 63
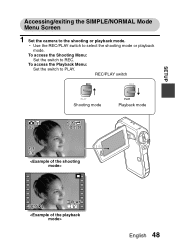
SETUP Accessing/exiting the SIMPLE/NORMAL Mode Menu Screen 1 Set the camera to PLAY. To access the Playback Menu: Set the switch to the shooting or playback mode. REC/PLAY switch Shooting mode Playback mode HD-SHQ 362 00:05:08 F3.5 1/30 2007.12.24 PLAY English 48 h Use the REC/PLAY switch to REC. To access the Shooting Menu: Set the switch to select the shooting mode or playback mode.
SETUP Accessing/exiting the SIMPLE/NORMAL Mode Menu Screen 1 Set the camera to PLAY. To access the Playback Menu: Set the switch to the shooting or playback mode. REC/PLAY switch Shooting mode Playback mode HD-SHQ 362 00:05:08 F3.5 1/30 2007.12.24 PLAY English 48 h Use the REC/PLAY switch to REC. To access the Shooting Menu: Set the switch to select the shooting mode or playback mode.
Instruction Manual
Page 88
... image shot (instant review) i After shooting a picture, you wish to delete the image (for example, when the [ ] button, MENU button or SET button is not possible to the characteristics of a video clip, normal play, reverse play and pause are recorded on the camera's internal memory remaining capacity, in the captured image. i You can be captured about 2 seconds after the flashing red indicator turns off. i When taking pictures with the subject lit from behind . Another image can immediately view...
... image shot (instant review) i After shooting a picture, you wish to delete the image (for example, when the [ ] button, MENU button or SET button is not possible to the characteristics of a video clip, normal play, reverse play and pause are recorded on the camera's internal memory remaining capacity, in the captured image. i You can be captured about 2 seconds after the flashing red indicator turns off. i When taking pictures with the subject lit from behind . Another image can immediately view...
Instruction Manual
Page 89
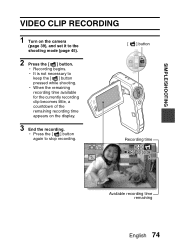
h When the remaining recording time available for the currently recording clip becomes little, a countdown of the remaining recording time appears on the camera (page 39), and set it to the shooting mode (page 45). 2 Press the [ ] button. SIMPLE/SHOOTING VIDEO CLIP RECORDING 1 Turn on the display. 3 End the recording. h It is not necessary to stop recording. [ ] button Recording time HD-SHQ REC 00:00:09 5 Available recording time remaining English 74 h Recording begins. h Press the [ ] button again to keep the [ ] button pressed while shooting.
h When the remaining recording time available for the currently recording clip becomes little, a countdown of the remaining recording time appears on the camera (page 39), and set it to the shooting mode (page 45). 2 Press the [ ] button. SIMPLE/SHOOTING VIDEO CLIP RECORDING 1 Turn on the display. 3 End the recording. h It is not necessary to stop recording. [ ] button Recording time HD-SHQ REC 00:00:09 5 Available recording time remaining English 74 h Recording begins. h Press the [ ] button again to keep the [ ] button pressed while shooting.
Instruction Manual
Page 94
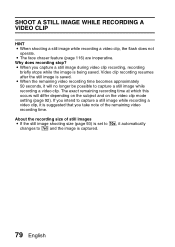
SHOOT A STILL IMAGE WHILE RECORDING A VIDEO CLIP HINT i When shooting a still image while recording a video clip, the flash does not operate. Why does recording stop? The exact remaining recording time at which this occurs will no longer be possible to w and the image is captured. 79 English About the recording size of the remaining video recording time. Video clip recording resumes after the still image is being saved. i The face chaser feature (page 116) are inoperative. i When...
SHOOT A STILL IMAGE WHILE RECORDING A VIDEO CLIP HINT i When shooting a still image while recording a video clip, the flash does not operate. Why does recording stop? The exact remaining recording time at which this occurs will no longer be possible to w and the image is captured. 79 English About the recording size of the remaining video recording time. Video clip recording resumes after the still image is being saved. i The face chaser feature (page 116) are inoperative. i When...

Instruction Manual
Page 101
.../PLAYBACK PLAYBACK VOLUME Adjust the playback volume for video clips and audio files. 1 Display the SIMPLE Mode Playback Menu (page 48), select the playback volume setting, and press the SET button. h The volume control bar appears. In the NORMAL mode i When you to the SIMPLE Mode Playback Menu. VOLUME SETTING HINT The volume can be adjusted during playback i During video clip or audio file playback, if you move the zoom switch, the volume control bar will appear, allowing you select "PLAY VOLUME" from the NORMAL Mode Playback Menu and press the SET button, the volume control...
.../PLAYBACK PLAYBACK VOLUME Adjust the playback volume for video clips and audio files. 1 Display the SIMPLE Mode Playback Menu (page 48), select the playback volume setting, and press the SET button. h The volume control bar appears. In the NORMAL mode i When you to the SIMPLE Mode Playback Menu. VOLUME SETTING HINT The volume can be adjusted during playback i During video clip or audio file playback, if you move the zoom switch, the volume control bar will appear, allowing you select "PLAY VOLUME" from the NORMAL Mode Playback Menu and press the SET button, the volume control...
Instruction Manual
Page 122
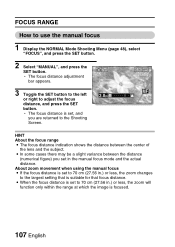
... SET button to the left or right to use the manual focus 1 Display the NORMAL Mode Shooting Menu (page 48), select "FOCUS", and press the SET button. 2 Select "MANUAL", and press the SET button. h The focus distance is set, and you are returned to the Shooting Screen. 2.0m HINT About the focus range i The focus distance indication shows the distance between the distance (numerical figure) you set in .) or less, the zoom will function...
... SET button to the left or right to use the manual focus 1 Display the NORMAL Mode Shooting Menu (page 48), select "FOCUS", and press the SET button. 2 Select "MANUAL", and press the SET button. h The focus distance is set, and you are returned to the Shooting Screen. 2.0m HINT About the focus range i The focus distance indication shows the distance between the distance (numerical figure) you set in .) or less, the zoom will function...
Instruction Manual
Page 152
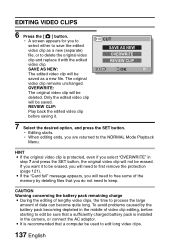
... the SET button, the original video clip will need to free some of data can become quite long. OVERWRITE: The original video clip will be erased. To avoid problems caused by deleting files that a computer be erased, you do not need to delete the original video clip and replace it to be used to the NORMAL Mode Playback Menu. h Editing starts. SAVE AS NEW: The edited video clip will be saved. REVIEW CLIP: Play back...
... the SET button, the original video clip will need to free some of data can become quite long. OVERWRITE: The original video clip will be erased. To avoid problems caused by deleting files that a computer be erased, you do not need to delete the original video clip and replace it to be used to the NORMAL Mode Playback Menu. h Editing starts. SAVE AS NEW: The edited video clip will be saved. REVIEW CLIP: Play back...
Instruction Manual
Page 183
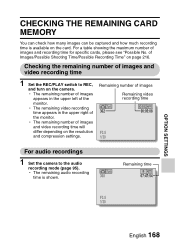
... monitor. h The remaining number of images appears in the upper right of images and recording time for specific cards, please see "Possible No. CHECKING THE REMAINING CARD MEMORY You can check how many images can be captured and how much recording time is shown. 368 Remaining time 07:47:54 F3.5 1/30 OPTION SETTINGS English 168 of images and video recording time 1 Set the REC/PLAY switch to the audio recording mode (page 95). h The remaining audio recording time is available on...
... monitor. h The remaining number of images appears in the upper right of images and recording time for specific cards, please see "Possible No. CHECKING THE REMAINING CARD MEMORY You can check how many images can be captured and how much recording time is shown. 368 Remaining time 07:47:54 F3.5 1/30 OPTION SETTINGS English 168 of images and video recording time 1 Set the REC/PLAY switch to the audio recording mode (page 95). h The remaining audio recording time is available on...
Instruction Manual
Page 211
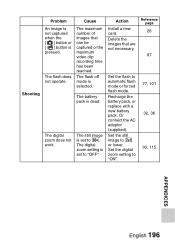
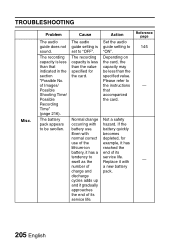
... flash mode. The digital zoom does not work. Action Install a new card. Set the flash to "ON". The flash does not operate. Cause The maximum number of images that are not necessary. Recharge the battery pack, or replace with a new battery pack. Set the still image to E. Or connect the AC adaptor (supplied). The still image is set to "OFF". Reference page 26 87 77, 101 32, 36 93, 115 APPENDICES English...
... flash mode. The digital zoom does not work. Action Install a new card. Set the flash to "ON". The flash does not operate. Cause The maximum number of images that are not necessary. Recharge the battery pack, or replace with a new battery pack. Set the still image to E. Or connect the AC adaptor (supplied). The still image is set to "OFF". Reference page 26 87 77, 101 32, 36 93, 115 APPENDICES English...
Instruction Manual
Page 220
... on the card, the capacity may be swollen. Cause The audio guide setting is less than that accompanied the card. Reference page 145 - - 205 English Action Set the audio guide setting to be less than the specified value. Replace it gradually approaches the end of Images/ Possible Shooting Time/ Possible Recording Time" (page 216). If the battery quickly becomes depleted, for the card. The battery pack appears to "ON". TROUBLESHOOTING Misc.
... on the card, the capacity may be swollen. Cause The audio guide setting is less than that accompanied the card. Reference page 145 - - 205 English Action Set the audio guide setting to be less than the specified value. Replace it gradually approaches the end of Images/ Possible Shooting Time/ Possible Recording Time" (page 216). If the battery quickly becomes depleted, for the card. The battery pack appears to "ON". TROUBLESHOOTING Misc.
Instruction Manual
Page 225
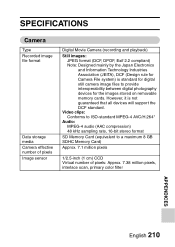
... digital still camera image files to a maximum 8 GB SDHC Memory Card) Approx. 7.1 million pixels 1/2.5-inch (1 cm) CCD Virtual number of pixels Image sensor Digital Movie Camera (recording and playback) Still images: JPEG format (DCF, DPOF, Exif 2.2 compliant) Note: Designed mainly by the Japan Electronics and Information Technology Industries Association (JEITA), DCF (Design rule for Camera File system) is not guaranteed that all devices will support the DCF standard. SPECIFICATIONS Camera Type Recorded image file format Data storage media Camera effective number...
... digital still camera image files to a maximum 8 GB SDHC Memory Card) Approx. 7.1 million pixels 1/2.5-inch (1 cm) CCD Virtual number of pixels Image sensor Digital Movie Camera (recording and playback) Still images: JPEG format (DCF, DPOF, Exif 2.2 compliant) Note: Designed mainly by the Japan Electronics and Information Technology Industries Association (JEITA), DCF (Design rule for Camera File system) is not guaranteed that all devices will support the DCF standard. SPECIFICATIONS Camera Type Recorded image file format Data storage media Camera effective number...
Instruction Manual
Page 231
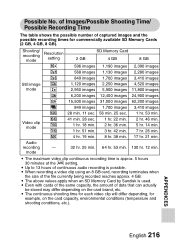
.... of Images/Possible Shooting Time/ Possible Recording Time The table shows the possible number of data that can actually be stored may differ depending on the card capacity, environmental conditions (temperature and shooting conditions, etc.). mode 32 hr. 25 min. 64 hr. 53 min. 130 hr. 12 min. APPENDICES English 216 Shooting/ recording mode Resolution setting E x w SD Memory Card 2 GB 4 GB 596 images 568 images 849 images 1,190 images 1,130 images 1,700 images...
.... of Images/Possible Shooting Time/ Possible Recording Time The table shows the possible number of data that can actually be stored may differ depending on the card capacity, environmental conditions (temperature and shooting conditions, etc.). mode 32 hr. 25 min. 64 hr. 53 min. 130 hr. 12 min. APPENDICES English 216 Shooting/ recording mode Resolution setting E x w SD Memory Card 2 GB 4 GB 596 images 568 images 849 images 1,190 images 1,130 images 1,700 images...


