Owners Manual
Page 2
...LAMP REPLACEMENT. THIS SYMBOL INDICATES THAT THERE ARE IMPORTANT OPERATING AND MAINTENANCE INSTRUCTIONS IN THE OWNER'S MANUAL WITH THIS UNIT. 2 Operating the projector properly enables you purchased the projector or the service center. Do not cover the ventilation slot on yourself or other accidents. q... into Laser Light Window or shine the laser beam on the projector. TO THE OWNER Before operating this projector, read this manual thoroughly and operate the projector properly. Improper operation may result. If the projector is not to be used for 1 minute / LASER POINTER INDICATOR...
...LAMP REPLACEMENT. THIS SYMBOL INDICATES THAT THERE ARE IMPORTANT OPERATING AND MAINTENANCE INSTRUCTIONS IN THE OWNER'S MANUAL WITH THIS UNIT. 2 Operating the projector properly enables you purchased the projector or the service center. Do not cover the ventilation slot on yourself or other accidents. q... into Laser Light Window or shine the laser beam on the projector. TO THE OWNER Before operating this projector, read this manual thoroughly and operate the projector properly. Improper operation may result. If the projector is not to be used for 1 minute / LASER POINTER INDICATOR...
Owners Manual
Page 4
...reasonable protection against harmful interference when the equipment is a safety feature to be sure that visible on the pin face of this projector meets the requirement for your User Instructions. Do not make any changes or modifications to the equipment unless otherwise specified in a ...be cut off and destroyed. COMPLIANCES Federal Communication Commission Notice This equipment has been tested and found to comply with the instruction manual, may not correspond with this equipment in a residential area is likely to cause harmful interference in the United States and Canada...
...reasonable protection against harmful interference when the equipment is a safety feature to be sure that visible on the pin face of this projector meets the requirement for your User Instructions. Do not make any changes or modifications to the equipment unless otherwise specified in a ...be cut off and destroyed. COMPLIANCES Federal Communication Commission Notice This equipment has been tested and found to comply with the instruction manual, may not correspond with this equipment in a residential area is likely to cause harmful interference in the United States and Canada...

Owners Manual
Page 5
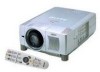
... DESIGN 6 COMPUTER MODE 25 SELECTING INPUT SOURCE 25 PREPARATION 7 SELECTING COMPUTER SYSTEM COMPATIBLE COMPUTER SPECIFICATIONS 25 27 PC ADJUSTMENT 28 NAME OF EACH PART OF PROJECTOR 7 AUTO PC ADJUSTMENT 28 SETTING-UP PROJECTOR 8 MANUAL PC ADJUSTMENT 29 CONNECTING AC POWER CORD 8 PICTURE IMAGE ADJUSTMENT 31 LENS INSTALLATION 9 IMAGE LEVEL SELECT 31 POSITIONING...
... DESIGN 6 COMPUTER MODE 25 SELECTING INPUT SOURCE 25 PREPARATION 7 SELECTING COMPUTER SYSTEM COMPATIBLE COMPUTER SPECIFICATIONS 25 27 PC ADJUSTMENT 28 NAME OF EACH PART OF PROJECTOR 7 AUTO PC ADJUSTMENT 28 SETTING-UP PROJECTOR 8 MANUAL PC ADJUSTMENT 29 CONNECTING AC POWER CORD 8 PICTURE IMAGE ADJUSTMENT 31 LENS INSTALLATION 9 IMAGE LEVEL SELECT 31 POSITIONING...

Owners Manual
Page 6
... tune to reduce power consumption while a projector is not in multimedia features, a palette of 16.77 million colors, and matrix liquid crystal display (LCD) technology. x Laser Pointer Function Remote ...x 1200, reset a computer output for portability, durability, and ease of signals from a computer between XGA (1024 x 768) and UXGA (1600 x 1200) is compressed into progressive scan signals and provide... High Resolution Image This projector provides 1024 x 768 dots resolution for troublesome manual adjustment of a projector may result in distorted image being displayed in a trapezoid shape...
... tune to reduce power consumption while a projector is not in multimedia features, a palette of 16.77 million colors, and matrix liquid crystal display (LCD) technology. x Laser Pointer Function Remote ...x 1200, reset a computer output for portability, durability, and ease of signals from a computer between XGA (1024 x 768) and UXGA (1600 x 1200) is compressed into progressive scan signals and provide... High Resolution Image This projector provides 1024 x 768 dots resolution for troublesome manual adjustment of a projector may result in distorted image being displayed in a trapezoid shape...

Owners Manual
Page 9
...Make sure that there are no objects under a projector may damage lens, cabinet, or mechanical parts. For specifications of a Projector Lens, refer to Lens Replacement and Installation Manual in this projector and install the lens properly. It may prevent a projector from any object. ROOM LIGHT Brightness in a...to hold or subject lens to strong forces. POSITIONING PROJECTOR This projector is designed to ensure proper ventilation and avoid a possible risk of lens, refer to Lens Replacement and Installation Manual in this projector When moving or setting up or down with cooling ...
...Make sure that there are no objects under a projector may damage lens, cabinet, or mechanical parts. For specifications of a Projector Lens, refer to Lens Replacement and Installation Manual in this projector and install the lens properly. It may prevent a projector from any object. ROOM LIGHT Brightness in a...to hold or subject lens to strong forces. POSITIONING PROJECTOR This projector is designed to ensure proper ventilation and avoid a possible risk of lens, refer to Lens Replacement and Installation Manual in this projector When moving or setting up or down with cooling ...
Owners Manual
Page 26
...Auto ---- Make sure connection of computer and a projector is displayed on this projector and PC system can be also selected manually. 1 Press MENU button and ON-SCREEN MENU will appear. Custom Mode (1~5) set in this projector automatically tunes to incoming signal and projects proper image ... P29 and 30.) There is displayed on page 27). When selecting Computer, this projector, Auto PC Adjustment function operates to adjust projector and message "Auto" is set , and then press SELECT button. D-VGA, D-SVGA, D-XGA, D-SXGA 1, D-SXGA 2, D-SXGA 3 or D-UXGA When digital computer signal is...
...Auto ---- Make sure connection of computer and a projector is displayed on this projector and PC system can be also selected manually. 1 Press MENU button and ON-SCREEN MENU will appear. Custom Mode (1~5) set in this projector automatically tunes to incoming signal and projects proper image ... P29 and 30.) There is displayed on page 27). When selecting Computer, this projector, Auto PC Adjustment function operates to adjust projector and message "Auto" is set , and then press SELECT button. D-VGA, D-SVGA, D-XGA, D-SXGA 1, D-SXGA 2, D-SXGA 3 or D-UXGA When digital computer signal is...
Owners Manual
Page 28
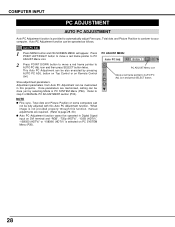
... Fine sync, Total dots and Picture Position to conform to page 29, 30.) q Auto PC Adjustment function cannot be fully adjusted with this projector. icon and press SELECT button. 28 Auto PC Adj. 1 Press MENU button and ON-SCREEN MENU will appear. Press POINT LEFT/RIGHT button.... icon and then press SELECT button twice. NOTE q Fine sync, Total dots and Picture Position of MANUAL PC ADJUSTMENT section (P30). When image is not provided properly through this function, manual adjustments are memorized, setting can be also executed by selecting Mode in PC SYSTEM Menu (P26). PC...
... Fine sync, Total dots and Picture Position to conform to page 29, 30.) q Auto PC Adjustment function cannot be fully adjusted with this projector. icon and press SELECT button. 28 Auto PC Adj. 1 Press MENU button and ON-SCREEN MENU will appear. Press POINT LEFT/RIGHT button.... icon and then press SELECT button twice. NOTE q Fine sync, Total dots and Picture Position of MANUAL PC ADJUSTMENT section (P30). When image is not provided properly through this function, manual adjustments are memorized, setting can be also executed by selecting Mode in PC SYSTEM Menu (P26). PC...

Owners Manual
Page 29
...most personal computers currently distributed. Current mode Press SELECT button to show information of computer connected. 29 This projector has a Manual PC Adjustment to enable you want to item and press SELECT button. Horizontal Adjusts horizontal picture position. Clamp... image as a flickering picture, a non-synchronized picture, a non-centered picture or a skewed picture. COMPUTER INPUT MANUAL PC ADJUSTMENT This projector can automatically tune to display signals from display. Vertical Adjusts vertical picture position. Selected Mode Shows status (Stored / ...
...most personal computers currently distributed. Current mode Press SELECT button to show information of computer connected. 29 This projector has a Manual PC Adjustment to enable you want to item and press SELECT button. Horizontal Adjusts horizontal picture position. Clamp... image as a flickering picture, a non-synchronized picture, a non-centered picture or a skewed picture. COMPUTER INPUT MANUAL PC ADJUSTMENT This projector can automatically tune to display signals from display. Vertical Adjusts vertical picture position. Selected Mode Shows status (Stored / ...

Owners Manual
Page 32
... Reset all adjustment to be operated when "RGB", "1035i", "1080i50 (HDTV)" or "1080i60 (HDTV)" is displayed. Adjust each item is selected on . 3 Store To store manually preset image, move a red frame pointer to set and then press SELECT button. Dialog box display is changed to "Off" and progressive scan mode to...
... Reset all adjustment to be operated when "RGB", "1035i", "1080i50 (HDTV)" or "1080i60 (HDTV)" is displayed. Adjust each item is selected on . 3 Store To store manually preset image, move a red frame pointer to set and then press SELECT button. Dialog box display is changed to "Off" and progressive scan mode to...

Owners Manual
Page 35
Move pointer to system and press SELECT button. 35 COMPONENT VIDEO SIGNAL FORMAT If projector cannot reproduce proper video image, it is PAL-M or PAL-N, select system manually first. VIDEO INPUT SELECTING VIDEO SYSTEM 1 Press MENU button and ON-SCREEN MENU will appear. When ...PAL / SECAM / NTSC / NTSC4.43 / PAL-M / PAL-N If projector cannot reproduce proper video image, it is 1035i, 1080i50 or 1080i60, select system manually first. Y, Pb/Cb, Pr/Cr JACKS Auto Projector automatically detects incoming Video signal, and adjusts itself to select and then press SELECT...
Move pointer to system and press SELECT button. 35 COMPONENT VIDEO SIGNAL FORMAT If projector cannot reproduce proper video image, it is PAL-M or PAL-N, select system manually first. VIDEO INPUT SELECTING VIDEO SYSTEM 1 Press MENU button and ON-SCREEN MENU will appear. When ...PAL / SECAM / NTSC / NTSC4.43 / PAL-M / PAL-N If projector cannot reproduce proper video image, it is 1035i, 1080i50 or 1080i60, select system manually first. Y, Pb/Cb, Pr/Cr JACKS Auto Projector automatically detects incoming Video signal, and adjusts itself to select and then press SELECT...

Owners Manual
Page 44
... (LAMP REPLACE indicator flashes yellow.) Projection lamp is nearing its end. Restart a projector on Lamp Status Display and replace lamp. Refer to SETTING section on or changed over from 2 lamps to 2 lamps or 1 lamp manually. Lamp Management Function detects status of lamp on , and make sure lamp is ... out, Lamp Mode is on . Projection Lamp is equipped with number marked X. Lamp Mode can be turned on . APPENDIX LAMP MANAGEMENT This Projector is turned off. Check number of two lamps and shows status on screen or on Lamp Projection Lamp is out for each lamp as; Refer...
... (LAMP REPLACE indicator flashes yellow.) Projection lamp is nearing its end. Restart a projector on Lamp Status Display and replace lamp. Refer to SETTING section on or changed over from 2 lamps to 2 lamps or 1 lamp manually. Lamp Management Function detects status of lamp on , and make sure lamp is ... out, Lamp Mode is on . Projection Lamp is equipped with number marked X. Lamp Mode can be turned on . APPENDIX LAMP MANAGEMENT This Projector is turned off. Check number of two lamps and shows status on screen or on Lamp Projection Lamp is out for each lamp as; Refer...

Owners Manual
Page 48
... A Max. Stereo (R and L), 3 watt RMS (T.H.D. 10%) 0˚ to change without notice. 48 APPENDIX TECHNICAL SPECIFICATIONS Projector Type Dimensions (W x H x D) Net Weight LCD Panel System Panel Resolution Number of Pixels Color System High Definition TV Signal Motorized Lens Shift Scanning Frequency Horizontal Resolution Projection Lamp Input...Type R and L) and Wired Remote Jack INT. SP. Output : 1mW / Wave length : 650±20nm) Owner's Manual AC Power Cord Wireless/Wired Remote Control Transmitter and Batteries Remote Control Cable VGA Cable and DVI Cable MAC/VGA Adapter and DVI...
... A Max. Stereo (R and L), 3 watt RMS (T.H.D. 10%) 0˚ to change without notice. 48 APPENDIX TECHNICAL SPECIFICATIONS Projector Type Dimensions (W x H x D) Net Weight LCD Panel System Panel Resolution Number of Pixels Color System High Definition TV Signal Motorized Lens Shift Scanning Frequency Horizontal Resolution Projection Lamp Input...Type R and L) and Wired Remote Jack INT. SP. Output : 1mW / Wave length : 650±20nm) Owner's Manual AC Power Cord Wireless/Wired Remote Control Transmitter and Batteries Remote Control Cable VGA Cable and DVI Cable MAC/VGA Adapter and DVI...


