
Instruction Manual, PLC-XP41L
Page 2
...INDICATOR lights red to operate improperly, read this projector, emits the laser beam as possible. REFER SERVICING TO QUALIFIED SERVICE PERSONNEL. THIS SYMBOL INDICATES THAT THERE ARE IMPORTANT OPERATING AND MAINTENANCE INSTRUCTIONS IN THE OWNER'S MANUAL WITH THIS UNIT. 2 Improper operation may ...to this manual thoroughly and operate the projector properly. READ AND KEEP THIS OWNER'S MANUAL FOR LATER USE. Eye damage could result. If your projector, and can reduce the service life of the projector cabinet for allowing air circulation and cooling the projector. 20cm ...
...INDICATOR lights red to operate improperly, read this projector, emits the laser beam as possible. REFER SERVICING TO QUALIFIED SERVICE PERSONNEL. THIS SYMBOL INDICATES THAT THERE ARE IMPORTANT OPERATING AND MAINTENANCE INSTRUCTIONS IN THE OWNER'S MANUAL WITH THIS UNIT. 2 Improper operation may ...to this manual thoroughly and operate the projector properly. READ AND KEEP THIS OWNER'S MANUAL FOR LATER USE. Eye damage could result. If your projector, and can reduce the service life of the projector cabinet for allowing air circulation and cooling the projector. 20cm ...

Instruction Manual, PLC-XP41L
Page 5
...ADJUSTMENT 22 23 AUTO PC ADJUSTMENT 23 NAME OF EACH PART OF PROJECTOR 7 MANUAL PC ADJUSTMENT 24 SETTING-UP PROJECTOR 8 COMPATIBLE COMPUTER SPECIFICATIONS 26 CONNECTING AC POWER CORD 8 PICTURE IMAGE ADJUSTMENT 27 POSITIONING PROJECTOR 9 IMAGE LEVEL SELECT 27 LENS INSTALLATION 9 IMAGE LEVEL ADJUSTMENT ... Business Machines, Inc. INDICATOR 38 AIR FILTER CARE AND CLEANING 38 CLEANING PROJECTION LENS 38 TURNING ON / OFF PROJECTOR 19 LAMP REPLACEMENT 39 ADJUSTING SCREEN ZOOM ADJUSTMENT 20 LAMP REPLACE COUNTER 39 20 TROUBLESHOOTING 40 FOCUS ADJUSTMENT LENS SHIFT ...
...ADJUSTMENT 22 23 AUTO PC ADJUSTMENT 23 NAME OF EACH PART OF PROJECTOR 7 MANUAL PC ADJUSTMENT 24 SETTING-UP PROJECTOR 8 COMPATIBLE COMPUTER SPECIFICATIONS 26 CONNECTING AC POWER CORD 8 PICTURE IMAGE ADJUSTMENT 27 POSITIONING PROJECTOR 9 IMAGE LEVEL SELECT 27 LENS INSTALLATION 9 IMAGE LEVEL ADJUSTMENT ... Business Machines, Inc. INDICATOR 38 AIR FILTER CARE AND CLEANING 38 CLEANING PROJECTION LENS 38 TURNING ON / OFF PROJECTOR 19 LAMP REPLACEMENT 39 ADJUSTING SCREEN ZOOM ADJUSTMENT 20 LAMP REPLACE COUNTER 39 20 TROUBLESHOOTING 40 FOCUS ADJUSTMENT LENS SHIFT ...

Instruction Manual, PLC-XP41L
Page 6
...crystal display (LCD) technology. This function makes it easy to 1280 x 1024 resolution. x Keystone Correction Positioning of a projector may result in distorted image being displayed in multimedia features, a palette of your computer. FEATURES AND DESIGN This Multimedia Projector is over ...IBM-compatible or Macintosh computer up and down with this projector includes Laser Pointer function. Resolution from a computer. There is compressed into 1024 x 768 dots. x Digital Zoom (for troublesome manual adjustment of original image size, allowing you want. Keystone ...
...crystal display (LCD) technology. This function makes it easy to 1280 x 1024 resolution. x Keystone Correction Positioning of a projector may result in distorted image being displayed in multimedia features, a palette of your computer. FEATURES AND DESIGN This Multimedia Projector is over ...IBM-compatible or Macintosh computer up and down with this projector includes Laser Pointer function. Resolution from a computer. There is compressed into 1024 x 768 dots. x Digital Zoom (for troublesome manual adjustment of original image size, allowing you want. Keystone ...

Instruction Manual, PLC-XP41L
Page 7
... LAMP COVER CARRYING HANDLE BOTTOM OF CABINET When attached the PJ-Net organizer (optional part) to the owner's manual in the optional PJ-Net organizer. Refer to the projector, remove the these parts. q Do not cover vent slots. ADJUSTABLE FEET AND FEET LOCK LATCHES 7 When using...INFRARED REMOTE RECEIVER HOT AIR EXHAUSTED ! q Keep rear grills at least 3'(1 m) away from any objects. This area will become hot while a projector is hot. q Do not put a flammable object near this area, especially screws and metallic parts. Air blown from overheating. Pay attention to ...
... LAMP COVER CARRYING HANDLE BOTTOM OF CABINET When attached the PJ-Net organizer (optional part) to the owner's manual in the optional PJ-Net organizer. Refer to the projector, remove the these parts. q Do not cover vent slots. ADJUSTABLE FEET AND FEET LOCK LATCHES 7 When using...INFRARED REMOTE RECEIVER HOT AIR EXHAUSTED ! q Keep rear grills at least 3'(1 m) away from any objects. This area will become hot while a projector is hot. q Do not put a flammable object near this area, especially screws and metallic parts. Air blown from overheating. Pay attention to ...
Instruction Manual, PLC-XP41L
Page 9
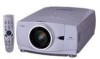
... 1 10 : 0 1 LENS INSTALLATION (For Lensless model PLC-XP41L only) Before setting up and down with motor-driven lens ... (14.4m). Before installation, check where a projector is designed to project on Projector. 1. PREPARATION POSITIONING PROJECTOR q This projector is used and prepare suitable lens. q Projector can be moved up a projector, install Projection Lens on a flat projection surface.... 77" 31" 23.6'(7.2m) 200" 154" 47.3'(14.4m) 35.4'(10.8m) Max. Refer to installation manual in order to adjust screen size. COVER CAP 9 Zoom 31" 100" 77" 150" 115" 200" 154...
... 1 10 : 0 1 LENS INSTALLATION (For Lensless model PLC-XP41L only) Before setting up and down with motor-driven lens ... (14.4m). Before installation, check where a projector is designed to project on Projector. 1. PREPARATION POSITIONING PROJECTOR q This projector is used and prepare suitable lens. q Projector can be moved up a projector, install Projection Lens on a flat projection surface.... 77" 31" 23.6'(7.2m) 200" 154" 47.3'(14.4m) 35.4'(10.8m) Max. Refer to installation manual in order to adjust screen size. COVER CAP 9 Zoom 31" 100" 77" 150" 115" 200" 154...

Instruction Manual, PLC-XP41L
Page 23
... tunes to incoming signal and projects proper image without any special setting. (Some computers need setting manually.) Note : Projector may display one of computers based on VGA, SVGA, XGA or SXGA (refer to "COMPATIBLE COMPUTER SPECIFICATION" on PC SYSTEM Menu icon. Press POINT LEFT/RIGHT buttons to move a red...Unit. Systems on DVI terminal, above message is no signal input from Auto PC Adjustment can be fully adjusted with this projector and PC system can be also selected manually. 1 Press MENU button and ON-SCREEN MENU will appear. Auto PC Adj. 1 Press MENU button and ON-SCREEN ...
... tunes to incoming signal and projects proper image without any special setting. (Some computers need setting manually.) Note : Projector may display one of computers based on VGA, SVGA, XGA or SXGA (refer to "COMPATIBLE COMPUTER SPECIFICATION" on PC SYSTEM Menu icon. Press POINT LEFT/RIGHT buttons to move a red...Unit. Systems on DVI terminal, above message is no signal input from Auto PC Adjustment can be fully adjusted with this projector and PC system can be also selected manually. 1 Press MENU button and ON-SCREEN MENU will appear. Auto PC Adj. 1 Press MENU button and ON-SCREEN ...

Instruction Manual, PLC-XP41L
Page 24
...a dark bar(s), try this icon to adjust "Clamp," "Display area (H/V)" or set "Full screen." COMPUTER INPUT MANUAL PC ADJUSTMENT This projector can automatically tune to display signals from standard ones and may be operated when in one horizontal period. Press POINT ...Menu cannot be recognized as necessary to match with those parameters manually adjusted. However, some computers employ special signal formats which are different from most personal computers currently distributed. This projector has a Manual PC Adjustment to enable you to precisely adjust several parameters to ...
...a dark bar(s), try this icon to adjust "Clamp," "Display area (H/V)" or set "Full screen." COMPUTER INPUT MANUAL PC ADJUSTMENT This projector can automatically tune to display signals from standard ones and may be operated when in one horizontal period. Press POINT ...Menu cannot be recognized as necessary to match with those parameters manually adjusted. However, some computers employ special signal formats which are different from most personal computers currently distributed. This projector has a Manual PC Adjustment to enable you to precisely adjust several parameters to ...
Instruction Manual, PLC-XP41L
Page 28
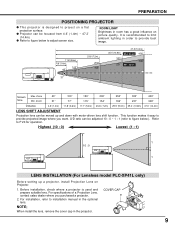
... to be selected and then press SELECT button. Image Level Menu Move a red frame pointer to any of contrast. (From 0 to 15.) 3 Store To store manually preset image, move a red frame pointer to item that you want to set and then press SELECT button. 28 Other icons operates as follows. Quit...
... to be selected and then press SELECT button. Image Level Menu Move a red frame pointer to any of contrast. (From 0 to 15.) 3 Store To store manually preset image, move a red frame pointer to item that you want to set and then press SELECT button. 28 Other icons operates as follows. Quit...

Instruction Manual, PLC-XP41L
Page 31
...PAL / SECAM / NTSC / NTSC4.43 / PAL-M / PAL-N If projector cannot reproduce proper video image, it is necessary to system and press SELECT button. When Video System is PAL-M or PAL-N, select system manually first. AV SYSTEM MENU (COMPONENT VIDEO) AV SYSTEM Menu icon This box ...SELECT button. When Video System is 1035i or 1080i, select system manually first. VIDEO INPUT SELECTING VIDEO SYSTEM 1 Press MENU button and ON-SCREEN MENU will appear. VIDEO JACK OR S-VIDEO JACK Auto Projector automatically detects incoming Video system, and adjusts itself to optimize its performance...
...PAL / SECAM / NTSC / NTSC4.43 / PAL-M / PAL-N If projector cannot reproduce proper video image, it is necessary to system and press SELECT button. When Video System is PAL-M or PAL-N, select system manually first. AV SYSTEM MENU (COMPONENT VIDEO) AV SYSTEM Menu icon This box ...SELECT button. When Video System is 1035i or 1080i, select system manually first. VIDEO INPUT SELECTING VIDEO SYSTEM 1 Press MENU button and ON-SCREEN MENU will appear. VIDEO JACK OR S-VIDEO JACK Auto Projector automatically detects incoming Video system, and adjusts itself to optimize its performance...
Instruction Manual, PLC-XP41L
Page 36
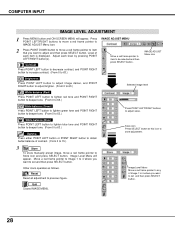
... 10 seconds. factory-set into the low power consumption mode. NOTE : When batteries of Projector; Be sure to turn projector off in USB driver package. PJ-Net Organizer This function cannot be switched to "Code 2." Refer to the owner's manual in "Code 2," both MENU and IMAGE buttons on just by computer, install USB...
... 10 seconds. factory-set into the low power consumption mode. NOTE : When batteries of Projector; Be sure to turn projector off in USB driver package. PJ-Net Organizer This function cannot be switched to "Code 2." Refer to the owner's manual in "Code 2," both MENU and IMAGE buttons on just by computer, install USB...

Instruction Manual, PLC-XP41L
Page 42
... and Canada) AC 200 ~ 240 V (2.4 A Max. Output : 1mW / Wave length : 650±20nm) Owner's Manual AC Power Cord Wireless/Wired Remote Control Transmitter and Batteries Remote Control Cable VGA Cable MAC/VGA Adapter 3 Types Control Cable (For...II Laser (Max. Stereo (R and L), 2 watt RMS (T.H.D. 10%) 0˚ to change without notice. 42 APPENDIX TECHNICAL SPECIFICATIONS Projector Type Dimensions (W x H x D) Net Weight LCD Panel System Panel Resolution Number of Pixels Color System High Definition TV Signal Scanning Frequency Projection Lens Throw distance Motorized Lens Shift Projection...
... and Canada) AC 200 ~ 240 V (2.4 A Max. Output : 1mW / Wave length : 650±20nm) Owner's Manual AC Power Cord Wireless/Wired Remote Control Transmitter and Batteries Remote Control Cable VGA Cable MAC/VGA Adapter 3 Types Control Cable (For...II Laser (Max. Stereo (R and L), 2 watt RMS (T.H.D. 10%) 0˚ to change without notice. 42 APPENDIX TECHNICAL SPECIFICATIONS Projector Type Dimensions (W x H x D) Net Weight LCD Panel System Panel Resolution Number of Pixels Color System High Definition TV Signal Scanning Frequency Projection Lens Throw distance Motorized Lens Shift Projection...


