Sanyo XU46 - PLC XGA LCD Projector Support and Manuals
Get Help and Manuals for this Sanyo item

Popular Sanyo XU46 Manual Pages
Instruction Manual, PLC-XU46 - Page 2

... INSTRUCTIONS IN THE OWNER'S MANUAL WITH THIS UNIT.
2 NO USERSERVICEABLE PARTS INSIDE EXCEPT LAMP REPLACEMENT. Do not cover the ventilation slot on the top, sides and rear of the projector cabinet for a considerable time. TO THE OWNER
Before operating this projector, read this manual again, check operations and cable connections and try the solutions in the "TROUBLESHOOTING" section...
Instruction Manual, PLC-XU46 - Page 4
... this projector meets the requirement for use the plug with the cover omitted. Model Numbers Trade Name Responsible party Address
Telephone No.
: PLC-XU46 : Sanyo : SANYO FISHER COMPANY : 21605 Plummer Street, Chatsworth, California 91311
: (818)998-7322
AC POWER CORD REQUIREMENT
The AC Power Cord supplied with this safety feature. THE SOCKET-OUTLET SHOULD BE INSTALLED NEAR...
Instruction Manual, PLC-XU46 - Page 5
...
23
NAME OF EACH PART OF PROJECTOR
7
MANUAL PC ADJUSTMENT
24
SETTING-UP PROJECTOR
CONNECTING AC POWER CORD POSITIONING PROJECTOR
8
PICTURE IMAGE ADJUSTMENTS
26
8
IMAGE LEVEL SELECT
26
9
IMAGE LEVEL ADJUSTMENT
27
ADJUSTABLE FEET
9
PICTURE SCREEN ADJUSTMENT
28
INSTALLING PROJECTOR IN PROPER POSITION 10
MOVING PROJECTOR
10
CONNECTING PROJECTOR
11 VIDEO INPUT
29
TERMINALS...
Instruction Manual, PLC-XU46 - Page 6
...projector and computer with Remote Control only.
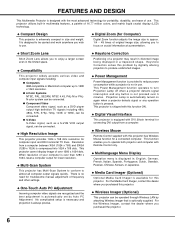
No complicated setup is necessary and projection is no need for troublesome manual adjustment of frequency and other settings. Projection Lamp is automatically turned on crucial information at a presentation. N Wireless Mouse
Remote... for this problem by Auto PC Adjustment. N Wireless Imager (Optional)
This projector can be connected...
Instruction Manual, PLC-XU46 - Page 15
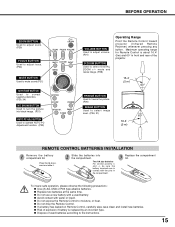
... pins in front and rear of the projector.
16.4' (5 m)
60°
FREEZE BUTTON Used to freeze the picture. (P20)
IMAGE BUTTON Used to select image level. (P26, 31)
60°
16.4' (5 m)
REMOTE CONTROL BATTERIES INSTALLATION
1 Remove the battery compartment lid.
G Avoid contact with a used batteries according to the instructions.
15 G Do not drop the...
Instruction Manual, PLC-XU46 - Page 18
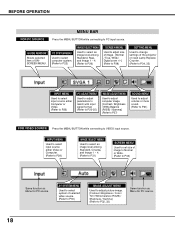
AV SYSTEM MENU
Used to select system of the projector or reset Lamp Replace Counter. (Refer to P34, 35)
INPUT MENU
Used to select ...change settings of selected video source. (Refer to P30)
IMAGE ADJUST MENU
Used to adjust picture image. [Contrast / Brightness / Color / Tint / White balance (R/G/B) / Sharpness / Gamma] (Refer to P33)
Same function as Menu for PC source.
GUIDE WINDOW
...
Instruction Manual, PLC-XU46 - Page 22
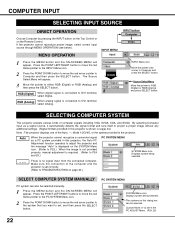
...This projector accepts various kinds of the computer and the projector is displayed on the Remote Control....TROUBLESHOOTING on this projector is no signal input from the connected computer.
Auto
When the projector ...set correctly. (Refer to Computer and press the SELECT button. The systems on page 40.)
SELECT COMPUTER SYSTEM MANUALLY PC SYSTEM MENU
PC system can be selected manually...
Instruction Manual, PLC-XU46 - Page 23
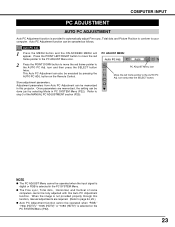
... or RGB is selected on the Remote Control. When the image is not provided properly through this function, manual adjustments are memorized, the setting can be operated as follows. button...Total dots, Horizontal, and Vertical of the MANUAL PC ADJUSTMENT section (P25). Adjustment parameters from Auto PC Adjustment can be fully adjusted with this projector. Auto PC Adj.
1 Press the MENU...
Instruction Manual, PLC-XU46 - Page 24
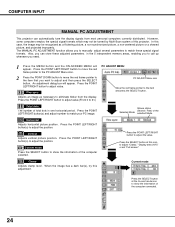
...MANUAL PC ADJUSTMENT
This projector can store these special signal formats. However, some computers employ the special signal formats which may be turned by Multi-Scan system of total dots in the 5 independent memory areas, enabling you to call up whenever you to manually adjust several parameters to adjust value. The MANUAL...Clamp," "Display area (H/V)" or set "Full screen." Press the ...
Instruction Manual, PLC-XU46 - Page 27
Reset
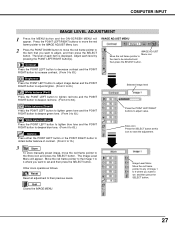
Reset all adjustment to be selected and then press the SELECT button. COMPUTER INPUT
IMAGE LEVEL ADJUSTMENT
1 Press the...icon Press the SELECT button at this icon to store the adjustment.
3
Store
To store manually preset image, move the red frame pointer to the item that you want to set and then press the SELECT button. Adjust each item is displayed.
The Image Level Menu will...
Instruction Manual, PLC-XU46 - Page 36
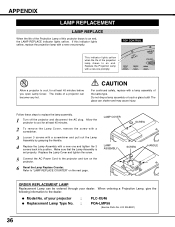
...AC plug. Do not drop a lamp assembly or touch a glass bulb! of a projector can be ordered through your projector
:
G Replacement Lamp Type No. :
PLC-XU46
POA-LMP56
(Service Parts No. 610 305 8801)
36 Allow the projector to an end, the LAMP REPLACE indicator lights yellow. APPENDIX
LAMP REPLACEMENT
LAMP REPLACE
When the life of the Projection Lamp of this indicator lights yellow...
Instruction Manual, PLC-XU46 - Page 37
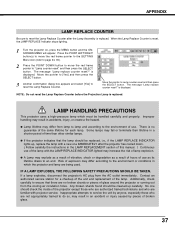
... of use of the lamp with projector service. When the Lamp Replace Counter is displayed.
Press the POINT LEFT/RIGHT button(s) to move the red frame pointer to the SETTING Menu icon (refer to page 34, 35).
2 Press the POINT DOWN button to move the red frame pointer to the environment of the lamp. The message "Lamp replace counter reset?"
Instruction Manual, PLC-XU46 - Page 40
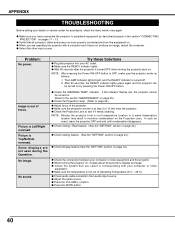
...dealer or service center for assistance, check the items below once again.
No image. G When turning the projector on, it needs cleaning. Some displays are operating the projector with your computer or video equipment and the projector. indicator. G Make sure you select is not out of Operating Temperature (5°C ~ 35°C). APPENDIX
TROUBLESHOOTING
Before calling...
Instruction Manual, PLC-XU46 - Page 41

... you are used to obtain service. G Check the mouse setting on the nameplate means the product is set to the projector.
(See "SETTING" section on the computer. G Turn the projector on before turning on page 34, 35.)
G Check cable connection between the projector and the Remote Control. Give the model number and explain about the problem.
It is a Directive conformity...
Instruction Manual, PLC-XU46 - Page 46
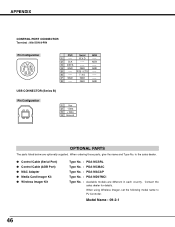
RTS / CTS -----
6 ----- Data 3 + Data 4 Ground
OPTIONAL PARTS
The parts listed below are different in each country. T X D
-----
7 GND
GND
-----
8 ----- When ordering those parts, give the name and Type No. Contact the
sales dealer for details. R X D
-----
2 CLK
-----
Model Name : 09-2-1
46 When using Wireless Imager, set the following model name to the sales dealer.
ADB...
Sanyo XU46 Reviews
We have not received any reviews for Sanyo yet.