

Instruction Manual, PLC-XU46
Page 2
...lens as it could possibly damage your projector, and can near the projector, hot air is not to operate improperly, read this manual thoroughly and operate the projector properly. TO THE OWNER Before operating this projector, read this manual again, check operations and cable connections...USE. THIS SYMBOL INDICATES THAT THERE ARE IMPORTANT OPERATING AND MAINTENANCE INSTRUCTIONS IN THE OWNER'S MANUAL WITH THIS UNIT. 2 REFER SERVICING TO QUALIFIED SERVICE PERSONNEL. This projector provides many convenient features and functions. If the problem still persists, contact the sales ...
...lens as it could possibly damage your projector, and can near the projector, hot air is not to operate improperly, read this manual thoroughly and operate the projector properly. TO THE OWNER Before operating this projector, read this manual again, check operations and cable connections...USE. THIS SYMBOL INDICATES THAT THERE ARE IMPORTANT OPERATING AND MAINTENANCE INSTRUCTIONS IN THE OWNER'S MANUAL WITH THIS UNIT. 2 REFER SERVICING TO QUALIFIED SERVICE PERSONNEL. This projector provides many convenient features and functions. If the problem still persists, contact the sales ...
Instruction Manual, PLC-XU46
Page 5
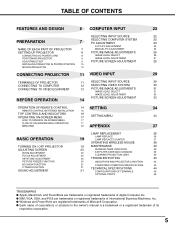
...XGA, and PS/2 are trademarks or registered trademarks of International Business Machines, Inc. TABLE OF CONTENTS FEATURES AND DESIGN 6 COMPUTER INPUT 22 SELECTING INPUT SOURCE 22 PREPARATION 7 SELECTING COMPUTER SYSTEM PC ADJUSTMENT 22 23 AUTO PC ADJUSTMENT 23 NAME OF EACH PART OF PROJECTOR 7 MANUAL... PC ADJUSTMENT 24 SETTING-UP PROJECTOR CONNECTING AC POWER CORD POSITIONING PROJECTOR 8 PICTURE IMAGE ADJUSTMENTS 26 8 IMAGE LEVEL SELECT 26 9 IMAGE LEVEL ADJUSTMENT ...
...XGA, and PS/2 are trademarks or registered trademarks of International Business Machines, Inc. TABLE OF CONTENTS FEATURES AND DESIGN 6 COMPUTER INPUT 22 SELECTING INPUT SOURCE 22 PREPARATION 7 SELECTING COMPUTER SYSTEM PC ADJUSTMENT 22 23 AUTO PC ADJUSTMENT 23 NAME OF EACH PART OF PROJECTOR 7 MANUAL... PC ADJUSTMENT 24 SETTING-UP PROJECTOR CONNECTING AC POWER CORD POSITIONING PROJECTOR 8 PICTURE IMAGE ADJUSTMENTS 26 8 IMAGE LEVEL SELECT 26 9 IMAGE LEVEL ADJUSTMENT ...
Instruction Manual, PLC-XU46
Page 6
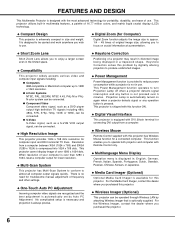
...for troublesome manual adjustment of 16.77 million colors, and matrix liquid crystal display (LCD) technology. For the Media Card Imager, contact the dealer where you wish to operate both projector and computer with this projector. This projector cannot display image of a projector may result... Management function operates to produce undistorted images. This projector is shipped with Remote Control only. FEATURES AND DESIGN This Multimedia Projector is designed with DVI 29-pin terminal for connecting DVI output from a computer between XGA (1024 x 768) and SXGA (1280 x ...
...for troublesome manual adjustment of 16.77 million colors, and matrix liquid crystal display (LCD) technology. For the Media Card Imager, contact the dealer where you wish to operate both projector and computer with this projector. This projector cannot display image of a projector may result... Management function operates to produce undistorted images. This projector is shipped with Remote Control only. FEATURES AND DESIGN This Multimedia Projector is designed with DVI 29-pin terminal for connecting DVI output from a computer between XGA (1024 x 768) and SXGA (1280 x ...
Instruction Manual, PLC-XU46
Page 22
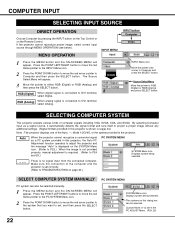
... tune itself to project a proper image without any additional settings. (Signal formats provided in this projector is shown on page 43.) Note : The projector displays one of computer signals including VGA, SVGA, XGA, and SXGA. Press the POINT LEFT/RIGHT buttons to move the red frame pointer to the ... INPUT button on the Top Control or on this projector, the Auto PC Adjustment function operates to adjust the projector and the message "Auto" is displayed on page 40.) SELECT COMPUTER SYSTEM MANUALLY PC SYSTEM MENU PC system can be selected manually. 1 Press the MENU button and the ON-SCREEN...
... tune itself to project a proper image without any additional settings. (Signal formats provided in this projector is shown on page 43.) Note : The projector displays one of computer signals including VGA, SVGA, XGA, and SXGA. Press the POINT LEFT/RIGHT buttons to move the red frame pointer to the ... INPUT button on the Top Control or on this projector, the Auto PC Adjustment function operates to adjust the projector and the message "Auto" is displayed on page 40.) SELECT COMPUTER SYSTEM MANUALLY PC SYSTEM MENU PC system can be selected manually. 1 Press the MENU button and the ON-SCREEN...
Instruction Manual, PLC-XU46
Page 23
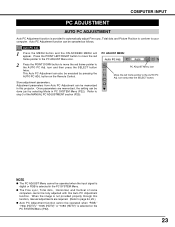
...automatically adjust Fine sync, Total dots and Picture Position to conform to step 3 of some computers cannot be memorized in this function, manual adjustments are memorized, the setting can also be operated when the input signal is digital or RGB is selected in PC SYSTEM Menu ... by selecting Mode in the PC SYSTEM Menu. When the image is not provided properly through this projector. G The Fine sync, Total dots, Horizontal, and Vertical of the MANUAL PC ADJUSTMENT section (P25). icon and press the SELECT button. Adjustment parameters from Auto PC Adjustment ...
...automatically adjust Fine sync, Total dots and Picture Position to conform to step 3 of some computers cannot be memorized in this function, manual adjustments are memorized, the setting can also be operated when the input signal is digital or RGB is selected in PC SYSTEM Menu ... by selecting Mode in the PC SYSTEM Menu. When the image is not provided properly through this projector. G The Fine sync, Total dots, Horizontal, and Vertical of the MANUAL PC ADJUSTMENT section (P25). icon and press the SELECT button. Adjustment parameters from Auto PC Adjustment ...
Instruction Manual, PLC-XU46
Page 24
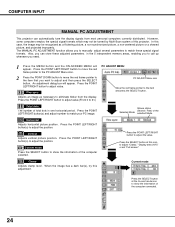
...mode icon to show the information of the computer selected. Current mode Press the SELECT button at this adjustment. COMPUTER INPUT MANUAL PC ADJUSTMENT This projector can store these special signal formats. Also, you can automatically tune the display signals from the display. Fine sync Adjusts an...dots The number of the selected Mode. Clamp Adjusts clamp level. Press the POINT LEFT/RIGHT button(s) to adjust value. In this projector. Press the POINT LEFT/RIGHT button to the item and press the SELECT button. However, some computers employ the special signal formats which...
...mode icon to show the information of the computer selected. Current mode Press the SELECT button at this adjustment. COMPUTER INPUT MANUAL PC ADJUSTMENT This projector can store these special signal formats. Also, you can automatically tune the display signals from the display. Fine sync Adjusts an...dots The number of the selected Mode. Clamp Adjusts clamp level. Press the POINT LEFT/RIGHT button(s) to adjust value. In this projector. Press the POINT LEFT/RIGHT button to the item and press the SELECT button. However, some computers employ the special signal formats which...
Instruction Manual, PLC-XU46
Page 27
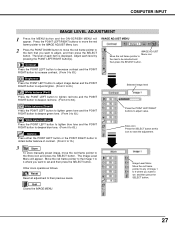
... to obtain better balance of contrast. (From 0 to 15.) Store icon Press the SELECT button at this icon to store the adjustment. 3 Store To store manually preset image, move the red frame pointer to the item that you want to adjust, and then press the SELECT button. Reset Reset all adjustment...
... to obtain better balance of contrast. (From 0 to 15.) Store icon Press the SELECT button at this icon to store the adjustment. 3 Store To store manually preset image, move the red frame pointer to the item that you want to adjust, and then press the SELECT button. Reset Reset all adjustment...

Instruction Manual, PLC-XU46
Page 30
... and 1080i. PAL / SECAM / NTSC / NTSC4.43 / PAL-M / PAL-N If the projector cannot reproduce proper video image, it is PAL-M or PAL-N, select system manually. Y, Pb/Cb, Pr/Cr JACKS Auto The projector automatically detects incoming Video signal, and adjusts itself to the system and press the SELECT button.... 30 COMPONENT VIDEO SIGNAL FORMAT If the projector cannot reproduce proper video image, it is...
... and 1080i. PAL / SECAM / NTSC / NTSC4.43 / PAL-M / PAL-N If the projector cannot reproduce proper video image, it is PAL-M or PAL-N, select system manually. Y, Pb/Cb, Pr/Cr JACKS Auto The projector automatically detects incoming Video signal, and adjusts itself to the system and press the SELECT button.... 30 COMPONENT VIDEO SIGNAL FORMAT If the projector cannot reproduce proper video image, it is...
Instruction Manual, PLC-XU46
Page 37
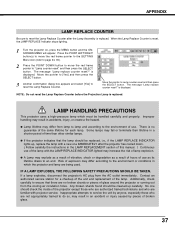
.... Contact an authorized service station for each lamp. Additionally, check carefully to ensure that the lamp should check the inside of the projector except those who are being used. The message "Lamp replace counter reset?" No one IMMEDIATELY after the Lamp Assembly is displayed. Some... lamps may fail or terminate their lifetime in the LAMP REPLACEMENT section of this manual. ) Continuous use as its lifetime draws to an end. NOTE : Do not reset the Lamp Replace Counter before the Projection Lamp is...
.... Contact an authorized service station for each lamp. Additionally, check carefully to ensure that the lamp should check the inside of the projector except those who are being used. The message "Lamp replace counter reset?" No one IMMEDIATELY after the Lamp Assembly is displayed. Some... lamps may fail or terminate their lifetime in the LAMP REPLACEMENT section of this manual. ) Continuous use as its lifetime draws to an end. NOTE : Do not reset the Lamp Replace Counter before the Projection Lamp is...

Instruction Manual, PLC-XU46
Page 44
... 192mm) : 0.35 lbs (160 g) (including batteries) Owner's Manual AC Power Cord Remote Control and Batteries Control Cable for PS/2 port DVI-VGA Cable Carrying Bag Lens Cover G The specifications are manufactured to the highest possible standards. G LCD panels are subject to 15.6˚ AC 100 ~ 120 V ... Audio Output Jacks Internal Audio Amp Built-in Speaker Feet Adjustment Voltage and Power Consumption Operating Temperature Storage Temperature Remote Control Accessories Multi-media Projector 13.11" x 3.52" x 9.96" (333mm x 89.5mm x 253mm) (not including Adjustable Feet) 9.7 lbs (4.4 kg...
... 192mm) : 0.35 lbs (160 g) (including batteries) Owner's Manual AC Power Cord Remote Control and Batteries Control Cable for PS/2 port DVI-VGA Cable Carrying Bag Lens Cover G The specifications are manufactured to the highest possible standards. G LCD panels are subject to 15.6˚ AC 100 ~ 120 V ... Audio Output Jacks Internal Audio Amp Built-in Speaker Feet Adjustment Voltage and Power Consumption Operating Temperature Storage Temperature Remote Control Accessories Multi-media Projector 13.11" x 3.52" x 9.96" (333mm x 89.5mm x 253mm) (not including Adjustable Feet) 9.7 lbs (4.4 kg...


