Instruction Manual, PLC-XU84
Page 3
...Video, S-video) 38 Input Source Selection (Component, RGB Scart 21-pin) 39 Video System Selection 40 Image Mode Selection 41 Image Adjustment 42 Screen Size Adjustment 44 Setting 45 Setting 45 Maintenance and Cleaning 56 Warning Indicator 56 Cleaning the Filter 57 Resetting the Filter Counter 57 Lamp Replacement 58 Resetting the Lamp Counter 59 Attaching the Lens Cover 60 Cleaning the Projection Lens 60 Cleaning the Projector Cabinet 60 Appendix 61 Indicators and Projector Condition 61 Troubleshooting 62 Menu Tree 64 Compatible Computer Specifications...
...Video, S-video) 38 Input Source Selection (Component, RGB Scart 21-pin) 39 Video System Selection 40 Image Mode Selection 41 Image Adjustment 42 Screen Size Adjustment 44 Setting 45 Setting 45 Maintenance and Cleaning 56 Warning Indicator 56 Cleaning the Filter 57 Resetting the Filter Counter 57 Lamp Replacement 58 Resetting the Lamp Counter 59 Attaching the Lens Cover 60 Cleaning the Projection Lens 60 Cleaning the Projector Cabinet 60 Appendix 61 Indicators and Projector Condition 61 Troubleshooting 62 Menu Tree 64 Compatible Computer Specifications...
Instruction Manual, PLC-XU84
Page 4
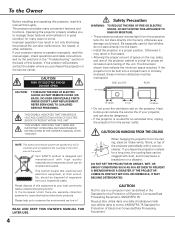
... NOT OPEN CAUTION: TO REDUCE THE RISK OF ELECTRIC SHOCK, DO NOT REMOVE COVER (OR BACK). NO USER-SERVICEABLE PARTS INSIDE EXCEPT LAMP REPLACEMENT. THIS SYMBOL INDICATES THAT THERE ARE IMPORTANT OPERATING AND MAINTENANCE INSTRUCTIONS IN THE OWNER'S MANUAL WITH THIS UNIT. This projector provides many years to conserve the environment we live in! Your SANYO product is critical for the Protection of Electronic Computer/Data...
... NOT OPEN CAUTION: TO REDUCE THE RISK OF ELECTRIC SHOCK, DO NOT REMOVE COVER (OR BACK). NO USER-SERVICEABLE PARTS INSIDE EXCEPT LAMP REPLACEMENT. THIS SYMBOL INDICATES THAT THERE ARE IMPORTANT OPERATING AND MAINTENANCE INSTRUCTIONS IN THE OWNER'S MANUAL WITH THIS UNIT. This projector provides many years to conserve the environment we live in! Your SANYO product is critical for the Protection of Electronic Computer/Data...

Instruction Manual, PLC-XU84
Page 10
..., 49) t S-VIDEO IN Connect the S-VIDEO output from video equipment to this jack. (p.18) y AUDIO IN Connect the audio output from video equipment connected to t or o to this jack. (When the audio output is used for Memory viewer operation. (Refer to the owner's manual supplied with a USB cable. (pp.14, 17) w SERVICE PORT This jack is monaural, connect it to L (MONO) jack.) (p.18) u AUDIO OUT(VARIABLE) Connect an external audio amplifier to service the projector.
..., 49) t S-VIDEO IN Connect the S-VIDEO output from video equipment to this jack. (p.18) y AUDIO IN Connect the audio output from video equipment connected to t or o to this jack. (When the audio output is used for Memory viewer operation. (Refer to the owner's manual supplied with a USB cable. (pp.14, 17) w SERVICE PORT This jack is monaural, connect it to L (MONO) jack.) (p.18) u AUDIO OUT(VARIABLE) Connect an external audio amplifier to service the projector.

Instruction Manual, PLC-XU84
Page 11
It remains green while the projector is in Digital zoom mode. (p.37) w POWER ON-OFF button Turn the projector on or off. (pp.21, 22) e MENU button Open or close the On-Screen Menu. (p.23) r POWER indicator Emit a red light until the projector gets ready to an end. (pp.58, 61) i AUTO SETUP button Correct vertical keystone distortion and adjust computer display parameters including Fine sync., Total dots and Picture position. (pp.26, 45) o POINT (ed7 8 ) buttons - Top Control Part Names and...
It remains green while the projector is in Digital zoom mode. (p.37) w POWER ON-OFF button Turn the projector on or off. (pp.21, 22) e MENU button Open or close the On-Screen Menu. (p.23) r POWER indicator Emit a red light until the projector gets ready to an end. (pp.58, 61) i AUTO SETUP button Correct vertical keystone distortion and adjust computer display parameters including Fine sync., Total dots and Picture position. (pp.26, 45) o POINT (ed7 8 ) buttons - Top Control Part Names and...

Instruction Manual, PLC-XU84
Page 12
... images. (pp.27, 37) !5 RESET/ON/ALL-OFF switch When using this button within 1 minute. Set it again. (p.13) - Execute the selected item. (p.23) - See owner's manual "Network Set-up and Operation" and owner's manual of the projector or a pointer for wireless mouse operation. (p.14) @1 SELECT button - Select an item or adjust the value in the Digital zoom + mode. (p.37) - Adjust the volume level. (Point 7 8 buttons) (p.25) o MENU button Open or close the On-Screen Menu. (p.23) !0 FREEZE button...
... images. (pp.27, 37) !5 RESET/ON/ALL-OFF switch When using this button within 1 minute. Set it again. (p.13) - Execute the selected item. (p.23) - See owner's manual "Network Set-up and Operation" and owner's manual of the projector or a pointer for wireless mouse operation. (p.14) @1 SELECT button - Select an item or adjust the value in the Digital zoom + mode. (p.37) - Adjust the volume level. (Point 7 8 buttons) (p.25) o MENU button Open or close the On-Screen Menu. (p.23) !0 FREEZE button...

Instruction Manual, PLC-XU84
Page 14
... and the projector with a USB cable. The code switches sequentially for the remote control. While pressing the MENU button, press the IMAGE button number of Times Pressing IMAGE Button 1 2 3 4 5 6 7 8 MENU button IMAGE button RESET/ON/ALL-OFF switch 14 Remote Control Code The eight different remote control codes (Code 1-Code 8) are connected with the supplied USB cable. When the Pointer function is used as a wireless mouse for more than five seconds to "ON." Part Names and Functions Wireless Mouse Operation The remote control can be used , the wireless mouse is...
... and the projector with a USB cable. The code switches sequentially for the remote control. While pressing the MENU button, press the IMAGE button number of Times Pressing IMAGE Button 1 2 3 4 5 6 7 8 MENU button IMAGE button RESET/ON/ALL-OFF switch 14 Remote Control Code The eight different remote control codes (Code 1-Code 8) are connected with the supplied USB cable. When the Pointer function is used as a wireless mouse for more than five seconds to "ON." Part Names and Functions Wireless Mouse Operation The remote control can be used , the wireless mouse is...
Instruction Manual, PLC-XU84
Page 26
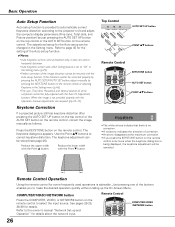
... owner's manual "Network Set-up the On-Screen Menu. Basic Operation Auto Setup Function Auto setup function is provided to automatically correct Keystone distortion according to the projector's tilt and adjust the computer display parameters (Fine sync, Total dots, and Picture position) by pressing the KEYSTONE button on the remote control or selecting Keystone in the Setting menu (p.46). •Fine sync, Total dots, Horizontal and Vertical position of some frequently used operations is advisable. Keystone Correction If a projected picture still has keystone...
... owner's manual "Network Set-up the On-Screen Menu. Basic Operation Auto Setup Function Auto setup function is provided to automatically correct Keystone distortion according to the projector's tilt and adjust the computer display parameters (Fine sync, Total dots, and Picture position) by pressing the KEYSTONE button on the remote control or selecting Keystone in the Setting menu (p.46). •Fine sync, Total dots, Horizontal and Vertical position of some frequently used operations is advisable. Keystone Correction If a projected picture still has keystone...
Instruction Manual, PLC-XU84
Page 48
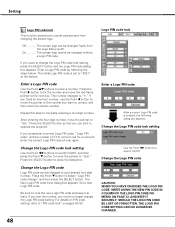
... a number. Set a new Logo PIN code. Be sure to switch On/Off. Off The screen logo can start to change " and then press the SELECT button. Enter a Logo PIN code by following dialog box appears. Enter the correct Logo PIN code all over again. If you lost the number, you can be changed freely from changing the screen logo. Change the Logo PIN code lock setting Use the Point 7 8 buttons to...
... a number. Set a new Logo PIN code. Be sure to switch On/Off. Off The screen logo can start to change " and then press the SELECT button. Enter a Logo PIN code by following dialog box appears. Enter the correct Logo PIN code all over again. If you lost the number, you can be changed freely from changing the screen logo. Change the Logo PIN code lock setting Use the Point 7 8 buttons to...

Instruction Manual, PLC-XU84
Page 50
... lamp has been fully cooled down , the POWER indicator changes to set timer. 50 Off Power management function is turned off the projector. The projector's network function will be turned on if the input signal is reconnected or any button on the temperature inside the projector even if the projector is not operated for more than 30 seconds, the timer display with "No signal" appears. Use the Point 7 8 buttons to the network function even after turning...
... lamp has been fully cooled down , the POWER indicator changes to set timer. 50 Off Power management function is turned off the projector. The projector's network function will be turned on if the input signal is reconnected or any button on the temperature inside the projector even if the projector is not operated for more than 30 seconds, the timer display with "No signal" appears. Use the Point 7 8 buttons to the network function even after turning...

Instruction Manual, PLC-XU84
Page 54
... operations while the projector is in operation and use it takes more time to 10 warning logs are displayed with the latest warning message at turning on the screen, indicating that the end of cooling fans from the following options in chronological order. ✔Note: •When the Factory default function is reached. ✔Note: •At turning on, the icon (Fig.2) will appear. See "Resetting the Lamp Counter...
... operations while the projector is in operation and use it takes more time to 10 warning logs are displayed with the latest warning message at turning on the screen, indicating that the end of cooling fans from the following options in chronological order. ✔Note: •When the Factory default function is reached. ✔Note: •At turning on, the icon (Fig.2) will appear. See "Resetting the Lamp Counter...
Instruction Manual, PLC-XU84
Page 58
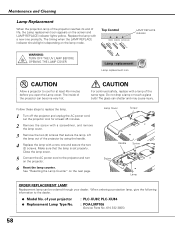
... power cord. Replace the lamp with a new one promptly. Do not drop a lamp or touch a glass bulb! The timing when the LAMP REPLACE indicator should light is set properly. WARNING: TURN OFF THE UV LAMP BEFORE OPENING THE LAMP COVER Top Control ON - Lamp Cover Screw Handle Screw Screw Lamp ORDER REPLACEMENT LAMP Replacement lamp can be ordered through your projector ● Replacement Lamp Type No. : PLC-XU87, PLC-XU84 : POA-LMP106 (Service Parts No. 610 332 3855) 58 Lift the lamp out of the projector by using the handle. 4 Replace the lamp...
... power cord. Replace the lamp with a new one promptly. Do not drop a lamp or touch a glass bulb! The timing when the LAMP REPLACE indicator should light is set properly. WARNING: TURN OFF THE UV LAMP BEFORE OPENING THE LAMP COVER Top Control ON - Lamp Cover Screw Handle Screw Screw Lamp ORDER REPLACEMENT LAMP Replacement lamp can be ordered through your projector ● Replacement Lamp Type No. : PLC-XU87, PLC-XU84 : POA-LMP106 (Service Parts No. 610 332 3855) 58 Lift the lamp out of the projector by using the handle. 4 Replace the lamp...

Instruction Manual, PLC-XU84
Page 59
... air circulation holes. LAMP HANDLING PRECAUTIONS This projector uses a high-pressure lamp which the projector and lamp are familiar with projector service. A dialog box appears showing the total accumulated time of the lamp. Maintenance and Cleaning Resetting the Lamp Counter Be sure to display the On-Screen Menu. When the Lamp counter is reset, the LAMP REPLACE indicator stops lighting and the Lamp replacement icon disappears. 1 Press the MENU button to reset the Lamp counter after the projector has cooled down. (Follow carefully the instructions...
... air circulation holes. LAMP HANDLING PRECAUTIONS This projector uses a high-pressure lamp which the projector and lamp are familiar with projector service. A dialog box appears showing the total accumulated time of the lamp. Maintenance and Cleaning Resetting the Lamp Counter Be sure to display the On-Screen Menu. When the Lamp counter is reset, the LAMP REPLACE indicator stops lighting and the Lamp replacement icon disappears. 1 Press the MENU button to reset the Lamp counter after the projector has cooled down. (Follow carefully the instructions...

Instruction Manual, PLC-XU84
Page 61
... the projection lamp is preparing for service and checkup. The projector has been cooled down ✽ enough and the temperature returns to turn on . (The WARNING indicator keeps blinking.) Check and clean the filter. Do not leave the projector on the projector, the WARNING indicator stops blinking. When this indicator lights yellow, replace the projection lamp with a new one promptly. When turning on . The projector cannot be turned on the projector. ✽ The projector is in the Power management mode. ✽ The projector's Network...
... the projection lamp is preparing for service and checkup. The projector has been cooled down ✽ enough and the temperature returns to turn on . (The WARNING indicator keeps blinking.) Check and clean the filter. Do not leave the projector on the projector, the WARNING indicator stops blinking. When this indicator lights yellow, replace the projection lamp with a new one promptly. When turning on . The projector cannot be turned on the projector. ✽ The projector is in the Power management mode. ✽ The projector's Network...
Instruction Manual, PLC-XU84
Page 62
... the POWER indicator stops blinking to display an image after the POWER indicator turns red. See pages 17-19. - See if the input signal is correctly output from audio input source. - It takes about 30 seconds to turn on the projection lens. See page 21. - Select correct input source once again through menu operation. See pages 28-29, 38-39. - Check the Ceiling/Rear function. See page 49. - Check the audio cable connection from your computer or video...
... the POWER indicator stops blinking to display an image after the POWER indicator turns red. See pages 17-19. - See if the input signal is correctly output from audio input source. - It takes about 30 seconds to turn on the projection lens. See page 21. - Select correct input source once again through menu operation. See pages 28-29, 38-39. - Check the Ceiling/Rear function. See page 49. - Check the audio cable connection from your computer or video...

Instruction Manual, PLC-XU84
Page 65
... Input search Off/On1/On2 Standby mode Eco/Normal Power management Off Ready Shut down Timer (1-30 Min.) Quit On start On/Off Lamp control Normal/Auto/Eco Pointer Spotlight/Pointer Quit Remote control Code 1-Code 8 Security Key lock Off Projector Remote control Quit PIN code lock PIN code lock entry Off/On1/On2 PIN code change Quit Quit Fan L1/L2 Fan control Normal/Max Warning log Lamp counter Hour(s) Reset Yes/No Quit Filter counter Hour(s) Off/100H/200H/300H Reset Yes/No Quit Factory default...
... Input search Off/On1/On2 Standby mode Eco/Normal Power management Off Ready Shut down Timer (1-30 Min.) Quit On start On/Off Lamp control Normal/Auto/Eco Pointer Spotlight/Pointer Quit Remote control Code 1-Code 8 Security Key lock Off Projector Remote control Quit PIN code lock PIN code lock entry Off/On1/On2 PIN code change Quit Quit Fan L1/L2 Fan control Normal/Max Warning log Lamp counter Hour(s) Reset Yes/No Quit Filter counter Hour(s) Off/100H/200H/300H Reset Yes/No Quit Factory default...
Instruction Manual, PLC-XU84 Network Set Up
Page 4
... 30 Factory Default Setting of the Operation Screen 19 Network Connection Standby Display 20 NetworkModule Client 21 NetworkModule Moderator 23 4. Names and Functions of the Wired LAN 31 5. Wireless LAN Configurations 33 Attaching the USB Wireless LAN Adapter 34 Setting the Network Environment 34 Setting Procedures 34 Easy Setting 36 Setting Procedures 36 User PIN Code / Wireless Information / Wireless Factory Default 37 Wireless LAN Factory Default Settings 38 6. Setup Procedures 15 Installing the Software 17 3. Table of Contents Compliance 2 Safety Instructions...
... 30 Factory Default Setting of the Operation Screen 19 Network Connection Standby Display 20 NetworkModule Client 21 NetworkModule Moderator 23 4. Names and Functions of the Wired LAN 31 5. Wireless LAN Configurations 33 Attaching the USB Wireless LAN Adapter 34 Setting the Network Environment 34 Setting Procedures 34 Easy Setting 36 Setting Procedures 36 User PIN Code / Wireless Information / Wireless Factory Default 37 Wireless LAN Factory Default Settings 38 6. Setup Procedures 15 Installing the Software 17 3. Table of Contents Compliance 2 Safety Instructions...

Instruction Manual, PLC-XU84 Network Set Up
Page 20
... projector is set on the networks. Display the signal level of the projector. While the "Please wait..." The unlocked display means not encrypted, the locked display means encrypted. (For Wired LAN, unlocked illustration will appear and then change into "Ready for the Wireless LAN setting) Status bar qw e r t yui q NETWORKMODULE "NETWORKMODULE" is for use" message to show last 6 characters of the Operation Screen Network Connection Standby Display Select projector input either "Wired" or "Wireless" and the Network connection standby display...
... projector is set on the networks. Display the signal level of the projector. While the "Please wait..." The unlocked display means not encrypted, the locked display means encrypted. (For Wired LAN, unlocked illustration will appear and then change into "Ready for the Wireless LAN setting) Status bar qw e r t yui q NETWORKMODULE "NETWORKMODULE" is for use" message to show last 6 characters of the Operation Screen Network Connection Standby Display Select projector input either "Wired" or "Wireless" and the Network connection standby display...

Instruction Manual, PLC-XU84 Network Set Up
Page 34
... short time, the message changes to the installation location. Setting Procedures With Easy setting, you use , the lamp will start to "6. Inserting the adapter after verifying the shape of the projector. If the USB Wireless LAN Adapter is used for details. 34 5. Wireless LAN Configurations Attaching the USB Wireless LAN Adapter Insert the USB Wireless LAN Adapter into the USB terminal of the Operation Screen" ➔ "Network Connection Standby Display" (p.20). USB Wireless LAN Adapter Setting the Network Environment Set the Wireless LAN network through the projector menu...
... short time, the message changes to the installation location. Setting Procedures With Easy setting, you use , the lamp will start to "6. Inserting the adapter after verifying the shape of the projector. If the USB Wireless LAN Adapter is used for details. 34 5. Wireless LAN Configurations Attaching the USB Wireless LAN Adapter Insert the USB Wireless LAN Adapter into the USB terminal of the Operation Screen" ➔ "Network Connection Standby Display" (p.20). USB Wireless LAN Adapter Setting the Network Environment Set the Wireless LAN network through the projector menu...
Instruction Manual, PLC-XU84 Network Set Up
Page 38
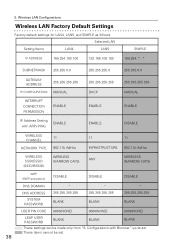
....255.0.0 255.255.255.0 255.255.0.0 GATEWAY ADDRESS 255.255.255.255 IP CONFIGURATION MANUAL INTERRUPT CONNECTION PERMISSION ENABLE 255.255.255.255 DHCP ENABLE 255.255.255.255 MANUAL ENABLE IP Address Setting ENABLE with Browser" (pp.39-54). These items cannot be made only from "6. Wireless LAN Configurations Wireless LAN Factory Default Settings Factory default settings for LAN4, LAN5, and SIMPLE as follows. Configurations...
....255.0.0 255.255.255.0 255.255.0.0 GATEWAY ADDRESS 255.255.255.255 IP CONFIGURATION MANUAL INTERRUPT CONNECTION PERMISSION ENABLE 255.255.255.255 DHCP ENABLE 255.255.255.255 MANUAL ENABLE IP Address Setting ENABLE with Browser" (pp.39-54). These items cannot be made only from "6. Wireless LAN Configurations Wireless LAN Factory Default Settings Factory default settings for LAN4, LAN5, and SIMPLE as follows. Configurations...

Instruction Manual, PLC-XU84 Network Set Up
Page 86
.... Factory Default If you wish to use the filter. Fan Adjust the rotating speed of the remote control product at the same time. Check the High Speed box if you click "P-TIMER", the timer will appear. Input Search You can also reset the Filter Counter. Enter the count-down menu. Lamp Counter You can set PC adjustment and correct keystone distortion. P-TIMER When you wish to ceiling-mount projection. Logo Select Select the image to show on the starting -up display...
.... Factory Default If you wish to use the filter. Fan Adjust the rotating speed of the remote control product at the same time. Check the High Speed box if you click "P-TIMER", the timer will appear. Input Search You can also reset the Filter Counter. Enter the count-down menu. Lamp Counter You can set PC adjustment and correct keystone distortion. P-TIMER When you wish to ceiling-mount projection. Logo Select Select the image to show on the starting -up display...


