
Assembly Manual
Page 3
... parts. Important Safety Instructions I This icon means a potentially hazardous situation which, if not avoided, could compromise the safety of this machine and will void the warranty. • If replacement parts are assembling at a close range. Obey the following warnings: Read and understand all times. • Do not connect power supply to change the design or functionality of the product. Keep the Owner's Manual...
... parts. Important Safety Instructions I This icon means a potentially hazardous situation which, if not avoided, could compromise the safety of this machine and will void the warranty. • If replacement parts are assembling at a close range. Obey the following warnings: Read and understand all times. • Do not connect power supply to change the design or functionality of the product. Keep the Owner's Manual...
Assembly Manual
Page 4
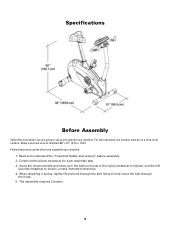
... insert the bolt through the holes. 5. Specifications Before Assembly Select the area where you assemble your machine. When attaching 2 pieces, lightly lift and look through the bolt holes to loosen, unless instructed otherwise. 4. Follow these basic points when you are going to set up and operate your machine: 1. The assembly requires 2 people. 4 Read and understand the "Important Safety Instructions" before assembly. 2. Allow a workout area...
... insert the bolt through the holes. 5. Specifications Before Assembly Select the area where you assemble your machine. When attaching 2 pieces, lightly lift and look through the bolt holes to loosen, unless instructed otherwise. 4. Follow these basic points when you are going to set up and operate your machine: 1. The assembly requires 2 people. 4 Read and understand the "Important Safety Instructions" before assembly. 2. Allow a workout area...
Assembly Manual
Page 16
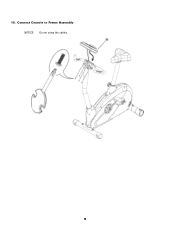
10. Connect Console to Frame Assembly NOTICE: Do not crimp the cables. 16
10. Connect Console to Frame Assembly NOTICE: Do not crimp the cables. 16

Owner's Manual
Page 2
... Instructions 3 User Setup 13 Specifications 5 Workout Programs 14 Features 6 Pausing or Stopping 16 Console 7 Console Setup Mode 16 Remote Heart Rate Monitor 9 Maintenance 17 Operations 11 Troubleshooting 19 Adjustments 11 Quick Start/Manual Program 12 Manuel du Propriétaire 25 To validate warranty support, keep the original proof of purchase and record the following information: Serial Number Date of Purchase To register your product, please call 1 (800) 605-3369. If you have questions or problems...
... Instructions 3 User Setup 13 Specifications 5 Workout Programs 14 Features 6 Pausing or Stopping 16 Console 7 Console Setup Mode 16 Remote Heart Rate Monitor 9 Maintenance 17 Operations 11 Troubleshooting 19 Adjustments 11 Quick Start/Manual Program 12 Manuel du Propriétaire 25 To validate warranty support, keep the original proof of purchase and record the following information: Serial Number Date of Purchase To register your product, please call 1 (800) 605-3369. If you have questions or problems...

Owner's Manual
Page 3
... Positional Adjustment Devices. Keep Owner's Manual for future reference Read and understand all power before you start an exercise program. This machine contains moving parts. • Set up and operate this machine on a solid, level, horizontal surface. • Stabilize the Pedals before you use the machine again. Be sure to anticipate that changes in speed and resistance level can occur during exercise. Please consult the "Safety Warning Labels and Serial Number...
... Positional Adjustment Devices. Keep Owner's Manual for future reference Read and understand all power before you start an exercise program. This machine contains moving parts. • Set up and operate this machine on a solid, level, horizontal surface. • Stabilize the Pedals before you use the machine again. Be sure to anticipate that changes in speed and resistance level can occur during exercise. Please consult the "Safety Warning Labels and Serial Number...

Owner's Manual
Page 4
... d'avertissement endommagée, illisible ou manquante. • Cette machine est à usage domestique uniquement. Record serial number in the Serial Number field at the beginning of this machine is 300 lbs (136 kg). • Replace any "Caution", "Warning" or "Danger" label that is illegible, damaged, or removed. • This machine is not used while using this machine. • The maximum user weight for this manual. 4
... d'avertissement endommagée, illisible ou manquante. • Cette machine est à usage domestique uniquement. Record serial number in the Serial Number field at the beginning of this machine is 300 lbs (136 kg). • Replace any "Caution", "Warning" or "Danger" label that is illegible, damaged, or removed. • This machine is not used while using this machine. • The maximum user weight for this manual. 4
Owner's Manual
Page 6
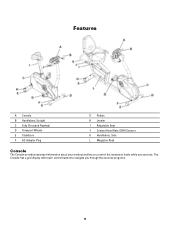
The Console has a grid display with touch control buttons to navigate you exercise. Features A Console B Handlebars, Upright C Fully Shrouded Flywheel D Transport Wheels E Stabilizers F AC Adapter Plug G Pedals H Leveler I Adjustable Seat J Contact Heart Rate (CHR) Sensors K Handlebars, Side L Magazine Rack Console The Console provides important information about your workout and lets you control the resistance levels while you through the exercise programs. 6
The Console has a grid display with touch control buttons to navigate you exercise. Features A Console B Handlebars, Upright C Fully Shrouded Flywheel D Transport Wheels E Stabilizers F AC Adapter Plug G Pedals H Leveler I Adjustable Seat J Contact Heart Rate (CHR) Sensors K Handlebars, Side L Magazine Rack Console The Console provides important information about your workout and lets you control the resistance levels while you through the exercise programs. 6

Owner's Manual
Page 7
...workout, confirms information , or resumes a paused workout I Schwinn Advantage™ - Reads heart rate signal from heart rate chest strap C STOP/RESET button - Pauses an active workout, and if pushed again, ends the workout D Increase button (▲) - Push STOP/RESET for 6 seconds each. Console Features A Backlit LCD Display B Telemetric Heart Rate - Increases a value (age, time, distance, calories, or workout resistance level) E Decrease button (▼) - Starts user data edit mode LCD The multi-function, backlit LCD shows your workout variables for manual control...
...workout, confirms information , or resumes a paused workout I Schwinn Advantage™ - Reads heart rate signal from heart rate chest strap C STOP/RESET button - Pauses an active workout, and if pushed again, ends the workout D Increase button (▲) - Push STOP/RESET for 6 seconds each. Console Features A Backlit LCD Display B Telemetric Heart Rate - Increases a value (age, time, distance, calories, or workout resistance level) E Decrease button (▼) - Starts user data edit mode LCD The multi-function, backlit LCD shows your workout variables for manual control...
Owner's Manual
Page 9
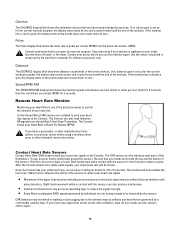
... workout. The Console shows your Heart Rate in kilometers per hour (km/h) or miles per hour (mph) for 6 seconds, then the revolutions per minute (BPM) from a Heart Rate Chest Strap Transmitter. Pulse The Pulse display field shows the heart rate in the workout. Use the values calculated or measured by the sensors. To use the machine again. Remote Heart Rate Monitor Monitoring your hands for 6 seconds. Once the Console has your initial heart rate, do not move...
... workout. The Console shows your Heart Rate in kilometers per hour (km/h) or miles per hour (mph) for 6 seconds, then the revolutions per minute (BPM) from a Heart Rate Chest Strap Transmitter. Pulse The Pulse display field shows the heart rate in the workout. Use the values calculated or measured by the sensors. To use the machine again. Remote Heart Rate Monitor Monitoring your hands for 6 seconds. Once the Console has your initial heart rate, do not move...

Owner's Manual
Page 11
... the Pedal, move the seat up on the upright bike or rearward on the recumbent bike. If your doctor before you start an exercise program. Step off the bike before you use the machine again. Be sure that allow you adjust the seat. • Upright bike-pull the adjustment knob on the seat bracket. Slide the seat forward or rearward to fully tighten and make sure the seat is fully engaged. The adjustment knob will need the...
... the Pedal, move the seat up on the upright bike or rearward on the recumbent bike. If your doctor before you start an exercise program. Step off the bike before you use the machine again. Be sure that allow you adjust the seat. • Upright bike-pull the adjustment knob on the seat bracket. Slide the seat forward or rearward to fully tighten and make sure the seat is fully engaged. The adjustment knob will need the...

Owner's Manual
Page 12
... Workout Program Selection To go to the Program Menu, you start the QUICK START / MANUAL program. 3. Pedal straps can be reached. 3. Carefully move the console tilt to the exercise bike. 1. Use the Increase/Decrease buttons to change the resistance level. Rotate the Pedals until one of the seat bracket. Push STOP when done with straps provide secure footing to one can be left in the User menu. Foot Position / Pedal Strap Adjustment Foot pedals with your workout...
... Workout Program Selection To go to the Program Menu, you start the QUICK START / MANUAL program. 3. Pedal straps can be reached. 3. Carefully move the console tilt to the exercise bike. 1. Use the Increase/Decrease buttons to change the resistance level. Rotate the Pedals until one of the seat bracket. Push STOP when done with straps provide secure footing to one can be left in the User menu. Foot Position / Pedal Strap Adjustment Foot pedals with your workout...
Owner's Manual
Page 13
...). 2. The Schwinn Advantage™ feature automatically records your fitness progress and edit data. Total calories 6. Age 12. From the POWER UP MODE screen, push the Increase/Decrease buttons to move off the screen to make the User selection. 13 Note: Push the STOP/RESET button to go to start a workout. If your selection. To set up the Custom Workout, push START/ENTER 2 times. Weight change (Starting Weight - Total number of...
...). 2. The Schwinn Advantage™ feature automatically records your fitness progress and edit data. Total calories 6. Age 12. From the POWER UP MODE screen, push the Increase/Decrease buttons to move off the screen to make the User selection. 13 Note: Push the STOP/RESET button to go to start a workout. If your selection. To set up the Custom Workout, push START/ENTER 2 times. Weight change (Starting Weight - Total number of...
Owner's Manual
Page 14
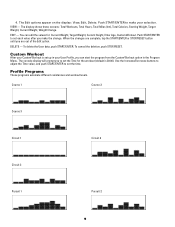
... 2 Circuit 3 Pursuit 1 Pursuit 2 14 The Edit options appear on the display: View, Edit, Delete. VIEW - When the changes are complete, tap the START/ENTER or STOP/RESET button until you make your User Profile, you to make the change. Profile Programs These programs automate different resistances and workout levels. EDIT - DELETE - Use the Increase/Decrease buttons to adjust the Time value, and push START/ENTER to set the Time...
... 2 Circuit 3 Pursuit 1 Pursuit 2 14 The Edit options appear on the display: View, Edit, Delete. VIEW - When the changes are complete, tap the START/ENTER or STOP/RESET button until you make your User Profile, you to make the change. Profile Programs These programs automate different resistances and workout levels. EDIT - DELETE - Use the Increase/Decrease buttons to adjust the Time value, and push START/ENTER to set the Time...

Owner's Manual
Page 15
... weight. When the test starts, the power (Watts) slowly increases. The program monitors your workout: 1. If you are a Guest User, you to change the resistance level at a given heart rate. Enter the distance with information about fitness zones, please refer to work harder, and as a result, your workout. Step on the machine or from your User profile, the Target Heart Rate program uses your previous scores and not other user setup information to produce a "Fitness Score". Push START...
... weight. When the test starts, the power (Watts) slowly increases. The program monitors your workout: 1. If you are a Guest User, you to change the resistance level at a given heart rate. Enter the distance with information about fitness zones, please refer to work harder, and as a result, your workout. Step on the machine or from your User profile, the Target Heart Rate program uses your previous scores and not other user setup information to produce a "Fitness Score". Push START...

Owner's Manual
Page 16
... software version to change between ELLIPTICAL and BIKE. 3. Push START/ENTER. 10. The exercise starts at 1. 3. To adjust the resistance, use ("SW30 V1.0" = x20 machine, "SW40 V1.0" = x40 machine, or "NLS 514" = 514 machine). 13. You can start the motivational messages. Console Setup Mode The Console Setup Mode lets you are working out. 1. The Console shows TOTAL HOURS. 9. Push Increase/Decrease to pause your workout, or push the STOP/RESET button to set . 4. The PULSE display shows the...
... software version to change between ELLIPTICAL and BIKE. 3. Push START/ENTER. 10. The exercise starts at 1. 3. To adjust the resistance, use ("SW30 V1.0" = x20 machine, "SW40 V1.0" = x40 machine, or "NLS 514" = 514 machine). 13. You can start the motivational messages. Console Setup Mode The Console Setup Mode lets you are working out. 1. The Console shows TOTAL HOURS. 9. Push Increase/Decrease to pause your workout, or push the STOP/RESET button to set . 4. The PULSE display shows the...

Owner's Manual
Page 17
... for loose, broken, damaged, or worn parts. Do not use , examine the exercise machine for smooth seat slider, handlebar slider, and console tilt operation. Repair or replace all bolts and screws are tight. Note: Avoid excessive moisture on the Console. Check pedals and crank arms and tighten as necessary. 17 Daily Monthly Weekly Before each workout, use petroleum based products. If needed, sparingly apply a thin coating of wear...
... for loose, broken, damaged, or worn parts. Do not use , examine the exercise machine for smooth seat slider, handlebar slider, and console tilt operation. Repair or replace all bolts and screws are tight. Note: Avoid excessive moisture on the Console. Check pedals and crank arms and tighten as necessary. 17 Daily Monthly Weekly Before each workout, use petroleum based products. If needed, sparingly apply a thin coating of wear...

Owner's Manual
Page 19
... and rear (upright) of interference (TV, Microwave, etc). Dry or calloused hands Sensors may require the seat back be replaced. Check data cable integrity All wires in cable should be "Polar" compatible. Unit operates but Telemetric (if equipped) Chest Strap HR not displayed Strap should be intact. These are secure and undamaged. Interference Try moving unit away from handlebars and cable to access cable box. Troubleshooting Problem...
... and rear (upright) of interference (TV, Microwave, etc). Dry or calloused hands Sensors may require the seat back be replaced. Check data cable integrity All wires in cable should be "Polar" compatible. Unit operates but Telemetric (if equipped) Chest Strap HR not displayed Strap should be intact. These are secure and undamaged. Interference Try moving unit away from handlebars and cable to access cable box. Troubleshooting Problem...

Owner's Manual
Page 20
... replaced. Small latch on flywheel. Contact Customer Care for 3 minutes. Console displays "E2" error code Check data cable integrity Check data cable connections/orientation Console Electronics No speed/RPM reading, Console displays Check data cable integrity "E3" error code Check data cable connections/orientation Check magnet position (requires shroud removal) Check RPM Sensor (requires shroud removal) Console shuts off (enters sleep mode) while in use Check data cable integrity Check data cable connections/orientation Reset Machine (if equipped with reset button...
... replaced. Small latch on flywheel. Contact Customer Care for 3 minutes. Console displays "E2" error code Check data cable integrity Check data cable connections/orientation Console Electronics No speed/RPM reading, Console displays Check data cable integrity "E3" error code Check data cable connections/orientation Check magnet position (requires shroud removal) Check RPM Sensor (requires shroud removal) Console shuts off (enters sleep mode) while in use Check data cable integrity Check data cable connections/orientation Reset Machine (if equipped with reset button...

Owner's Manual
Page 21
Crank should be tightened securely to crank. Insure connection is securely tightened. 21 Insure knob is not cross-threaded. Insure adjustment pin is locked into one of the seat post adjustment holes. Be sure cranks are connected at 180 degrees from each other. Pedals loose/unit difficult to pedal Seat post movement Check pedal to crank connection Check crank to axle connection Check locking pin Check adjustment knob Pedal should be tightened securely to axle.
Crank should be tightened securely to crank. Insure connection is securely tightened. 21 Insure knob is not cross-threaded. Insure adjustment pin is locked into one of the seat post adjustment holes. Be sure cranks are connected at 180 degrees from each other. Pedals loose/unit difficult to pedal Seat post movement Check pedal to crank connection Check crank to axle connection Check locking pin Check adjustment knob Pedal should be tightened securely to axle.

Warranty
Page 1
... days • Labor 90 days (Labor support does not include the installation of replacement parts involved in the initial product assembly and preventative maintenance services.) Support for Products Purchased Directly from state to state. Throughout the terms of Remedies EXCEPT AS OTHERWISE REQUIRED BY APPLICABLE LAW, THE PURCHASER'S EXCLUSIVE REMEDY IS LIMITED TO REPAIR OR REPLACEMENT OF ANY COMPONENT DEEMED BY NAUTILUS...
... days • Labor 90 days (Labor support does not include the installation of replacement parts involved in the initial product assembly and preventative maintenance services.) Support for Products Purchased Directly from state to state. Throughout the terms of Remedies EXCEPT AS OTHERWISE REQUIRED BY APPLICABLE LAW, THE PURCHASER'S EXCLUSIVE REMEDY IS LIMITED TO REPAIR OR REPLACEMENT OF ANY COMPONENT DEEMED BY NAUTILUS...


