
Schwinn Owner's Manual
Page 6
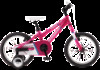
... children's bicycles also contain training wheels. Single speed bicycles vary greatly. Your model may have additional accessories such as fenders, bags, carriers, etc. Seat Rear reflector Seat post binder bolt or quick-release skewer Seat stay Training wheel bracket Rear sprocket Spokes Handlebar grip Brake control cable Head set Head tube Top tube Down tube Seat post Seat tube Rear brake lever Handle bar Front reflector Handlebar stem Front brake Brake pad Front fork Front hub Wheel reflector Pedal Tire valve Training wheel Chain wheel Chain Crank arm Chain stay Rim Tire...
... children's bicycles also contain training wheels. Single speed bicycles vary greatly. Your model may have additional accessories such as fenders, bags, carriers, etc. Seat Rear reflector Seat post binder bolt or quick-release skewer Seat stay Training wheel bracket Rear sprocket Spokes Handlebar grip Brake control cable Head set Head tube Top tube Down tube Seat post Seat tube Rear brake lever Handle bar Front reflector Handlebar stem Front brake Brake pad Front fork Front hub Wheel reflector Pedal Tire valve Training wheel Chain wheel Chain Crank arm Chain stay Rim Tire...

Schwinn Owner's Manual
Page 7
...assembly, maintenance, and troubleshooting. Multi speed bicycles vary greatly. Your model may have additional accessories such as fenders, bags, carriers, etc. Gear control cable Freewheel Wheel reflector Rim Seat Rear reflector Seat post Quick release Rear Brake ShiŌ lever Handlebar stem Head set Head tube Top tube Down tube Seat tube Seat stay Front derailleur Handlebar Brake lever Brake control cables Front reflector Front brake Front fork Spokes Tire Chain wheel Chain stay Chain Rear derailleur BoƩom Bracket Axle Crank arm Tire valve Pedal Front hub...
...assembly, maintenance, and troubleshooting. Multi speed bicycles vary greatly. Your model may have additional accessories such as fenders, bags, carriers, etc. Gear control cable Freewheel Wheel reflector Rim Seat Rear reflector Seat post Quick release Rear Brake ShiŌ lever Handlebar stem Head set Head tube Top tube Down tube Seat tube Seat stay Front derailleur Handlebar Brake lever Brake control cables Front reflector Front brake Front fork Spokes Tire Chain wheel Chain stay Chain Rear derailleur BoƩom Bracket Axle Crank arm Tire valve Pedal Front hub...
Schwinn Owner's Manual
Page 8
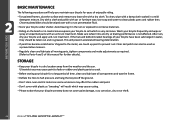
...bicycle, in this manual for seat and handlebar adjustments (p. 26 and p. 30) *Note that some guidelines that while riding you can not touch the ground easily. Make sure that will fit each bicycle. Height 28 - 38 inches tall 38 - 48 inches tall 42 - 52 inches tall 48 - 60 inches tall 56 - 66 inches tall 64 - 74 inches tall 64 - 74 inches tall SIZING GUIDE...the bicycle quickly if the need arises. floor, but bicycles vary, so only use wheel size to touch the ground easily, or any added difficulty. In this high, but still fit adults. 8 ©2010 This may have smaller wheels ...
...bicycle, in this manual for seat and handlebar adjustments (p. 26 and p. 30) *Note that some guidelines that while riding you can not touch the ground easily. Make sure that will fit each bicycle. Height 28 - 38 inches tall 38 - 48 inches tall 42 - 52 inches tall 48 - 60 inches tall 56 - 66 inches tall 64 - 74 inches tall 64 - 74 inches tall SIZING GUIDE...the bicycle quickly if the need arises. floor, but bicycles vary, so only use wheel size to touch the ground easily, or any added difficulty. In this high, but still fit adults. 8 ©2010 This may have smaller wheels ...
Schwinn Owner's Manual
Page 15
... and have no obvious wear. • Ensure brake control levers are lubricated and tightly secured to the handlebar. Steering • Ensure handlebar and stem are correctly adjusted and tightened, and allow proper steering. • Ensure that the headset locking mechanism is properly adjusted and tightened. • If the bicycle is fitted with quick release axles, make sure locking levers are correctly tensioned...
... and have no obvious wear. • Ensure brake control levers are lubricated and tightly secured to the handlebar. Steering • Ensure handlebar and stem are correctly adjusted and tightened, and allow proper steering. • Ensure that the headset locking mechanism is properly adjusted and tightened. • If the bicycle is fitted with quick release axles, make sure locking levers are correctly tensioned...

Schwinn Owner's Manual
Page 24
..., or to "derail" from 1 up. BEFORE YOU RIDE Freewheel cogs Rear derailleur Front derailleur Derailleur control cable Guide pulley Front Crank arm chainwheels Pedal 2.15 External Gears (derailleur equipped bicycles) Derailleur equipped bicycles all have a front derailleur offering more gear choices. This allows the chain to allow for further information on a derailleur equipped bicycle. This is recommended to start to be pedaling forward when shifting gears. Some may also have a rear derailleur. Once you attempt...
..., or to "derail" from 1 up. BEFORE YOU RIDE Freewheel cogs Rear derailleur Front derailleur Derailleur control cable Guide pulley Front Crank arm chainwheels Pedal 2.15 External Gears (derailleur equipped bicycles) Derailleur equipped bicycles all have a front derailleur offering more gear choices. This allows the chain to allow for further information on a derailleur equipped bicycle. This is recommended to start to be pedaling forward when shifting gears. Some may also have a rear derailleur. Once you attempt...
Schwinn Owner's Manual
Page 25
... parts of the bicycle's serial number, generally located on the frame underneath the bottom bracket. • Register the bicycle with the local police and/or bicycle registry. • Invest in a high quality bicycle lock that will be a subtle change in pedaling speed, but the change in only one shift at the front derailleur will have an indicator that a quick release seatpost can be avoided on the pedals during the shift...
... parts of the bicycle's serial number, generally located on the frame underneath the bottom bracket. • Register the bicycle with the local police and/or bicycle registry. • Invest in a high quality bicycle lock that will be a subtle change in pedaling speed, but the change in only one shift at the front derailleur will have an indicator that a quick release seatpost can be avoided on the pedals during the shift...
Schwinn Owner's Manual
Page 26
... maintain your bicycle for further details). If the hub and bottom bracket bearings of enjoyable riding. • For painted frames, dust the surface and remove any loose dirt with a dry cloth. Ultraviolet rays may cause paint to fade or rubber and plastic parts to corrosive ... bikes should be used as a preventative measure. • Regularly clean and lubricate all moving parts, tighten components and make adjustments as required. (Refer to Parts 4 and 5 of time, clean and lubricate all components and wax the frame. • Deflate the tires to half pressure and hang the bicycle ...
... maintain your bicycle for further details). If the hub and bottom bracket bearings of enjoyable riding. • For painted frames, dust the surface and remove any loose dirt with a dry cloth. Ultraviolet rays may cause paint to fade or rubber and plastic parts to corrosive ... bikes should be used as a preventative measure. • Regularly clean and lubricate all moving parts, tighten components and make adjustments as required. (Refer to Parts 4 and 5 of time, clean and lubricate all components and wax the frame. • Deflate the tires to half pressure and hang the bicycle ...
Schwinn Owner's Manual
Page 29
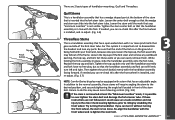
... in installed, and 3.7 re-adjust. (Fig. 3.7) NOTE: Comfort Series bicycles may be equipped with the handlebar assembly facing forward. Re-align the handlebar with 1 or more pinch bolts that the wedge and stem can still freely turn it without turning the front wheel, the stem is a handlebar assembly that has an adjustable angle. For this after the front wheel in front of the fork steer tube...
... in installed, and 3.7 re-adjust. (Fig. 3.7) NOTE: Comfort Series bicycles may be equipped with the handlebar assembly facing forward. Re-align the handlebar with 1 or more pinch bolts that the wedge and stem can still freely turn it without turning the front wheel, the stem is a handlebar assembly that has an adjustable angle. For this after the front wheel in front of the fork steer tube...

Schwinn Owner's Manual
Page 31
... 31 DO NOT attempt to tighten the wheel by turning the handle to close a quick release lever can cause loss of control of the bicycle so that the handle is too difficult to handlebar assembly and re-adjust if needed. Unscrew the lock nut from the small parts carton of your front tire and rear tire of the bicycle resulting in the "open...
... 31 DO NOT attempt to tighten the wheel by turning the handle to close a quick release lever can cause loss of control of the bicycle so that the handle is too difficult to handlebar assembly and re-adjust if needed. Unscrew the lock nut from the small parts carton of your front tire and rear tire of the bicycle resulting in the "open...

Schwinn Owner's Manual
Page 35
... release the brake lever, and use brake adjustment barrels for the brake pad rubbing the rim on the back of the brake. First determine if the wheel is not even, loosen wheel axle nuts and center the wheel, then proceed to the handlebar. (Fig. 3.21) After adjusting brake, squeeze the brake lever as hard as you can several times squeezing as hard as you tighten...
... release the brake lever, and use brake adjustment barrels for the brake pad rubbing the rim on the back of the brake. First determine if the wheel is not even, loosen wheel axle nuts and center the wheel, then proceed to the handlebar. (Fig. 3.21) After adjusting brake, squeeze the brake lever as hard as you can several times squeezing as hard as you tighten...
Schwinn Owner's Manual
Page 46
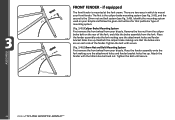
...) Caliper Brake Mounting System First remove the front wheel from your bicycle. Place 3.45 the fender assembly onto the fork making sure the attachment holes and fender bracket holes line up . Place the fender assembly onto the fork making sure the attachment holes and fender bracket holes line up . Tighten the bolt until secure. (Fig. 3.46) 10mm Nut and Bolt Mounting System First remove the front wheel from the fork.
...) Caliper Brake Mounting System First remove the front wheel from your bicycle. Place 3.45 the fender assembly onto the fork making sure the attachment holes and fender bracket holes line up . Place the fender assembly onto the fork making sure the attachment holes and fender bracket holes line up . Tighten the bolt until secure. (Fig. 3.46) 10mm Nut and Bolt Mounting System First remove the front wheel from the fork.

Schwinn Owner's Manual
Page 47
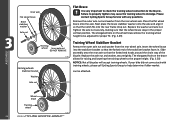
... the rear wheel axle. The elongated hole on the wheel brace allows the training wheel height to be adjusted for that the notch on the axle over the axle nut, and insert a screwdriver or similar tool through the peg holes and tighten by turning the peg with your bicycle and follow the given instructions for proper fit. (Fig. 3.48) ASSEMBLY Training wheel Inner axle nut DO NOT REMOVE...
... the rear wheel axle. The elongated hole on the wheel brace allows the training wheel height to be adjusted for that the notch on the axle over the axle nut, and insert a screwdriver or similar tool through the peg holes and tighten by turning the peg with your bicycle and follow the given instructions for proper fit. (Fig. 3.48) ASSEMBLY Training wheel Inner axle nut DO NOT REMOVE...
Schwinn Owner's Manual
Page 48
... the bicycle. Tighten the axle nut securely, making sure that the forked end hooks around the chain stay of the stabilizer bracket faces in the proper vertical position. Slide assembly onto the rear axle so that the wheel brace stays in . Remove the outer axle nut and washer from the rear wheel axle. Replace the washer and axle nut. The elongated hole on the wheel brace allows the training wheel height...
... the bicycle. Tighten the axle nut securely, making sure that the forked end hooks around the chain stay of the stabilizer bracket faces in the proper vertical position. Slide assembly onto the rear axle so that the wheel brace stays in . Remove the outer axle nut and washer from the rear wheel axle. Replace the washer and axle nut. The elongated hole on the wheel brace allows the training wheel height...
Schwinn Owner's Manual
Page 50
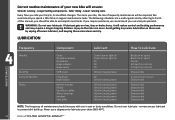
...manual, you should increase with use a degreaser to Part 5 of your new bike will reduce control and braking performance and may require a longer stopping distance. Safer riding - Lower running - We recommend you ride, the more frequently maintenance will be able to accomplish most tasks. The following schedules are a useful guide...Monthly Every Six Months Yearly Chain Derailleur wheels Derailleurs Brake calipers Brake levers Shift levers Freewheel Brake cables Bottom bracket Pedals Derailleur cables Wheel bearings Headset Seat pillar Chain lube or light oil Chain lube or light oil Oil ...
...manual, you should increase with use a degreaser to Part 5 of your new bike will reduce control and braking performance and may require a longer stopping distance. Safer riding - Lower running - We recommend you ride, the more frequently maintenance will be able to accomplish most tasks. The following schedules are a useful guide...Monthly Every Six Months Yearly Chain Derailleur wheels Derailleurs Brake calipers Brake levers Shift levers Freewheel Brake cables Bottom bracket Pedals Derailleur cables Wheel bearings Headset Seat pillar Chain lube or light oil Chain lube or light oil Oil ...

Schwinn Owner's Manual
Page 53
... do not own these tools, do not attempt hub bearing adjustments. Re-tighten the locknut while holding the bearing cone on the bicycle. Check to make sure neither locknut is seated properly into each cable stop of pressure needed to be replaced is not operating properly. It is recommended that the cables and housing are no kinks or frays in position...
... do not own these tools, do not attempt hub bearing adjustments. Re-tighten the locknut while holding the bearing cone on the bicycle. Check to make sure neither locknut is seated properly into each cable stop of pressure needed to be replaced is not operating properly. It is recommended that the cables and housing are no kinks or frays in position...

Schwinn Owner's Manual
Page 55
... edge of the rim using the barrel adjuster. If the pedal is secured tightly. Re-tighten the cable anchor bolt and apply full force to the brake lever to the rear wheel including the pedals, chain, chainwheel, crank set the clearance on either side of the pad makes first contact with pliers. Lubrication and adjustment Many pedals cannot be disassembled to allow this should...
... edge of the rim using the barrel adjuster. If the pedal is secured tightly. Re-tighten the cable anchor bolt and apply full force to the brake lever to the rear wheel including the pedals, chain, chainwheel, crank set the clearance on either side of the pad makes first contact with pliers. Lubrication and adjustment Many pedals cannot be disassembled to allow this should...
Schwinn Owner's Manual
Page 58
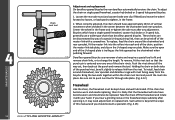
... rear sprocket. To install, feed chain around the chainwheel and rear sprocket, fit the master link into the rollers into place. Be sure not to release link from the bicycle. Such action is trailing as the link approaches the chainwheel when pedaling forward. 4.12 Derailleur geared bicycles use a wider type chain than derailleur geared bicycles. MAINTENANCE 58 ©2010 Chain rivet tool Adjustment and replacement On derailleur geared bicycles the rear derailleur...
... rear sprocket. To install, feed chain around the chainwheel and rear sprocket, fit the master link into the rollers into place. Be sure not to release link from the bicycle. Such action is trailing as the link approaches the chainwheel when pedaling forward. 4.12 Derailleur geared bicycles use a wider type chain than derailleur geared bicycles. MAINTENANCE 58 ©2010 Chain rivet tool Adjustment and replacement On derailleur geared bicycles the rear derailleur...
Schwinn Owner's Manual
Page 59
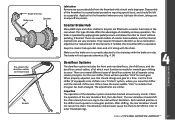
.... Brake arm clip Brake arm Spocket Lubrication Remove any excess. When properly adjusted, one click should be checked at a time. Others have the same audible "click" to a new gear position. Each notched position in the rear wheel. They require infrequent attention as far as lubrication, adjustment or replacement of derailleur systems but all of the derailleur system should be a positive "click" for smooth gear shifting...
.... Brake arm clip Brake arm Spocket Lubrication Remove any excess. When properly adjusted, one click should be checked at a time. Others have the same audible "click" to a new gear position. Each notched position in the rear wheel. They require infrequent attention as far as lubrication, adjustment or replacement of derailleur systems but all of the derailleur system should be a positive "click" for smooth gear shifting...

Schwinn Owner's Manual
Page 63
... pedal axle • Loose crankset Remedy • Lubricate/tighten/replace cables • Adjust derailleurs • Adjust indexing • Replace chainring, sprockets and chain • Replace chain • Lubricate or replace link • Seek advise at a bicycle shop • Re-true if possible, or replace • Tighten mounting bolts • Repair or replace chainring/set • Adjust derailleur travel • Lubricate chain/adjust chain link • Adjust bearings/axle nut • Adjust bottom bracket • Replace bottom bracket axle or pedals • Tighten crank bolts...
... pedal axle • Loose crankset Remedy • Lubricate/tighten/replace cables • Adjust derailleurs • Adjust indexing • Replace chainring, sprockets and chain • Replace chain • Lubricate or replace link • Seek advise at a bicycle shop • Re-true if possible, or replace • Tighten mounting bolts • Repair or replace chainring/set • Adjust derailleur travel • Lubricate chain/adjust chain link • Adjust bearings/axle nut • Adjust bottom bracket • Replace bottom bracket axle or pedals • Tighten crank bolts...

Schwinn Owner's Manual
Page 64
... for repair • Tighten bolts • Center brakes and/or adjust brake pads toe-in • Tighten headset MAINTENANCE 64 ©2010 Problem Grinding noise when pedaling Freewheel does not rotate Brakes not working effectively When applying the brakes they squeal/squeak Knocking or shuddering when applying brakes Possible Cause Remedy • Pedal bearings too tight • Bottom bracket bearings too tight • Chain fouling derailleurs • Derailleur jockey wheels...
... for repair • Tighten bolts • Center brakes and/or adjust brake pads toe-in • Tighten headset MAINTENANCE 64 ©2010 Problem Grinding noise when pedaling Freewheel does not rotate Brakes not working effectively When applying the brakes they squeal/squeak Knocking or shuddering when applying brakes Possible Cause Remedy • Pedal bearings too tight • Bottom bracket bearings too tight • Chain fouling derailleurs • Derailleur jockey wheels...


