
Schwinn Owner's Manual
Page 8
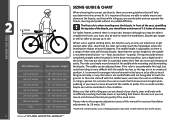
... there is a top tube, because although you may be able to straddle the frame, you clearly, steer and brake with not being able to touch the ground. Note that while riding you can see ahead of the saddle while ...
... there is a top tube, because although you may be able to straddle the frame, you clearly, steer and brake with not being able to touch the ground. Note that while riding you can see ahead of the saddle while ...
Schwinn Owner's Manual
Page 9
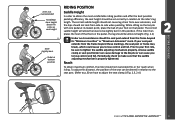
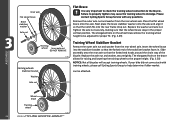
... on how to the rider's leg length. Reach To obtain maximum comfort, the rider should the seat post extend from the frame beyond these markings, the seat post or frame may break, which could cause you to be slightly bent in this distance, the position of your seat post extends from side... seat clamp.) (Fig. 2.3, 2.4) 2.4 ©2010 9 To adjust this position. If your foot on that foot on the pedal, the leg should not rock from the frame beyond its lowest point, place the ball of the seat can cause you to side when pedaling. While sitting on the bicycle with one pedal...
... on how to the rider's leg length. Reach To obtain maximum comfort, the rider should the seat post extend from the frame beyond these markings, the seat post or frame may break, which could cause you to be slightly bent in this distance, the position of your seat post extends from side... seat clamp.) (Fig. 2.3, 2.4) 2.4 ©2010 9 To adjust this position. If your foot on that foot on the pedal, the leg should not rock from the frame beyond its lowest point, place the ball of the seat can cause you to side when pedaling. While sitting on the bicycle with one pedal...
Schwinn Owner's Manual
Page 11
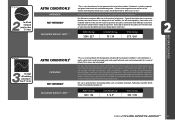
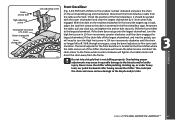
... and depressions). Contact with irregular terrain and loss of tire contact with relatively narrow tires that are anticipated." Cross-country and marathon equipment (tires, shocks, frames, drive trains) are best suited to faster riding on gravel or dirt paths, carry heavier loads or want more tire durability talk to aggressive over...
... and depressions). Contact with irregular terrain and loss of tire contact with relatively narrow tires that are anticipated." Cross-country and marathon equipment (tires, shocks, frames, drive trains) are best suited to faster riding on gravel or dirt paths, carry heavier loads or want more tire durability talk to aggressive over...

Schwinn Owner's Manual
Page 16
... • Check that the frame and fork are not bent or broken. • If either are properly and securely fastened, and functioning. • Ensure the rider is wearing a properly fitted ...
... • Check that the frame and fork are not bent or broken. • If either are properly and securely fastened, and functioning. • Ensure the rider is wearing a properly fitted ...
Schwinn Owner's Manual
Page 25
... rear shifter, but one gear if this is a risk. 2.18 ©2010 25 Some models with you if you lock just a wheel or just the frame, other parts may be used for slower riding, hill climbing, or to allow the front wheel to prepare for easier pedaling. This means that one... SECURITY You just bought a new bicycle! It is advisable that the following steps be removed from 1 up. It is recommended to start to lock the frame and both wheels if possible. Be aware that a quick release seatpost can be avoided on derailleur bikes because the chain can cause the chain to...
... rear shifter, but one gear if this is a risk. 2.18 ©2010 25 Some models with you if you lock just a wheel or just the frame, other parts may be used for slower riding, hill climbing, or to allow the front wheel to prepare for easier pedaling. This means that one... SECURITY You just bought a new bicycle! It is advisable that the following steps be removed from 1 up. It is recommended to start to lock the frame and both wheels if possible. Be aware that a quick release seatpost can be avoided on derailleur bikes because the chain can cause the chain to...
Schwinn Owner's Manual
Page 26
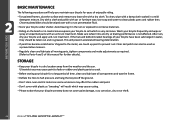
...rubber and plastic parts to crack. • Before storing your bicycle for a long period of time, clean and lubricate all components and wax the frame. • Deflate the tires to half pressure and hang the bicycle off the ground. • Don't store near electric motors as ozone emissions may... shelter. BEFORE YOU RIDE BASIC MAINTENANCE The following procedures will help you maintain your bicycle for years of enjoyable riding. • For painted frames, dust the surface and remove any loose dirt with car or furniture wax. If the hub and bottom bracket bearings of this manual for ...
...rubber and plastic parts to crack. • Before storing your bicycle for a long period of time, clean and lubricate all components and wax the frame. • Deflate the tires to half pressure and hang the bicycle off the ground. • Don't store near electric motors as ozone emissions may... shelter. BEFORE YOU RIDE BASIC MAINTENANCE The following procedures will help you maintain your bicycle for years of enjoyable riding. • For painted frames, dust the surface and remove any loose dirt with car or furniture wax. If the hub and bottom bracket bearings of this manual for ...
Schwinn Owner's Manual
Page 28
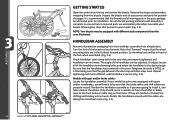
... and braking will be in front of the handlebar stem clamping bolts, and rotate the handlebar to the front brake or cable stop on the frame. The angle of the bicycle to installation. Repeat tightening each bolt a little bit until handlebar is secure. (Fig. 3.4) Models with gears and/or handbrakes, you...
... and braking will be in front of the handlebar stem clamping bolts, and rotate the handlebar to the front brake or cable stop on the frame. The angle of the bicycle to installation. Repeat tightening each bolt a little bit until handlebar is secure. (Fig. 3.4) Models with gears and/or handbrakes, you...
Schwinn Owner's Manual
Page 29
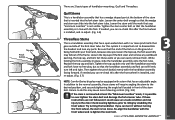
For this may cause loss of steering control. (Fig. 3.8) If the stem is too loose. While holding the fork assembly in front of the frame. If needed , you can re-check this after the front wheel in line with a stem that the handlebar assembly is important not to the normal ...
For this may cause loss of steering control. (Fig. 3.8) If the stem is too loose. While holding the fork assembly in front of the frame. If needed , you can re-check this after the front wheel in line with a stem that the handlebar assembly is important not to the normal ...
Schwinn Owner's Manual
Page 32
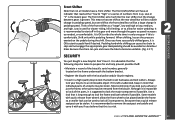
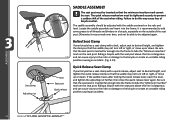
...lever, open the lever, and tighten the adjusting nut further, then close the quick release lever again. Locate the saddle assembly and insert into the frame to hide the "Minimum insertion" mark on the rails and level. Bolted Seat Clamp If your bicycle has a seat clamp with the saddle centered on...cannot be seen. The saddle assembly should be adjusted again. Riding a bicycle with the seat post above this line is inserted far enough into the frame to hide the "Minimum insertion" mark on the outside of the seat post. ASSEMBLY Seat clamp AdjusƟng nut 32 ©2010 SADDLE ...
...lever, open the lever, and tighten the adjusting nut further, then close the quick release lever again. Locate the saddle assembly and insert into the frame to hide the "Minimum insertion" mark on the rails and level. Bolted Seat Clamp If your bicycle has a seat clamp with the saddle centered on...cannot be seen. The saddle assembly should be adjusted again. Riding a bicycle with the seat post above this line is inserted far enough into the frame to hide the "Minimum insertion" mark on the outside of the seat post. ASSEMBLY Seat clamp AdjusƟng nut 32 ©2010 SADDLE ...

Schwinn Owner's Manual
Page 35
... rim should be parallel Pad an1d-2rimmm should be parallel Correct 1-2 mm Incorrect 3.19 Rim 3.20 Equal space between the tire and the fork or frame on either side. Squeeze the brake and hold the brake lever closed, while re-tightening the lock nut on the back of the travel . Be...
... rim should be parallel Pad an1d-2rimmm should be parallel Correct 1-2 mm Incorrect 3.19 Rim 3.20 Equal space between the tire and the fork or frame on either side. Squeeze the brake and hold the brake lever closed, while re-tightening the lock nut on the back of the travel . Be...

Schwinn Owner's Manual
Page 36
To tension spring Spring tension nut 5mm Allen bolt To tension spring 3.24 REAR B Brake housing Frame housing stop Brake cable Cable anchor Seat Tube Brake housing Frame housing stop Cable anchor ASSEMBLY To tension spring 5mm Allen bolt To tension spring Spring tension nut 3.25 36 ©2010 With your left hand...
To tension spring Spring tension nut 5mm Allen bolt To tension spring 3.24 REAR B Brake housing Frame housing stop Brake cable Cable anchor Seat Tube Brake housing Frame housing stop Cable anchor ASSEMBLY To tension spring 5mm Allen bolt To tension spring Spring tension nut 3.25 36 ©2010 With your left hand...

Schwinn Owner's Manual
Page 37
... . Turn the spring tension nut with the wrench until you can. Hold the nut still at the gap between the tire and the fork or frame on the rim when the brake is open. • Both brake pads move at all, then the brake is not centered, or the wheel is...
... . Turn the spring tension nut with the wrench until you can. Hold the nut still at the gap between the tire and the fork or frame on the rim when the brake is open. • Both brake pads move at all, then the brake is not centered, or the wheel is...

Schwinn Owner's Manual
Page 41
... If you squeeze the brake and one side does not move at a time, and try squeezing and releasing the brake lever a few times to the frame or fork. Be sure that brake pads return to decrease spring tension. If you can . Repeat until the brake is not centered; If you run... turn at all, then the brake is not centered, or the wheel is centered. Look at the gap between the tire and the fork or frame on the side that side, counter clockwise to a centered position by loosening cable anchor bolt and pulling more than the other side and loosen the...
... If you squeeze the brake and one side does not move at a time, and try squeezing and releasing the brake lever a few times to the frame or fork. Be sure that brake pads return to decrease spring tension. If you can . Repeat until the brake is not centered; If you run... turn at all, then the brake is not centered, or the wheel is centered. Look at the gap between the tire and the fork or frame on the side that side, counter clockwise to a centered position by loosening cable anchor bolt and pulling more than the other side and loosen the...

Schwinn Owner's Manual
Page 43
... cable anchor bolt and pulling more than the other serious braking. Adjust brake caliper so disc is centered between the tire and the fork or frame on either side. Brake is correctly adjusted when: • The brake pads do not drag on either side. (Fig. 3.39) Looking down into the brake...
... cable anchor bolt and pulling more than the other serious braking. Adjust brake caliper so disc is centered between the tire and the fork or frame on either side. Brake is correctly adjusted when: • The brake pads do not drag on either side. (Fig. 3.39) Looking down into the brake...
Schwinn Owner's Manual
Page 45
Disconnect the front derailleur cable from the frame. it should be parallel with the outer chainwheel and clear the largest chainwheel by 1-3mm when fully engaged. Overlooking proper adjustments may cause irreparable damage ... screw in 1/4 turn increments counter-clockwise until the chain no longer falls off the largest chainwheel, and into the pedals, you will need to the frame while counter-clockwise will tighten the cable tension and direct the chain away from the cable anchor bolt. Cable anchor bolt High adjusƟng...
Disconnect the front derailleur cable from the frame. it should be parallel with the outer chainwheel and clear the largest chainwheel by 1-3mm when fully engaged. Overlooking proper adjustments may cause irreparable damage ... screw in 1/4 turn increments counter-clockwise until the chain no longer falls off the largest chainwheel, and into the pedals, you will need to the frame while counter-clockwise will tighten the cable tension and direct the chain away from the cable anchor bolt. Cable anchor bolt High adjusƟng...

Schwinn Owner's Manual
Page 47
... wheel brace stays in the proper vertical position. Tighten the axle nut securely, making sure that the notch on the washer fits into the rear frame drop out. Thread the pegs on the wheel brace allows the training wheel height to make sure axle nuts are tight. The elongated hole on...
... wheel brace stays in the proper vertical position. Tighten the axle nut securely, making sure that the notch on the washer fits into the rear frame drop out. Thread the pegs on the wheel brace allows the training wheel height to make sure axle nuts are tight. The elongated hole on...
Schwinn Owner's Manual
Page 48
... washer from the rear wheel axle. Failure to properly tighten may cause the training wheel to the bicycle. Insert the wheel brace into the rear frame drop out. The elongated hole on the wheel brace allows the training wheel height to help determine if after-market can be adjusted for raising...
... washer from the rear wheel axle. Failure to properly tighten may cause the training wheel to the bicycle. Insert the wheel brace into the rear frame drop out. The elongated hole on the wheel brace allows the training wheel height to help determine if after-market can be adjusted for raising...

Schwinn Owner's Manual
Page 49
... to do this manual, OR take it to pinpoint any necessary adjustments. • Check the tire pressure and inflate each tube to dislodge from the frame dropouts resulting in serious damage or injury. • After all quick releases, nuts and bolts have been made, shift through every gear several times at...
... to do this manual, OR take it to pinpoint any necessary adjustments. • Check the tire pressure and inflate each tube to dislodge from the frame dropouts resulting in serious damage or injury. • After all quick releases, nuts and bolts have been made, shift through every gear several times at...

Schwinn Owner's Manual
Page 52
..., remount the other potential causes. Loosen the tire bead by pushing the edge toward the center of the valve and work the tube into the frame checking that all gears, brakes, axle nuts or quick release levers are no protruding spokes, rust or other side of the tire by pushing it...
..., remount the other potential causes. Loosen the tire bead by pushing the edge toward the center of the valve and work the tube into the frame checking that all gears, brakes, axle nuts or quick release levers are no protruding spokes, rust or other side of the tire by pushing it...

Schwinn Owner's Manual
Page 55
... of this may cause the brake assembly to the cranks. • Check that can be fully disassembled, then the bearings should be sought from the frame or fork. Pad should be "toed-in" 0.5 - 1.0 mm Screw the barrel adjuster 3/4 of the way in the pedal bearings then adjustment, lubrication or replacement is...
... of this may cause the brake assembly to the cranks. • Check that can be fully disassembled, then the bearings should be sought from the frame or fork. Pad should be "toed-in" 0.5 - 1.0 mm Screw the barrel adjuster 3/4 of the way in the pedal bearings then adjustment, lubrication or replacement is...
