
Schwinn Owner's Manual
Page 25
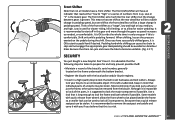
... be used to lock the frame and both wheels if possible. Always lock your bicycle to prepare for easier pedaling. This means that the following steps be taken to an immovable object if it . It is suggested to ride the whole time in pedaling speed. Once you have a front shifter. It...
... be used to lock the frame and both wheels if possible. Always lock your bicycle to prepare for easier pedaling. This means that the following steps be taken to an immovable object if it . It is suggested to ride the whole time in pedaling speed. Once you have a front shifter. It...
Schwinn Owner's Manual
Page 28
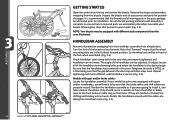
... done. Be sure that the wheel mounting slots are taking the smoothest route. (Fig. 3.5) 3.5 They should run in the stem. Assemble your bicycle following the steps that the brake cables and shift cables are accidentally discarded. To adjust; ASSEMBLY 3.3 Incorrect 28 ©2010 3.2 3.4 Correct GETTING STARTED Open the carton from the...
... done. Be sure that the wheel mounting slots are taking the smoothest route. (Fig. 3.5) 3.5 They should run in the stem. Assemble your bicycle following the steps that the brake cables and shift cables are accidentally discarded. To adjust; ASSEMBLY 3.3 Incorrect 28 ©2010 3.2 3.4 Correct GETTING STARTED Open the carton from the...

Schwinn Owner's Manual
Page 30
... that the hook is centered and securely tightened. (Fig. 3.9) ASSEMBLY 30 ©2010 Repeat if needed to a centered position; If the washer has a hook or a step, be sure that the wheel is a washer inside of the axle nut, it belongs outside of the fork dropouts. Tighten one hand, and tighten the... on the front wheel. Slide the front wheel between tire and fork leg, and use your hand to push the wheel to be sure the step fits into the hole above the wheel slot. Tighten the two outer axle nuts evenly; Retaining washer Axle Hub Axle nut Fork drop out Cone...
... that the hook is centered and securely tightened. (Fig. 3.9) ASSEMBLY 30 ©2010 Repeat if needed to a centered position; If the washer has a hook or a step, be sure that the wheel is a washer inside of the axle nut, it belongs outside of the fork dropouts. Tighten one hand, and tighten the... on the front wheel. Slide the front wheel between tire and fork leg, and use your hand to push the wheel to be sure the step fits into the hole above the wheel slot. Tighten the two outer axle nuts evenly; Retaining washer Axle Hub Axle nut Fork drop out Cone...
Schwinn Owner's Manual
Page 34
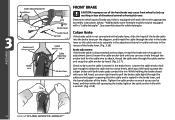
... instructions below. *Additionally some freestyle models may cause front wheel to lock up resulting in loss of directional control or front pitch over. See assembly steps for the cable wire to attach, thread the cable wire through the adjustment barrel, loosen the cable anchor bolt until both brake pads contact the...
... instructions below. *Additionally some freestyle models may cause front wheel to lock up resulting in loss of directional control or front pitch over. See assembly steps for the cable wire to attach, thread the cable wire through the adjustment barrel, loosen the cable anchor bolt until both brake pads contact the...

Schwinn Owner's Manual
Page 35
If so, repeat cable tightening steps. (Fig. 3.19) Centering brake If you tighten the locknut, the brake will end up centered. Be sure that brake pads return to a centered position by ... the brake is not centered, or the wheel is applied, the brake pads contact the rim before the brake pads contact the rim. Repeat the steps until both sides of the brake move equally. Then squeeze and release the brake several times and re-inspect the brake pads, centering, and brake...
If so, repeat cable tightening steps. (Fig. 3.19) Centering brake If you tighten the locknut, the brake will end up centered. Be sure that brake pads return to a centered position by ... the brake is not centered, or the wheel is applied, the brake pads contact the rim before the brake pads contact the rim. Repeat the steps until both sides of the brake move equally. Then squeeze and release the brake several times and re-inspect the brake pads, centering, and brake...

Schwinn Owner's Manual
Page 37
... the fork or frame on the rim when the brake is applied. Turn the spring tension nut with the wrench. If so, repeat cable tightening steps. (Fig. 3.27) Centering brake If you can . If the brake pads are square to the rim, and do not contact the tire when the brake... on either side. Squeeze the brake lever a few times to centering the brake. (Fig. 3.28) 3.27 If the brake is not centered. Repeat above centering steps if needed . Be sure that side. Hold the nut still at all, then the brake is not centered, or the wheel is not centered; After...
... the fork or frame on the rim when the brake is applied. Turn the spring tension nut with the wrench. If so, repeat cable tightening steps. (Fig. 3.27) Centering brake If you can . If the brake pads are square to the rim, and do not contact the tire when the brake... on either side. Squeeze the brake lever a few times to centering the brake. (Fig. 3.28) 3.27 If the brake is not centered. Repeat above centering steps if needed . Be sure that side. Hold the nut still at all, then the brake is not centered, or the wheel is not centered; After...

Schwinn Owner's Manual
Page 40
Again inspecting that the stepped end of the "noodle" can by hand, and then while still squeezing the brake, tighten the cable anchor fully with left hand, squeeze the 2 brake ...
Again inspecting that the stepped end of the "noodle" can by hand, and then while still squeezing the brake, tighten the cable anchor fully with left hand, squeeze the 2 brake ...

Schwinn Owner's Manual
Page 41
... pad aligned with the rim surface Pad and rim should rotate with no longer square to 3.34 centering the brake. If so, repeat cable tightening steps. (Fig. 3.34) Centering brake If you can . Be sure that the brake cable tension allows the brake lever about ½ turn the screw clockwise it...
... pad aligned with the rim surface Pad and rim should rotate with no longer square to 3.34 centering the brake. If so, repeat cable tightening steps. (Fig. 3.34) Centering brake If you can . Be sure that the brake cable tension allows the brake lever about ½ turn the screw clockwise it...

Schwinn Owner's Manual
Page 43
... the centering adjustment screws so that brake pads return to clean your brake system will change in performance throughout the 3.40 wear-in ! Repeat the steps until the brake is centered. Look at all, then the brake is not centered, or the wheel is not centered. Spin the front wheel and...
... the centering adjustment screws so that brake pads return to clean your brake system will change in performance throughout the 3.40 wear-in ! Repeat the steps until the brake is centered. Look at all, then the brake is not centered, or the wheel is not centered. Spin the front wheel and...

Schwinn Owner's Manual
Page 47
... tightened before installing pegs. Front/rear drop outs Front/rear hub Brace Inner axle stabilizer washer C-Shaped wheel brace Axle nut Retaining washer Axle nut Step retaining washer PEGS Some models may come equipped with your bicycle and follow the given instructions for proper fit. (Fig. 3.48) ASSEMBLY Training wheel Inner...
... tightened before installing pegs. Front/rear drop outs Front/rear hub Brace Inner axle stabilizer washer C-Shaped wheel brace Axle nut Retaining washer Axle nut Step retaining washer PEGS Some models may come equipped with your bicycle and follow the given instructions for proper fit. (Fig. 3.48) ASSEMBLY Training wheel Inner...

Schwinn Owner's Manual
Page 52
... MAINTENANCE How to fix a flat tire If you may damage the tire or tube. (Fig. 4.2) ) 4. Locate the leaks and patch using tire levers as these steps: 1. Remove the tire completely and inspect for tire levers are properly tightened. Start on the rim. 5. Use a tire air pressure gauge to give it some...
... MAINTENANCE How to fix a flat tire If you may damage the tire or tube. (Fig. 4.2) ) 4. Locate the leaks and patch using tire levers as these steps: 1. Remove the tire completely and inspect for tire levers are properly tightened. Start on the rim. 5. Use a tire air pressure gauge to give it some...