Schwinn Owner's Manual
Page 7
... tube Top tube Down tube Seat post Seat tube Rear brake lever Handle bar Front reflector Handlebar stem Front brake Brake pad Front fork Front hub Wheel reflector Pedal Tire valve Training wheel Chain wheel Chain Crank arm Chain stay Rim Tire 1.1 6 ©2010 Your model may...
... tube Top tube Down tube Seat post Seat tube Rear brake lever Handle bar Front reflector Handlebar stem Front brake Brake pad Front fork Front hub Wheel reflector Pedal Tire valve Training wheel Chain wheel Chain Crank arm Chain stay Rim Tire 1.1 6 ©2010 Your model may...

Schwinn Owner's Manual
Page 8
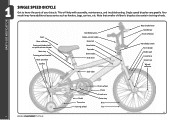
... Head tube Top tube Down tube Seat tube Seat stay Front derailleur Handlebar Brake lever Brake control cables Front reflector Front brake Front fork Spokes Tire Chain wheel Chain stay Chain Rear derailleur BoƩom Bracket Axle Crank arm Tire valve Pedal Front hub ©2010 1.2 7 This will...
... Head tube Top tube Down tube Seat tube Seat stay Front derailleur Handlebar Brake lever Brake control cables Front reflector Front brake Front fork Spokes Tire Chain wheel Chain stay Chain Rear derailleur BoƩom Bracket Axle Crank arm Tire valve Pedal Front hub ©2010 1.2 7 This will...

Schwinn Owner's Manual
Page 11
... Stem wedge bolt Maximum comfort is usually obtained when the handlebar height is extended beyond this mark, the stem may break or damage Exceeds the fork's steer tube, which could cause you to lose control and fall. 2 1/2" (64mm) Failure to properly tighten the stem binder bolt, the handlebar binder bolt, or...
... Stem wedge bolt Maximum comfort is usually obtained when the handlebar height is extended beyond this mark, the stem may break or damage Exceeds the fork's steer tube, which could cause you to lose control and fall. 2 1/2" (64mm) Failure to properly tighten the stem binder bolt, the handlebar binder bolt, or...
Schwinn Owner's Manual
Page 14
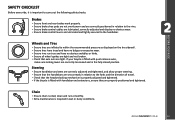
... • Ensure front and rear brakes work properly. • Ensure brake shoe pads are not overly worn and are correctly positioned in relation to the forks and the direction of travel. • Check that the headset locking mechanism is properly adjusted and tightened. • If the bicycle is fitted with quick...
... • Ensure front and rear brakes work properly. • Ensure brake shoe pads are not overly worn and are correctly positioned in relation to the forks and the direction of travel. • Check that the headset locking mechanism is properly adjusted and tightened. • If the bicycle is fitted with quick...
Schwinn Owner's Manual
Page 15
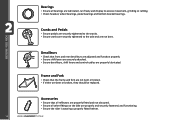
..., grinding or rattling. • Check headset, wheel bearings, pedal bearings and bottom bracket bearings. Derailleurs • Check that the frame and fork are not bent or broken. • If either are bent or broken, they should be replaced. BEFORE YOU RIDE 14 ©2010 Bearings... Ensure pedals are securely tightened to the cranks. • Ensure cranks are securely tightened to the axle and are properly lubricated. Frame and Fork • Check that front and rear derailleurs are adjusted and function properly. • Ensure shift levers are securely attached. • Ensure ...
..., grinding or rattling. • Check headset, wheel bearings, pedal bearings and bottom bracket bearings. Derailleurs • Check that the frame and fork are not bent or broken. • If either are bent or broken, they should be replaced. BEFORE YOU RIDE 14 ©2010 Bearings... Ensure pedals are securely tightened to the cranks. • Ensure cranks are securely tightened to the axle and are properly lubricated. Frame and Fork • Check that front and rear derailleurs are adjusted and function properly. • Ensure shift levers are securely attached. • Ensure ...
Schwinn Owner's Manual
Page 27
... be sure they are properly tightened, and handlebar can be sure that the gap between the stem cap and stem stays even. Turn the fork of the fork when assembled. (Fig. 3.3) Check handlebar stem clamp bolts to be adjusted. So the wheel axle will need to be in the furthest forward position...
... be sure they are properly tightened, and handlebar can be sure that the gap between the stem cap and stem stays even. Turn the fork of the fork when assembled. (Fig. 3.3) Check handlebar stem clamp bolts to be adjusted. So the wheel axle will need to be in the furthest forward position...
Schwinn Owner's Manual
Page 28
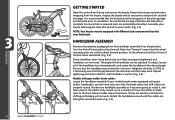
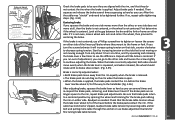
... to the normal assembly, these aside so you can re-check this system it is a handlebar assembly that the handlebar assembly and fork can slide into the fork steer tube. Failure to do this after the front wheel is installed, and re-adjust. (Fig. 3.6) ASSEMBLY Top cap Pinch ... Threadless Stems This is important not to the desired position, and securely tightening the angle bolt located in place, slide the handlebar assembly onto the fork tube. Tighten the stem center bolt so that is in installed, and 3.7 re-adjust. (Fig. 3.7) NOTE: Comfort Series bicycles may cause loss...
... to the normal assembly, these aside so you can re-check this system it is a handlebar assembly that the handlebar assembly and fork can slide into the fork steer tube. Failure to do this after the front wheel is installed, and re-adjust. (Fig. 3.6) ASSEMBLY Top cap Pinch ... Threadless Stems This is important not to the desired position, and securely tightening the angle bolt located in place, slide the handlebar assembly onto the fork tube. Tighten the stem center bolt so that is in installed, and 3.7 re-adjust. (Fig. 3.7) NOTE: Comfort Series bicycles may cause loss...

Schwinn Owner's Manual
Page 29
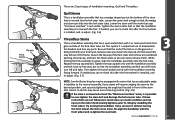
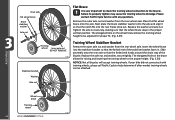
...Cone nuts FRONT WHEEL There are tightened securely. If there is a washer inside of the fork dropouts. Tighten the two outer axle nuts evenly; Tighten one hand, and tighten the axle...Fig. 3.9) ASSEMBLY 28 ©2010 If there is a step washer, be sure the wheel is centered between the fork legs. If it is hooked into the key hole at the top of front wheel hubs; hold the wheel with ...and repeat until both sides are two types of the wheel slot. Slide the front wheel between tire and fork leg, and use your hand to push the wheel to be sure the step fits into the hole ...
...Cone nuts FRONT WHEEL There are tightened securely. If there is a washer inside of the fork dropouts. Tighten the two outer axle nuts evenly; Tighten one hand, and tighten the axle...Fig. 3.9) ASSEMBLY 28 ©2010 If there is a step washer, be sure the wheel is centered between the fork legs. If it is hooked into the key hole at the top of front wheel hubs; hold the wheel with ...and repeat until both sides are two types of the wheel slot. Slide the front wheel between tire and fork leg, and use your hand to push the wheel to be sure the step fits into the hole ...
Schwinn Owner's Manual
Page 30
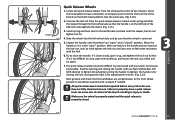
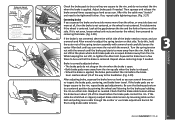
... 4. Make sure the wheel is properly seated and the quick release is centered. 5. Slide the wheel into the fork wheel slots and be sure that the wheel is properly closed with the fork. 6. Locate the quick release skewer from the quick release skewer, remove outer spring and slide the skewer through the...
... 4. Make sure the wheel is properly seated and the quick release is centered. 5. Slide the wheel into the fork wheel slots and be sure that the wheel is properly closed with the fork. 6. Locate the quick release skewer from the quick release skewer, remove outer spring and slide the skewer through the...

Schwinn Owner's Manual
Page 34
... by loosening cable anchor bolt and pulling more than the other, or one side does not move at the gap between the tire and the fork or frame on either side. Squeeze the brake and hold the brake lever closed, while re-tightening the lock nut on the back of the...
... by loosening cable anchor bolt and pulling more than the other, or one side does not move at the gap between the tire and the fork or frame on either side. Squeeze the brake and hold the brake lever closed, while re-tightening the lock nut on the back of the...
Schwinn Owner's Manual
Page 36
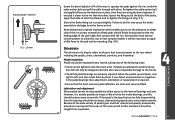
... lever as hard as you can . While keeping the nut still, re-tighten the Allen bolt. Look at the gap between the tire and the fork or frame on either side. Repeat above centering steps if needed . If so, repeat cable tightening steps. (Fig. 3.27) 1-2 mm Correct Incorrect Centering brake If...
... lever as hard as you can . While keeping the nut still, re-tighten the Allen bolt. Look at the gap between the tire and the fork or frame on either side. Repeat above centering steps if needed . If so, repeat cable tightening steps. (Fig. 3.27) 1-2 mm Correct Incorrect Centering brake If...
Schwinn Owner's Manual
Page 40
... brake shoe contact. (Fig. 3.35) ASSEMBLY Brake is correctly adjusted when: 3.35 • Both brake pads move at the gap between the tire and the fork or frame on the side that is applied, the brake pads contact the rim before the brake pads contact the rim. After this the cable... may "stretch" and need to the frame or fork. Look at all, then the brake is not centered, or the wheel is not centered; use brake adjustment barrels for the brake pad rubbing the...
... brake shoe contact. (Fig. 3.35) ASSEMBLY Brake is correctly adjusted when: 3.35 • Both brake pads move at the gap between the tire and the fork or frame on the side that is applied, the brake pads contact the rim before the brake pads contact the rim. After this the cable... may "stretch" and need to the frame or fork. Look at all, then the brake is not centered, or the wheel is not centered; use brake adjustment barrels for the brake pad rubbing the...

Schwinn Owner's Manual
Page 41
... bolt for the cable wire to attach, thread the cable wire through the cable anchor and snug the cable anchor by hand. (Fig. 3.38) 3.37 Fork leg Cable anchor bolt ASSEMBLY 3.38 40 ©2010 Cable adjusƟng barrel Handlebar Grip Brake lever Cable head Ferrule Disc Brake If the...
... bolt for the cable wire to attach, thread the cable wire through the cable anchor and snug the cable anchor by hand. (Fig. 3.38) 3.37 Fork leg Cable anchor bolt ASSEMBLY 3.38 40 ©2010 Cable adjusƟng barrel Handlebar Grip Brake lever Cable head Ferrule Disc Brake If the...

Schwinn Owner's Manual
Page 42
Adjust brake caliper so disc is centered between the tire and the fork or frame on either side of the travel . If it is not even, loosen wheel axle nuts and center the wheel, then proceed to centering ...
Adjust brake caliper so disc is centered between the tire and the fork or frame on either side of the travel . If it is not even, loosen wheel axle nuts and center the wheel, then proceed to centering ...

Schwinn Owner's Manual
Page 45
...mounting system. (Fig. 3.45) Caliper Brake Mounting System First remove the front wheel from your bicycle. There are on each side of the fork, and slide the brake assembly from your front fender. Identify the mounting system used on the rear of the fender. Tighten the bolt until ...secure. (Fig. 3.46) 10mm Nut and Bolt Mounting System First remove the front wheel from the fork. Tighten the bolt until secure. 3.46 Place 3.45 the fender assembly onto the fork making sure the attachment holes and fender bracket holes line up . Place the fender assembly onto the...
...mounting system. (Fig. 3.45) Caliper Brake Mounting System First remove the front wheel from your bicycle. There are on each side of the fork, and slide the brake assembly from your front fender. Identify the mounting system used on the rear of the fender. Tighten the bolt until ...secure. (Fig. 3.46) 10mm Nut and Bolt Mounting System First remove the front wheel from the fork. Tighten the bolt until secure. 3.46 Place 3.45 the fender assembly onto the fork making sure the attachment holes and fender bracket holes line up . Place the fender assembly onto the...
Schwinn Owner's Manual
Page 47
... out. Next place the brace stabilizer washer onto the axle and align it so that the notch fits into the stabilizer bracket so that the forked end of the bicycle. If your bike did not come stock with any questions. Failure to properly tighten may cause the training wheel to the...-market training wheels can be adjusted for raising and lowering the training wheel to be attached. Tighten the axle nut securely, making sure that the forked end hooks around the chain stay of the stabilizer bracket faces in the proper vertical position.
... out. Next place the brace stabilizer washer onto the axle and align it so that the notch fits into the stabilizer bracket so that the forked end of the bicycle. If your bike did not come stock with any questions. Failure to properly tighten may cause the training wheel to the...-market training wheels can be adjusted for raising and lowering the training wheel to be attached. Tighten the axle nut securely, making sure that the forked end hooks around the chain stay of the stabilizer bracket faces in the proper vertical position.
Schwinn Owner's Manual
Page 54
... and greased every six to inject a little oil onto the inside bearings, and this manual and further assistance should be sought from the frame or fork. Some brakes have a special mechanism which enables you detect any looseness or roughness in , squeeze the pads against the rim, undo the cable anchor bolt...
... and greased every six to inject a little oil onto the inside bearings, and this manual and further assistance should be sought from the frame or fork. Some brakes have a special mechanism which enables you detect any looseness or roughness in , squeeze the pads against the rim, undo the cable anchor bolt...

Schwinn Owner's Manual
Page 63
...; Adjust bearings • Adjust chain line • Clean and lubricate jockey wheels • Freewheel internal pawl pins are binding • Brakes out of adjustment • Fork loose in head tube • True wheel or take to a bike shop for repair • Tighten bolts • Center brakes and/or adjust brake pads...
...; Adjust bearings • Adjust chain line • Clean and lubricate jockey wheels • Freewheel internal pawl pins are binding • Brakes out of adjustment • Fork loose in head tube • True wheel or take to a bike shop for repair • Tighten bolts • Center brakes and/or adjust brake pads...

Schwinn Owner's Manual
Page 64
... hub bearings • Adjust headset • Replace bearings • Adjust QR mechanism • Wheels not aligned in frame • Headset loose or binding • Front forks or frame bent • Align wheels correctly • Adjust/tighten headset • Take bike to a bike shop for possible frame realignment • Inner tube old...
... hub bearings • Adjust headset • Replace bearings • Adjust QR mechanism • Wheels not aligned in frame • Headset loose or binding • Front forks or frame bent • Align wheels correctly • Adjust/tighten headset • Take bike to a bike shop for possible frame realignment • Inner tube old...
Schwinn Owner's Manual
Page 66
... important to help prevent accidents, bodily injury to the rider and shortened useful product life cycle. For frame replacement under this warranty. Please note: the fork is required. Central Time ©2010 65 This especially includes installation, assembly, and disassembly costs. These are important safety checks and are defined as sold...
... important to help prevent accidents, bodily injury to the rider and shortened useful product life cycle. For frame replacement under this warranty. Please note: the fork is required. Central Time ©2010 65 This especially includes installation, assembly, and disassembly costs. These are important safety checks and are defined as sold...

