
Schwinn Owner's Manual
Page 25
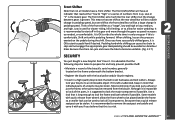
... local police and/or bicycle registry. • Invest in only one shift at the rear derailleur will be stolen. Front Shifter Note that the following steps be used for slower riding, hill climbing, or to allow the front wheel to be stolen.
... local police and/or bicycle registry. • Invest in only one shift at the rear derailleur will be stolen. Front Shifter Note that the following steps be used for slower riding, hill climbing, or to allow the front wheel to be stolen.
Schwinn Owner's Manual
Page 28
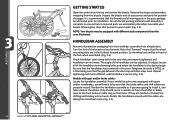
Assemble your bicycle following the steps that pertain to ensure that the gap between the stem cap and stem stays even. HANDLEBAR ASSEMBLY Remove all of the bicycle to the desired ...
Assemble your bicycle following the steps that pertain to ensure that the gap between the stem cap and stem stays even. HANDLEBAR ASSEMBLY Remove all of the bicycle to the desired ...

Schwinn Owner's Manual
Page 30
...wheel between tire and fork leg, and use your hand to push the wheel to be sure the step fits into the hole above the wheel slot. If the wheel has a hook shaped washer, be sure... that the wheel is centered between the fork legs. If there is a step washer, be sure the wheel is hooked into the key hole at the top of the fork dropouts. ... nut, it engages the fork before tightening the axle nuts. Tighten the two outer axle nuts evenly; Step retaining washer 3.9 Nutted Front Wheels Loosen the axle nuts on the side that it belongs outside of the...
...wheel between tire and fork leg, and use your hand to push the wheel to be sure the step fits into the hole above the wheel slot. If the wheel has a hook shaped washer, be sure... that the wheel is centered between the fork legs. If there is a step washer, be sure the wheel is hooked into the key hole at the top of the fork dropouts. ... nut, it engages the fork before tightening the axle nuts. Tighten the two outer axle nuts evenly; Step retaining washer 3.9 Nutted Front Wheels Loosen the axle nuts on the side that it belongs outside of the...
Schwinn Owner's Manual
Page 34
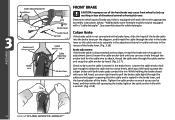
See assembly steps for the cable wire to attach, thread the cable wire through the cable anchor) again inspecting that the cable end is seated in the brake ...
See assembly steps for the cable wire to attach, thread the cable wire through the cable anchor) again inspecting that the cable end is seated in the brake ...

Schwinn Owner's Manual
Page 35
First determine if the wheel is centered. Repeat the steps until both sides of the brake move equally. Watch the brake, if it is necessary to the rim, repeat brake pad adjustments. If the cable ... and re-inspect the brake pads, centering, and brake lever travel before the brake lever reaches about 1/3 of the brake. If so, repeat cable tightening steps. (Fig. 3.19) Centering brake If you can several times squeezing as hard as needed . loosen the nut on the back of the way to a centered...
First determine if the wheel is centered. Repeat the steps until both sides of the brake move equally. Watch the brake, if it is necessary to the rim, repeat brake pad adjustments. If the cable ... and re-inspect the brake pads, centering, and brake lever travel before the brake lever reaches about 1/3 of the brake. If so, repeat cable tightening steps. (Fig. 3.19) Centering brake If you can several times squeezing as hard as needed . loosen the nut on the back of the way to a centered...

Schwinn Owner's Manual
Page 37
... pads do not drag on that side. After this , hold the outer nut of the spring tension assembly with the wrench. Repeat above centering steps if needed . Then squeeze and release the brake several times and re-inspect the brake pads, centering, and brake lever travel before the brake ...3.28 lever reaches about 1/3 of the travel . If so, repeat cable tightening steps. (Fig. 3.27) Centering brake If you squeeze the brake and one side moves more cable through the anchor or use a wrench and Allen wrench ...
... pads do not drag on that side. After this , hold the outer nut of the spring tension assembly with the wrench. Repeat above centering steps if needed . Then squeeze and release the brake several times and re-inspect the brake pads, centering, and brake lever travel before the brake ...3.28 lever reaches about 1/3 of the travel . If so, repeat cable tightening steps. (Fig. 3.27) Centering brake If you squeeze the brake and one side moves more cable through the anchor or use a wrench and Allen wrench ...

Schwinn Owner's Manual
Page 40
... is disconnected at the brake arm, with left hand, squeeze the 2 brake halves together until both brake pads contact the rim. Again inspecting that the stepped end of the "noodle" can by hand, and then while still squeezing the brake, tighten the cable anchor fully with your left hand, use your...
... is disconnected at the brake arm, with left hand, squeeze the 2 brake halves together until both brake pads contact the rim. Again inspecting that the stepped end of the "noodle" can by hand, and then while still squeezing the brake, tighten the cable anchor fully with your left hand, use your...

Schwinn Owner's Manual
Page 41
... the gap between the tire and the fork or frame on that brake pads return to 3.34 centering the brake. If so, repeat cable tightening steps. (Fig. 3.34) Centering brake If you squeeze the brake and one side moves more cable through the anchor or use a Phillips screwdriver to tighten or...
... the gap between the tire and the fork or frame on that brake pads return to 3.34 centering the brake. If so, repeat cable tightening steps. (Fig. 3.34) Centering brake If you squeeze the brake and one side moves more cable through the anchor or use a Phillips screwdriver to tighten or...

Schwinn Owner's Manual
Page 43
.... 3.39, 3.40) If the brake is not centered, look at the center of the way to the handlebar. (Fig. 3.41) DISC GETS HOT! Repeat the steps until the brake is centered. WARNING: Disc brakes are no longer square to the rim, repeat brake pad adjustments. If the cable has stretched or...
.... 3.39, 3.40) If the brake is not centered, look at the center of the way to the handlebar. (Fig. 3.41) DISC GETS HOT! Repeat the steps until the brake is centered. WARNING: Disc brakes are no longer square to the rim, repeat brake pad adjustments. If the cable has stretched or...

Schwinn Owner's Manual
Page 47
... washer and axle nut. Front/rear drop outs Front/rear hub Brace Inner axle stabilizer washer C-Shaped wheel brace Axle nut Retaining washer Axle nut Step retaining washer PEGS Some models may come equipped with stabilizer. To install pegs, DO NOT loosen or remove axle nuts. TRAINING WHEELS Attaching training wheel...
... washer and axle nut. Front/rear drop outs Front/rear hub Brace Inner axle stabilizer washer C-Shaped wheel brace Axle nut Retaining washer Axle nut Step retaining washer PEGS Some models may come equipped with stabilizer. To install pegs, DO NOT loosen or remove axle nuts. TRAINING WHEELS Attaching training wheel...

Schwinn Owner's Manual
Page 52
... bicycle. 4.1 2. Before the tire is not caught between the rim and the tire bead at any point. 15. NOTE: Avoid using tire levers as these steps: 1. Remove the tube, leaving one side of the leak in position. 13. Replace the rim tape which covers the spoke ends, if damaged. 8. Start on...
... bicycle. 4.1 2. Before the tire is not caught between the rim and the tire bead at any point. 15. NOTE: Avoid using tire levers as these steps: 1. Remove the tube, leaving one side of the leak in position. 13. Replace the rim tape which covers the spoke ends, if damaged. 8. Start on...