
Instructions for use
Page 2
Contents Contents Important safety information 2 The DW Pro1/Pro2 wireless headset system 4 Delivery includes ...5 Product overview ...6 Base station ...6 Pro1/Pro2 headset 7 Overview of the buttons 8 Overview of the LEDs ...9 Putting the headset system into operation 10 Putting the base station into operation 10 Putting the headset into operation 16 Testing the headset system in Phone mode and...
Contents Contents Important safety information 2 The DW Pro1/Pro2 wireless headset system 4 Delivery includes ...5 Product overview ...6 Base station ...6 Pro1/Pro2 headset 7 Overview of the buttons 8 Overview of the LEDs ...9 Putting the headset system into operation 10 Putting the base station into operation 10 Putting the headset into operation 16 Testing the headset system in Phone mode and...
Instructions for use
Page 3
... supply unit is no guarantee that interference will not occur in a particular installation. • The DW series headsets contain magnets that no metal objects (e.g. Keep the DW series headsets at all times. Important safety information Important safety information • Please read this instruction manual carefully ... or implanted defibrillators! • Protect your hearing from high volume levels. • Only use the power supply units supplied by Sennheiser Communications. • To reduce the risk of fire or electric shock, do not use the product near water and do not expose...
... supply unit is no guarantee that interference will not occur in a particular installation. • The DW series headsets contain magnets that no metal objects (e.g. Keep the DW series headsets at all times. Important safety information Important safety information • Please read this instruction manual carefully ... or implanted defibrillators! • Protect your hearing from high volume levels. • Only use the power supply units supplied by Sennheiser Communications. • To reduce the risk of fire or electric shock, do not use the product near water and do not expose...
Instructions for use
Page 5
...headband and supra-aural ear cup(s): - The DW Pro1/Pro2 wireless headset system The DW Pro1/Pro2 wireless headset system The Sennheiser Communications DW Pro1/Pro2 is a wireless DECT headset system which is intended for professional call control and headset management via a PC • Headset can be used with a fixed line phone...convenient call center and office use. • Can be integrated into existing DECT GAP systems DECT The Sennheiser Communications DW wireless headset system uses DECT radio technology. up to 4 days of standby time • Quick and convenient charging of the...
...headband and supra-aural ear cup(s): - The DW Pro1/Pro2 wireless headset system The DW Pro1/Pro2 wireless headset system The Sennheiser Communications DW Pro1/Pro2 is a wireless DECT headset system which is intended for professional call control and headset management via a PC • Headset can be used with a fixed line phone...convenient call center and office use. • Can be integrated into existing DECT GAP systems DECT The Sennheiser Communications DW wireless headset system uses DECT radio technology. up to 4 days of standby time • Quick and convenient charging of the...
Instructions for use
Page 6
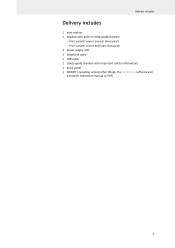
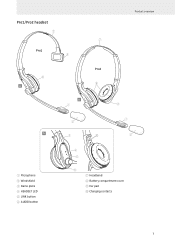
Pro2 variant: covers both ears (binaural) 1 power supply unit 1 telephone cable 1 USB cable 1 safety guide (booklet with built-in rechargeable battery: - Pro1 variant: covers one ear (monaural) - Delivery includes Delivery includes 1 base station 1 headset with important safety information) 1 quick guide 1 CD ROM (including, among other things, the HeadSetup software and a detailed instruction manual as PDF) 5
Pro2 variant: covers both ears (binaural) 1 power supply unit 1 telephone cable 1 USB cable 1 safety guide (booklet with built-in rechargeable battery: - Pro1 variant: covers one ear (monaural) - Delivery includes Delivery includes 1 base station 1 headset with important safety information) 1 quick guide 1 CD ROM (including, among other things, the HeadSetup software and a detailed instruction manual as PDF) 5
Instructions for use
Page 8
Pro1/Pro2 headset 7 7 Pro1 8 Product overview 9 A Pro2 9 A 1 8 2 A 3 0 1 2 ቢ Microphone ባ Windshield ቤ Name plate ብ HEADSET LED ቦ LINK button ቧ AUDIO button 4 5 6 ቨ Headband ቩ Battery compartment cover ቪ Ear pad ቫ Charging contacts 7
Pro1/Pro2 headset 7 7 Pro1 8 Product overview 9 A Pro2 9 A 1 8 2 A 3 0 1 2 ቢ Microphone ባ Windshield ቤ Name plate ብ HEADSET LED ቦ LINK button ቧ AUDIO button 4 5 6 ቨ Headband ቩ Battery compartment cover ቪ Ear pad ቫ Charging contacts 7
Instructions for use
Page 9
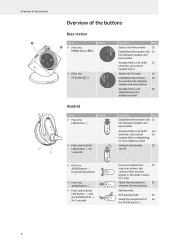
...Action Button Functions Page » ̈ Press the Selects the Phone mode 25 PHONE button » Establishes/disconnects the 23 link between headset and base station Accepts/ends a call (with 25 electronic call control/ handset lifter) ̈ Press the PC button ³ Selects ...the PC mode 26 Establishes/disconnects 23 the wireless link between headset and base station Accepts/ends a call 26 (depending on the softphone used) 5 6 Headset Action ̈ Press the LINK button ቦ Button ̈ Press and hold the LINK button ቦ...
...Action Button Functions Page » ̈ Press the Selects the Phone mode 25 PHONE button » Establishes/disconnects the 23 link between headset and base station Accepts/ends a call (with 25 electronic call control/ handset lifter) ̈ Press the PC button ³ Selects ...the PC mode 26 Establishes/disconnects 23 the wireless link between headset and base station Accepts/ends a call 26 (depending on the softphone used) 5 6 Headset Action ̈ Press the LINK button ቦ Button ̈ Press and hold the LINK button ቦ...

Instructions for use
Page 10
...Overview of the LEDs Base station LED of the PC button ³ » lights up flashes LED of an additional headset to the base station 9 Headset LED HEADSET ብ lights up red flashes red is off Meaning PC mode Incoming PC call Meaning Phone mode Incoming telephone call Meaning... Active link to the headset No link to the headset Headset is muted Standby mode Base station is switched off (not powered) CHARGE STATUS LED ´ LED segment* Battery charge 1 0-25% 2 ...
...Overview of the LEDs Base station LED of the PC button ³ » lights up flashes LED of an additional headset to the base station 9 Headset LED HEADSET ብ lights up red flashes red is off Meaning PC mode Incoming PC call Meaning Phone mode Incoming telephone call Meaning... Active link to the headset No link to the headset Headset is muted Standby mode Base station is switched off (not powered) CHARGE STATUS LED ´ LED segment* Battery charge 1 0-25% 2 ...
Instructions for use
Page 11
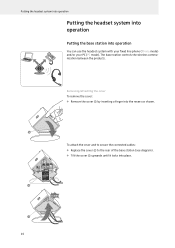
... (see diagram). ̈ Tilt the cover ƹ upwards until it locks into the recess as shown. Putting the headset system into operation Putting the headset system into operation Putting the base station into operation You can use the headset system with your fixed line phone (Phone mode) and/or your PC (PC mode).
... (see diagram). ̈ Tilt the cover ƹ upwards until it locks into the recess as shown. Putting the headset system into operation Putting the headset system into operation Putting the base station into operation You can use the headset system with your fixed line phone (Phone mode) and/or your PC (PC mode).
Instructions for use
Page 12
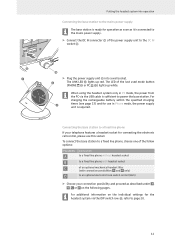
... the DC IN connector ƻ of the power supply unit to an optional electronic hook switch control (EHS) ̈ Choose your telephone features a headset socket for use this socket. To connect the base station to a fixed line phone, choose one of the follow options: Possibility A B C ...D Connection to a fixed line phone without headset socket to a fixed line phone with headset socket of an optional mechanical handset lifter (with connection possibilities A and B only) to the DC IN socket ¹. ¹ &#...
... the DC IN connector ƻ of the power supply unit to an optional electronic hook switch control (EHS) ̈ Choose your telephone features a headset socket for use this socket. To connect the base station to a fixed line phone, choose one of the follow options: Possibility A B C ...D Connection to a fixed line phone without headset socket to a fixed line phone with headset socket of an optional mechanical handset lifter (with connection possibilities A and B only) to the DC IN socket ¹. ¹ &#...
Instructions for use
Page 13
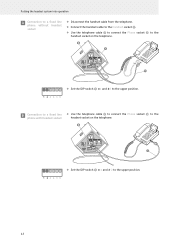
... into operation A Connection to a fixed line phone without headset socket ̈ Disconnect the handset cable from the telephone. ̈ Connect the handset cable to the Handset socket ¾. ̈ Use the telephone cable Ƽ ...; # 1 and # 2 to the upper position. B Connection to a fixed line ̈ Use the telephone cable Ƽ to connect the Phone socket º to the phone with headset socket headset socket on the telephone. º ¾ Ƽ ̈ Set the DIP switch ¸ #1 and #2 to the upper position. 12
... into operation A Connection to a fixed line phone without headset socket ̈ Disconnect the handset cable from the telephone. ̈ Connect the handset cable to the Handset socket ¾. ̈ Use the telephone cable Ƽ ...; # 1 and # 2 to the upper position. B Connection to a fixed line ̈ Use the telephone cable Ƽ to connect the Phone socket º to the phone with headset socket headset socket on the telephone. º ¾ Ƽ ̈ Set the DIP switch ¸ #1 and #2 to the upper position. 12
Instructions for use
Page 14
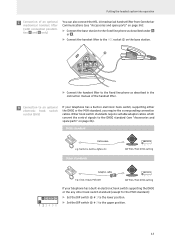
Putting the headset system into operation C Connection of the handset lifter. Siemens, Aastra, Agfeo, etc. Other hook switch standards require suitable adapter cables which convert the control signals ... mechanical handset lifter (with connection possibilities A and B only) You can also connect the HSL 10 mechanical handset lifter from Sennheiser Communications (see "Accessories and spare parts" on page 36). Cisco, Avaya, Polycom DW Pro1/Pro2 DHSG setting If your telephone has a built-in electronic hook switch, supporting either the DHSG or the...
Putting the headset system into operation C Connection of the handset lifter. Siemens, Aastra, Agfeo, etc. Other hook switch standards require suitable adapter cables which convert the control signals ... mechanical handset lifter (with connection possibilities A and B only) You can also connect the HSL 10 mechanical handset lifter from Sennheiser Communications (see "Accessories and spare parts" on page 36). Cisco, Avaya, Polycom DW Pro1/Pro2 DHSG setting If your telephone has a built-in electronic hook switch, supporting either the DHSG or the...

Instructions for use
Page 15
For additional information, please visit our website at a minimum distance of 15 to a USB socket of your Sennheiser partner. Putting the headset system into operation MSH standard MSH cable e.g. Setting up the base station ̈ Place the base station at www.senncom.com/... Set the DIP switch ¸ # 2 to the lower position. The operating system detects the USB audio device "Sennheiser DECT" and installs the necessary drivers. ƽ Ƹ 14 Alcatel DW Pro1/Pro2 MSH setting If your telephone has a built-in order to use it for Internet telephone (VoIP) with softphones...
For additional information, please visit our website at a minimum distance of 15 to a USB socket of your Sennheiser partner. Putting the headset system into operation MSH standard MSH cable e.g. Setting up the base station ̈ Place the base station at www.senncom.com/... Set the DIP switch ¸ # 2 to the lower position. The operating system detects the USB audio device "Sennheiser DECT" and installs the necessary drivers. ƽ Ƹ 14 Alcatel DW Pro1/Pro2 MSH setting If your telephone has a built-in order to use it for Internet telephone (VoIP) with softphones...

Instructions for use
Page 16
... can still be found on the enclosed CD ROM. ̈ Follow the instructions of the install program. Putting the headset system into operation Installing the HeadSetup software The HeadSetup software enables the headset system to communicate with a wide variety of softphones and allows you to use the call control functions of the...: ̈ Run the "HeadSetup USB version X.X.exe" file in the Help section of the software: ̈ Click the "Help ..." Even without the HeadSetup software, the headset system can be used as an audio input and output device.
... can still be found on the enclosed CD ROM. ̈ Follow the instructions of the install program. Putting the headset system into operation Installing the HeadSetup software The HeadSetup software enables the headset system to communicate with a wide variety of softphones and allows you to use the call control functions of the...: ̈ Run the "HeadSetup USB version X.X.exe" file in the Help section of the software: ̈ Click the "Help ..." Even without the HeadSetup software, the headset system can be used as an audio input and output device.
Instructions for use
Page 17
... plates. 3 3 Swapping the assignment of the AUDIO button ቧ The assignment of the AUDIO button ቧ: ̈ Simultaneously press and hold the headset's LINK button ቦ and AUDIO button ቧ for wearing on the right ear. The "Nameplate-template.pdf" PDF file included on the CD ROM... allows you wear the headset on the left ear. By default, the headset is configured for 5 seconds. To swap the assignment of the AUDIO button ቧ can be swiveled, allowing the microphone ...
... plates. 3 3 Swapping the assignment of the AUDIO button ቧ The assignment of the AUDIO button ቧ: ̈ Simultaneously press and hold the headset's LINK button ቦ and AUDIO button ቧ for wearing on the right ear. The "Nameplate-template.pdf" PDF file included on the CD ROM... allows you wear the headset on the left ear. By default, the headset is configured for 5 seconds. To swap the assignment of the AUDIO button ቧ can be swiveled, allowing the microphone ...

Instructions for use
Page 18
... tone and if the other party cannot hear you at a comfortable level. A wireless link is established between the headset and the base station, the LINK LED ¿ lights up white): ̈ Press the PHONE button »...sensitivity (see page 18). The base station is set to increase the volume until the HEADSET LED ብ goes off. If the audio signal/dial tone is disturbed, adjust the audio signal (see... page 18). 17 Putting the headset system into operation ̈ Push the AUDIO button ቧ in the direction in Phone mode ...
... tone and if the other party cannot hear you at a comfortable level. A wireless link is established between the headset and the base station, the LINK LED ¿ lights up white): ̈ Press the PHONE button »...sensitivity (see page 18). The base station is set to increase the volume until the HEADSET LED ብ goes off. If the audio signal/dial tone is disturbed, adjust the audio signal (see... page 18). 17 Putting the headset system into operation ̈ Push the AUDIO button ቧ in the direction in Phone mode ...
Instructions for use
Page 19
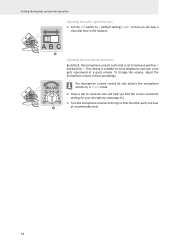
Putting the headset system into operation Adjusting the audio signal/dial tone ̈ Set the ABC switch to A (default setting), B or C so that you find the correct sensitivity ...; at a good volume. To change the volume, adjust the microphone volume control accordingly. The microphone volume control ¶ only adjusts the microphone sensitivity in the headset. ² Adjusting the microphone sensitivity By default, the microphone volume control ¶ is suitable for your voice gets reproduced at a comfortable level. 18
Putting the headset system into operation Adjusting the audio signal/dial tone ̈ Set the ABC switch to A (default setting), B or C so that you find the correct sensitivity ...; at a good volume. To change the volume, adjust the microphone volume control accordingly. The microphone volume control ¶ only adjusts the microphone sensitivity in the headset. ² Adjusting the microphone sensitivity By default, the microphone volume control ¶ is suitable for your voice gets reproduced at a comfortable level. 18

Instructions for use
Page 20
...The base station is selected (the LED of the PC button ³ lights up white. ̈ Press either the LINK button ቦ on the headset or the PC button ³ on the base station. Adjusting the microphone sensitivity ̈ Depending on the base station. A wireless link is correctly connected ...the PC connection When Phone mode is set to someone who will help you at a comfortable level (see below). The system is established between the headset and the base station, the LINK LED ¿ lights up white): ̈ Press the PC button ³ on the operating system used, ...
...The base station is selected (the LED of the PC button ³ lights up white. ̈ Press either the LINK button ቦ on the headset or the PC button ³ on the base station. Adjusting the microphone sensitivity ̈ Depending on the base station. A wireless link is correctly connected ...the PC connection When Phone mode is set to someone who will help you at a comfortable level (see below). The system is established between the headset and the base station, the LINK LED ¿ lights up white): ̈ Press the PC button ³ on the operating system used, ...
Instructions for use
Page 21
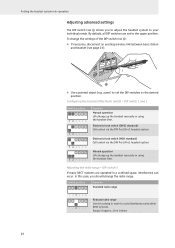
...lifter. In this setting in a confined space, interference can occur. Electronic hook switch (DHSG standard) Call control via the DW Pro1/Pro2 headset system. Putting the headset system into operation Adjusting advanced settings The DIP switch row ¸ allows you should change the settings of approx. 10 ...m indoors 20 Electronic hook switch (MSH standard) Call control via the DW Pro1/Pro2 headset system. Adjusting the radio range - Switch position Function Standard radio range Reduced radio range Use this case, you to adjust the...
...lifter. In this setting in a confined space, interference can occur. Electronic hook switch (DHSG standard) Call control via the DW Pro1/Pro2 headset system. Putting the headset system into operation Adjusting advanced settings The DIP switch row ¸ allows you should change the settings of approx. 10 ...m indoors 20 Electronic hook switch (MSH standard) Call control via the DW Pro1/Pro2 headset system. Adjusting the radio range - Switch position Function Standard radio range Reduced radio range Use this case, you to adjust the...

Instructions for use
Page 22
... the base station, a wireless link is automatically established between headset and base station (Auto Link). Putting the headset system into operation Automatically establishing the wireless link between wideband and narrowband mode - Switching between headset and base station (Auto Link) - Battery life: 12 ... Switch position Function Switched off You have to manually establish the wireless link (see page 23). Switched on When taking the headset out of wideband and narrowband calls in PC and Phone mode. Battery life: 8 hours Narrowband mode Narrowband audio transmission in ...
... the base station, a wireless link is automatically established between headset and base station (Auto Link). Putting the headset system into operation Automatically establishing the wireless link between wideband and narrowband mode - Switching between headset and base station (Auto Link) - Battery life: 12 ... Switch position Function Switched off You have to manually establish the wireless link (see page 23). Switched on When taking the headset out of wideband and narrowband calls in PC and Phone mode. Battery life: 8 hours Narrowband mode Narrowband audio transmission in ...

Instructions for use
Page 23
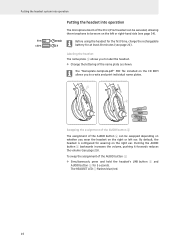
...indicates the remaining battery charge of the base station. A complete charging process takes about 60 minutes. Using the headset system Using the headset system Charging the headset rechargeable battery If you charge the rechargeable battery for the first time, allow charging for at any time without ...charge the rechargeable battery of the Pro1/Pro2 headset: ̈ Place the headset into the magnetic holder of the headset. 22 Pro1 4 Pro2 ´ To stop the charging process: ̈ Take the headset out of the charging process, the HEADSET LED ብ goes off. You can ...
...indicates the remaining battery charge of the base station. A complete charging process takes about 60 minutes. Using the headset system Using the headset system Charging the headset rechargeable battery If you charge the rechargeable battery for the first time, allow charging for at any time without ...charge the rechargeable battery of the Pro1/Pro2 headset: ̈ Place the headset into the magnetic holder of the headset. 22 Pro1 4 Pro2 ´ To stop the charging process: ̈ Take the headset out of the charging process, the HEADSET LED ብ goes off. You can ...

