
Instructions for Use
Page 2
... devices 6 Putting the MX W1 into operation 6 Charging the MX W1 6 Associating the earphones to the transmitter (Pairing) .....9 Setting up your MX W1 for usage 12 Using the MX W1 14 Switching the earphones on/off 14 Switching the transmitter on/off 15 Putting on the earphones 16 Care and maintenance 17 Get the most out of your Sennheiser MX W1 19 Troubleshooting 20...
... devices 6 Putting the MX W1 into operation 6 Charging the MX W1 6 Associating the earphones to the transmitter (Pairing) .....9 Setting up your MX W1 for usage 12 Using the MX W1 14 Switching the earphones on/off 14 Switching the transmitter on/off 15 Putting on the earphones 16 Care and maintenance 17 Get the most out of your Sennheiser MX W1 19 Troubleshooting 20...
Instructions for Use
Page 3
...switching the earphones on to third parties. • Do not use the devices in this instruction manual. 2 However, there is still a danger of safety and current technology. Then increase the volume to the lowest comfortable volume. • Use only the Sennheiser supplied MX W1 charging ...cable and power supply unit. Important safety instructions The MX W1 has been manufactured according to the accepted rules of damage to equipment if the following general ...
...switching the earphones on to third parties. • Do not use the devices in this instruction manual. 2 However, there is still a danger of safety and current technology. Then increase the volume to the lowest comfortable volume. • Use only the Sennheiser supplied MX W1 charging ...cable and power supply unit. Important safety instructions The MX W1 has been manufactured according to the accepted rules of damage to equipment if the following general ...
Instructions for Use
Page 5
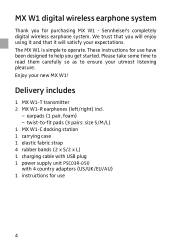
... you for use 4 We trust that you will enjoy using it and that it will satisfy your expectations. Sennheiser's completely digital wireless earphone system. twist-to operate. The MX W1 is simple to -fit pads (3 pairs: size S/M/L) 1 MX W1-C docking station 1 carrying case 1 elastic fabric strap 4 rubber bands (2 x S/2 x L) 1 charging cable with USB plug 1 power supply unit...
... you for use 4 We trust that you will enjoy using it and that it will satisfy your expectations. Sennheiser's completely digital wireless earphone system. twist-to operate. The MX W1 is simple to -fit pads (3 pairs: size S/M/L) 1 MX W1-C docking station 1 carrying case 1 elastic fabric strap 4 rubber bands (2 x S/2 x L) 1 charging cable with USB plug 1 power supply unit...

Instructions for Use
Page 6
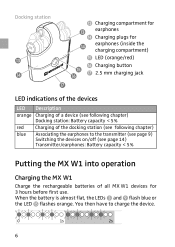
Product overview Earphones ² ³ · » ¿ ³ Twist-to-fit pad · Speaker » LED (orange/blue) ¿ Operation/pairing button of the earphone ´ 2.5 mm charging jack ² Battery compartment ´ Transmitter ¶º ¶ Operation/pairing button of the transmitter º Reset button ¾ ¾ LED (orange/blue) µ 2.5 mm charging jack ¸ Connecting cable with ¹ 3.5 mm stereo jack plug ¹ Dowel pin µ ¸ 5
Product overview Earphones ² ³ · » ¿ ³ Twist-to-fit pad · Speaker » LED (orange/blue) ¿ Operation/pairing button of the earphone ´ 2.5 mm charging jack ² Battery compartment ´ Transmitter ¶º ¶ Operation/pairing button of the transmitter º Reset button ¾ ¾ LED (orange/blue) µ 2.5 mm charging jack ¸ Connecting cable with ¹ 3.5 mm stereo jack plug ¹ Dowel pin µ ¸ 5
Instructions for Use
Page 7
... to the transmitter (see page 9) Switching the devices on/off (see page 14) Transmitter/earphones: Battery capacity < 5% Putting the MX W1 into operation Charging the MX W1 Charge the rechargeable batteries of the docking station (see following chapter) blue Associating the earphones to charge the device. 0 1s 2s 6 When the battery is almost flat, the LEDs...
... to the transmitter (see page 9) Switching the devices on/off (see page 14) Transmitter/earphones: Battery capacity < 5% Putting the MX W1 into operation Charging the MX W1 Charge the rechargeable batteries of the docking station (see following chapter) blue Associating the earphones to charge the device. 0 1s 2s 6 When the battery is almost flat, the LEDs...
Instructions for Use
Page 8
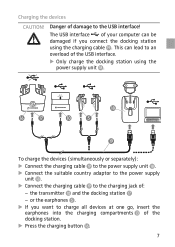
... µ and the docking station Ƽ - The USB interface of your computer can lead to the charging jack of: - Charging the devices CAUTION! or the earphones ´. ̈ If you connect the docking station using the power supply unit ƽ. ƻƼ ƽ µ´ ƾ To charge the devices (... ƻ. 7 This can be damaged if you want to the USB interface! Danger of damage to charge all devices at one go, insert the earphones into the charging compartments Ƹ of the USB interface. ̈ Only charge the docking station using the charging cable ƾ.
... µ and the docking station Ƽ - The USB interface of your computer can lead to the charging jack of: - Charging the devices CAUTION! or the earphones ´. ̈ If you connect the docking station using the power supply unit ƽ. ƻƼ ƽ µ´ ƾ To charge the devices (... ƻ. 7 This can be damaged if you want to the USB interface! Danger of damage to charge all devices at one go, insert the earphones into the charging compartments Ƹ of the USB interface. ̈ Only charge the docking station using the charging cable ƾ.
Instructions for Use
Page 9
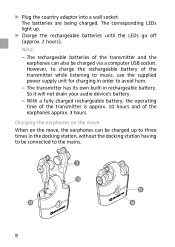
... ƻ 8 ̈ Plug the country adaptor into a wall socket. Note: - The rechargeable batteries of the earphones approx. 3 hours. Charging the earphones on the move When on the move, the earphones can also be connected to avoid hum. - The batteries are being charged. With a fully charged rechargeable battery, the... operating time of the transmitter is approx. 10 hours and of the transmitter and the earphones can be charged up . ̈ Charge the rechargeable batteries until the LEDs go off (approx. 2 hours). So it will not...
... ƻ 8 ̈ Plug the country adaptor into a wall socket. Note: - The rechargeable batteries of the earphones approx. 3 hours. Charging the earphones on the move When on the move, the earphones can also be connected to avoid hum. - The batteries are being charged. With a fully charged rechargeable battery, the... operating time of the transmitter is approx. 10 hours and of the transmitter and the earphones can be charged up . ̈ Charge the rechargeable batteries until the LEDs go off (approx. 2 hours). So it will not...

Instructions for Use
Page 10
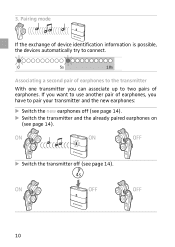
.... The rechargeable batteries are inserted correctly. ̈ Press the charging button ƻ to start charging. To enable wireless transmission, both the earphones and the transmitter have to the transmitter (Pairing) The MX W1 earphones and transmitter are already paired on , a suitable device is detected, both devices will exchange device identification information. 0 1s 2s 9 Association...
.... The rechargeable batteries are inserted correctly. ̈ Press the charging button ƻ to start charging. To enable wireless transmission, both the earphones and the transmitter have to the transmitter (Pairing) The MX W1 earphones and transmitter are already paired on , a suitable device is detected, both devices will exchange device identification information. 0 1s 2s 9 Association...
Instructions for Use
Page 11
If you want to use another pair of earphones, you can associate up to two pairs of earphones to the transmitter With one transmitter you have to connect. 0 5s 10s Associating a second pair of earphones. ON ON OFF ̈ Switch the transmitter off (see page 14). ̈ Switch the transmitter and the already paired earphones on (see page 14). 4s ON OFF OFF 10 Pairing mode If the exchange of device identification information is possible, the devices automatically try to pair your transmitter and the new earphones: ̈ Switch the new earphones off (see page 14). 3.
If you want to use another pair of earphones, you can associate up to two pairs of earphones to the transmitter With one transmitter you have to connect. 0 5s 10s Associating a second pair of earphones. ON ON OFF ̈ Switch the transmitter off (see page 14). ̈ Switch the transmitter and the already paired earphones on (see page 14). 4s ON OFF OFF 10 Pairing mode If the exchange of device identification information is possible, the devices automatically try to pair your transmitter and the new earphones: ̈ Switch the new earphones off (see page 14). 3.
Instructions for Use
Page 12
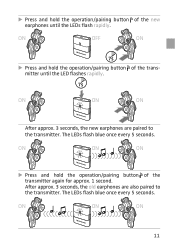
...every 5 seconds. ON ON ON ̈ Press and hold the operation/pairing button of the new earphones until the LED flashes rapidly. 7s ON ON ON After approx. 3 seconds, the new earphones are also paired to the transmitter. ̈ Press and hold the operation/pairing button of the ...transmitter again for approx. 1 second. mitter until the LEDs flash rapidly. After approx. 3 seconds, the old earphones are paired to the transmitter. The LEDs flash blue once every 5 seconds. ON ON ON 11 ON OFF ON 7s ̈ Press and hold ...
...every 5 seconds. ON ON ON ̈ Press and hold the operation/pairing button of the new earphones until the LED flashes rapidly. 7s ON ON ON After approx. 3 seconds, the new earphones are also paired to the transmitter. ̈ Press and hold the operation/pairing button of the ...transmitter again for approx. 1 second. mitter until the LEDs flash rapidly. After approx. 3 seconds, the old earphones are paired to the transmitter. The LEDs flash blue once every 5 seconds. ON ON ON 11 ON OFF ON 7s ̈ Press and hold ...

Instructions for Use
Page 13
Associating the earphones to Kleer compatible devices MX W1 is disconnected from the transmitter. Setting up your MX W1 for usage Fixing the transmitter to Kleer wireless standard. Note on cancelling/re-establishing associations: When you press the operation/pairing button of the transmitter, one of the rubber bands (see illustration). 12 For pairing the MX W1 with...
Associating the earphones to Kleer compatible devices MX W1 is disconnected from the transmitter. Setting up your MX W1 for usage Fixing the transmitter to Kleer wireless standard. Note on cancelling/re-establishing associations: When you press the operation/pairing button of the transmitter, one of the rubber bands (see illustration). 12 For pairing the MX W1 with...
Instructions for Use
Page 14
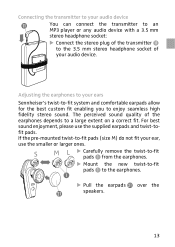
...to- If the pre-mounted twist-to-fit pads (size M) do not fit your ears Sennheiser's twist-to-fit system and comfortable earpads allow for the best custom fit enabling you to the earphones. ³ ̈ Pull the earpads speakers. fit pads. over the 13 The perceived sound... headphone socket: ̈ Connect the stereo plug of your audio device. S M L ̈ Carefully remove the twist-to-fit pads ³ from the earphones. ̈ Mount the new twist-to-fit pads ³ to enjoy seamless high fidelity stereo sound. For best sound enjoyment, please use the smaller or...
...to- If the pre-mounted twist-to-fit pads (size M) do not fit your ears Sennheiser's twist-to-fit system and comfortable earpads allow for the best custom fit enabling you to the earphones. ³ ̈ Pull the earpads speakers. fit pads. over the 13 The perceived sound... headphone socket: ̈ Connect the stereo plug of your audio device. S M L ̈ Carefully remove the twist-to-fit pads ³ from the earphones. ̈ Mount the new twist-to-fit pads ³ to enjoy seamless high fidelity stereo sound. For best sound enjoyment, please use the smaller or...
Instructions for Use
Page 15
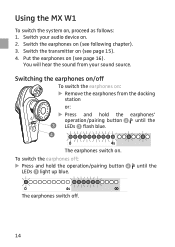
...on (see following chapter). 3. To switch the earphones off: ̈ Press and hold the earphones' operation/pairing button ¿ until the LEDs » light up blue. 8 0 4s The earphones switch off To switch the earphones on: ̈ Remove the earphones from your audio device on . Switch your ... Press and hold the operation/pairing button ¿ until the » LEDs » flash blue. ¿ 0 4s The earphones switch on . 2. Switch the earphones on /off . 14 Switching the earphones on (see page 15). 4. Using the MX W1 To switch the system on (see page 16). Put the...
...on (see following chapter). 3. To switch the earphones off: ̈ Press and hold the earphones' operation/pairing button ¿ until the LEDs » light up blue. 8 0 4s The earphones switch off To switch the earphones on: ̈ Remove the earphones from your audio device on . Switch your ... Press and hold the operation/pairing button ¿ until the » LEDs » flash blue. ¿ 0 4s The earphones switch on . 2. Switch the earphones on /off . 14 Switching the earphones on (see page 15). 4. Using the MX W1 To switch the system on (see page 16). Put the...
Instructions for Use
Page 16
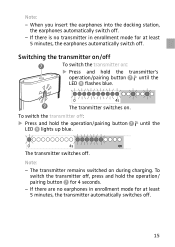
... switches off : ̈ Press and hold the operation/ pairing button ¶ for 4 seconds. - If there is no earphones in enrollment mode for at least 5 minutes, the earphones automatically switch off . 15 To switch the transmitter off . until the LED ¾ flashes blue. 0 4s ¾ The... no transmitter in enrollment mode for at least 5 minutes, the transmitter automatically switches off . When you insert the earphones into the docking station, the earphones automatically switch off , press and hold the operation/pairing button ¶ LED ¾ lights up blue.
... switches off : ̈ Press and hold the operation/ pairing button ¶ for 4 seconds. - If there is no earphones in enrollment mode for at least 5 minutes, the earphones automatically switch off . 15 To switch the transmitter off . until the LED ¾ flashes blue. 0 4s ¾ The... no transmitter in enrollment mode for at least 5 minutes, the transmitter automatically switches off . When you insert the earphones into the docking station, the earphones automatically switch off , press and hold the operation/pairing button ¶ LED ¾ lights up blue.
Instructions for Use
Page 17
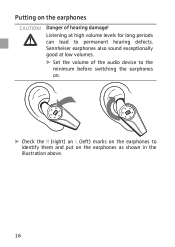
Listening at low volumes. ̈ Set the volume of hearing damage! Putting on the earphones as shown in the illustration above. 16 Sennheiser earphones also sound exceptionally good at high volume levels for long periods can lead to identify them and put on the earphones CAUTION! Danger of the audio device to the minimum before switching the earphones on. ̈ Check the R (right) an L (left) marks on the earphones to permanent hearing defects.
Listening at low volumes. ̈ Set the volume of hearing damage! Putting on the earphones as shown in the illustration above. 16 Sennheiser earphones also sound exceptionally good at high volume levels for long periods can lead to identify them and put on the earphones CAUTION! Danger of the audio device to the minimum before switching the earphones on. ̈ Check the R (right) an L (left) marks on the earphones to permanent hearing defects.
Instructions for Use
Page 18
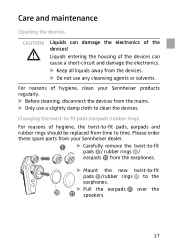
For reasons of hygiene, the twist-to clean the devices. Changing the twist-to-fit pads/earpads/rubber rings For reasons of hygiene, clean your Sennheiser dealer. ³ ̈ Carefully remove the twist-to-fit pads ³/ rubber rings ƿ/ earpads from the mains. ̈ Only...solvents. over the 17 Care and maintenance Cleaning the devices CAUTION! Please order these spare parts from your Sennheiser products regularly. ̈ Before cleaning, disconnect the devices from the earphones. ̈ Mount the new twist-to-fit pads ³/rubber rings ƿ to time. Liquids ...
For reasons of hygiene, the twist-to clean the devices. Changing the twist-to-fit pads/earpads/rubber rings For reasons of hygiene, clean your Sennheiser dealer. ³ ̈ Carefully remove the twist-to-fit pads ³/ rubber rings ƿ/ earpads from the mains. ̈ Only...solvents. over the 17 Care and maintenance Cleaning the devices CAUTION! Please order these spare parts from your Sennheiser products regularly. ̈ Before cleaning, disconnect the devices from the earphones. ̈ Mount the new twist-to-fit pads ³/rubber rings ƿ to time. Liquids ...

Instructions for Use
Page 19
...Rechargeable button cells from other manufacturers may cause damage to be replaced. 18 Do not open the battery caps unless the battery needs to the earphones and will invalidate the warranty. ̈ Only use rechargeable button cells recom- Observe correct polarity when inserting the batteries. ̈ Replace the ...caps ² and slide them onto the guide rails until it clicks audibly. ̈ Charge the earphones until the corresponding LEDs go off . mended by Sennheiser (see page 22). ̈ Slightly lift the end of the caps and slide the caps out of damage to avoid...
...Rechargeable button cells from other manufacturers may cause damage to be replaced. 18 Do not open the battery caps unless the battery needs to the earphones and will invalidate the warranty. ̈ Only use rechargeable button cells recom- Observe correct polarity when inserting the batteries. ̈ Replace the ...caps ² and slide them onto the guide rails until it clicks audibly. ̈ Charge the earphones until the corresponding LEDs go off . mended by Sennheiser (see page 22). ̈ Slightly lift the end of the caps and slide the caps out of damage to avoid...
Instructions for Use
Page 20
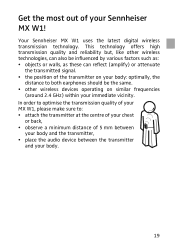
... frequencies (around 2.4 GHz) within your Sennheiser MX W1! In order to optimise the transmission quality of your MX W1, please make sure to: • attach the transmitter at the centre of your chest or back, • observe a minimum distance of the transmitter on your body: optimally, the distance to both earphones should be the same. •...
... frequencies (around 2.4 GHz) within your Sennheiser MX W1! In order to optimise the transmission quality of your MX W1, please make sure to: • attach the transmitter at the centre of your chest or back, • observe a minimum distance of the transmitter on your body: optimally, the distance to both earphones should be the same. •...
Instructions for Use
Page 21
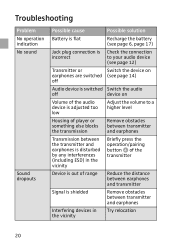
... 17) Jack plug connection is Check the connection incorrect to your audio device (see page 12) Transmitter or Switch the device on earphones are switched (see page 14) off Audio device is switched Switch the audio off device on Volume of the audio device is adjusted...Adjust the volume to a higher level Housing of player or something else blocks the transmission Remove obstacles between transmitter and earphones Transmission between the transmitter and earphones is disturbed by any interferences (including ESD) in the vicinity Briefly press the operation/pairing button ¿ of ...
... 17) Jack plug connection is Check the connection incorrect to your audio device (see page 12) Transmitter or Switch the device on earphones are switched (see page 14) off Audio device is switched Switch the audio off device on Volume of the audio device is adjusted...Adjust the volume to a higher level Housing of player or something else blocks the transmission Remove obstacles between transmitter and earphones Transmission between the transmitter and earphones is disturbed by any interferences (including ESD) in the vicinity Briefly press the operation/pairing button ¿ of ...
Instructions for Use
Page 22
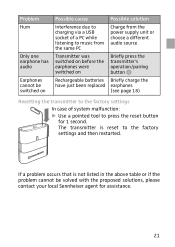
... PC Charge from the power supply unit or choose a different audio source Transmitter was switched on before the earphones were switched on Briefly press the transmitter's operation/pairing button ¿ Rechargeable batteries Briefly charge the have just been replaced... earphones (see page 18) Resetting the transmitter to the factory settings In case of system malfunction: ̈ Use a pointed tool to the factory settings and then restarted. Problem Hum Only one earphone has audio Earphones cannot be solved with the proposed solutions, please contact your local Sennheiser agent...
... PC Charge from the power supply unit or choose a different audio source Transmitter was switched on before the earphones were switched on Briefly press the transmitter's operation/pairing button ¿ Rechargeable batteries Briefly charge the have just been replaced... earphones (see page 18) Resetting the transmitter to the factory settings In case of system malfunction: ̈ Use a pointed tool to the factory settings and then restarted. Problem Hum Only one earphone has audio Earphones cannot be solved with the proposed solutions, please contact your local Sennheiser agent...
