
Instructions for Use
Page 33
... signals 6 Putting the RS 125 system into operation 7 Setting up the transmitter 7 Connecting the transmitter to a sound source 8 Connecting the transmitter to the mains 9 Inserting and changing the headphones' rechargeable batteries 9 Charging the headphones' rechargeable batteries ........ 10 Adjusting the headband of the headphones 11 Using the RS 125 system 12 Switching the transmitter on and off 12 Switching the headphones on and off 13 Searching for a sound source 14 Changing the transmission channel 15 Adjusting the volume...
... signals 6 Putting the RS 125 system into operation 7 Setting up the transmitter 7 Connecting the transmitter to a sound source 8 Connecting the transmitter to the mains 9 Inserting and changing the headphones' rechargeable batteries 9 Charging the headphones' rechargeable batteries ........ 10 Adjusting the headband of the headphones 11 Using the RS 125 system 12 Switching the transmitter on and off 12 Switching the headphones on and off 13 Searching for a sound source 14 Changing the transmission channel 15 Adjusting the volume...
Instructions for Use
Page 34
... or moisture. • Only use of time. • Ensure that the mains unit is - Important safety instructions Important safety instructions • Read this instruction manual. • Keep this instructions, or under operating conditions which differ from those described herein. 2 Intended use the supplied mains unit. • Disconnect the mains connector from the wall socket - Always include this instruction manual. properly plugged into the wall socket, - to...
... or moisture. • Only use of time. • Ensure that the mains unit is - Important safety instructions Important safety instructions • Read this instruction manual. • Keep this instructions, or under operating conditions which differ from those described herein. 2 Intended use the supplied mains unit. • Disconnect the mains connector from the wall socket - Always include this instruction manual. properly plugged into the wall socket, - to...

Instructions for Use
Page 36
... to wear and very easy to individual needs. Delivery includes 1 HDR 125 headphones 1 TR 125 transmitter with connection cable 2 AAA size NiMH rechargeable batteries, 1.2 V 1 NT-RS 100 mains unit 1 adapter 3.5 mm to ¼" (6.3 mm) jack socket 1 instruction manual 4 The RS 125 RF headphone system The RS 125 RF headphone system The RS 125 RF stereo hi-fi headphone system offers excellent sound quality and allows for wireless listening everywhere in the house and...
... to wear and very easy to individual needs. Delivery includes 1 HDR 125 headphones 1 TR 125 transmitter with connection cable 2 AAA size NiMH rechargeable batteries, 1.2 V 1 NT-RS 100 mains unit 1 adapter 3.5 mm to ¼" (6.3 mm) jack socket 1 instruction manual 4 The RS 125 RF headphone system The RS 125 RF headphone system The RS 125 RF stereo hi-fi headphone system offers excellent sound quality and allows for wireless listening everywhere in the house and...
Instructions for Use
Page 37
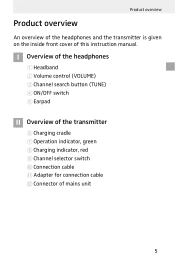
Product overview Product overview An overview of the headphones and the transmitter is given on the inside front cover of mains unit 5 I Overview of the headphones 1 Headband 2 Volume control (VOLUME) 3 Channel search button (TUNE) 4 ON/OFF switch 5 Earpad II Overview of the transmitter 6 Charging cradle 7 Operation indicator, green 8 Charging indicator, red 9 Channel selector switch 0 Connection cable A Adapter for connection cable B Connector of this instruction manual.
Product overview Product overview An overview of the headphones and the transmitter is given on the inside front cover of mains unit 5 I Overview of the headphones 1 Headband 2 Volume control (VOLUME) 3 Channel search button (TUNE) 4 ON/OFF switch 5 Earpad II Overview of the transmitter 6 Charging cradle 7 Operation indicator, green 8 Charging indicator, red 9 Channel selector switch 0 Connection cable A Adapter for connection cable B Connector of this instruction manual.
Instructions for Use
Page 39
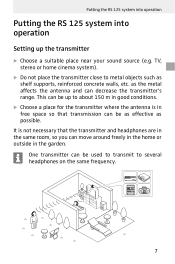
Putting the RS 125 system into operation Putting the RS 125 system into operation Setting up to about 150 m in good conditions. ̈ Choose a place for the transmitter where the antenna is not necessary that the transmitter and headphones are in free space so that transmission can be used to transmit to metal objects such as the metal affects the antenna and can move...
Putting the RS 125 system into operation Putting the RS 125 system into operation Setting up to about 150 m in good conditions. ̈ Choose a place for the transmitter where the antenna is not necessary that the transmitter and headphones are in free space so that transmission can be used to transmit to metal objects such as the metal affects the antenna and can move...
Instructions for Use
Page 40
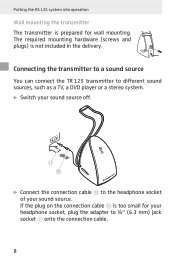
If the plug on the connection cable 0 is too small for wall mounting. A 0 ̈ Connect the connection cable 0 to ¼" (6.3 mm) jack socket A onto the connection cable. 8 Connecting the transmitter to a sound source You can connect the TR 125 transmitter to different sound sources, such as a TV, a DVD player or a stereo system. ̈ Switch your sound source. Putting the RS 125 system into operation Wall mounting the transmitter The transmitter is prepared for your headphone socket, plug the adapter to...
If the plug on the connection cable 0 is too small for wall mounting. A 0 ̈ Connect the connection cable 0 to ¼" (6.3 mm) jack socket A onto the connection cable. 8 Connecting the transmitter to a sound source You can connect the TR 125 transmitter to different sound sources, such as a TV, a DVD player or a stereo system. ̈ Switch your sound source. Putting the RS 125 system into operation Wall mounting the transmitter The transmitter is prepared for your headphone socket, plug the adapter to...
Instructions for Use
Page 41
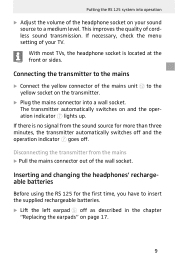
... transmitter automatically switches on and the operation indicator 7 lights up. If necessary, check the menu setting of your sound source to the yellow socket on the transmitter. ̈ Plug the mains connector into a wall socket. Inserting and changing the headphones' rechargeable batteries Before using the RS 125 for more than three minutes, the transmitter automatically switches off and the operation indicator 7 goes off as described in the chapter "Replacing...
... transmitter automatically switches on and the operation indicator 7 lights up. If necessary, check the menu setting of your sound source to the yellow socket on the transmitter. ̈ Plug the mains connector into a wall socket. Inserting and changing the headphones' rechargeable batteries Before using the RS 125 for more than three minutes, the transmitter automatically switches off and the operation indicator 7 goes off as described in the chapter "Replacing...
Instructions for Use
Page 42
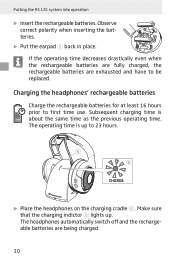
... be replaced. Subsequent charging time is up . If the operating time decreases drastically even when the rechargeable batteries are fully charged, the rechargeable batteries are being charged. 10 The headphones automatically switch off and the rechargeable batteries are exhausted and have to first time use. Putting the RS 125 system into operation ̈ Insert the rechargeable batteries. The operating time is 16h about the same time as...
... be replaced. Subsequent charging time is up . If the operating time decreases drastically even when the rechargeable batteries are fully charged, the rechargeable batteries are being charged. 10 The headphones automatically switch off and the rechargeable batteries are exhausted and have to first time use. Putting the RS 125 system into operation ̈ Insert the rechargeable batteries. The operating time is 16h about the same time as...
Instructions for Use
Page 43
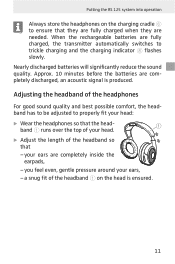
... head- 1 band 1 runs over the top of your ears are needed. Nearly discharged batteries will significantly reduce the sound quality. When the rechargeable batteries are completely discharged, an acoustic signal is ensured. 11 Approx. 10 minutes before the batteries are fully charged, the transmitter automatically switches to trickle charging and the charging indicator 8 flashes slowly. your head. 25 ̈ Adjust the...
... head- 1 band 1 runs over the top of your ears are needed. Nearly discharged batteries will significantly reduce the sound quality. When the rechargeable batteries are completely discharged, an acoustic signal is ensured. 11 Approx. 10 minutes before the batteries are fully charged, the transmitter automatically switches to trickle charging and the charging indicator 8 flashes slowly. your head. 25 ̈ Adjust the...
Instructions for Use
Page 44
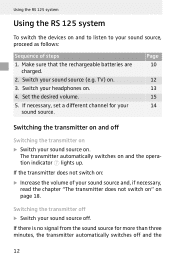
..., set a different channel for more than three minutes, the transmitter automatically switches off and the 12 If there is no signal from the sound source for your sound source. TV) on and the operation indicator 7 lights up. Set the desired volume. 5. The transmitter automatically switches on . 3. Using the RS 125 system Using the RS 125 system To switch the devices on and to listen to your headphones on. 4. Switch your sound source...
..., set a different channel for more than three minutes, the transmitter automatically switches off and the 12 If there is no signal from the sound source for your sound source. TV) on and the operation indicator 7 lights up. Set the desired volume. 5. The transmitter automatically switches on . 3. Using the RS 125 system Using the RS 125 system To switch the devices on and to listen to your headphones on. 4. Switch your sound source...
Instructions for Use
Page 45
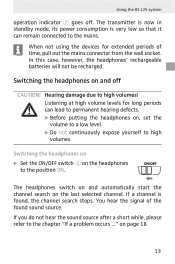
Using the RS 125 system operation indicator 7 goes off CAUTION! When not using the devices for long periods can remain connected to high volumes. In this case, however, the headphones' rechargeable batteries will not be recharged. The headphones switch on and automatically start the channel search on page 18. 13 on the last selected channel. Hearing damage due to the chapter "If a problem occurs ..." Listening...
Using the RS 125 system operation indicator 7 goes off CAUTION! When not using the devices for long periods can remain connected to high volumes. In this case, however, the headphones' rechargeable batteries will not be recharged. The headphones switch on and automatically start the channel search on page 18. 13 on the last selected channel. Hearing damage due to the chapter "If a problem occurs ..." Listening...
Instructions for Use
Page 46
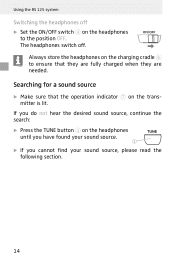
... desired sound source, continue the search: ̈ Press the TUNE button 3 on the transmitter is lit. Using the RS 125 system Switching the headphones off . Searching for a sound source ̈ Make sure that they are fully charged when they are needed. If you cannot find your sound source, please read the following section. 14 The headphones switch off ̈ Set the ON/OFF switch 4 on...
... desired sound source, continue the search: ̈ Press the TUNE button 3 on the transmitter is lit. Using the RS 125 system Switching the headphones off . Searching for a sound source ̈ Make sure that they are fully charged when they are needed. If you cannot find your sound source, please read the following section. 14 The headphones switch off ̈ Set the ON/OFF switch 4 on...
Instructions for Use
Page 47
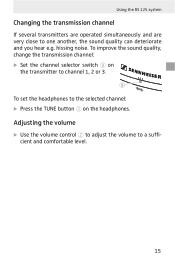
Using the RS 125 system Changing the transmission channel If several transmitters are operated simultaneously and are very close to a sufficient and comfortable level. 15 hissing noise. Adjusting the volume ̈ Use the volume control 2 to adjust the volume to one another, the sound quality can deteriorate and you hear e.g. To improve the sound quality, change the transmission channel: ̈ Set the channel selector switch 9 on the transmitter to channel 1, 2 or 3. 9 To set the headphones to the selected channel: ̈ Press the TUNE button 3 on the headphones.
Using the RS 125 system Changing the transmission channel If several transmitters are operated simultaneously and are very close to a sufficient and comfortable level. 15 hissing noise. Adjusting the volume ̈ Use the volume control 2 to adjust the volume to one another, the sound quality can deteriorate and you hear e.g. To improve the sound quality, change the transmission channel: ̈ Set the channel selector switch 9 on the transmitter to channel 1, 2 or 3. 9 To set the headphones to the selected channel: ̈ Press the TUNE button 3 on the headphones.
Instructions for Use
Page 48
... (see page 13). ̈ Press the TUNE button 3 for 5 seconds. ̈ Switch the headphones off for the acoustic signals is given on , the headphones produce a sequence of the acoustic signals is retained in memory until you change the setting again or replace the rechargeable batteries. 16 Using the RS 125 system Switching the acoustic signals (beeps) on and off An overview of three...
... (see page 13). ̈ Press the TUNE button 3 for 5 seconds. ̈ Switch the headphones off for the acoustic signals is given on , the headphones produce a sequence of the acoustic signals is retained in memory until you change the setting again or replace the rechargeable batteries. 16 Using the RS 125 system Switching the acoustic signals (beeps) on and off An overview of three...
Instructions for Use
Page 49
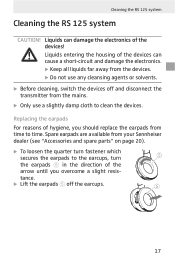
Cleaning the RS 125 system Cleaning the RS 125 system CAUTION! Replacing the earpads For reasons of the arrow until you should replace the earpads from your Sennheiser dealer (see "Accessories and spare parts" on page 20). ̈ To loosen the quarter turn fastener which secures the earpads to the earcups, turn 5 the earpads 5 in the direction of hygiene, you overcome a slight resis...
Cleaning the RS 125 system Cleaning the RS 125 system CAUTION! Replacing the earpads For reasons of the arrow until you should replace the earpads from your Sennheiser dealer (see "Accessories and spare parts" on page 20). ̈ To loosen the quarter turn fastener which secures the earpads to the earcups, turn 5 the earpads 5 in the direction of hygiene, you overcome a slight resis...
Instructions for Use
Page 50
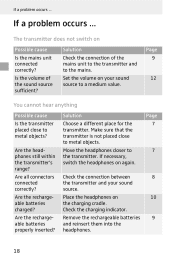
... the headphones on Possible cause Is the mains unit connected correctly? The transmitter does not switch on 10 the charging cradle. Are the rechargeable batteries charged? Make sure that the transmitter is not placed close to the transmitter. Set the volume on again. Are the headphones still within the transmitter's range? Are all connectors connected correctly? If necessary, switch the headphones on your sound source.
... the headphones on Possible cause Is the mains unit connected correctly? The transmitter does not switch on 10 the charging cradle. Are the rechargeable batteries charged? Make sure that the transmitter is not placed close to the transmitter. Set the volume on again. Are the headphones still within the transmitter's range? Are all connectors connected correctly? If necessary, switch the headphones on your sound source.
Instructions for Use
Page 51
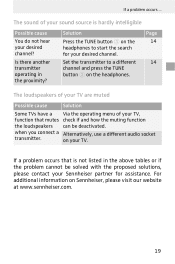
... the operating menu of your desired channel. when you connect a Alternatively, use a different audio socket transmitter. Set the transmitter to a different channel and press the TUNE button 3 on the headphones to start the search for assistance. If a problem occurs that mutes check if and how the muting function the loudspeakers can be solved with the proposed solutions, please contact your Sennheiser partner for your sound source...
... the operating menu of your desired channel. when you connect a Alternatively, use a different audio socket transmitter. Set the transmitter to a different channel and press the TUNE button 3 on the headphones to start the search for assistance. If a problem occurs that mutes check if and how the muting function the loudspeakers can be solved with the proposed solutions, please contact your Sennheiser partner for your sound source...
Instructions for Use
Page 52
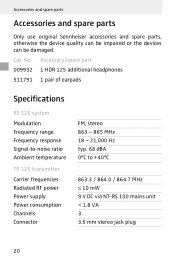
... earpads Specifications RS 125 system Modulation Frequency range Frequency response Signal-to-noise ratio Ambient temperature TR 125 transmitter Carrier frequencies Radiated RF power Power supply Power consumption Channels Connector FM, stereo 863 - 865 MHz 18 - 21,000 Hz typ. 68 dBA 0°C to +40°C 863.3 / 864.0 / 864.7 MHz ≤ 10 mW 9 V DC via NT-RS 100 mains unit < 1.8 VA 3 3.5 mm stereo jack plug 20 Accessories and spare parts Accessories and spare parts Only use original Sennheiser accessories...
... earpads Specifications RS 125 system Modulation Frequency range Frequency response Signal-to-noise ratio Ambient temperature TR 125 transmitter Carrier frequencies Radiated RF power Power supply Power consumption Channels Connector FM, stereo 863 - 865 MHz 18 - 21,000 Hz typ. 68 dBA 0°C to +40°C 863.3 / 864.0 / 864.7 MHz ≤ 10 mW 9 V DC via NT-RS 100 mains unit < 1.8 VA 3 3.5 mm stereo jack plug 20 Accessories and spare parts Accessories and spare parts Only use original Sennheiser accessories...

Instructions for Use
Page 53
rechargeable batteries NT-RS 100 mains unit Nominal input voltage Mains frequency Nominal output voltage Nominal output current Operating temperature range 230 V AC 50 Hz 9 V DC 200 mA 0°C to 23 hrs (with fully charged rechargeable batteries) approx. 275 g incl. SPL (at 1 kHz) THD (at 1 kHz) Power supply Charging time Operating time Weight dynamic, circumaural, closed 104 dB < 0.5% 2 AAA size NiMH rechargeable batteries (LR 03) approx. 16 hrs...
rechargeable batteries NT-RS 100 mains unit Nominal input voltage Mains frequency Nominal output voltage Nominal output current Operating temperature range 230 V AC 50 Hz 9 V DC 200 mA 0°C to 23 hrs (with fully charged rechargeable batteries) approx. 275 g incl. SPL (at 1 kHz) THD (at 1 kHz) Power supply Charging time Operating time Weight dynamic, circumaural, closed 104 dB < 0.5% 2 AAA size NiMH rechargeable batteries (LR 03) approx. 16 hrs...
Instructions for Use
Page 55
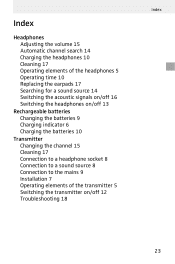
... Adjusting the volume 15 Automatic channel search 14 Charging the headphones 10 Cleaning 17 Operating elements of the headphones 5 Operating time 10 Replacing the earpads 17 Searching for a sound source 14 Switching the acoustic signals on/off 16 Switching the headphones on/off 13 Rechargeable batteries Changing the batteries 9 Charging indicator 6 Charging the batteries 10 Transmitter Changing the channel 15 Cleaning 17 Connection to a headphone socket 8 Connection to a sound source 8 Connection to the mains 9 Installation 7 Operating...
... Adjusting the volume 15 Automatic channel search 14 Charging the headphones 10 Cleaning 17 Operating elements of the headphones 5 Operating time 10 Replacing the earpads 17 Searching for a sound source 14 Switching the acoustic signals on/off 16 Switching the headphones on/off 13 Rechargeable batteries Changing the batteries 9 Charging indicator 6 Charging the batteries 10 Transmitter Changing the channel 15 Cleaning 17 Connection to a headphone socket 8 Connection to a sound source 8 Connection to the mains 9 Installation 7 Operating...

