
Instructions for Use
Page 3
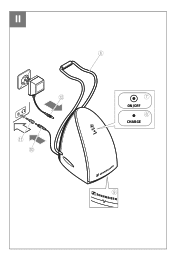
II 6 B A 0 7 ON/OFF 8 CHARGE 9
II 6 B A 0 7 ON/OFF 8 CHARGE 9

Instructions for Use
Page 31
II 6 B A 0 7 ON/OFF 8 CHARGE 9
II 6 B A 0 7 ON/OFF 8 CHARGE 9
Instructions for Use
Page 33
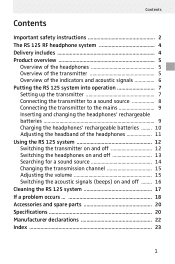
... and acoustic signals 6 Putting the RS 125 system into operation 7 Setting up the transmitter 7 Connecting the transmitter to a sound source 8 Connecting the transmitter to the mains 9 Inserting and changing the headphones' rechargeable batteries 9 Charging the headphones' rechargeable batteries ........ 10... Adjusting the headband of the headphones 11 Using the RS 125 system 12 Switching the transmitter on and off 12 Switching the headphones on...
... and acoustic signals 6 Putting the RS 125 system into operation 7 Setting up the transmitter 7 Connecting the transmitter to a sound source 8 Connecting the transmitter to the mains 9 Inserting and changing the headphones' rechargeable batteries 9 Charging the headphones' rechargeable batteries ........ 10... Adjusting the headband of the headphones 11 Using the RS 125 system 12 Switching the transmitter on and off 12 Switching the headphones on...
Instructions for Use
Page 35
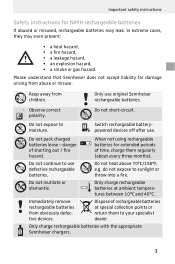
... batteries at special collection points or return them regularly (about every three months). Only charge rechargeable batteries with the appropriate Sennheiser chargers. 3 Keep away from obviously defective devices. do not expose to moisture. In extreme cases, they ... hazard, • an explosion hazard, • a smoke or gas hazard. Please understand that Sennheiser does not accept liability for extended periods of shorting out / fire hazard. Do not pack charged batteries loose - When not using rechargeable batteries for damage arising from abuse or misuse. Do not...
... batteries at special collection points or return them regularly (about every three months). Only charge rechargeable batteries with the appropriate Sennheiser chargers. 3 Keep away from obviously defective devices. do not expose to moisture. In extreme cases, they ... hazard, • an explosion hazard, • a smoke or gas hazard. Please understand that Sennheiser does not accept liability for extended periods of shorting out / fire hazard. Do not pack charged batteries loose - When not using rechargeable batteries for damage arising from abuse or misuse. Do not...
Instructions for Use
Page 37
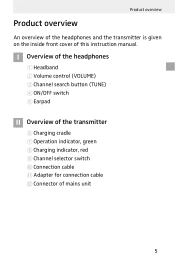
Product overview Product overview An overview of the headphones and the transmitter is given on the inside front cover of mains unit 5 I Overview of the headphones 1 Headband 2 Volume control (VOLUME) 3 Channel search button (TUNE) 4 ON/OFF switch 5 Earpad II Overview of the transmitter 6 Charging cradle 7 Operation indicator, green 8 Charging indicator, red 9 Channel selector switch 0 Connection cable A Adapter for connection cable B Connector of this instruction manual.
Product overview Product overview An overview of the headphones and the transmitter is given on the inside front cover of mains unit 5 I Overview of the headphones 1 Headband 2 Volume control (VOLUME) 3 Channel search button (TUNE) 4 ON/OFF switch 5 Earpad II Overview of the transmitter 6 Charging cradle 7 Operation indicator, green 8 Charging indicator, red 9 Channel selector switch 0 Connection cable A Adapter for connection cable B Connector of this instruction manual.
Instructions for Use
Page 38
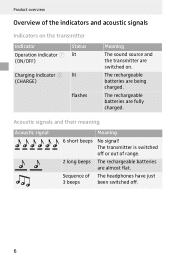
... 6 short beeps No signal! Sequence of The headphones have just 3 beeps been switched off or out of range. 2 long beeps The rechargeable batteries are being charged. The transmitter is switched off . 6 The rechargeable batteries are switched on the transmitter Indicator Operation indicator 7 (ON/OFF) Status lit...
... 6 short beeps No signal! Sequence of The headphones have just 3 beeps been switched off or out of range. 2 long beeps The rechargeable batteries are being charged. The transmitter is switched off . 6 The rechargeable batteries are switched on the transmitter Indicator Operation indicator 7 (ON/OFF) Status lit...
Instructions for Use
Page 42
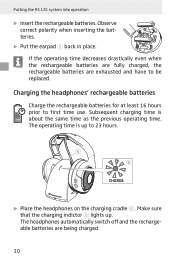
... least 16 hours prior to first time use. Make sure that the charging indictor 8 lights up to be replaced. Subsequent charging time is up . Observe correct polarity when inserting the batteries. ̈ Put the earpad 5 back in place. Putting the RS 125 system into operation ̈ Insert the rechargeable batteries. The headphones automatically switch...
... least 16 hours prior to first time use. Make sure that the charging indictor 8 lights up to be replaced. Subsequent charging time is up . Observe correct polarity when inserting the batteries. ̈ Put the earpad 5 back in place. Putting the RS 125 system into operation ̈ Insert the rechargeable batteries. The headphones automatically switch...
Instructions for Use
Page 43
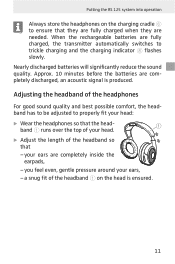
..., an acoustic signal is ensured. 11 you feel even, gentle pressure around your ears are fully charged, the transmitter automatically switches to trickle charging and the charging indicator 8 flashes slowly. Adjusting the headband of the headphones For good sound quality and best possible ... over the top of your head. 25 ̈ Adjust the length of the headband 1 on the charging cradle 6 to ensure that - your ears, - Putting the RS 125 system into operation Always store the headphones on the head is produced. Nearly discharged batteries will significantly reduce the...
..., an acoustic signal is ensured. 11 you feel even, gentle pressure around your ears are fully charged, the transmitter automatically switches to trickle charging and the charging indicator 8 flashes slowly. Adjusting the headband of the headphones For good sound quality and best possible ... over the top of your head. 25 ̈ Adjust the length of the headband 1 on the charging cradle 6 to ensure that - your ears, - Putting the RS 125 system into operation Always store the headphones on the head is produced. Nearly discharged batteries will significantly reduce the...
Instructions for Use
Page 44
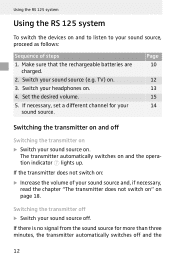
Switch your sound source, proceed as follows: Sequence of your sound source on. The transmitter automatically switches on . 3. Using the RS 125 system Using the RS 125 system To switch the devices on and to listen to your headphones on. 4. If necessary, set a different channel for more than three ...does not switch on and off and the 12 Switch your sound source (e.g. Set the desired volume. 5. Make sure that the rechargeable batteries are charged. 2. If there is no signal from the sound source for your sound source off ̈ Switch your sound source. TV) on and the...
Switch your sound source, proceed as follows: Sequence of your sound source on. The transmitter automatically switches on . 3. Using the RS 125 system Using the RS 125 system To switch the devices on and to listen to your headphones on. 4. If necessary, set a different channel for more than three ...does not switch on and off and the 12 Switch your sound source (e.g. Set the desired volume. 5. Make sure that the rechargeable batteries are charged. 2. If there is no signal from the sound source for your sound source off ̈ Switch your sound source. TV) on and the...
Instructions for Use
Page 46
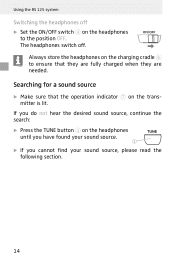
Always store the headphones on the charging cradle 6 to the position OFF. If you do not hear the desired sound source, continue the search: ̈ Press the TUNE button 3 on the headphones / .... 3 ̈ If you cannot find your sound source, please read the following section. 14 Searching for a sound source ̈ Make sure that they are fully charged when they are needed. Using the RS 125 system Switching the headphones off .
Always store the headphones on the charging cradle 6 to the position OFF. If you do not hear the desired sound source, continue the search: ̈ Press the TUNE button 3 on the headphones / .... 3 ̈ If you cannot find your sound source, please read the following section. 14 Searching for a sound source ̈ Make sure that they are fully charged when they are needed. Using the RS 125 system Switching the headphones off .
Instructions for Use
Page 50
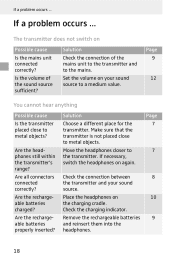
... the headphones still within the transmitter's range? If a problem occurs ... Solution Check the connection of the sound source sufficient? Set the volume on 10 the charging cradle. Check the charging indicator. Are the rechargeable batteries charged? If a problem occurs ... Are all connectors connected correctly? Place the headphones on your sound source.
... the headphones still within the transmitter's range? If a problem occurs ... Solution Check the connection of the sound source sufficient? Set the volume on 10 the charging cradle. Check the charging indicator. Are the rechargeable batteries charged? If a problem occurs ... Are all connectors connected correctly? Place the headphones on your sound source.

Instructions for Use
Page 53
..., LT, LU, LV, ME, MK, MT, NL, NO, PL, PT, RO, RS, SE, SI, SK, TR, UA. 21 Specifications TR 125 transmitter Weight Dimensions (incl. charging cradle) approx. 430 g approx. 85 x 133 x 225 mm (W x D x H) HDR 125 headphones Transducer principle Max. rechargeable batteries NT-RS 100 mains unit Nominal input voltage Mains frequency Nominal output voltage...
..., LT, LU, LV, ME, MK, MT, NL, NO, PL, PT, RO, RS, SE, SI, SK, TR, UA. 21 Specifications TR 125 transmitter Weight Dimensions (incl. charging cradle) approx. 430 g approx. 85 x 133 x 225 mm (W x D x H) HDR 125 headphones Transducer principle Max. rechargeable batteries NT-RS 100 mains unit Nominal input voltage Mains frequency Nominal output voltage...
Instructions for Use
Page 55
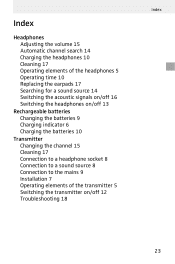
Index Index Headphones Adjusting the volume 15 Automatic channel search 14 Charging the headphones 10 Cleaning 17 Operating elements of the headphones 5 Operating time 10 Replacing the earpads 17 Searching for a sound source 14 Switching... the acoustic signals on/off 16 Switching the headphones on/off 13 Rechargeable batteries Changing the batteries 9 Charging indicator 6 Charging the batteries 10 Transmitter Changing the channel 15 Cleaning 17 Connection to a headphone socket 8 Connection to a sound source 8 Connection to the mains 9 ...
Index Index Headphones Adjusting the volume 15 Automatic channel search 14 Charging the headphones 10 Cleaning 17 Operating elements of the headphones 5 Operating time 10 Replacing the earpads 17 Searching for a sound source 14 Switching... the acoustic signals on/off 16 Switching the headphones on/off 13 Rechargeable batteries Changing the batteries 9 Charging indicator 6 Charging the batteries 10 Transmitter Changing the channel 15 Cleaning 17 Connection to a headphone socket 8 Connection to a sound source 8 Connection to the mains 9 ...

Instructions for Use
Page 59
II 6 B A 0 7 ON/OFF 8 CHARGE 9
II 6 B A 0 7 ON/OFF 8 CHARGE 9

Instructions for Use
Page 87
II 6 B A 0 7 ON/OFF 8 CHARGE 9
II 6 B A 0 7 ON/OFF 8 CHARGE 9

