
Instructions for Use
Page 33
... a sound source 8 Connecting the transmitter to the mains 9 Inserting and changing the headphones' rechargeable batteries 9 Charging the headphones' rechargeable batteries ........ 10 Adjusting the headband of the headphones 11 Using the RS 125 system 12 Switching the transmitter on and off 12 Switching the headphones on and off 13 Searching for a sound source 14 Changing the transmission...
... a sound source 8 Connecting the transmitter to the mains 9 Inserting and changing the headphones' rechargeable batteries 9 Charging the headphones' rechargeable batteries ........ 10 Adjusting the headband of the headphones 11 Using the RS 125 system 12 Switching the transmitter on and off 12 Switching the headphones on and off 13 Searching for a sound source 14 Changing the transmission...

Instructions for Use
Page 36
... extremely comfortable to wear and very easy to individual needs. The volume can easily be adjusted to use. The RS 125 RF headphone system The RS 125 RF headphone system The RS 125 RF stereo hi-fi headphone system offers excellent sound quality and allows for wireless listening everywhere in the house and garden. Enjoy a completely unrestricted listening experience...
... extremely comfortable to wear and very easy to individual needs. The volume can easily be adjusted to use. The RS 125 RF headphone system The RS 125 RF headphone system The RS 125 RF stereo hi-fi headphone system offers excellent sound quality and allows for wireless listening everywhere in the house and garden. Enjoy a completely unrestricted listening experience...
Instructions for Use
Page 37
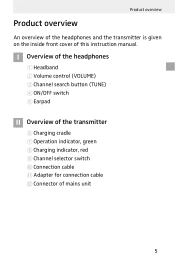
Product overview Product overview An overview of the headphones and the transmitter is given on the inside front cover of mains unit 5 I Overview of the headphones 1 Headband 2 Volume control (VOLUME) 3 Channel search button (TUNE) 4 ON/OFF switch 5 Earpad II Overview of the transmitter 6 Charging cradle 7 Operation indicator, green 8 Charging indicator, red 9 Channel selector switch 0 Connection cable A Adapter for connection cable B Connector of this instruction manual.
Product overview Product overview An overview of the headphones and the transmitter is given on the inside front cover of mains unit 5 I Overview of the headphones 1 Headband 2 Volume control (VOLUME) 3 Channel search button (TUNE) 4 ON/OFF switch 5 Earpad II Overview of the transmitter 6 Charging cradle 7 Operation indicator, green 8 Charging indicator, red 9 Channel selector switch 0 Connection cable A Adapter for connection cable B Connector of this instruction manual.
Instructions for Use
Page 38
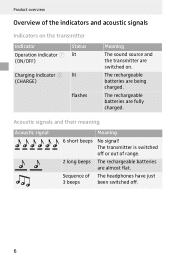
...) flashes Meaning The sound source and the transmitter are fully charged. The transmitter is switched off . 6 The rechargeable batteries are almost flat. Sequence of The headphones have just 3 beeps been switched off or out of the indicators and acoustic signals Indicators on .
...) flashes Meaning The sound source and the transmitter are fully charged. The transmitter is switched off . 6 The rechargeable batteries are almost flat. Sequence of The headphones have just 3 beeps been switched off or out of the indicators and acoustic signals Indicators on .
Instructions for Use
Page 39
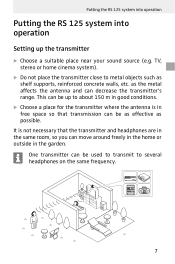
Putting the RS 125 system into operation Putting the RS 125 system into operation Setting up to about 150 m in the garden. It is in free space so that the transmitter and headphones are in the same room, so you can move around freely in the home or outside in good conditions. ̈ Choose a place for... concrete walls, etc. One transmitter can decrease the transmitter's range. TV, stereo or home cinema system). ̈ Do not place the transmitter close to several headphones on the same frequency. 7
Putting the RS 125 system into operation Putting the RS 125 system into operation Setting up to about 150 m in the garden. It is in free space so that the transmitter and headphones are in the same room, so you can move around freely in the home or outside in good conditions. ̈ Choose a place for... concrete walls, etc. One transmitter can decrease the transmitter's range. TV, stereo or home cinema system). ̈ Do not place the transmitter close to several headphones on the same frequency. 7
Instructions for Use
Page 40
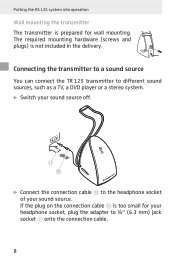
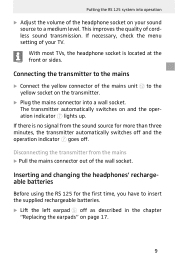
... the transmitter to a sound source You can connect the TR 125 transmitter to ¼" (6.3 mm) jack socket A onto the connection cable. 8 Putting the RS 125 system into operation Wall mounting the transmitter The transmitter is not included in the delivery. A 0 ̈ Connect the connection cable 0 to the headphone socket of your sound source off.
... the transmitter to a sound source You can connect the TR 125 transmitter to ¼" (6.3 mm) jack socket A onto the connection cable. 8 Putting the RS 125 system into operation Wall mounting the transmitter The transmitter is not included in the delivery. A 0 ̈ Connect the connection cable 0 to the headphone socket of your sound source off.
Instructions for Use
Page 41
... transmitter automatically switches on page 17. 9 If there is located at the front or sides. Inserting and changing the headphones' rechargeable batteries Before using the RS 125 for more than three minutes, the transmitter automatically switches off and the operation indicator 7 goes off as described in the... earpads" on and the operation indicator 7 lights up. With most TVs, the headphone socket is no signal from the mains ̈ Pull the mains connector out of the wall socket. Putting the RS 125 system into a wall socket. If necessary, check the menu setting of the mains...
... transmitter automatically switches on page 17. 9 If there is located at the front or sides. Inserting and changing the headphones' rechargeable batteries Before using the RS 125 for more than three minutes, the transmitter automatically switches off and the operation indicator 7 goes off as described in the... earpads" on and the operation indicator 7 lights up. With most TVs, the headphone socket is no signal from the mains ̈ Pull the mains connector out of the wall socket. Putting the RS 125 system into a wall socket. If necessary, check the menu setting of the mains...
Instructions for Use
Page 42
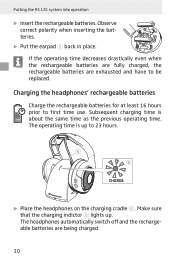
... batteries for at least 16 hours prior to be replaced. Putting the RS 125 system into operation ̈ Insert the rechargeable batteries. Make sure that the charging indictor 8 lights up to 23 hours. 6 25 8 CHARGE ̈ Place the headphones on the charging cradle 6. Observe correct polarity when inserting the batteries. ...If the operating time decreases drastically even when the rechargeable batteries are fully charged, the rechargeable batteries are being charged. 10 The headphones automatically switch off and the rechargeable batteries are exhausted and have to first time use.
... batteries for at least 16 hours prior to be replaced. Putting the RS 125 system into operation ̈ Insert the rechargeable batteries. Make sure that the charging indictor 8 lights up to 23 hours. 6 25 8 CHARGE ̈ Place the headphones on the charging cradle 6. Observe correct polarity when inserting the batteries. ...If the operating time decreases drastically even when the rechargeable batteries are fully charged, the rechargeable batteries are being charged. 10 The headphones automatically switch off and the rechargeable batteries are exhausted and have to first time use.
Instructions for Use
Page 43
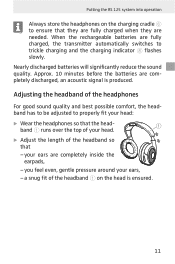
... good sound quality and best possible comfort, the headband has to be adjusted to properly fit your head: ̈ Wear the headphones so that the head- 1 band 1 runs over the top of your head. 25 ̈ Adjust the length of the headband 1 on the charging cradle 6 to ... acoustic signal is ensured. 11 your ears, - Approx. 10 minutes before the batteries are fully charged, the transmitter automatically switches to ensure that - Putting the RS 125 system into operation Always store the headphones on the head is produced.
... good sound quality and best possible comfort, the headband has to be adjusted to properly fit your head: ̈ Wear the headphones so that the head- 1 band 1 runs over the top of your head. 25 ̈ Adjust the length of the headband 1 on the charging cradle 6 to ... acoustic signal is ensured. 11 your ears, - Approx. 10 minutes before the batteries are fully charged, the transmitter automatically switches to ensure that - Putting the RS 125 system into operation Always store the headphones on the head is produced.
Instructions for Use
Page 44
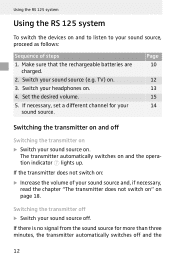
... lights up. Page 10 12 13 15 14 Switching the transmitter on and off ̈ Switch your sound source (e.g. Using the RS 125 system Using the RS 125 system To switch the devices on and to listen to your sound source, proceed as follows: Sequence of your sound source and, if... transmitter does not switch on" on page 18. Switch your sound source on. Switching the transmitter off Switching the transmitter on ̈ Switch your headphones on : ̈ Increase the volume of steps 1. Make sure that the rechargeable batteries are charged. 2. Switch your sound source off and the ...
... lights up. Page 10 12 13 15 14 Switching the transmitter on and off ̈ Switch your sound source (e.g. Using the RS 125 system Using the RS 125 system To switch the devices on and to listen to your sound source, proceed as follows: Sequence of your sound source and, if... transmitter does not switch on" on page 18. Switch your sound source on. Switching the transmitter off Switching the transmitter on ̈ Switch your headphones on : ̈ Increase the volume of steps 1. Make sure that the rechargeable batteries are charged. 2. Switch your sound source off and the ...
Instructions for Use
Page 45
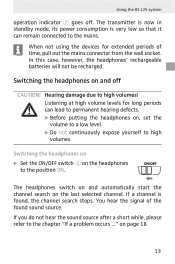
... consumption is found sound source. If a channel is very low so that it can lead to permanent hearing defects. ̈ Before putting the headphones on, set the volume to a low level. ̈ Do not continuously expose yourself to high volumes. You hear the signal of time, ... periods of the found , the channel search stops. on the headphones / to the mains. When not using the devices for long periods can remain connected to the position ON. Hearing damage due to the chapter "If a problem occurs ..." Using the RS 125 system operation indicator 7 goes off CAUTION!
... consumption is found sound source. If a channel is very low so that it can lead to permanent hearing defects. ̈ Before putting the headphones on, set the volume to a low level. ̈ Do not continuously expose yourself to high volumes. You hear the signal of time, ... periods of the found , the channel search stops. on the headphones / to the mains. When not using the devices for long periods can remain connected to the position ON. Hearing damage due to the chapter "If a problem occurs ..." Using the RS 125 system operation indicator 7 goes off CAUTION!
Instructions for Use
Page 46
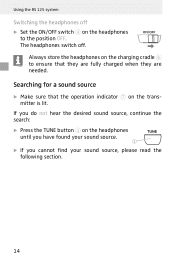
... the charging cradle 6 to the position OFF. The headphones switch off ̈ Set the ON/OFF switch 4 on the headphones / to ensure that the operation indicator 7 on the headphones until you have found your sound source. 3 ̈ If you do not hear the desired sound source, continue the search: ̈ Press the TUNE... source, please read the following section. 14 Searching for a sound source ̈ Make sure that they are fully charged when they are needed. Using the RS 125 system Switching the headphones off .
... the charging cradle 6 to the position OFF. The headphones switch off ̈ Set the ON/OFF switch 4 on the headphones / to ensure that the operation indicator 7 on the headphones until you have found your sound source. 3 ̈ If you do not hear the desired sound source, continue the search: ̈ Press the TUNE... source, please read the following section. 14 Searching for a sound source ̈ Make sure that they are fully charged when they are needed. Using the RS 125 system Switching the headphones off .
Instructions for Use
Page 47
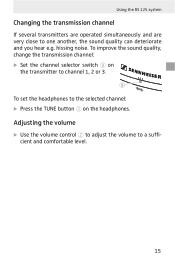
Adjusting the volume ̈ Use the volume control 2 to adjust the volume to the selected channel: ̈ Press the TUNE button 3 on the headphones. To improve the sound quality, change the transmission channel: ̈ Set the channel selector switch 9 on the transmitter to channel 1, 2 or 3. 9 To set the headphones to a sufficient and comfortable level. 15 hissing noise. Using the RS 125 system Changing the transmission channel If several transmitters are operated simultaneously and are very close to one another, the sound quality can deteriorate and you hear e.g.
Adjusting the volume ̈ Use the volume control 2 to adjust the volume to the selected channel: ̈ Press the TUNE button 3 on the headphones. To improve the sound quality, change the transmission channel: ̈ Set the channel selector switch 9 on the transmitter to channel 1, 2 or 3. 9 To set the headphones to a sufficient and comfortable level. 15 hissing noise. Using the RS 125 system Changing the transmission channel If several transmitters are operated simultaneously and are very close to one another, the sound quality can deteriorate and you hear e.g.
Instructions for Use
Page 48
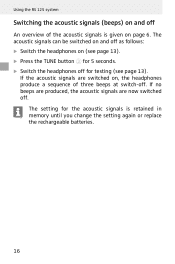
...on and off as follows: ̈ Switch the headphones on (see page 13). The setting for 5 seconds. ̈ Switch the headphones off . If no beeps are produced, the acoustic signals are switched on, the headphones produce a sequence of the acoustic signals is retained... in memory until you change the setting again or replace the rechargeable batteries. 16 If the acoustic signals are now switched off for testing (see page 13). ̈ Press the TUNE button 3 for the acoustic signals is given on page 6. Using the RS 125...
...on and off as follows: ̈ Switch the headphones on (see page 13). The setting for 5 seconds. ̈ Switch the headphones off . If no beeps are produced, the acoustic signals are switched on, the headphones produce a sequence of the acoustic signals is retained... in memory until you change the setting again or replace the rechargeable batteries. 16 If the acoustic signals are now switched off for testing (see page 13). ̈ Press the TUNE button 3 for the acoustic signals is given on page 6. Using the RS 125...
Instructions for Use
Page 50
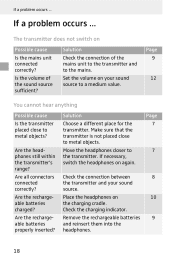
... unit to the transmitter and to metal objects? Solution Check the connection of the sound source sufficient? If necessary, switch the headphones on Possible cause Is the mains unit connected correctly? Check the charging indicator. The transmitter does not switch on again. Page ... transmitter. Make sure that the transmitter is not placed close to the mains. Place the headphones on your sound source. Are the rechargeable batteries properly inserted? Move the headphones closer to metal objects. Are all connectors connected correctly? Set the volume on 10 the charging...
... unit to the transmitter and to metal objects? Solution Check the connection of the sound source sufficient? If necessary, switch the headphones on Possible cause Is the mains unit connected correctly? Check the charging indicator. The transmitter does not switch on again. Page ... transmitter. Make sure that the transmitter is not placed close to the mains. Place the headphones on your sound source. Are the rechargeable batteries properly inserted? Move the headphones closer to metal objects. Are all connectors connected correctly? Set the volume on 10 the charging...
Instructions for Use
Page 51
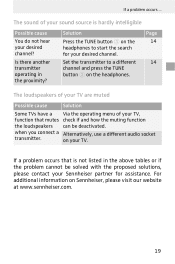
...channel. when you connect a Alternatively, use a different audio socket transmitter. on the headphones to a different channel and press the TUNE button 3 on Sennheiser, please visit our website at www.sennheiser.com. 19 Is there another transmitter operating in the above tables or if the problem... how the muting function the loudspeakers can be solved with the proposed solutions, please contact your Sennheiser partner for your desired channel? For additional information on the headphones. Page 14 14 The loudspeakers of your TV are muted Possible cause Solution Some TVs have ...
...channel. when you connect a Alternatively, use a different audio socket transmitter. on the headphones to a different channel and press the TUNE button 3 on Sennheiser, please visit our website at www.sennheiser.com. 19 Is there another transmitter operating in the above tables or if the problem... how the muting function the loudspeakers can be solved with the proposed solutions, please contact your Sennheiser partner for your desired channel? For additional information on the headphones. Page 14 14 The loudspeakers of your TV are muted Possible cause Solution Some TVs have ...
Instructions for Use
Page 52
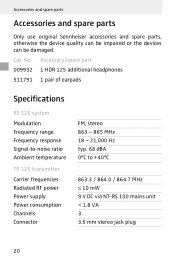
Cat. Accessory/spare part 009932 1 HDR 125 additional headphones 511791 1 pair of earpads Specifications RS 125 system Modulation Frequency range Frequency response Signal-to-noise ratio Ambient temperature TR 125 transmitter Carrier frequencies Radiated RF power Power supply Power consumption Channels Connector FM, stereo 863 -.../ 864.7 MHz ≤ 10 mW 9 V DC via NT-RS 100 mains unit < 1.8 VA 3 3.5 mm stereo jack plug 20 No. Accessories and spare parts Accessories and spare parts Only use original Sennheiser accessories and spare parts, otherwise the device quality can be impaired or...
Cat. Accessory/spare part 009932 1 HDR 125 additional headphones 511791 1 pair of earpads Specifications RS 125 system Modulation Frequency range Frequency response Signal-to-noise ratio Ambient temperature TR 125 transmitter Carrier frequencies Radiated RF power Power supply Power consumption Channels Connector FM, stereo 863 -.../ 864.7 MHz ≤ 10 mW 9 V DC via NT-RS 100 mains unit < 1.8 VA 3 3.5 mm stereo jack plug 20 No. Accessories and spare parts Accessories and spare parts Only use original Sennheiser accessories and spare parts, otherwise the device quality can be impaired or...

Instructions for Use
Page 53
charging cradle) approx. 430 g approx. 85 x 133 x 225 mm (W x D x H) HDR 125 headphones Transducer principle Max. rechargeable batteries NT-RS 100 mains unit Nominal input voltage Mains frequency Nominal output voltage Nominal output current Operating temperature range 230 V AC... 50 Hz 9 V DC 200 mA 0°C to 23 hrs (with fully charged rechargeable batteries) approx. 275 g incl. Specifications TR 125 transmitter Weight ...
charging cradle) approx. 430 g approx. 85 x 133 x 225 mm (W x D x H) HDR 125 headphones Transducer principle Max. rechargeable batteries NT-RS 100 mains unit Nominal input voltage Mains frequency Nominal output voltage Nominal output current Operating temperature range 230 V AC... 50 Hz 9 V DC 200 mA 0°C to 23 hrs (with fully charged rechargeable batteries) approx. 275 g incl. Specifications TR 125 transmitter Weight ...
Instructions for Use
Page 55
... Automatic channel search 14 Charging the headphones 10 Cleaning 17 Operating elements of the headphones 5 Operating time 10 Replacing the earpads 17 Searching for a sound source 14 Switching the acoustic signals on/off 16 Switching the headphones on/off 13 Rechargeable batteries Changing... the batteries 9 Charging indicator 6 Charging the batteries 10 Transmitter Changing the channel 15 Cleaning 17 Connection to a headphone socket 8 Connection to a sound source 8 Connection to ...
... Automatic channel search 14 Charging the headphones 10 Cleaning 17 Operating elements of the headphones 5 Operating time 10 Replacing the earpads 17 Searching for a sound source 14 Switching the acoustic signals on/off 16 Switching the headphones on/off 13 Rechargeable batteries Changing... the batteries 9 Charging indicator 6 Charging the batteries 10 Transmitter Changing the channel 15 Cleaning 17 Connection to a headphone socket 8 Connection to a sound source 8 Connection to ...