
Instructions for use
Page 2
... headset 5 Overview of the control unit 6 Putting the S1 PASSIVE into operation 7 Connecting the headset to the intercom 7 Inserting and changing the batteries/rechargeable batteries 7 Connecting an audio device or mobile phone to the control unit 8 Attaching the belt clip, the cable clip and the design caps 9 Using the S1 PASSIVE 11 Individually adjusting the headset and wearing it 11 Switching the control unit on/off 13 Adjusting the headset to the listening situation 13 Transporting the S1 PASSIVE...
... headset 5 Overview of the control unit 6 Putting the S1 PASSIVE into operation 7 Connecting the headset to the intercom 7 Inserting and changing the batteries/rechargeable batteries 7 Connecting an audio device or mobile phone to the control unit 8 Attaching the belt clip, the cable clip and the design caps 9 Using the S1 PASSIVE 11 Individually adjusting the headset and wearing it 11 Switching the control unit on/off 13 Adjusting the headset to the listening situation 13 Transporting the S1 PASSIVE...

Instructions for use
Page 3
... generates permanent magnetic fields. ̈ Keep product, accessory and packaging parts out of reach of time. ̈ If during the working day. Remove the rechargeable batteries if the product will not be replaced by your attention. Important safety information Important safety information ̈ Please read this instruction manual carefully and completely before using the headset, this can limit your Sennheiser partner. 2 | S1 PASSIVE
... generates permanent magnetic fields. ̈ Keep product, accessory and packaging parts out of reach of time. ̈ If during the working day. Remove the rechargeable batteries if the product will not be replaced by your attention. Important safety information Important safety information ̈ Please read this instruction manual carefully and completely before using the headset, this can limit your Sennheiser partner. 2 | S1 PASSIVE
Instructions for use
Page 4
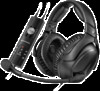
... volume peaks above 110 dB • Control unit with excellent passive noise attenuation. The S1 PASSIVE headset Intended use Intended use of the connected audio device or mobile phone during ATC communications. In addition, the headset has been designed with an emphasis on long flights. cations • "Auto shut-off" extends battery life • Made in noisy single- An integrated switch allows you to adjustable contact pressure and ear...
... volume peaks above 110 dB • Control unit with excellent passive noise attenuation. The S1 PASSIVE headset Intended use Intended use of the connected audio device or mobile phone during ATC communications. In addition, the headset has been designed with an emphasis on long flights. cations • "Auto shut-off" extends battery life • Made in noisy single- An integrated switch allows you to adjustable contact pressure and ear...

Instructions for use
Page 5
... www.sennheiser-aviation.com or www.sennheiser.com. Delivery includes Delivery includes S1 PASSIVE headset Transport case for headset and accessories 3.5 mm audio cable (OMTP compatible) 3.5 mm adapter cable (AT&T compatible) Cable clip Wind and pop screen Belt clip S1 PASSIVE Safety Guide Quick Guide Safety guide and quick guide A list of accessories can be found on suppliers, contact your local Sennheiser partner: • www.sennheiser-aviation.com > "Purchase Information" • www.sennheiser.com > "Service & Support" 4 | S1 PASSIVE
... www.sennheiser-aviation.com or www.sennheiser.com. Delivery includes Delivery includes S1 PASSIVE headset Transport case for headset and accessories 3.5 mm audio cable (OMTP compatible) 3.5 mm adapter cable (AT&T compatible) Cable clip Wind and pop screen Belt clip S1 PASSIVE Safety Guide Quick Guide Safety guide and quick guide A list of accessories can be found on suppliers, contact your local Sennheiser partner: • www.sennheiser-aviation.com > "Purchase Information" • www.sennheiser.com > "Service & Support" 4 | S1 PASSIVE

Instructions for use
Page 8
... batteries/rechargeable batteries. Putting the S1 PASSIVE into operation Putting the S1 PASSIVE into operation Connecting the headset to the intercom ̈ Connect the jack plugs of the control unit B to the corresponding jack sockets of the intercoms Microphone input Headphone output Inserting and changing the batteries/rechargeable batteries If you switch the headset on (see page 13), the Power LED 9 provides information on the remaining battery/rechargeable battery capacity. LED lights up yellow: The battery...
... batteries/rechargeable batteries. Putting the S1 PASSIVE into operation Putting the S1 PASSIVE into operation Connecting the headset to the intercom ̈ Connect the jack plugs of the control unit B to the corresponding jack sockets of the intercoms Microphone input Headphone output Inserting and changing the batteries/rechargeable batteries If you switch the headset on (see page 13), the Power LED 9 provides information on the remaining battery/rechargeable battery capacity. LED lights up yellow: The battery...

Instructions for use
Page 9
... Power OFF/ON switch must be controlled via the control unit. ̈ Operate your connected device as usual and observe the manufacturers instructions. ON 8 | S1 PASSIVE However, other functions cannot be set to the position ON. ̈ Use the volume control to adjust the volume of use Muting Type Alkaline batteries/ rechargeable batteries Lithium batteries Operating time approx. 200 hrs approx. 220 hrs If the battery capacity is low, the headset automatically switches off to connect an audio device or mobile telephone...
... Power OFF/ON switch must be controlled via the control unit. ̈ Operate your connected device as usual and observe the manufacturers instructions. ON 8 | S1 PASSIVE However, other functions cannot be set to the position ON. ̈ Use the volume control to adjust the volume of use Muting Type Alkaline batteries/ rechargeable batteries Lithium batteries Operating time approx. 200 hrs approx. 220 hrs If the battery capacity is low, the headset automatically switches off to connect an audio device or mobile telephone...

Instructions for use
Page 10
... the belt clip onto the seat belt. 2 Snap the control unit into operation Connecting AT&T compatible mobile phones ̈ Use the supplied audio cable together with your mobile phone, contact your mobile phone manufacturer for information on suitable connection possibilities. ON If the supplied connection cables are not compatible with the adapter cable when connecting mobile phones from Apple® iPhone®, Motorola® and BlackBerry®. Putting the S1 PASSIVE into the belt clip.
... the belt clip onto the seat belt. 2 Snap the control unit into operation Connecting AT&T compatible mobile phones ̈ Use the supplied audio cable together with your mobile phone, contact your mobile phone manufacturer for information on suitable connection possibilities. ON If the supplied connection cables are not compatible with the adapter cable when connecting mobile phones from Apple® iPhone®, Motorola® and BlackBerry®. Putting the S1 PASSIVE into the belt clip.
Instructions for use
Page 11
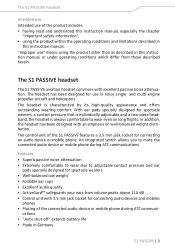
Putting the S1 PASSIVE into operation Attaching the cable clip The cable clip allows you to attach the headphone cable to your clothing so that the cable doesn't hinder or distract you. 1 Guide the headphone cable through the cable clip. 2 Attach the cable clip to your clothing. 3 Loop the cable through the clip so that the headphone cable doesn't hinder you. 1 2 Replacing the design caps Design caps in different finishes and with individual imprints are available from your Sennheiser partner. 1 2 10 | S1 PASSIVE
Putting the S1 PASSIVE into operation Attaching the cable clip The cable clip allows you to attach the headphone cable to your clothing so that the cable doesn't hinder or distract you. 1 Guide the headphone cable through the cable clip. 2 Attach the cable clip to your clothing. 3 Loop the cable through the clip so that the headphone cable doesn't hinder you. 1 2 Replacing the design caps Design caps in different finishes and with individual imprints are available from your Sennheiser partner. 1 2 10 | S1 PASSIVE

Instructions for use
Page 12
a snug fit of your ears, - To do so, you feel even, gentle pressure around your head. 2 Adjust the length of the headband so that the headband runs over the top of the headband on the head is ensured. 1 2 S1 PASSIVE | 11 you can adjust the headband. 1 Wear the headset so that - your head. Using the S1 PASSIVE Using the S1 PASSIVE Individually adjusting the headset and wearing it Adjusting the headband For good noise attenuation and best possible comfort, the headset has to be adjusted to properly fit your ears are completely inside the ear pads, -
a snug fit of your ears, - To do so, you feel even, gentle pressure around your head. 2 Adjust the length of the headband so that the headband runs over the top of the headband on the head is ensured. 1 2 S1 PASSIVE | 11 you can adjust the headband. 1 Wear the headset so that - your head. Using the S1 PASSIVE Using the S1 PASSIVE Individually adjusting the headset and wearing it Adjusting the headband For good noise attenuation and best possible comfort, the headset has to be adjusted to properly fit your ears are completely inside the ear pads, -

Instructions for use
Page 13
... slide switches. 2 Use the 3-step slide switches to change the contact pressure for each ear cup. 1 2 45° Positioning the microphone towards the corner of the mouth The microphone boom is placed at the corner of approx. 2 cm between best possible noise attenuation and still comfortable contact pressure. Maintain a distance of the mouth. Using the S1 PASSIVE Adjusting the contact pressure The S1 PASSIVE...
... slide switches. 2 Use the 3-step slide switches to change the contact pressure for each ear cup. 1 2 45° Positioning the microphone towards the corner of the mouth The microphone boom is placed at the corner of approx. 2 cm between best possible noise attenuation and still comfortable contact pressure. Maintain a distance of the mouth. Using the S1 PASSIVE Adjusting the contact pressure The S1 PASSIVE...
Instructions for use
Page 14
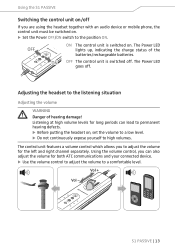
... volume to the listening situation Adjusting the volume WARNING Danger of the batteries/rechargeable batteries. The Power LED goes off If you can lead to permanent hearing defects. ̈ Before putting the headset on, set the volume to a low level. ̈ Do not continuously expose yourself to the position ON. S1 PASSIVE | 13 Using the volume control, you are using the headset together with an audio device or mobile phone, the control unit must be switched...
... volume to the listening situation Adjusting the volume WARNING Danger of the batteries/rechargeable batteries. The Power LED goes off If you can lead to permanent hearing defects. ̈ Before putting the headset on, set the volume to a low level. ̈ Do not continuously expose yourself to the position ON. S1 PASSIVE | 13 Using the volume control, you are using the headset together with an audio device or mobile phone, the control unit must be switched...
Instructions for use
Page 15
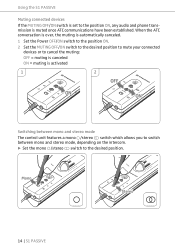
... Stereo 14 | S1 PASSIVE When the ATC conversation is over, the muting is automatically canceled. 1 Set the Power OFF/ON switch to the position ON. 2 Set the MUTING OFF/ON switch to the desired position to mute your connected devices or to cancel the muting: OFF = muting is canceled ON = muting is activated 1 2 OFF ON ON Switching between mono and stereo mode The control unit features a mono /stereo switch which allows you to switch...
... Stereo 14 | S1 PASSIVE When the ATC conversation is over, the muting is automatically canceled. 1 Set the Power OFF/ON switch to the position ON. 2 Set the MUTING OFF/ON switch to the desired position to mute your connected devices or to cancel the muting: OFF = muting is canceled ON = muting is activated 1 2 OFF ON ON Switching between mono and stereo mode The control unit features a mono /stereo switch which allows you to switch...

Instructions for use
Page 16
... battery compartment cover. 2 Set the Auto Shut-Off switch to the position ON. 3 Close the battery compartment cover. 1 2 Adjusting the microphone sensitivity The microphone sensitivity has been factory preset to 35 mV/Pa. ̈ Use a slotted screwdriver to adjust the microphone sensitivity. Using the S1 PASSIVE Activating the "auto shut-off" function The "auto shut-off" function automatically switches the headset off when it is delivered ex-works...
... battery compartment cover. 2 Set the Auto Shut-Off switch to the position ON. 3 Close the battery compartment cover. 1 2 Adjusting the microphone sensitivity The microphone sensitivity has been factory preset to 35 mV/Pa. ̈ Use a slotted screwdriver to adjust the microphone sensitivity. Using the S1 PASSIVE Activating the "auto shut-off" function The "auto shut-off" function automatically switches the headset off when it is delivered ex-works...

Instructions for use
Page 18
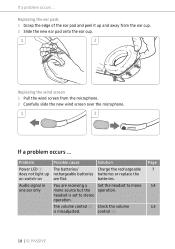
... holder. 1 2 1 2 S1 PASSIVE | 17 Cleaning and maintaining the S1 PASSIVE Cleaning and maintaining the S1 PASSIVE CAUTION Liquids can cause a short-circuit and damage the electronics. ̈ Keep all liquids far away from the product. ̈ Do not use a soft, dry cloth to time. Replacing the headband padding 1 Slightly lift the headband padding and carefully remove it from your Sennheiser partner...
... holder. 1 2 1 2 S1 PASSIVE | 17 Cleaning and maintaining the S1 PASSIVE Cleaning and maintaining the S1 PASSIVE CAUTION Liquids can cause a short-circuit and damage the electronics. ̈ Keep all liquids far away from the product. ̈ Do not use a soft, dry cloth to time. Replacing the headband padding 1 Slightly lift the headband padding and carefully remove it from your Sennheiser partner...
Instructions for use
Page 19
Solution Charge the rechargeable batteries or replace the batteries. The volume control 0 is set to mono operation. Set the headset to stereo operation. If a problem occurs ... Problem Power LED 9 does not light up and away from the ear cup. 2 Slide the new ear pad onto the ear cup. 1 2 Replacing the wind screen 1 Pull the wind screen from the microphone. 2 Carefully slide the new wind screen over the microphone. 1 2 If a problem occurs ... Page 7 14 13 18 | S1 PASSIVE You are...
Solution Charge the rechargeable batteries or replace the batteries. The volume control 0 is set to mono operation. Set the headset to stereo operation. If a problem occurs ... Problem Power LED 9 does not light up and away from the ear cup. 2 Slide the new ear pad onto the ear cup. 1 2 Replacing the wind screen 1 Pull the wind screen from the microphone. 2 Carefully slide the new wind screen over the microphone. 1 2 If a problem occurs ... Page 7 14 13 18 | S1 PASSIVE You are...

Instructions for use
Page 20
... and spare parts Problem Microphone volume too low or too high No audio signal (headset is not connected to the position OFF. Solution Page Adjust the microphone 15 sensitivity on the headset or on -board DC power supply system) Possible cause The microphone sensitivity is not adjusted properly for assistance. Set the Auto Shut-Off 15 switch to the on the intercom. To find a Sennheiser partner in...
... and spare parts Problem Microphone volume too low or too high No audio signal (headset is not connected to the position OFF. Solution Page Adjust the microphone 15 sensitivity on the headset or on -board DC power supply system) Possible cause The microphone sensitivity is not adjusted properly for assistance. Set the Auto Shut-Off 15 switch to the on the intercom. To find a Sennheiser partner in...
Instructions for use
Page 21
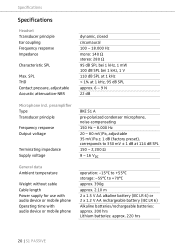
... temperature Weight without cable Cable length Power supply for use with audio device or mobile phone Operating time with audio device or mobile phone BKE S1 A pre-polarized condenser microphone, noise-compensating 150 Hz - 8.000 Hz 20 - 80 mV/Pa, adjustable 35 mV/Pa ± 1 dB (factory preset), corresponds to +70°C approx. 390g approx. 2.10 m 2 x 1.5 V AA alkaline battery (IEC LR 6) or 2 x 1.2 V AA rechargeable battery (IEC LR 6) Alkaline batteries/rechargeable batteries: approx. 200...
... temperature Weight without cable Cable length Power supply for use with audio device or mobile phone Operating time with audio device or mobile phone BKE S1 A pre-polarized condenser microphone, noise-compensating 150 Hz - 8.000 Hz 20 - 80 mV/Pa, adjustable 35 mV/Pa ± 1 dB (factory preset), corresponds to +70°C approx. 390g approx. 2.10 m 2 x 1.5 V AA alkaline battery (IEC LR 6) or 2 x 1.2 V AA rechargeable battery (IEC LR 6) Alkaline batteries/rechargeable batteries: approx. 200...

Instructions for use
Page 23
... for such equipment. This symbol indicates that electrical and electronic equipment must be disposed of its operational lifetime. In compliance with : USA 47 CFR part 15B Canada Europe ICES 003 Trademarks Sennheiser and ActiveGardTM are registered trademarks of 5 years on this instruction manual may be recycled and/or reused. Manufacturer declarations Manufacturer declarations Warranty Sennheiser electronic GmbH & Co.
... for such equipment. This symbol indicates that electrical and electronic equipment must be disposed of its operational lifetime. In compliance with : USA 47 CFR part 15B Canada Europe ICES 003 Trademarks Sennheiser and ActiveGardTM are registered trademarks of 5 years on this instruction manual may be recycled and/or reused. Manufacturer declarations Manufacturer declarations Warranty Sennheiser electronic GmbH & Co.

Spec sheet
Page 2
... the phone, even above the clouds with the S1 PASSIVE, a premium passive headset. S1 PASSIVE - Start your safety, the audio signal of safety and comfort. You can keep listening to connect MP3 players or mobile telephones. For your career above the clouds. Sennheiser's cooperation with single-engine and multi-engine propeller planes and helicopters. With ear pads specially designed for flight students, S1 PASSIVE is muted as...
... the phone, even above the clouds with the S1 PASSIVE, a premium passive headset. S1 PASSIVE - Start your safety, the audio signal of safety and comfort. You can keep listening to connect MP3 players or mobile telephones. For your career above the clouds. Sennheiser's cooperation with single-engine and multi-engine propeller planes and helicopters. With ear pads specially designed for flight students, S1 PASSIVE is muted as...
Spec sheet
Page 3
... Delivery includes · S1 PASSIVE headset · Transport case for headset and accessories · 3.5 mm audio cable (OMTP-compatible) · 3.5 mm adapter cable (AT&T-compatible) · Cable clip · Wind and pop screen · Belt clip · Safety instructions and quick guide General data Ambient temperature Weight without cable Cable length Power supply for connecting audio devices and mobile telephones • Connected audio device or mobile telephone is muted while communicating with audio device or mobile telephone Operation: -15 °...
... Delivery includes · S1 PASSIVE headset · Transport case for headset and accessories · 3.5 mm audio cable (OMTP-compatible) · 3.5 mm adapter cable (AT&T-compatible) · Cable clip · Wind and pop screen · Belt clip · Safety instructions and quick guide General data Ambient temperature Weight without cable Cable length Power supply for connecting audio devices and mobile telephones • Connected audio device or mobile telephone is muted while communicating with audio device or mobile telephone Operation: -15 °...


