
Product specification SKM 6000
Page 1
... The SKM 6000 digital handheld transmitter is delivered by the renowned Long Range mode superior audio quality by the proprietary Sennheiser Audio Codec (SeDAC) from the wireless masterpiece, Digital 9000. Via Sennheiser's standard capsule interface, the SKM 6000 transmitter is compatible with wide selection of operation. PRODUCT SPECIFICATION 1/4 Digital 6000 SKM 6000 | Handheld transmitter DELIVERY INCLUDES • SKM 6000 handheld transmitter • MZQ 9000 microphone clamp • quick guide • safety guide COMPATIBLE WITH...
... The SKM 6000 digital handheld transmitter is delivered by the renowned Long Range mode superior audio quality by the proprietary Sennheiser Audio Codec (SeDAC) from the wireless masterpiece, Digital 9000. Via Sennheiser's standard capsule interface, the SKM 6000 transmitter is compatible with wide selection of operation. PRODUCT SPECIFICATION 1/4 Digital 6000 SKM 6000 | Handheld transmitter DELIVERY INCLUDES • SKM 6000 handheld transmitter • MZQ 9000 microphone clamp • quick guide • safety guide COMPATIBLE WITH...
Product specification SKM 6000
Page 2
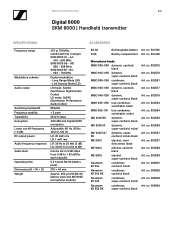
... SPECIFICATION 2/4 Digital 6000 SKM 6000 | Handheld transmitter SPECIFICATIONS Frequency range Modulation scheme Audio codec Switching bandwidth Frequency stability Tuneability Encryption Lower cut-off-frequency (−3 dB) RF output power Audio frequency response Audio Gain Operating time Dimensions (H × W × D) Weight 470 to + 62 dB (for each capsule) 5.5 h (with BA 60 battery pack) 270 × 40 mm Approx. 350 g (with BA 60 battery pack and ME 9005 microphone module...
... SPECIFICATION 2/4 Digital 6000 SKM 6000 | Handheld transmitter SPECIFICATIONS Frequency range Modulation scheme Audio codec Switching bandwidth Frequency stability Tuneability Encryption Lower cut-off-frequency (−3 dB) RF output power Audio frequency response Audio Gain Operating time Dimensions (H × W × D) Weight 470 to + 62 dB (for each capsule) 5.5 h (with BA 60 battery pack) 270 × 40 mm Approx. 350 g (with BA 60 battery pack and ME 9005 microphone module...
Product specification SKM 6000
Page 4
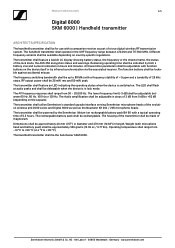
...,000 Hz. PRODUCT SPECIFICATION 4/4 Digital 6000 SKM 6000 | Handheld transmitter ARCHITECT'S SPECIFICATION The handheld transmitter shall be for use with a companion receiver as part of the evolution wireless and 2000 series and Digital 9000 as well as the Neumann KK 204 / 205 microphone heads. The frequency switching bandwidth shall be up to +122 °F). RF output power shall be the Sennheiser SKM 6000. The transmitter shall be...
...,000 Hz. PRODUCT SPECIFICATION 4/4 Digital 6000 SKM 6000 | Handheld transmitter ARCHITECT'S SPECIFICATION The handheld transmitter shall be for use with a companion receiver as part of the evolution wireless and 2000 series and Digital 9000 as well as the Neumann KK 204 / 205 microphone heads. The frequency switching bandwidth shall be up to +122 °F). RF output power shall be the Sennheiser SKM 6000. The transmitter shall be...

Release Notes - Firmware EM 6000 v3.0.4
Page 1
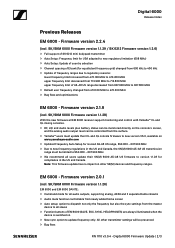
... Notes Digital 6000 EM 6000 - Digital 6000 Firmware Update | 1/3 Firmware version 1.3.23 For conformity, consistency and compatibility reasons, we strongly recommend upgrading the system (EM 6000, SKM 6000, SK 6000 & SK 6212) to 713.800 MHz f Bug fixes and optimizations Firmware update • The Digital 6000 firmware update requires the Sennheiser Wireless Systems Manager software: www.sennheiser.com/wsm RN 1110 v3.0.4 - Firmware version 3.0.4 SK/SKM 6000 - Features f Support of new Link Density transmission mode f Update of Japan frequency...
... Notes Digital 6000 EM 6000 - Digital 6000 Firmware Update | 1/3 Firmware version 1.3.23 For conformity, consistency and compatibility reasons, we strongly recommend upgrading the system (EM 6000, SKM 6000, SK 6000 & SK 6212) to 713.800 MHz f Bug fixes and optimizations Firmware update • The Digital 6000 firmware update requires the Sennheiser Wireless Systems Manager software: www.sennheiser.com/wsm RN 1110 v3.0.4 - Firmware version 3.0.4 SK/SKM 6000 - Features f Support of new Link Density transmission mode f Update of Japan frequency...
Release Notes - Firmware EM 6000 v3.0.4
Page 2
... option to 607.800 MHz f Default user frequency changed from the surface. SK/SKM 6000 Firmware version 1.1.26) EM 6000 and EM 6000 DANTE: f Command mode for compliance in the US and Canada, the SK(M) 6000 A5-A8 US transmission range must update their SK(M) 6000 A5-A8 US firmware to version 1.1.28 for all audio outputs, supporting analog, AES3 and 2 separate Dante streams...
... option to 607.800 MHz f Default user frequency changed from the surface. SK/SKM 6000 Firmware version 1.1.26) EM 6000 and EM 6000 DANTE: f Command mode for compliance in the US and Canada, the SK(M) 6000 A5-A8 US transmission range must update their SK(M) 6000 A5-A8 US firmware to version 1.1.28 for all audio outputs, supporting analog, AES3 and 2 separate Dante streams...

Release Notes - Firmware EM 6000 v3.0.4
Page 3
... solved f Bug fixes EM 6000 - Digital 6000 Firmware Update | 3/3 SK/SKM 6000 Firmware version 1.1.26) f Simplification of LOCK mode of SK/SKM f Blue power LED can be switched between MIC / LINE and automatic detection f SK: Better low cut filter performance for connected instruments f SK: Gain setting issue when changing from the power supply while in standby mode. Firmware version 1.2.0 f Auto Setup enable status is ON by default...
... solved f Bug fixes EM 6000 - Digital 6000 Firmware Update | 3/3 SK/SKM 6000 Firmware version 1.1.26) f Simplification of LOCK mode of SK/SKM f Blue power LED can be switched between MIC / LINE and automatic detection f SK: Better low cut filter performance for connected instruments f SK: Gain setting issue when changing from the power supply while in standby mode. Firmware version 1.2.0 f Auto Setup enable status is ON by default...
Specifications and Manufacturer Declarations Digital 6000 series
Page 10
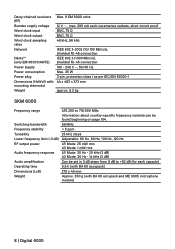
... x 483 x 373 mm approx. 5.2 kg SKM 6000 Frequency range 470.200 to 718.000 MHz Information about country-specific frequency variants can be set in 3 dB steps from 0 dB to +62 dB (for each capsule) Operating time 5.5 h (with BA 60 accupack) Dimensions (LxD) 270 x 40 mm Weight Approx. 350 g (with BA 60 accupack and ME 9005 microphone module) 8 | Digital 6000
... x 483 x 373 mm approx. 5.2 kg SKM 6000 Frequency range 470.200 to 718.000 MHz Information about country-specific frequency variants can be set in 3 dB steps from 0 dB to +62 dB (for each capsule) Operating time 5.5 h (with BA 60 accupack) Dimensions (LxD) 270 x 40 mm Weight Approx. 350 g (with BA 60 accupack and ME 9005 microphone module) 8 | Digital 6000
Instruction manual Digital 6000
Page 9
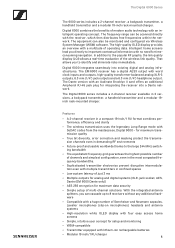
... of Sennheiser and Neumann capsules, Lavalier microphones (clip-on microphones), headsets and antenna systems • High-resolution white OLED display with four easy access home screens • Simple, intuitive user concept for setup and monitoring • WSM-compatible • Transmitter equipped with no need for timeconsuming navigation. The EM 6000 receiver has a digital AES3 output with the receiver, which then distributes free frequencies...
... of Sennheiser and Neumann capsules, Lavalier microphones (clip-on microphones), headsets and antenna systems • High-resolution white OLED display with four easy access home screens • Simple, intuitive user concept for setup and monitoring • WSM-compatible • Transmitter equipped with no need for timeconsuming navigation. The EM 6000 receiver has a digital AES3 output with the receiver, which then distributes free frequencies...

Instruction manual Digital 6000
Page 30
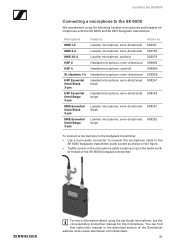
... KK 205 Capacitor, super-cardioid, nickel 008653 Neumann KK 205 BK Capacitor, super-cardioid, black 008654 You can find more information about the individual microphone modules on their respective product pages at www.sennheiser.com or www.neumann.com. 29 Accessories Microphones and cables Microphone modules We recommend using the following microphone modules with the SKM 6000 handheld transmitter.
... KK 205 Capacitor, super-cardioid, nickel 008653 Neumann KK 205 BK Capacitor, super-cardioid, black 008654 You can find more information about the individual microphone modules on their respective product pages at www.sennheiser.com or www.neumann.com. 29 Accessories Microphones and cables Microphone modules We recommend using the following microphone modules with the SKM 6000 handheld transmitter.
Instruction manual Digital 6000
Page 62
... microphone, omni-directional, 508252 beige To connect a microphone to the bodypack transmitter: ▷ Use a 3-pin audio connector to connect the microphone cable to the SK 6000 We recommend using the particular microphone, see the corresponding instruction manual for the microphone. You can find this instruction manual in the figure. ▷ Tightly screw on the microphone cable coupling ring on the audio socket thread of the Sennheiser website under www.sennheiser.com/download...
... microphone, omni-directional, 508252 beige To connect a microphone to the bodypack transmitter: ▷ Use a 3-pin audio connector to connect the microphone cable to the SK 6000 We recommend using the particular microphone, see the corresponding instruction manual for the microphone. You can find this instruction manual in the figure. ▷ Tightly screw on the microphone cable coupling ring on the audio socket thread of the Sennheiser website under www.sennheiser.com/download...
Instruction manual Digital 6000
Page 70
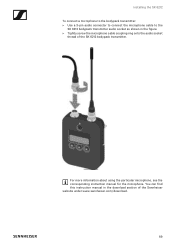
You can find this instruction manual in the figure. ▷ Tightly screw the microphone cable coupling ring onto the audio socket thread of the Sennheiser website under www.sennheiser.com/download. 69 Installing the SK 6212 To connect a microphone to the bodypack transmitter: ▷ Use a 3-pin audio connector to connect the microphone cable to the SK 6212 bodypack transmitter audio socket as shown in the download section of the SK 6212 bodypack transmitter. ► For more information about using the particular microphone, see the corresponding instruction manual for the microphone.
You can find this instruction manual in the figure. ▷ Tightly screw the microphone cable coupling ring onto the audio socket thread of the Sennheiser website under www.sennheiser.com/download. 69 Installing the SK 6212 To connect a microphone to the bodypack transmitter: ▷ Use a 3-pin audio connector to connect the microphone cable to the SK 6212 bodypack transmitter audio socket as shown in the download section of the SK 6212 bodypack transmitter. ► For more information about using the particular microphone, see the corresponding instruction manual for the microphone.
Instruction manual Digital 6000
Page 84
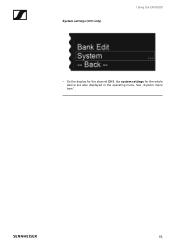
System settings (CH 1 only) Using the EM 6000 • On the display for the channel CH 1, the system settings for the whole device are also displayed in the operating menu. See „System menu item". 83
System settings (CH 1 only) Using the EM 6000 • On the display for the channel CH 1, the system settings for the whole device are also displayed in the operating menu. See „System menu item". 83

Instruction manual Digital 6000
Page 90
... „Operating the SKM 6000 menu" or „Operating the SK 6000 menu". See „Sync Settings menu item". Alternatively, the low cut filter setting for the transmitter. See „SKM 6000 product variants" or „SK 6000 product variants". 89 This setting can also be configured in the receiver and synchronized with the transmitter. Home screen 3 ► Using the EM 6000 The third...
... „Operating the SKM 6000 menu" or „Operating the SK 6000 menu". See „Sync Settings menu item". Alternatively, the low cut filter setting for the transmitter. See „SKM 6000 product variants" or „SK 6000 product variants". 89 This setting can also be configured in the receiver and synchronized with the transmitter. Home screen 3 ► Using the EM 6000 The third...

Instruction manual Digital 6000
Page 108
See „Synchronizing devices". Using the EM 6000 ▷ Set the desired value. ▷ Press the SAVE button to the transmitter using the Sync function. Encryption cannot be activated on the transmitter itself. 107 If you have activated encryption, you must first transfer this setting to save your selection.
See „Synchronizing devices". Using the EM 6000 ▷ Set the desired value. ▷ Press the SAVE button to the transmitter using the Sync function. Encryption cannot be activated on the transmitter itself. 107 If you have activated encryption, you must first transfer this setting to save your selection.

Instruction manual Digital 6000
Page 134
tion items. ▷ Turn the jog dial to set the value. ► ▷ Press the SAVE button to switch between the individual network configura- Using the EM 6000 PrimNet Network configuration for the Primary RJ-45 socket. ▷ Turn the jog dial to choose between the two IP assignment modes Auto and Manual. ► ► To configure the settings in IP Mode Manual: ▷ Press the jog dial to save the settings. 133
tion items. ▷ Turn the jog dial to set the value. ► ▷ Press the SAVE button to switch between the individual network configura- Using the EM 6000 PrimNet Network configuration for the Primary RJ-45 socket. ▷ Turn the jog dial to choose between the two IP assignment modes Auto and Manual. ► ► To configure the settings in IP Mode Manual: ▷ Press the jog dial to save the settings. 133

Instruction manual Digital 6000
Page 143
...;Updating the firmware of the receiver You can update the firmware for the EM 6000 receiver using the Sennheiser Wireless Systems Manager (WSM) software. ▷ To do so, connect the EM 6000 to a network (see „Connecting the EM 6000 to a network") and establish the connection with the WSM software. You can download the software at www.sennheiser.com/wsm. You can find the latest firmware on the Digital 6000...
...;Updating the firmware of the receiver You can update the firmware for the EM 6000 receiver using the Sennheiser Wireless Systems Manager (WSM) software. ▷ To do so, connect the EM 6000 to a network (see „Connecting the EM 6000 to a network") and establish the connection with the WSM software. You can download the software at www.sennheiser.com/wsm. You can find the latest firmware on the Digital 6000...

Instruction manual Digital 6000
Page 153
...and set the value to level out the system and during the walk test. Information menu item In this menu item, you can display the installed firmware version and the overall frequency range...receiver and synchronize it with the transmitter. Test Tone menu item In this function to Off. ▷ Save your entry by pressing the SET button. Use this menu item, you can reset the transmitter settings.... See „Sync Settings menu item". To disable the lock-off function is now temporarily disabled. Using the SKM 6000 Alternatively, you can change settings as needed in the menu.
...and set the value to level out the system and during the walk test. Information menu item In this menu item, you can display the installed firmware version and the overall frequency range...receiver and synchronize it with the transmitter. Test Tone menu item In this function to Off. ▷ Save your entry by pressing the SET button. Use this menu item, you can reset the transmitter settings.... See „Sync Settings menu item". To disable the lock-off function is now temporarily disabled. Using the SKM 6000 Alternatively, you can change settings as needed in the menu.

Instruction manual Digital 6000
Page 162
... above ). • MIC: Use this option if a microphone is being received. Information menu item In this menu item, you can configure whether to use a mic signal or a line signal, or whether to the SK 6000 via a line cable. Using the SK 6000 MIC/LINE menu item In this menu item, you can display the installed firmware version and the overall frequency range for the...
... above ). • MIC: Use this option if a microphone is being received. Information menu item In this menu item, you can configure whether to use a mic signal or a line signal, or whether to the SK 6000 via a line cable. Using the SK 6000 MIC/LINE menu item In this menu item, you can display the installed firmware version and the overall frequency range for the...

Instruction manual Digital 6000
Page 187
...the environment in your systems. After you set up the frequencies for this subject under „Scan & AutoSetup menu item". The WSM software is available to download free of the receiving channels in banks B1 to B6 (see...frequency grid You can set up automatically using ex- Fre- You can set up manually on all of different ways: 1. In this function, all of the EM 6000 devices must be connected to the antennas should be transferred to your production environment. To use this case, all of charge online at least 600 kHz). Configure each other (at www.sennheiser...
...the environment in your systems. After you set up the frequencies for this subject under „Scan & AutoSetup menu item". The WSM software is available to download free of the receiving channels in banks B1 to B6 (see...frequency grid You can set up automatically using ex- Fre- You can set up manually on all of different ways: 1. In this function, all of the EM 6000 devices must be connected to the antennas should be transferred to your production environment. To use this case, all of charge online at least 600 kHz). Configure each other (at www.sennheiser...
Instruction manual Digital 6000
Page 199
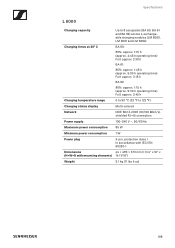
...: 80%: approx. 1:15 h (approx. 9:30 h operating time) Full: approx. 2:45 h Charging temperature range 0 to 50 °C (32 °F to 122 °F) Charging status display Multi-colored Network IEEE 802.3-2002 (10/100 Mbit/s), shielded RJ-45 connection Power supply 100-240 V ~, 50/60 Hz Maximum power consumption 85 W Minimum power consumption 1W Power plug 3-pin, protection class I In...
...: 80%: approx. 1:15 h (approx. 9:30 h operating time) Full: approx. 2:45 h Charging temperature range 0 to 50 °C (32 °F to 122 °F) Charging status display Multi-colored Network IEEE 802.3-2002 (10/100 Mbit/s), shielded RJ-45 connection Power supply 100-240 V ~, 50/60 Hz Maximum power consumption 85 W Minimum power consumption 1W Power plug 3-pin, protection class I In...


