
Instructions for Use
Page 2
... lock mode temporarily 11 Muting the audio signal or deactivating the RF signal 12 Selecting a standard display 14 Using the operating menu 15 The buttons ...15 Overview of the operating menu 15 Working with the operating menu 17 Adjusting settings via the operating menu 19 The main menu "Menu 19 The extended menu "Advanced Menu 22 Synchronizing the plug-on transmitter with a receiver 26 Cleaning the plug-on transmitter 27 Recommendations and tips 28 If a problem occurs 29 Accessories ...30 Specifications...
... lock mode temporarily 11 Muting the audio signal or deactivating the RF signal 12 Selecting a standard display 14 Using the operating menu 15 The buttons ...15 Overview of the operating menu 15 Working with the operating menu 17 Adjusting settings via the operating menu 19 The main menu "Menu 19 The extended menu "Advanced Menu 22 Synchronizing the plug-on transmitter with a receiver 26 Cleaning the plug-on transmitter 27 Recommendations and tips 28 If a problem occurs 29 Accessories ...30 Specifications...

Instructions for Use
Page 3
... not operate properly or has been dropped. • WARNING: To reduce the risk of the SKP 2000 plug-on to third parties. • Heed all warnings and follow all servicing to rain or moisture. Replacement parts When replacement parts are required, be sure the service technician uses replacement parts specified by Sennheiser. • Refer all instructions in this instruction manual. Intended use Intended use attachments/accessories specified by Sennheiser or those...
... not operate properly or has been dropped. • WARNING: To reduce the risk of the SKP 2000 plug-on to third parties. • Heed all warnings and follow all servicing to rain or moisture. Replacement parts When replacement parts are required, be sure the service technician uses replacement parts specified by Sennheiser. • Refer all instructions in this instruction manual. Intended use Intended use attachments/accessories specified by Sennheiser or those...

Instructions for Use
Page 4
...; a transmission system is part of application The plug-on transmitter can be operated simultaneously on , • several transmission systems can be combined with ... With this series, Sennheiser offers high-quality state-of use after switch-on the preset frequencies without causing intermodulation interference. Transmitter SKP 2000 Combinable with the EK 2000 portable receiver and the EM 2000 and EM 2050 rack-mount receivers. Features of the...
...; a transmission system is part of application The plug-on transmitter can be operated simultaneously on , • several transmission systems can be combined with ... With this series, Sennheiser offers high-quality state-of use after switch-on the preset frequencies without causing intermodulation interference. Transmitter SKP 2000 Combinable with the EK 2000 portable receiver and the EM 2000 and EM 2050 rack-mount receivers. Features of the...

Instructions for Use
Page 5
... Each frequency range (Aw-Dw, Gw) offers 26 frequency banks with up to a fixed frequency (frequency preset). The frequency banks "U1" to "U6" allow you to the supplied frequency information sheet. frequency preset Channel 64 - Updated versions of the frequency presets, please refer to freely select and store frequencies. The SKP 2000 plug-on transmitter The frequency bank system The plug-on our website at www.sennheiser.com. freely selectable frequency Channel 64...
... Each frequency range (Aw-Dw, Gw) offers 26 frequency banks with up to a fixed frequency (frequency preset). The frequency banks "U1" to "U6" allow you to the supplied frequency information sheet. frequency preset Channel 64 - Updated versions of the frequency presets, please refer to freely select and store frequencies. The SKP 2000 plug-on transmitter The frequency bank system The plug-on our website at www.sennheiser.com. freely selectable frequency Channel 64...

Instructions for Use
Page 7
... Product overview Overview of the SKP 2000 plug-on transmitter ³ · » ¿ ´ ² ¶ º ¾ µ ¸ ³ Microphone input, XLR-3 socket ¶ Operation and battery status (female, unbalanced) indicator, red LED · Mechanical locking ring of XLR-3 socket lit = ON flashing = LOW BATTERY » Infra-red interface ¿ Display panel, backlit in orange ´ UP button (̆) º ON/OFF...
... Product overview Overview of the SKP 2000 plug-on transmitter ³ · » ¿ ´ ² ¶ º ¾ µ ¸ ³ Microphone input, XLR-3 socket ¶ Operation and battery status (female, unbalanced) indicator, red LED · Mechanical locking ring of XLR-3 socket lit = ON flashing = LOW BATTERY » Infra-red interface ¿ Display panel, backlit in orange ´ UP button (̆) º ON/OFF...
Instructions for Use
Page 10
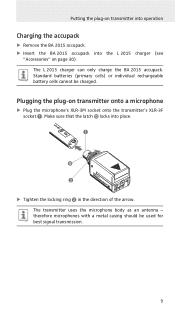
... the BA 2015 accupack. Make sure that the latch ¹ locks into the L 2015 charger (see "Accessories" on page 30). Plugging the plug-on transmitter onto a microphone ̈ Plug the microphone's XLR-3M socket onto the transmitter's XLR-3F socket ³. The transmitter uses the microphone body as an antenna - Putting the plug-on transmitter into operation Charging the accupack ̈ Remove the BA 2015 accupack. ̈...
... the BA 2015 accupack. Make sure that the latch ¹ locks into the L 2015 charger (see "Accessories" on page 30). Plugging the plug-on transmitter onto a microphone ̈ Plug the microphone's XLR-3M socket onto the transmitter's XLR-3F socket ³. The transmitter uses the microphone body as an antenna - Putting the plug-on transmitter into operation Charging the accupack ̈ Remove the BA 2015 accupack. ̈...
Instructions for Use
Page 11
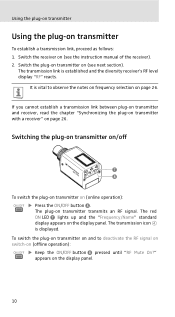
The transmission link is displayed. Switching the plug-on transmitter on/off ¶ º To switch the plug-on transmitter on the display panel. 10 appears on (online operation): ON/OFF ̈ Press the ON/OFF button º. Using the plug-on transmitter Using the plug-on the display panel. Switch the receiver on page 26. The red ON LED ¶ lights up and the "Frequency/Name" standard display appears on transmitter To establish a transmission link, proceed...
The transmission link is displayed. Switching the plug-on transmitter on/off ¶ º To switch the plug-on transmitter on the display panel. 10 appears on (online operation): ON/OFF ̈ Press the ON/OFF button º. Using the plug-on transmitter Using the plug-on the display panel. Switch the receiver on page 26. The red ON LED ¶ lights up and the "Frequency/Name" standard display appears on transmitter To establish a transmission link, proceed...
Instructions for Use
Page 12
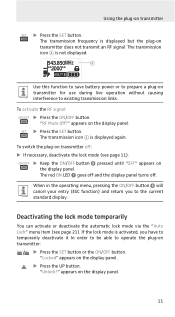
... the lock mode (see page 21). appears on the display panel. ̈ Press the UP button. If the lock mode is not displayed. 543.850MHz ብ **2000** AF P MUTE Use this function to save battery power or to prepare a plug-on transmitter off . "Locked" appears on the display panel. 11 To switch the plug-on transmitter for use during live operation without causing interference to existing transmission links. When in the operating menu...
... the lock mode (see page 21). appears on the display panel. ̈ Press the UP button. If the lock mode is not displayed. 543.850MHz ብ **2000** AF P MUTE Use this function to save battery power or to prepare a plug-on transmitter off . "Locked" appears on the display panel. 11 To switch the plug-on transmitter for use during live operation without causing interference to existing transmission links. When in the operating menu...
Instructions for Use
Page 16
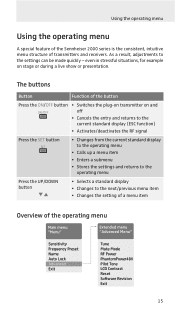
... to the operating menu Press the UP/DOWN button • Selects a standard display • Changes to the settings can be made quickly - The buttons Button Function of the button Press the ON/OFF button ON/OFF • Switches the plug-on transmitter on stage or during a live show or presentation. As a result, adjustments to the next/previous menu item • Changes the setting of a menu item Overview of transmitters and receivers.
... to the operating menu Press the UP/DOWN button • Selects a standard display • Changes to the settings can be made quickly - The buttons Button Function of the button Press the ON/OFF button ON/OFF • Switches the plug-on transmitter on stage or during a live show or presentation. As a result, adjustments to the next/previous menu item • Changes the setting of a menu item Overview of transmitters and receivers.
Instructions for Use
Page 17
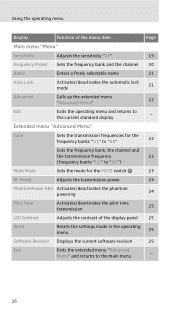
... operating menu 25 Software Revision Displays the current software revision 25 Exit Exits the extended menu "Advanced Menu" and returns to the current standard display - Extended menu "Advanced Menu" Tune Sets the transmission frequencies for the frequency banks "U1" to "U6" 22 Sets the frequency bank, the channel and the transmission frequency 23 (frequency banks "U1" to "U6") Mute Mode Sets the mode for the MUTE switch ¾ 23 RF Power Adjusts the transmission power...
... operating menu 25 Software Revision Displays the current software revision 25 Exit Exits the extended menu "Advanced Menu" and returns to the current standard display - Extended menu "Advanced Menu" Tune Sets the transmission frequencies for the frequency banks "U1" to "U6" 22 Sets the frequency bank, the channel and the transmission frequency 23 (frequency banks "U1" to "U6") Mute Mode Sets the mode for the MUTE switch ¾ 23 RF Power Adjusts the transmission power...
Instructions for Use
Page 18
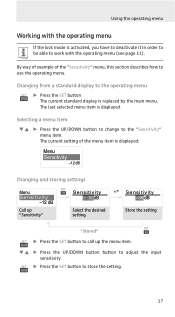
... is replaced by the main menu. The last selected menu item is activated, you have to deactivate it In order to be able to adjust the input sensitivity. Using the operating menu Working with the operating menu If the lock mode is displayed. Selecting a menu item ̈ Press the UP/DOWN button to change to use the operating menu. Changing from a standard display to store the setting. 17 SET ̈ Press the SET button to the operating menu SET...
... is replaced by the main menu. The last selected menu item is activated, you have to deactivate it In order to be able to adjust the input sensitivity. Using the operating menu Working with the operating menu If the lock mode is displayed. Selecting a menu item ̈ Press the UP/DOWN button to change to use the operating menu. Changing from a standard display to store the setting. 17 SET ̈ Press the SET button to the operating menu SET...

Instructions for Use
Page 20
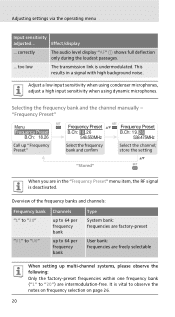
... talking distances, speakers with the sync icon. Effect/display ... allowing you to the plugon transmitter. B.Ch: 19.31 543.850MHz ቢ AF P MUTE Input sensitivity adjusted... Adjusting settings via the operating menu Adjusting settings via the operating menu Make use of the possibility to adjust settings via the operating menu of the receiver. For more information, refer to the instruction manual of your receiver and to transfer these settings to check the adjusted sensitivity before...
... talking distances, speakers with the sync icon. Effect/display ... allowing you to the plugon transmitter. B.Ch: 19.31 543.850MHz ቢ AF P MUTE Input sensitivity adjusted... Adjusting settings via the operating menu Adjusting settings via the operating menu Make use of the possibility to adjust settings via the operating menu of the receiver. For more information, refer to the instruction manual of your receiver and to transfer these settings to check the adjusted sensitivity before...
Instructions for Use
Page 21
... the setting "Stored" When you are intermodulation-free. It is vital to "20") are in a signal with high background noise. correctly The audio level display "AF" ቢ shows full deflection only during the loudest passages. ... This results in the "Frequency Preset" menu item, the RF signal is undermodulated. Selecting the frequency bank and the channel manually - Adjust a low input sensitivity when using condenser microphones, adjust a high input...
... the setting "Stored" When you are intermodulation-free. It is vital to "20") are in a signal with high background noise. correctly The audio level display "AF" ቢ shows full deflection only during the loudest passages. ... This results in the "Frequency Preset" menu item, the RF signal is undermodulated. Selecting the frequency bank and the channel manually - Adjust a low input sensitivity when using condenser microphones, adjust a high input...

Instructions for Use
Page 22
... to use the lock mode, refer to select the desired setting. For information on the current standard display indicates that the plug-on the "Frequency/Name" and "Name/Channel" standard displays (see page 14). Adjusting settings via the operating menu Entering a name - "Name" Menu Name Lichael Call up "Auto Lock" Auto Lock Active Select the desired setting Auto Lock Inactive Store the setting "Stored" The lock mode prevents that the lock mode is accidentally switched off or programed during operation.
... to use the lock mode, refer to select the desired setting. For information on the current standard display indicates that the plug-on the "Frequency/Name" and "Name/Channel" standard displays (see page 14). Adjusting settings via the operating menu Entering a name - "Name" Menu Name Lichael Call up "Auto Lock" Auto Lock Active Select the desired setting Auto Lock Inactive Store the setting "Stored" The lock mode prevents that the lock mode is accidentally switched off or programed during operation.
Instructions for Use
Page 23
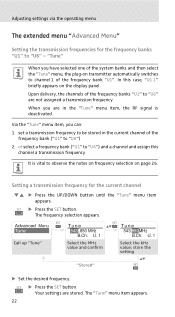
..." menu, the plug-on page 26. Adjusting settings via the operating menu The extended menu "Advanced Menu" Setting the transmission frequencies for the current channel ̈ Press the UP/DOWN button until the "Tune" menu item appears. In this channel a transmission frequency. set a transmission frequency to be stored in the "Tune" menu item, the RF signal is vital to observe the notes on frequency selection on transmitter automatically switches to channel 1 of the frequency...
..." menu, the plug-on page 26. Adjusting settings via the operating menu The extended menu "Advanced Menu" Setting the transmission frequencies for the current channel ̈ Press the UP/DOWN button until the "Tune" menu item appears. In this channel a transmission frequency. set a transmission frequency to be stored in the "Tune" menu item, the RF signal is vital to observe the notes on frequency selection on transmitter automatically switches to channel 1 of the frequency...
Instructions for Use
Page 26
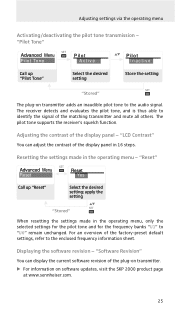
... setting "Stored" The plug-on software updates, visit the SKP 2000 product page at www.sennheiser.com. 25 apply the setting "Stored" When resetting the settings made in the operating menu - Displaying the software revision - "Pilot Tone" Advanced Menu NP ai l mo teTo n e Pilot Active Pilot Inactive Call up "Reset" Select the desired setting; The pilot tone supports the receiver's squelch function. "Software Revision" You can adjust the contrast of the factory-preset default settings...
... setting "Stored" The plug-on software updates, visit the SKP 2000 product page at www.sennheiser.com. 25 apply the setting "Stored" When resetting the settings made in the operating menu - Displaying the software revision - "Pilot Tone" Advanced Menu NP ai l mo teTo n e Pilot Active Pilot Inactive Call up "Reset" Select the desired setting; The pilot tone supports the receiver's squelch function. "Software Revision" You can adjust the contrast of the factory-preset default settings...

Instructions for Use
Page 27
...; Only use a plug-on transmitter and a receiver from the same frequency range (see page 20). Synchronizing the plug-on transmitter with a receiver Synchronizing the plug-on transmitter with a receiver When synchronizing the plug-on transmitter with the receiver (individual operation), refer to the instruction manual of the receiver. Synchronizing the plug-on transmitter manually: ̈ Make sure that the desired frequencies are synchronized with the receiver - If you set the channel on the plug-on transmitter with each...
...; Only use a plug-on transmitter and a receiver from the same frequency range (see page 20). Synchronizing the plug-on transmitter with a receiver Synchronizing the plug-on transmitter with a receiver When synchronizing the plug-on transmitter with the receiver (individual operation), refer to the instruction manual of the receiver. Synchronizing the plug-on transmitter manually: ̈ Make sure that the desired frequencies are synchronized with the receiver - If you set the channel on the plug-on transmitter with each...

Instructions for Use
Page 30
...). Reduce the squelch threshold setting on transmitter and receiving antennas. No RF signal at the receiver Plug-on the transmitter (see page 12). Transmission range is activated Deactivate the lock mode (see page 11). Plug-on transmitter doesn't transmit a pilot tone Activate the pilot tone transmission on transmitter and receiver are flat or Replace the batteries or accupack is adjusted too low/ too high Adjust the input sensitivity (see page 9). Audio signal has...
...). Reduce the squelch threshold setting on transmitter and receiving antennas. No RF signal at the receiver Plug-on the transmitter (see page 12). Transmission range is activated Deactivate the lock mode (see page 11). Plug-on transmitter doesn't transmit a pilot tone Activate the pilot tone transmission on transmitter and receiver are flat or Replace the batteries or accupack is adjusted too low/ too high Adjust the input sensitivity (see page 9). Audio signal has...
Instructions for Use
Page 36
... PEAK (overmodulation) 7 audio signal, muting (Mute) 12 Auto Lock (activating/deactivating the lock mode) 21 B batteries, inserting 8 buttons (function of the ~) 15 C channel assigning a frequency 23 overview 4 selecting (Frequency Preset) 20 selecting (Tune) 22 charging accupack 9 battery status display 7 cleaning (plug-on transmitter) 27 displays adjusting the contrast of the display panel (LCD Contrast) 25 charge status 7 overview 7 standard displays 14 F factory default settings (resetting the settings in the operating menu) 25 frequency ~ ranges 4 preset frequencies 4 selecting ~ presets...
... PEAK (overmodulation) 7 audio signal, muting (Mute) 12 Auto Lock (activating/deactivating the lock mode) 21 B batteries, inserting 8 buttons (function of the ~) 15 C channel assigning a frequency 23 overview 4 selecting (Frequency Preset) 20 selecting (Tune) 22 charging accupack 9 battery status display 7 cleaning (plug-on transmitter) 27 displays adjusting the contrast of the display panel (LCD Contrast) 25 charge status 7 overview 7 standard displays 14 F factory default settings (resetting the settings in the operating menu) 25 frequency ~ ranges 4 preset frequencies 4 selecting ~ presets...
Instructions for Use
Page 37
... (offline operation) 10, 12 S Sensitivity (adjusting the input sensitivity) 19 setting up (transmission link) 26 Mode) 23 Software Revision (displaying the muting (audio signal) 12 software revision) 25 N switching on/off (plug-on Name (entering a name) 21 transmitter) 10 O synchronizing (plug-on offline operation (RF signal deactivated) 10 transmitter/receiver) 26 T online operation (RF signal activated) 10 P PhantomPower P48V (activating/ deactivating the phantom transmission frequency selecting (Frequency Preset) 20, 22 setting (Tune) 22 transmission power, powering) 24...
... (offline operation) 10, 12 S Sensitivity (adjusting the input sensitivity) 19 setting up (transmission link) 26 Mode) 23 Software Revision (displaying the muting (audio signal) 12 software revision) 25 N switching on/off (plug-on Name (entering a name) 21 transmitter) 10 O synchronizing (plug-on offline operation (RF signal deactivated) 10 transmitter/receiver) 26 T online operation (RF signal activated) 10 P PhantomPower P48V (activating/ deactivating the phantom transmission frequency selecting (Frequency Preset) 20, 22 setting (Tune) 22 transmission power, powering) 24...


