

Instructions for Use
Page 32
... in the channel bank "U 19 Adjusting the sensitivity 20 Switching the phantom powering on/off 21 Selecting the standard display 21 Entering a name 21 Loading the factory-preset default settings 22 Activating/deactivating the pilot tone transmission 22 Activating/deactivating the lock mode 23 Exiting the operating menu 23 Troubleshooting 24 Error checklist 24 Recommendations and tips 25 Care and maintenance 25 Specifications 26 Accessories 27...
... in the channel bank "U 19 Adjusting the sensitivity 20 Switching the phantom powering on/off 21 Selecting the standard display 21 Entering a name 21 Loading the factory-preset default settings 22 Activating/deactivating the pilot tone transmission 22 Activating/deactivating the lock mode 23 Exiting the operating menu 23 Troubleshooting 24 Error checklist 24 Recommendations and tips 25 Care and maintenance 25 Specifications 26 Accessories 27...

Instructions for Use
Page 33
... preset frequency range. 4 The SKP 500 G2 plug-on transmitter The SKP 500 G2 plug-on transmitter is available in the channel banks "1" to "8" has been factory-preset to 20 switchable channels each country. With this series, Sennheiser offers high-quality state-of y further optimized PLL synthesizer and microprocessor technology, y the HDX noise reduction system, y and the pilot tone squelch control. Transmitters and receivers permit wireless transmission with a high level of operational...
... preset frequency range. 4 The SKP 500 G2 plug-on transmitter The SKP 500 G2 plug-on transmitter is available in the channel banks "1" to "8" has been factory-preset to 20 switchable channels each country. With this series, Sennheiser offers high-quality state-of y further optimized PLL synthesizer and microprocessor technology, y the HDX noise reduction system, y and the pilot tone squelch control. Transmitters and receivers permit wireless transmission with a high level of operational...

Instructions for Use
Page 34
... cleaning the unit. Safety instructions Never open an electronic unit! Use a damp cloth for the plug-on transmitter y 2 batteries y Instructions for use any cleansing agents or solvents. Use the unit in breach of this instruction, the warranty becomes null and void. Delivery includes The packaging contains the following items: y 1 SKP 500 G2 plug-on transmitter: y Dynamic microphones y Condenser microphones with internal power supply y Condenser microphones with 48 V phantom powering 5 If units are opened by...
... cleaning the unit. Safety instructions Never open an electronic unit! Use a damp cloth for the plug-on transmitter y 2 batteries y Instructions for use any cleansing agents or solvents. Use the unit in breach of this instruction, the warranty becomes null and void. Delivery includes The packaging contains the following items: y 1 SKP 500 G2 plug-on transmitter: y Dynamic microphones y Condenser microphones with internal power supply y Condenser microphones with 48 V phantom powering 5 If units are opened by...

Instructions for Use
Page 35
... channel bank system with factory-preset frequencies. Together with a matching receiver and a microphone, the plug-on the preset frequencies without causing intermodulation interference. Areas of application The plug-on transmitter can be operated simultaneously on transmitter is suitable for immediate use after switch-on, y several transmission systems can be ordered separately) EM 500 G2 SKP 500 G2 EK 500 G2 Area of the ew 500 G2 series (EM 500 G2 rack-mount receiver or EK 500 G2 bodypack receiver...
... channel bank system with factory-preset frequencies. Together with a matching receiver and a microphone, the plug-on the preset frequencies without causing intermodulation interference. Areas of application The plug-on transmitter can be operated simultaneously on transmitter is suitable for immediate use after switch-on, y several transmission systems can be ordered separately) EM 500 G2 SKP 500 G2 EK 500 G2 Area of the ew 500 G2 series (EM 500 G2 rack-mount receiver or EK 500 G2 bodypack receiver...
Instructions for Use
Page 36
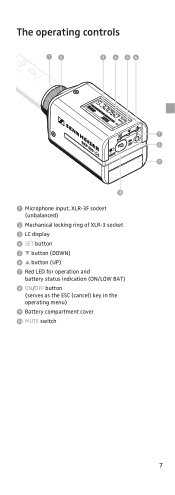
The operating controls ³· » ¿ ´² ¶ º ¾ µ ³ Microphone input, XLR-3F socket (unbalanced) · Mechanical locking ring of XLR-3 socket » LC display ¿ SET button ´ ̄ button (DOWN) ² ̆ button (UP) ¶ Red LED for operation and battery status indication (ON/LOW BAT) º ON/OFF button (serves as the ESC (cancel) key in the operating menu) ¾ Battery compartment cover µ MUTE switch 7
The operating controls ³· » ¿ ´² ¶ º ¾ µ ³ Microphone input, XLR-3F socket (unbalanced) · Mechanical locking ring of XLR-3 socket » LC display ¿ SET button ´ ̄ button (DOWN) ² ̆ button (UP) ¶ Red LED for operation and battery status indication (ON/LOW BAT) º ON/OFF button (serves as the ESC (cancel) key in the operating menu) ¾ Battery compartment cover µ MUTE switch 7
Instructions for Use
Page 37
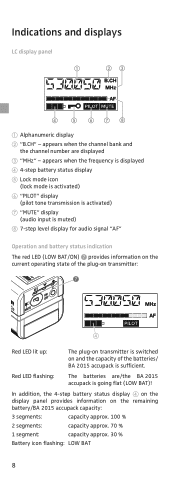
... % Battery icon flashing: LOW BAT 8 Red LED flashing: The batteries are displayed ቤ "MHz" - appears when the channel bank and the channel number are /the BA 2015 accupack is sufficient. appears when the frequency is displayed ብ 4-step battery status display ቦ Lock mode icon (lock mode is activated) ቧ "PILOT" display (pilot tone transmission is activated) ቨ "MUTE" display (audio input is muted) ቩ 7-step level display for audio signal "AF" Operation and battery status...
... % Battery icon flashing: LOW BAT 8 Red LED flashing: The batteries are displayed ቤ "MHz" - appears when the channel bank and the channel number are /the BA 2015 accupack is sufficient. appears when the frequency is displayed ብ 4-step battery status display ቦ Lock mode icon (lock mode is activated) ቧ "PILOT" display (pilot tone transmission is activated) ቨ "MUTE" display (audio input is muted) ቩ 7-step level display for audio signal "AF" Operation and battery status...

Instructions for Use
Page 39
... control purposes: y The taking into place with an integrated sensor which is necessary for use Inserting and replacing the batteries For powering the plug-on transmitter, you can either use two 1.5 V AA size batteries or the rechargeable Sennheiser BA 2015 accupack. ̈ Slide the battery compartment cover ᕩ in order to the rack-mount receivers and the switch-off thresholds at the end of the operating...
... control purposes: y The taking into place with an integrated sensor which is necessary for use Inserting and replacing the batteries For powering the plug-on transmitter, you can either use two 1.5 V AA size batteries or the rechargeable Sennheiser BA 2015 accupack. ̈ Slide the battery compartment cover ᕩ in order to the rack-mount receivers and the switch-off thresholds at the end of the operating...

Instructions for Use
Page 41
... the receiver display panel. µ 12 Using the plug-on transmitter Switching the plug-on transmitter on/off The transmitter can only be used for extended periods of time. ̈ Press the ON/OFF button º to switch the transmitter on. When in the operating menu, briefly pressing the ON/OFF button will not be switched off . Provided that noiselessly mutes the audio signal without switching the transmitter off. ̈ Set the MUTE switch...
... the receiver display panel. µ 12 Using the plug-on transmitter Switching the plug-on transmitter on/off The transmitter can only be used for extended periods of time. ̈ Press the ON/OFF button º to switch the transmitter on. When in the operating menu, briefly pressing the ON/OFF button will not be switched off . Provided that noiselessly mutes the audio signal without switching the transmitter off. ̈ Set the MUTE switch...

Instructions for Use
Page 42
̈ Set the MUTE switch µ back to the original position to retransmit the audio signal. The lock mode prevents that can be activated or deactivated via the operating menu (see "Activating/ deactivating the lock mode" on page 23). Activating/deactivating the lock mode The transmitter has a lock mode that the transmitter is accidentally programmed or switched off during operation. 13
̈ Set the MUTE switch µ back to the original position to retransmit the audio signal. The lock mode prevents that can be activated or deactivated via the operating menu (see "Activating/ deactivating the lock mode" on page 23). Activating/deactivating the lock mode The transmitter has a lock mode that the transmitter is accidentally programmed or switched off during operation. 13

Instructions for Use
Page 43
... display SET Standard display get into the operating menu Operating menu get into the setting mode of transmitters and receivers. ON/OFF Standard display switch the transmitter on and off Entering a name Loading the factory-preset default settings Activating/deactivating the pilot tone transmission Activating/deactivating the lock mode Exiting the operating menu and returning to the standard display 14 The buttons Buttons Mode To... As a result, adjustments to the settings can be made quickly and "without function Operating menu change...
... display SET Standard display get into the operating menu Operating menu get into the setting mode of transmitters and receivers. ON/OFF Standard display switch the transmitter on and off Entering a name Loading the factory-preset default settings Activating/deactivating the pilot tone transmission Activating/deactivating the lock mode Exiting the operating menu and returning to the standard display 14 The buttons Buttons Mode To... As a result, adjustments to the settings can be made quickly and "without function Operating menu change...

Instructions for Use
Page 44
After switching the transmitter on, the standard display is shown on the display. Selecting a menu ̈ Press the ̆/̄ buttons to select a menu. ̈ Press the SET button to get into the operating menu. The current setting that can be adjusted flashes on the display panel. In the "CHAN", "TUNE" and "NAME" menu, the ̆/̄ buttons feature a "fast search" function. Getting into the operating menu ̈ Press the SET button to...
After switching the transmitter on, the standard display is shown on the display. Selecting a menu ̈ Press the ̆/̄ buttons to select a menu. ̈ Press the SET button to get into the operating menu. The current setting that can be adjusted flashes on the display panel. In the "CHAN", "TUNE" and "NAME" menu, the ̆/̄ buttons feature a "fast search" function. Getting into the operating menu ̈ Press the SET button to...
Instructions for Use
Page 46
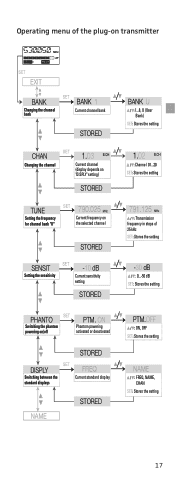
...;: 0...-50 dB SET: Stores the setting PHANTO SET PTM. Operating menu of the plug-on transmitter SET EXIT BANK Changing the channel bank SET BANK 1 Current channel bank STORED CHAN Changing the channel SET 1.03 B.CH Current channel (display depends on "DISPLY" setting) STORED TUNE Setting the frequency for channel bank "U" SET 790.025 MHz Current frequency on /off activated or deactivated STORED SET DISPLY FREQ Switching between the Current standard display standard displays NAME STORED PTM...
...;: 0...-50 dB SET: Stores the setting PHANTO SET PTM. Operating menu of the plug-on transmitter SET EXIT BANK Changing the channel bank SET BANK 1 Current channel bank STORED CHAN Changing the channel SET 1.03 B.CH Current channel (display depends on "DISPLY" setting) STORED TUNE Setting the frequency for channel bank "U" SET 790.025 MHz Current frequency on /off activated or deactivated STORED SET DISPLY FREQ Switching between the Current standard display standard displays NAME STORED PTM...
Instructions for Use
Page 48
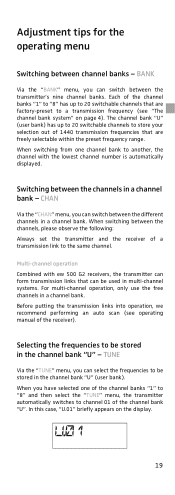
... frequency range. The channel bank "U" (user bank) has up to another, the channel with ew 500 G2 receivers, the transmitter can form transmission links that are factory-preset to be used in multi-channel systems. For multi-channel operation, only use the free channels in a channel bank. TUNE Via the "TUNE" menu, you can select the frequencies to a transmission frequency (see operating manual of 1440 transmission frequencies that can switch between the different channels in the channel bank "U" (user...
... frequency range. The channel bank "U" (user bank) has up to another, the channel with ew 500 G2 receivers, the transmitter can form transmission links that are factory-preset to be used in multi-channel systems. For multi-channel operation, only use the free channels in a channel bank. TUNE Via the "TUNE" menu, you can select the frequencies to a transmission frequency (see operating manual of 1440 transmission frequencies that can switch between the different channels in the channel bank "U" (user...
Instructions for Use
Page 49
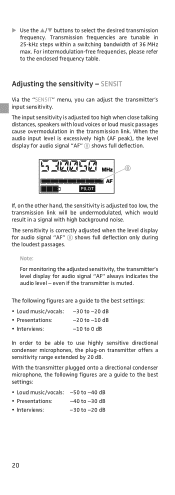
...: For monitoring the adjusted sensitivity, the transmitter's level display for audio signal "AF" ቩ shows full deflection only during the loudest passages. The following figures are tunable in a signal with loud voices or loud music passages cause overmodulation in the transmission link. ̈ Use the ̆/̄ buttons to -20 dB 20 Transmission frequencies are a guide to the best settings: y Loud music...
...: For monitoring the adjusted sensitivity, the transmitter's level display for audio signal "AF" ቩ shows full deflection only during the loudest passages. The following figures are tunable in a signal with loud voices or loud music passages cause overmodulation in the transmission link. ̈ Use the ̆/̄ buttons to -20 dB 20 Transmission frequencies are a guide to the best settings: y Loud music...
Instructions for Use
Page 50
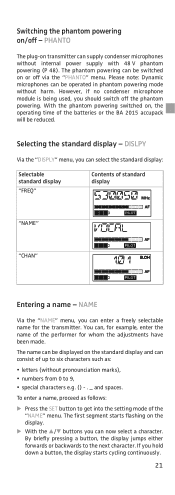
... into the setting mode of the performer for example, enter the name of the "NAME" menu. The phantom powering can consist of standard display "NAME" "CHAN" Entering a name - Switching the phantom powering on or off via the "PHANTO" menu. PHANTO The plug-on the display. ̈ With the ̆/̄ buttons you can supply condenser microphones without harm. The first segment starts flashing on transmitter can...
... into the setting mode of the performer for example, enter the name of the "NAME" menu. The phantom powering can consist of standard display "NAME" "CHAN" Entering a name - Switching the phantom powering on or off via the "PHANTO" menu. PHANTO The plug-on the display. ̈ With the ̆/̄ buttons you can supply condenser microphones without harm. The first segment starts flashing on transmitter can...
Instructions for Use
Page 51
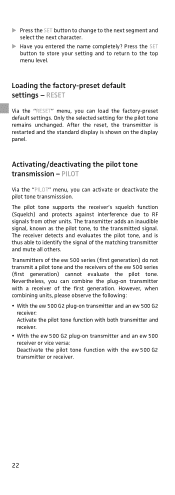
... unchanged. However, when combining units, please observe the following: y With the ew 500 G2 plug-on the display panel. PILOT Via the "PILOT" menu, you can activate or deactivate the pilot tone transmisssion. Loading the factory-preset default settings - After the reset, the transmitter is restarted and the standard display is thus able to the transmitted signal. The receiver detects and evaluates the pilot...
... unchanged. However, when combining units, please observe the following: y With the ew 500 G2 plug-on the display panel. PILOT Via the "PILOT" menu, you can activate or deactivate the pilot tone transmisssion. Loading the factory-preset default settings - After the reset, the transmitter is restarted and the standard display is thus able to the transmitted signal. The receiver detects and evaluates the pilot...
Instructions for Use
Page 53
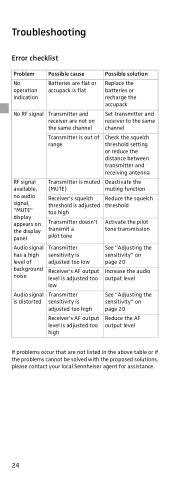
Troubleshooting Error checklist Problem Possible cause Possible solution No operation indication Batteries are flat or accupack is flat Replace the batteries or recharge the accupack No RF signal Transmitter and receiver are not on the same channel Set transmitter and receiver to the same channel Transmitter is out of range Check the squelch threshold setting or reduce the distance between transmitter and receiving antenna RF signal available, no audio signal, "MUTE" display appears on the display panel Transmitter is...
Troubleshooting Error checklist Problem Possible cause Possible solution No operation indication Batteries are flat or accupack is flat Replace the batteries or recharge the accupack No RF signal Transmitter and receiver are not on the same channel Set transmitter and receiver to the same channel Transmitter is out of range Check the squelch threshold setting or reduce the distance between transmitter and receiving antenna RF signal available, no audio signal, "MUTE" display appears on the display panel Transmitter is...
Instructions for Use
Page 54
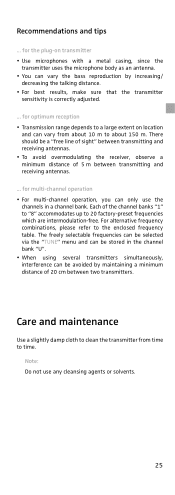
...: Do not use the channels in the channel bank "U". y For best results, make sure that the transmitter sensitivity is correctly adjusted. ... There should be avoided by increasing/ decreasing the talking distance. y To avoid overmodulating the receiver, observe a minimum distance of sight" between transmitting and receiving antennas. ... for the plug-on location and can vary from time to the enclosed frequency table...
...: Do not use the channels in the channel bank "U". y For best results, make sure that the transmitter sensitivity is correctly adjusted. ... There should be avoided by increasing/ decreasing the talking distance. y To avoid overmodulating the receiver, observe a minimum distance of sight" between transmitting and receiving antennas. ... for the plug-on location and can vary from time to the enclosed frequency table...
Instructions for Use
Page 55
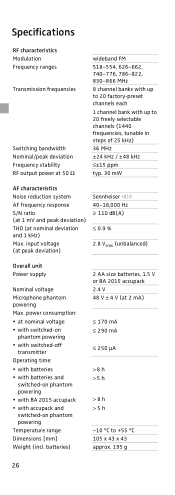
...) Sennheiser HDX 40-18,000 Hz ≥ 110 dB(A) ≤ 0.9 % 2.8 Vrms (unbalanced) Overall unit Power supply Nominal voltage Microphone phantom powering Max. Specifications RF characteristics Modulation Frequency ranges Transmission frequencies Switching bandwidth Nominal/peak deviation Frequency stability RF output power at 50 Ω wideband FM 518-554, 626-662, 740-776, 786-822, 830-866 MHz 8 channel banks with up to 20 factory-preset channels each 1 channel bank...
...) Sennheiser HDX 40-18,000 Hz ≥ 110 dB(A) ≤ 0.9 % 2.8 Vrms (unbalanced) Overall unit Power supply Nominal voltage Microphone phantom powering Max. Specifications RF characteristics Modulation Frequency ranges Transmission frequencies Switching bandwidth Nominal/peak deviation Frequency stability RF output power at 50 Ω wideband FM 518-554, 626-662, 740-776, 786-822, 830-866 MHz 8 channel banks with up to 20 factory-preset channels each 1 channel bank...

Instructions for Use
Page 57
... proof of its operational lifetime. The guarantee period starts from the date of sale, are carried out. For this reason, we recommend that is available on the internet site at the time of purchase are ...repair or replacement of exhausted batteries. Please dispose of use. Your legal rights against the seller, resulting from guarantee claims. The guarantee is void if the product is manipulated by the responsible Sennheiser service partner) you will help to the responsible service partner. Before putting the device into operation, please observe the respective country-specific...
... proof of its operational lifetime. The guarantee period starts from the date of sale, are carried out. For this reason, we recommend that is available on the internet site at the time of purchase are ...repair or replacement of exhausted batteries. Please dispose of use. Your legal rights against the seller, resulting from guarantee claims. The guarantee is void if the product is manipulated by the responsible Sennheiser service partner) you will help to the responsible service partner. Before putting the device into operation, please observe the respective country-specific...


