
Instructions for Use
Page 15
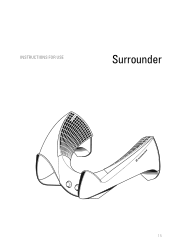
INSTRUCTIONS FOR USE Surrounder 15
INSTRUCTIONS FOR USE Surrounder 15
Instructions for Use
Page 16
Chap. Contents ...P a g e 1 The Surrounder's technology 17 The Surrounder creates a virutal room around your head 17 2 Delivery includes 18 3 Operating controls 19 4 Putting the Surrounder into operation 20 Connecting the Surrounder to the mains 20 5 Connection to the sound source 20 6 How to use the Surrounder 24 7 Important notes ...24 8 Technical data ...25 16
Chap. Contents ...P a g e 1 The Surrounder's technology 17 The Surrounder creates a virutal room around your head 17 2 Delivery includes 18 3 Operating controls 19 4 Putting the Surrounder into operation 20 Connecting the Surrounder to the mains 20 5 Connection to the sound source 20 6 How to use the Surrounder 24 7 Important notes ...24 8 Technical data ...25 16
Instructions for Use
Page 17
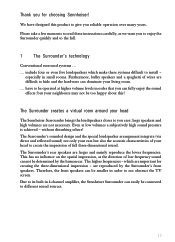
... be connected to give you ears: large speakers and high volumes are important for choosing Sennheiser! which make these instructions carefully, as the direction of wires are difficult to hide and the hardware can fully enjoy the sound effects: but also the acoustic characteristics of your head The Sennheiser Surrounder brings the loudspeakers closer to not obstruct the TV screen. have...
... be connected to give you ears: large speakers and high volumes are important for choosing Sennheiser! which make these instructions carefully, as the direction of wires are difficult to hide and the hardware can fully enjoy the sound effects: but also the acoustic characteristics of your head The Sennheiser Surrounder brings the loudspeakers closer to not obstruct the TV screen. have...
Instructions for Use
Page 18
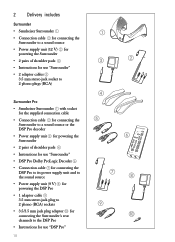
...; • Connection cable ባ for connecting the Surrounder to a sound source • Power supply unit (12 V) ቤ for powering the Surrounder • 2 pairs of shoulder pads ብ • Instructions for use "Surrounder" • 2 adaptor cables ቦ 3.5 mm stereo jack socket to 2 phono plugs (RCA) Surrounder Pro • Sennheiser Surrounder ቢ with socket for the supplied connection cable • Connection cable ባ for connecting the Surrounder to a sound source or the DSP Pro decoder • Power supply unit ቤ for powering the Surrounder • 2 pairs of...
...; • Connection cable ባ for connecting the Surrounder to a sound source • Power supply unit (12 V) ቤ for powering the Surrounder • 2 pairs of shoulder pads ብ • Instructions for use "Surrounder" • 2 adaptor cables ቦ 3.5 mm stereo jack socket to 2 phono plugs (RCA) Surrounder Pro • Sennheiser Surrounder ቢ with socket for the supplied connection cable • Connection cable ባ for connecting the Surrounder to a sound source or the DSP Pro decoder • Power supply unit ቤ for powering the Surrounder • 2 pairs of...
Instructions for Use
Page 19
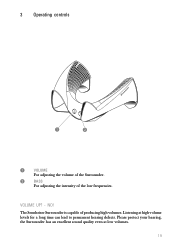
The Sennheiser Surrounder is capable of the low frequencies. VOLUME UP? - Please protect your hearing, the Surrounder has an excellent sound quality even at high volume levels for a long time can lead to permanent hearing defects. 3 Operating controls ³ · ³ VOLUME For adjusting the volume of the Surrounder. · BASS For adjusting the intensity of producing high volumes. Listening at low volumes. 19 NO!
The Sennheiser Surrounder is capable of the low frequencies. VOLUME UP? - Please protect your hearing, the Surrounder has an excellent sound quality even at high volume levels for a long time can lead to permanent hearing defects. 3 Operating controls ³ · ³ VOLUME For adjusting the volume of the Surrounder. · BASS For adjusting the intensity of producing high volumes. Listening at low volumes. 19 NO!
Instructions for Use
Page 20
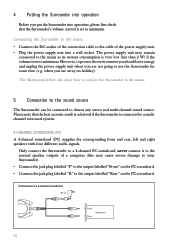
... front and rear, left and right speakers with four different audio signals. when you are not going to almost any stereo and multi-channel sound source. Connection to the cable of the connection cable to a 4-channel soundcard NT 12 Front Rear Soundcard 20 Connecting the Surrounder to the mains • Connect the DC socket of the power supply unit. • Plug the power supply unit into operation, please first check that the...
... front and rear, left and right speakers with four different audio signals. when you are not going to almost any stereo and multi-channel sound source. Connection to the cable of the connection cable to a 4-channel soundcard NT 12 Front Rear Soundcard 20 Connecting the Surrounder to the mains • Connect the DC socket of the power supply unit. • Plug the power supply unit into operation, please first check that the...
Instructions for Use
Page 21
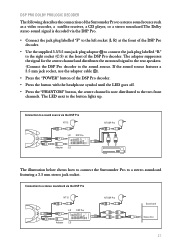
... DSP Pro. • Connect the jack plug labelled "F" to the left socket (L R) at the front of the DSP Pro decoder. • Use the supplied 3.5/3.5 mm jack plug adaptor ቫ to connect the jack plug labelled "R" to the right socket (C S) at the front of the Surrounder Pro to a stereo sound source such as a video recorder, a satellite receiver, a CD player, or a stereo soundcard.The Dolby stereo sound signal is now distributed to the two front channels. The...
... DSP Pro. • Connect the jack plug labelled "F" to the left socket (L R) at the front of the DSP Pro decoder. • Use the supplied 3.5/3.5 mm jack plug adaptor ቫ to connect the jack plug labelled "R" to the right socket (C S) at the front of the Surrounder Pro to a stereo sound source such as a video recorder, a satellite receiver, a CD player, or a stereo soundcard.The Dolby stereo sound signal is now distributed to the two front channels. The...
Instructions for Use
Page 22
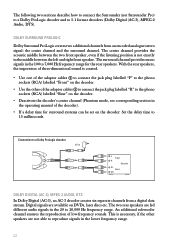
... two additional channels from a digital data stream. The surround channel provides mono signals in the 100 to 7,000 Hz frequency range for surround systems can be set on the decoder: Set the delay time to the phono sockets (RCA) labelled "Rear" on the decoder. • Deactivate the decoder's centre channel (Phantom mode, see corresponding section in the operating manual of the adaptor cables ቦ to connect the jack plug labelled...
... two additional channels from a digital data stream. The surround channel provides mono signals in the 100 to 7,000 Hz frequency range for surround systems can be set on the decoder: Set the delay time to the phono sockets (RCA) labelled "Rear" on the decoder. • Deactivate the decoder's centre channel (Phantom mode, see corresponding section in the operating manual of the adaptor cables ቦ to connect the jack plug labelled...
Instructions for Use
Page 23
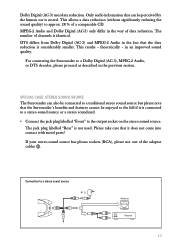
... with metal parts! The number of data reduction. in the way of channels is not used. Dolby Digital (AC-3) uses data reduction. The jack plug labelled "Rear" is identical. Connection to the output socket on the stereo sound source. SPECIAL CASE: STEREO SOUND SOURCE The Surrounder can be connected to a traditional stereo sound source but please note that it is connected to a stereo sound source or a stereo soundcard. • Connect the jack plug labelled "Front" to a stereo sound source...
... with metal parts! The number of data reduction. in the way of channels is not used. Dolby Digital (AC-3) uses data reduction. The jack plug labelled "Rear" is identical. Connection to the output socket on the stereo sound source. SPECIAL CASE: STEREO SOUND SOURCE The Surrounder can be connected to a traditional stereo sound source but please note that it is connected to a stereo sound source or a stereo soundcard. • Connect the jack plug labelled "Front" to a stereo sound source...
Instructions for Use
Page 24
... rotary switches ("VOL" and "BASS"). 7 Important notes Ǡ Only use any solvents. To replace the shoulder pads, carefully pull them (replacement shoulder pads are available as the volume control (VOLUME) and the bass control (BASS) are attached by authorised personnel and is all the more valid for powering the Surrounder. 24 Always disconnect the mains connector when you wish to change connections or...
... rotary switches ("VOL" and "BASS"). 7 Important notes Ǡ Only use any solvents. To replace the shoulder pads, carefully pull them (replacement shoulder pads are available as the volume control (VOLUME) and the bass control (BASS) are attached by authorised personnel and is all the more valid for powering the Surrounder. 24 Always disconnect the mains connector when you wish to change connections or...
Instructions for Use
Page 25
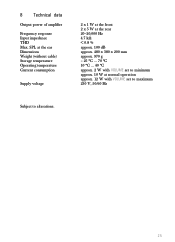
SPL at the ear Dimensions Weight (without cable) Storage temperature Operating temperature Current consumption Supply voltage 2 x 1 W at the front 2 x 5 W at the rear 20-20,000 Hz 4.7 kΩ < 0.8 % approx. 100 dB approx. 480 x 380 x 200 mm approx. 970 g - 25 °C ... 70 °C 10 °C ... 40 °C approx. 2 W with VOLUME set to minimum approx. 10 W at normal operation approx. 12 W with VOLUME set to maximum 230 V, 50/60 Hz Subject to alterations. 25 8 Technical data Output power of amplifier Frequency response Input impedance THD Max.
SPL at the ear Dimensions Weight (without cable) Storage temperature Operating temperature Current consumption Supply voltage 2 x 1 W at the front 2 x 5 W at the rear 20-20,000 Hz 4.7 kΩ < 0.8 % approx. 100 dB approx. 480 x 380 x 200 mm approx. 970 g - 25 °C ... 70 °C 10 °C ... 40 °C approx. 2 W with VOLUME set to minimum approx. 10 W at normal operation approx. 12 W with VOLUME set to maximum 230 V, 50/60 Hz Subject to alterations. 25 8 Technical data Output power of amplifier Frequency response Input impedance THD Max.
Instructions for Use
Page 74
Änderungen vorbehalten Subject to alterations Sous réserve de modification Con riserva di modifiche Reservado el derecho a introducir modificaciones Wijzigingen voorbehouden Sennheiser electronic GmbH & Co. KG D-30900 Wedemark Printed in Ireland Publ. 10/98 Telefon +49 (0)5130 600-0 Telefax +49 (0)5130 600 300 xxxxx A01
Änderungen vorbehalten Subject to alterations Sous réserve de modification Con riserva di modifiche Reservado el derecho a introducir modificaciones Wijzigingen voorbehouden Sennheiser electronic GmbH & Co. KG D-30900 Wedemark Printed in Ireland Publ. 10/98 Telefon +49 (0)5130 600-0 Telefax +49 (0)5130 600 300 xxxxx A01

