Instructions for use
Page 1
XS WIRELESS Instruction manual
XS WIRELESS Instruction manual
Instructions for use
Page 2
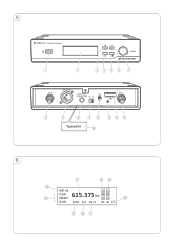
A XS WIRELESS TRUE DIVERSITY RECEIVER 1 2 set volume sync 345 6 7 ANT B BALANCED AUDIO OUT UNBALANCED LINE MIC SQ ANT A DC 12V 300mA 8 9 0 A B CDE Typenschild F B G HI O ANT AB N TUNE 615.375 PRESET J SCAN SYNC B.2 CH.12 RF AF M LK
A XS WIRELESS TRUE DIVERSITY RECEIVER 1 2 set volume sync 345 6 7 ANT B BALANCED AUDIO OUT UNBALANCED LINE MIC SQ ANT A DC 12V 300mA 8 9 0 A B CDE Typenschild F B G HI O ANT AB N TUNE 615.375 PRESET J SCAN SYNC B.2 CH.12 RF AF M LK
Instructions for use
Page 4
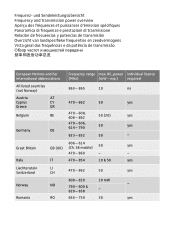
...) 606 - 614 (Ch. 38 mobile) 50 yes 470 - 860 - - RO 646 - 759 30 yes und Sendeleistungsübersicht Frequency and transmission power overview Aperçu des fréquences et puissances d'émission spécifiques Panoramica di frequenze e prestazioni di trasmissione Relación de...frequenties en zendvermogens Vista geral das frequências e da potência de transmissão European Nations and her international abbreviations Frequency range max. Italy IT 470 - 854 10 & 50 yes Liechtenstein LI Switzerland CH 470 - 862 50 yes Norway Romania 800...
...) 606 - 614 (Ch. 38 mobile) 50 yes 470 - 860 - - RO 646 - 759 30 yes und Sendeleistungsübersicht Frequency and transmission power overview Aperçu des fréquences et puissances d'émission spécifiques Panoramica di frequenze e prestazioni di trasmissione Relación de...frequenties en zendvermogens Vista geral das frequências e da potência de transmissão European Nations and her international abbreviations Frequency range max. Italy IT 470 - 854 10 & 50 yes Liechtenstein LI Switzerland CH 470 - 862 50 yes Norway Romania 800...
Instructions for use
Page 5
... into operation 8 Putting the radio microphone into operation 8 Using the XS WIRELESS systems 9 Switching the receiver on/off 9 Switching the transmitters on/off 9 Muting the transmitters ...10 Adjusting the sensitivity ...10 Selecting and changing a receiver channel 10 Synchronizing a transmitter with the receiver 11 Adjusting the squelch threshold 11 Cleaning and maintaining the XS WIRELESS systems 12 If a problem occurs ...12 Specifications ...13...
... into operation 8 Putting the radio microphone into operation 8 Using the XS WIRELESS systems 9 Switching the receiver on/off 9 Switching the transmitters on/off 9 Muting the transmitters ...10 Adjusting the sensitivity ...10 Selecting and changing a receiver channel 10 Synchronizing a transmitter with the receiver 11 Adjusting the squelch threshold 11 Cleaning and maintaining the XS WIRELESS systems 12 If a problem occurs ...12 Specifications ...13...
Instructions for use
Page 6
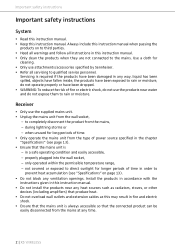
... of power source specified in the chapter "Specifications" (see "Specifications" on to third parties. • Heed all warnings and follow all servicing to rain or moisture, do not use the products near any time. 2 | XS WIRELESS properly plugged into the wall socket, - not covered or exposed to rain or moisture. Receiver • Only use attachments/accessories specified by Sennheiser...
... of power source specified in the chapter "Specifications" (see "Specifications" on to third parties. • Heed all warnings and follow all servicing to rain or moisture, do not use the products near any time. 2 | XS WIRELESS properly plugged into the wall socket, - not covered or exposed to rain or moisture. Receiver • Only use attachments/accessories specified by Sennheiser...
Instructions for use
Page 7
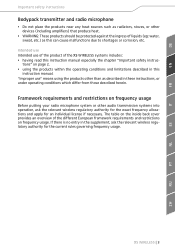
... requirements and restrictions on frequency usage Before putting your radio microphone system or other than as this instruction manual. The table on the inside back cover provides an overview of the XS WIRELESS systems includes: • having read this instruction manual especially the chapter "Important safety instruc- Intended use Intended use " means using the products within the operating conditions and limitations...
... requirements and restrictions on frequency usage Before putting your radio microphone system or other than as this instruction manual. The table on the inside back cover provides an overview of the XS WIRELESS systems includes: • having read this instruction manual especially the chapter "Important safety instruc- Intended use Intended use " means using the products within the operating conditions and limitations...
Instructions for use
Page 8
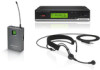
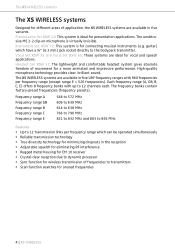
The unobtrusive ME 2-2 clip-on microphone is for unused frequencies 4 | XS WIRELESS Headset Set XSW 52: The lightweight and comfortable headset system gives absolute freedom of movement for vocal and speech applications. The XS WIRELESS systems are available in five UHF frequency ranges with up to 12 channels each. Frequency range A Frequency range GB Frequency range B Frequency range C Frequency range E 548 to 572 MHz 606...
The unobtrusive ME 2-2 clip-on microphone is for unused frequencies 4 | XS WIRELESS Headset Set XSW 52: The lightweight and comfortable headset system gives absolute freedom of movement for vocal and speech applications. The XS WIRELESS systems are available in five UHF frequency ranges with up to 12 channels each. Frequency range A Frequency range GB Frequency range B Frequency range C Frequency range E 548 to 572 MHz 606...

Instructions for use
Page 9
... ME 2-2 clip-on microphone CI 1 ¼" (6.3 mm) jack cable MZQ 1 stand mount ME 3 headmic 2 rod antennas 2 AA size batteries Instruction manual EN FR IT ES Delivery includes Delivery includes XS WIRELESS systems Vocal Set XSW 35 Vocal Set XSW 65 Presentation Set XSW 12 Instrument Set XSW 72 Headset Set XSW 52 A list of accessories can be found on suppliers, contact your local Sennheiser partner: www.sennheiser.com > "Service & Support". For information...
... ME 2-2 clip-on microphone CI 1 ¼" (6.3 mm) jack cable MZQ 1 stand mount ME 3 headmic 2 rod antennas 2 AA size batteries Instruction manual EN FR IT ES Delivery includes Delivery includes XS WIRELESS systems Vocal Set XSW 35 Vocal Set XSW 65 Presentation Set XSW 12 Instrument Set XSW 72 Headset Set XSW 52 A list of accessories can be found on suppliers, contact your local Sennheiser partner: www.sennheiser.com > "Service & Support". For information...
Instructions for use
Page 10
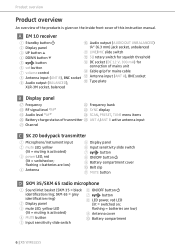
...) for 6 set button connection of mains unit 7 volume control D Cable grip for mains cable 8 Antenna input (ANT B), BNC socket E Antenna input (ANT A), BNC socket 9 Audio output (BALANCED), F Type plate XLR-3M socket, balanced B Display panel G Frequency L Frequency bank H RF signal level "RF" M SYNC display I Audio level "AF" N SCAN, PRESET, TUNE menu items J Battery charge status of this instruction manual. flashing = batteries are low...
...) for 6 set button connection of mains unit 7 volume control D Cable grip for mains cable 8 Antenna input (ANT B), BNC socket E Antenna input (ANT A), BNC socket 9 Audio output (BALANCED), F Type plate XLR-3M socket, balanced B Display panel G Frequency L Frequency bank H RF signal level "RF" M SYNC display I Audio level "AF" N SCAN, PRESET, TUNE menu items J Battery charge status of this instruction manual. flashing = batteries are low...
Instructions for use
Page 11
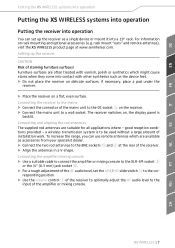
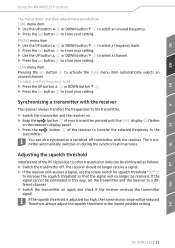
...receiver on delicate surfaces; Connecting the amplifier/mixing console ̈ Use a suitable cable to connect the amplifier or mixing console to the BNC sockets E and 8 at www.sennheiser.com. rack mount "ears" and remote antennas), visit the XS WIRELESS product page at the rear of the receiver... installation work. To increase the range, you can set the LINE/MIC slide switch A to be used without a large amount of the AF audio level, set up the receiver CAUTION Risk of staining furniture surfaces! The receiver switches on, the display panel is to the cor- a wireless ...
...receiver on delicate surfaces; Connecting the amplifier/mixing console ̈ Use a suitable cable to connect the amplifier or mixing console to the BNC sockets E and 8 at www.sennheiser.com. rack mount "ears" and remote antennas), visit the XS WIRELESS product page at the rear of the receiver... installation work. To increase the range, you can set the LINE/MIC slide switch A to be used without a large amount of the AF audio level, set up the receiver CAUTION Risk of staining furniture surfaces! The receiver switches on, the display panel is to the cor- a wireless ...
Instructions for use
Page 12
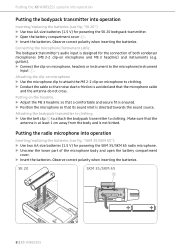
... AA 1.5V AA 8 | XS WIRELESS Putting the XS WIRELESS systems into operation Putting the bodypack transmitter into operation Inserting/replacing the batteries (see fig. Connecting the microphone/instrument cable The bodypack transmitter's audio input is not kinked. Observe correct polarity when inserting the batteries. Make sure that the microphone cable and the antenna do not cross. guitars). ̈ Connect the clip-on the headmic ̈...
... AA 1.5V AA 8 | XS WIRELESS Putting the XS WIRELESS systems into operation Putting the bodypack transmitter into operation Inserting/replacing the batteries (see fig. Connecting the microphone/instrument cable The bodypack transmitter's audio input is not kinked. Observe correct polarity when inserting the batteries. Make sure that the microphone cable and the antenna do not cross. guitars). ̈ Connect the clip-on the headmic ̈...
Instructions for use
Page 13
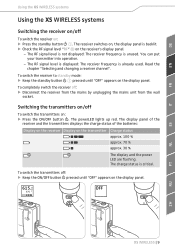
... XS WIRELESS systems Using the XS WIRELESS systems Switching the receiver on/off To switch the receiver on : ̈ Press the ON/OFF button . Read the chapter "Selecting and changing a receiver channel". The charge status is backlit. ̈ Check the RF signal level "RF" H on the transmitter Charge status approx. 100 % approx. 70 % approx. 30 % The display and the power...
... XS WIRELESS systems Using the XS WIRELESS systems Switching the receiver on/off To switch the receiver on : ̈ Press the ON/OFF button . Read the chapter "Selecting and changing a receiver channel". The charge status is backlit. ̈ Check the RF signal level "RF" H on the transmitter Charge status approx. 100 % approx. 70 % approx. 30 % The display and the power...
Instructions for use
Page 14
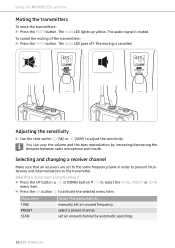
The mute LED goes off. The muting is muted. Selecting and changing a receiver channel Make sure that all receivers are set an unused channel by increasing/decreasing the distance between radio microphone and mouth. Menu item TUNE PRESET SCAN Select this menu item to activate the ...Using the XS WIRELESS systems Muting the transmitters To mute the transmitters: ̈ Press the MUTE button. Selecting a menu item and activating it ̈ Press the UP button 3 or DOWN button 4 to select the TUNE, PRESET or SCAN menu item. ̈ Press the set an unused frequency. The audio...
The mute LED goes off. The muting is muted. Selecting and changing a receiver channel Make sure that all receivers are set an unused channel by increasing/decreasing the distance between radio microphone and mouth. Menu item TUNE PRESET SCAN Select this menu item to activate the ...Using the XS WIRELESS systems Muting the transmitters To mute the transmitters: ̈ Press the MUTE button. Selecting a menu item and activating it ̈ Press the UP button 3 or DOWN button 4 to select the TUNE, PRESET or SCAN menu item. ̈ Press the set an unused frequency. The audio...
Instructions for use
Page 15
... DE EN FR IT Using the XS WIRELESS systems The menu items and their adjustment possibilities TUNE menu item ̈ Use the UP button 3 or DOWN button 4 to select an unused frequency. ̈ Press the set button 6 to activate the SCAN menu item automatically selects an unused channel. You can be received. Therefore, always adjust the...
... DE EN FR IT Using the XS WIRELESS systems The menu items and their adjustment possibilities TUNE menu item ̈ Use the UP button 3 or DOWN button 4 to select an unused frequency. ̈ Press the set button 6 to activate the SCAN menu item automatically selects an unused channel. You can be received. Therefore, always adjust the...
Instructions for use
Page 16
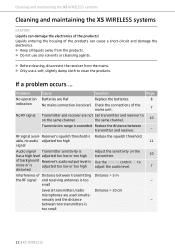
... operation Batteries are flat Replace the batteries. 8 indication No mains connection (receiver) Check the connections of the mains unit. 7 No RF signal Transmitter and receiver are used simulta- between transmitting Distance > 5 m the RF signal and receiving antennas is too - small Several transmitters/radio Distance > 20 cm microphones are not Set transmitter and receiver to on the transmitter. 10 of background Receiver's audio output level is Use...
... operation Batteries are flat Replace the batteries. 8 indication No mains connection (receiver) Check the connections of the mains unit. 7 No RF signal Transmitter and receiver are used simulta- between transmitting Distance > 5 m the RF signal and receiving antennas is too - small Several transmitters/radio Distance > 20 cm microphones are not Set transmitter and receiver to on the transmitter. 10 of background Receiver's audio output level is Use...
Instructions for use
Page 17
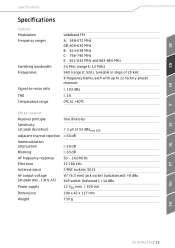
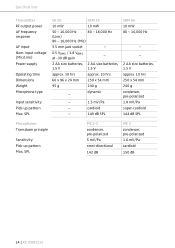
DE EN FR IT Specifications Specifications System Modulation Frequency ranges Switching bandwidth Frequencies Signal-to-noise ratio THD Temperature ...176;C EM 10 receiver Receiver principle true diversity Sensitivity (at peak deviation) < 3 μV at 52 dBarms S/N Adjacent channel rejection ≥ 60 dB Intermodulation attenuation ≥ 50 dB Blocking ≥ 65 dB AF frequency response 50 - 16...) jack socket (unbalanced): +8 dBu XLR socket (balanced): +14 dBu Power supply 12 VDC nom. / 300 mA Dimensions 200 x 42 x 127 mm Weight 730 g ES NL PT RU ZH XS WIRELESS | 13
DE EN FR IT Specifications Specifications System Modulation Frequency ranges Switching bandwidth Frequencies Signal-to-noise ratio THD Temperature ...176;C EM 10 receiver Receiver principle true diversity Sensitivity (at peak deviation) < 3 μV at 52 dBarms S/N Adjacent channel rejection ≥ 60 dB Intermodulation attenuation ≥ 50 dB Blocking ≥ 65 dB AF frequency response 50 - 16...) jack socket (unbalanced): +8 dBu XLR socket (balanced): +14 dBu Power supply 12 VDC nom. / 300 mA Dimensions 200 x 42 x 127 mm Weight 730 g ES NL PT RU ZH XS WIRELESS | 13
Instructions for use
Page 18
... (Line) 80 - 16,000 Hz (Mic) 3.5 mm jack socket - 0.5 VRMS / 1.8 VRMS - SPL ME 2-2 condenser, pre-polarized 5 mV/Pa omni-directional 142 dB ME 3 condenser, pre-polarized 1.6 mV/Pa cardioid 150 dB 14 | XS WIRELESS Specifications Transmitter RF output power AF frequency response AF input Nom. at -30 dB gain 2 AA size batteries, 2 AA size batteries, 1.5 V 1.5 V approx. 10 hrs approx...
... (Line) 80 - 16,000 Hz (Mic) 3.5 mm jack socket - 0.5 VRMS / 1.8 VRMS - SPL ME 2-2 condenser, pre-polarized 5 mV/Pa omni-directional 142 dB ME 3 condenser, pre-polarized 1.6 mV/Pa cardioid 150 dB 14 | XS WIRELESS Specifications Transmitter RF output power AF frequency response AF input Nom. at -30 dB gain 2 AA size batteries, 2 AA size batteries, 1.5 V 1.5 V approx. 10 hrs approx...
Instructions for use
Page 19
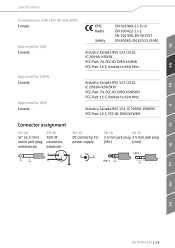
DE EN Specifications In compliance with (EM, SK and SKM) Europe: Approved by (SK) Canada: Approved by (SKM) Canada: Approved by (EM) Canada: EMC Radio Safety EN 301489-1/-3/-9 EN 300422-1/-2, EN 301440, EN 301357 EN 60065, EN 62311 (SAR) Industry Canada RSS 123 (210), IC 2099A-XSWSK FCC-Part 74, ...FCC-Part 15 C, FCC-ID: DMO XSWEM Connector assignment EM 10 ¼'' (6.3 mm) mono jack plug, unbalanced EM 10 XLR-3F connector, balanced + 21 3 EM 10 SK 20 SK 20 DC connector for 3.5 mm jack plug 3.5 mm jack plug power supply (Mic) (Line) FR IT ES NL PT RU ZH XS WIRELESS |...
DE EN Specifications In compliance with (EM, SK and SKM) Europe: Approved by (SK) Canada: Approved by (SKM) Canada: Approved by (EM) Canada: EMC Radio Safety EN 301489-1/-3/-9 EN 300422-1/-2, EN 301440, EN 301357 EN 60065, EN 62311 (SAR) Industry Canada RSS 123 (210), IC 2099A-XSWSK FCC-Part 74, ...FCC-Part 15 C, FCC-ID: DMO XSWEM Connector assignment EM 10 ¼'' (6.3 mm) mono jack plug, unbalanced EM 10 XLR-3F connector, balanced + 21 3 EM 10 SK 20 SK 20 DC connector for 3.5 mm jack plug 3.5 mm jack plug power supply (Mic) (Line) FR IT ES NL PT RU ZH XS WIRELESS |...
Instructions for use
Page 20
... must accept any interference received, including interference that interference will not occur in a particular installation. Before putting the device into operation, please observe the respective country-specific regulations. Manufacturer Declarations Manufacturer Declarations Warranty Sennheiser electronic GmbH & Co. In compliance with the transmitters can radiate radio frequency energy and, if not installed and used in a residential installation. Statements regarding FCC...
... must accept any interference received, including interference that interference will not occur in a particular installation. Before putting the device into operation, please observe the respective country-specific regulations. Manufacturer Declarations Manufacturer Declarations Warranty Sennheiser electronic GmbH & Co. In compliance with the transmitters can radiate radio frequency energy and, if not installed and used in a residential installation. Statements regarding FCC...

Instructions for use
Page 21
KG Am Labor 1, 30900 Wedemark, Germany www.sennheiser.com Printed in Taiwan, Publ. 01/12, 542696/A03 Sennheiser electronic GmbH & Co.
KG Am Labor 1, 30900 Wedemark, Germany www.sennheiser.com Printed in Taiwan, Publ. 01/12, 542696/A03 Sennheiser electronic GmbH & Co.


