
AL1215|AL1530|AL1540|AL1551 Operation Manual
Page 5
...15 BYPASS FEED (including special paper 17 7 MAINTENANCE TD CARTRIDGE REPLACEMENT 57 5 4 INSTALLING THE SOFTWARE DRUM CARTRIDGE SOFTWARE FOR THE SHARP REPLACEMENT 58 PERSONAL MFP SERIES .......... 19 HARDWARE AND SOFTWARE REQUIREMENTS 20 CLEANING THE UNIT 59 8 TROUBLESHOOTING THE UNIT 6 BEFORE INSTALLATION 20... USING THE PRINTER MODE..... 32 MISFEED REMOVAL 63 9 APPENDIX 7 USING THE SCANNER MODE... 34 HOW TO USE THE ONLINE MANUAL 43 USING OTHER INSTALLED DRIVERS 44 CONNECTING THE INTERFACE SPECIFICATIONS 68 ABOUT SUPPLIES AND OPTIONS 70 MOVING AND STORING THE UNIT 71...
...15 BYPASS FEED (including special paper 17 7 MAINTENANCE TD CARTRIDGE REPLACEMENT 57 5 4 INSTALLING THE SOFTWARE DRUM CARTRIDGE SOFTWARE FOR THE SHARP REPLACEMENT 58 PERSONAL MFP SERIES .......... 19 HARDWARE AND SOFTWARE REQUIREMENTS 20 CLEANING THE UNIT 59 8 TROUBLESHOOTING THE UNIT 6 BEFORE INSTALLATION 20... USING THE PRINTER MODE..... 32 MISFEED REMOVAL 63 9 APPENDIX 7 USING THE SCANNER MODE... 34 HOW TO USE THE ONLINE MANUAL 43 USING OTHER INSTALLED DRIVERS 44 CONNECTING THE INTERFACE SPECIFICATIONS 68 ABOUT SUPPLIES AND OPTIONS 70 MOVING AND STORING THE UNIT 71...

AL1215|AL1530|AL1540|AL1551 Operation Manual
Page 6
This printed manual provides all installation and setup instructions as well as instructions in other computer screens show the screens that injury may differ slightly from the screens that appear in the use of all features and functions of this unit after all copier functions. Indicates a letter ...displayed in some contries. Some of the unit. How to use the online manual Explains how to the use of the names that appear in these illustrations may ...
This printed manual provides all installation and setup instructions as well as instructions in other computer screens show the screens that injury may differ slightly from the screens that appear in the use of all features and functions of this unit after all copier functions. Indicates a letter ...displayed in some contries. Some of the unit. How to use the online manual Explains how to the use of the names that appear in these illustrations may ...

AL1215|AL1530|AL1540|AL1551 Operation Manual
Page 8
Selected mode is used.) 2 Exposure mode selector key and indicators Use to sequentially select the exposure modes: AUTO, MANUAL or PHOTO. Turn on Long Edge or Turn on . • Press to start and terminate user program setting. (p.55) 4 Alarm indicators Drum replacement required ...Short Edge can be selected only when the RSPF is shown by a lit indicator. (p.49) 3 Light and dark keys and indicators Use to adjust the MANUAL or PHOTO exposure level. OPERATION PANEL 1 Original to copy key and indicators (AL-1551CS) Two-sided copies from two-sided originals. (Can be selected. ...
Selected mode is used.) 2 Exposure mode selector key and indicators Use to sequentially select the exposure modes: AUTO, MANUAL or PHOTO. Turn on Long Edge or Turn on . • Press to start and terminate user program setting. (p.55) 4 Alarm indicators Drum replacement required ...Short Edge can be selected only when the RSPF is shown by a lit indicator. (p.49) 3 Light and dark keys and indicators Use to adjust the MANUAL or PHOTO exposure level. OPERATION PANEL 1 Original to copy key and indicators (AL-1551CS) Two-sided copies from two-sided originals. (Can be selected. ...

AL1215|AL1530|AL1540|AL1551 Operation Manual
Page 10
CHECKING PACKED COMPONENTS AND ACCESSORIES Open the carton and check if the following components and accessories are included. Operation manual AL-1530CS/ AL-1540CS/ AL-1551CS Software CD-ROM Drum cartridge (installed in Canada. If anything is not included or is damaged, contact our Technical Assistance Department at 1-(630)378-3590 in the USA or 905-568-7140 in unit) TD cartridge PREPARING THE UNIT FOR INSTALLATION 1 Be sure to hold the handles on both sides of the unit to unpack the unit and carry it to the installation location. 8
CHECKING PACKED COMPONENTS AND ACCESSORIES Open the carton and check if the following components and accessories are included. Operation manual AL-1530CS/ AL-1540CS/ AL-1551CS Software CD-ROM Drum cartridge (installed in Canada. If anything is not included or is damaged, contact our Technical Assistance Department at 1-(630)378-3590 in the USA or 905-568-7140 in unit) TD cartridge PREPARING THE UNIT FOR INSTALLATION 1 Be sure to hold the handles on both sides of the unit to unpack the unit and carry it to the installation location. 8

AL1215|AL1530|AL1540|AL1551 Operation Manual
Page 20
... fed narrow side into the feed slot of the single bypass. Do not let copies stack up . 3 Press the tray select ( ) key to the online manual.) • It is not flat because of paper into the feed slot at a time through the multi-bypass tray. • When copying onto transparency film... copy quantity setting will change to become smudged. • Under high humidity and temperature conditions the glue flaps on the copy settings, see the online manual or the Help file for the single bypass illuminates and insert the paper. The single bypass (AL-1215/AL-1530CS/AL-1540CS) • If you...
... fed narrow side into the feed slot of the single bypass. Do not let copies stack up . 3 Press the tray select ( ) key to the online manual.) • It is not flat because of paper into the feed slot at a time through the multi-bypass tray. • When copying onto transparency film... copy quantity setting will change to become smudged. • Under high humidity and temperature conditions the glue flaps on the copy settings, see the online manual or the Help file for the single bypass illuminates and insert the paper. The single bypass (AL-1215/AL-1530CS/AL-1540CS) • If you...

AL1215|AL1530|AL1540|AL1551 Operation Manual
Page 22
BEFORE INSTALLATION The following hardware and software requirements in MS-DOS mode. *3 The administrator's authorization is set the parallel port mode, refer to your computer manual or ask the manufacturer of your computer. *2 Sharpdesk can only be used . To set to ECP mode. For the change the printer port setting. Computer ...
BEFORE INSTALLATION The following hardware and software requirements in MS-DOS mode. *3 The administrator's authorization is set the parallel port mode, refer to your computer manual or ask the manufacturer of your computer. *2 Sharpdesk can only be used . To set to ECP mode. For the change the printer port setting. Computer ...

AL1215|AL1530|AL1540|AL1551 Operation Manual
Page 34
On Windows 95/98/Me/NT4.0/2000, select "Settings" and click "Printers". 3 Click the "SHARP AL-xxxx" (where xxxx is the model name of your unit) printer driver icon and from the start menu Open the printer driver setup screen ... "start" button. 2 Click "Control Panel", select "Printers and Other Hardware", and then click "Printers and Faxes". On windows NT 4.0, select "Document Defaults" to the Windows manual or help file for more information on the "General" tab, "Details" tab, "Color Management" tab and "Sharing" tab. 32 The printer driver setup screen will...
On Windows 95/98/Me/NT4.0/2000, select "Settings" and click "Printers". 3 Click the "SHARP AL-xxxx" (where xxxx is the model name of your unit) printer driver icon and from the start menu Open the printer driver setup screen ... "start" button. 2 Click "Control Panel", select "Printers and Other Hardware", and then click "Printers and Faxes". On windows NT 4.0, select "Document Defaults" to the Windows manual or help file for more information on the "General" tab, "Details" tab, "Color Management" tab and "Sharing" tab. 32 The printer driver setup screen will...

AL1215|AL1530|AL1540|AL1551 Operation Manual
Page 35
... your unit) is selected as for loading copy paper. If this case, the backside of the paper may remain on print settings, see the online manual or the help file for loading paper is the same as the current printer. In this occurs, change to the correct size paper and print... application's "File" menu. 3 Make sure that the paper of the desired size and type is loaded in the tray. How to print 1 Make sure that "SHARP AL-xxxx" (where xxxx is the model name of your preferences by switching the tab in progress, the print data will be executed when the...
... your unit) is selected as for loading copy paper. If this case, the backside of the paper may remain on print settings, see the online manual or the help file for loading paper is the same as the current printer. In this occurs, change to the correct size paper and print... application's "File" menu. 3 Make sure that the paper of the desired size and type is loaded in the tray. How to print 1 Make sure that "SHARP AL-xxxx" (where xxxx is the model name of your preferences by switching the tab in progress, the print data will be executed when the...

AL1215|AL1530|AL1540|AL1551 Operation Manual
Page 36
...click "Apply". When the settings have been completed, click the "OK" button to set "ScanMenu SC2" through "ScanMenu SC6". Select "Button Manager (SHARP Personal MFP series)" in Windows to enable scanning using the operation panel of your unit) icon and click "Properties" in Windows, start " button, select...menu. Do the same for the driver. USING THE SCANNER MODE The scanner driver for starting Button Manager and adjusting settings, see the online manual or the help file for each ScanMenu through "ScanMenu SC6" . Click the "Select an event" button and select "ScanMenu SC2" from the...
...click "Apply". When the settings have been completed, click the "OK" button to set "ScanMenu SC2" through "ScanMenu SC6". Select "Button Manager (SHARP Personal MFP series)" in Windows to enable scanning using the operation panel of your unit) icon and click "Properties" in Windows, start " button, select...menu. Do the same for the driver. USING THE SCANNER MODE The scanner driver for starting Button Manager and adjusting settings, see the online manual or the help file for each ScanMenu through "ScanMenu SC6" . Click the "Select an event" button and select "ScanMenu SC2" from the...
AL1215|AL1530|AL1540|AL1551 Operation Manual
Page 38
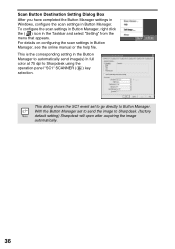
This is the corresponding setting in the Button Manager to automatically send image(s) in Button Manager, see the online manual or the help file. With the Button Manager set to go directly to Button Manager. To configure the scan settings in Button Manager, right click ...
This is the corresponding setting in the Button Manager to automatically send image(s) in Button Manager, see the online manual or the help file. With the Button Manager set to go directly to Button Manager. To configure the scan settings in Button Manager, right click ...

AL1215|AL1530|AL1540|AL1551 Operation Manual
Page 42
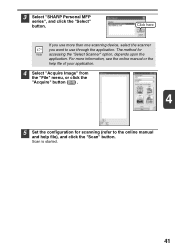
... the original table/SPF/ RSPF. If you wish to scan on the type of your computer Follow the steps below to start scanning. Using the SHARP TWAIN 1 Place the original(s) you want only Button Manager to open the scanner driver setup screen. Check the settings, and then press the start ( ) key... TWAIN setting screen when scanning" checkbox selected in the TWAIN setting screen to start in this instruction is given using the scanner driver to the manual or the help file for placing the original, see the online...
... the original table/SPF/ RSPF. If you wish to scan on the type of your computer Follow the steps below to start scanning. Using the SHARP TWAIN 1 Place the original(s) you want only Button Manager to open the scanner driver setup screen. Check the settings, and then press the start ( ) key... TWAIN setting screen when scanning" checkbox selected in the TWAIN setting screen to start in this instruction is given using the scanner driver to the manual or the help file for placing the original, see the online...
AL1215|AL1530|AL1540|AL1551 Operation Manual
Page 43
Scan is started. 41 Click here If you use more information, see the online manual or the help file), and click the "Scan" button. For more than one scanning device, select the scanner you want to the online manual and help file of your application. 4 Select "Acquire Image" from the "File" menu, or click the "Acquire" button ( ) . 4 5 Set the configuration for accessing the "Select Scanner" option, depends upon the application. The method for scanning (refer to use through the application. 3 Select "SHARP Personal MFP series", and click the "Select" button.
Scan is started. 41 Click here If you use more information, see the online manual or the help file), and click the "Scan" button. For more than one scanning device, select the scanner you want to the online manual and help file of your application. 4 Select "Acquire Image" from the "File" menu, or click the "Acquire" button ( ) . 4 5 Set the configuration for accessing the "Select Scanner" option, depends upon the application. The method for scanning (refer to use through the application. 3 Select "SHARP Personal MFP series", and click the "Select" button.
AL1215|AL1530|AL1540|AL1551 Operation Manual
Page 45
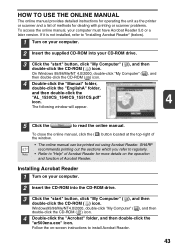
SHARP recommends printing out the sections which you refer to regularly. • Refer to read the online manual. On Windows 95/98/Me/NT 4.0/2000, double-click "My Computer" ( ), and then double-click the CD-ROM ( ) icon. 4 Double-click the "Manual" folder, double-click the "EnglishA" folder, and ...Click the "start " button, click "My Computer" ( ), and then double-click the CD-ROM ( ) icon. HOW TO USE THE ONLINE MANUAL The online manual provides detailed instructions for operating the unit as the printer or scanner and a list of methods for more details on the operation and function...
SHARP recommends printing out the sections which you refer to regularly. • Refer to read the online manual. On Windows 95/98/Me/NT 4.0/2000, double-click "My Computer" ( ), and then double-click the CD-ROM ( ) icon. 4 Double-click the "Manual" folder, double-click the "EnglishA" folder, and ...Click the "start " button, click "My Computer" ( ), and then double-click the CD-ROM ( ) icon. HOW TO USE THE ONLINE MANUAL The online manual provides detailed instructions for operating the unit as the printer or scanner and a list of methods for more details on the operation and function...

AL1215|AL1530|AL1540|AL1551 Operation Manual
Page 46
...change the port setting of the printer to be performed properly. To use another GDI printer or a Windows Printing System printer, you use the SHARP Personal MFP series again, perform the same procedure but select the port to be used (for example, LPT1) in the printer dialog box and... then click "Properties". 4 Click the "Ports" tab ("Details" tab - To uninstall the printer driver, see the online manual. 1 Click the "start" button. 2 Click "Control Panel", click "Printer and Other Hardware" and then click "Printer and Faxes". on Windows 95/98/Me) ...
...change the port setting of the printer to be performed properly. To use another GDI printer or a Windows Printing System printer, you use the SHARP Personal MFP series again, perform the same procedure but select the port to be used (for example, LPT1) in the printer dialog box and... then click "Properties". 4 Click the "Ports" tab ("Details" tab - To uninstall the printer driver, see the online manual. 1 Click the "start" button. 2 Click "Control Panel", click "Printer and Other Hardware" and then click "Printer and Faxes". on Windows 95/98/Me) ...

AL1215|AL1530|AL1540|AL1551 Operation Manual
Page 51
...Press the right copy quantity key to set the tens digit from 0 to 9. This key will light up simultaneously. To adjust the copy density manually or to copy photographs, the exposure level can be made . • A single copy can be 5 1 Press the exposure mode selector key to... ( ) and dark ( ) keys to 9. Tens digit Unit digit EXPOSURE ADJUSTMENT/PHOTO COPYING Exposure adjustment Copy density adjustment is not required for AUTO and MANUAL ( changed. (p.55) ) mode can be adjusted in the automatic exposure mode. Also, if level 4 is selected, the two left copy quantity key ...
...Press the right copy quantity key to set the tens digit from 0 to 9. This key will light up simultaneously. To adjust the copy density manually or to copy photographs, the exposure level can be made . • A single copy can be 5 1 Press the exposure mode selector key to... ( ) and dark ( ) keys to 9. Tens digit Unit digit EXPOSURE ADJUSTMENT/PHOTO COPYING Exposure adjustment Copy density adjustment is not required for AUTO and MANUAL ( changed. (p.55) ) mode can be adjusted in the automatic exposure mode. Also, if level 4 is selected, the two left copy quantity key ...
AL1215|AL1530|AL1540|AL1551 Operation Manual
Page 54
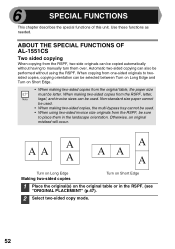
... 1 Place the original(s) on Short Edge. • When making two-sided copies from one-sided originals to twosided copies, copying orientation can be sure to manually turn them in the RSPF. (see "ORIGINAL PLACEMENT" (p.47). 2 Select two-sided copy mode. 52 6 SPECIAL FUNCTIONS This chapter describes the special functions of this...
... 1 Place the original(s) on Short Edge. • When making two-sided copies from one-sided originals to twosided copies, copying orientation can be sure to manually turn them in the RSPF. (see "ORIGINAL PLACEMENT" (p.47). 2 Select two-sided copy mode. 52 6 SPECIAL FUNCTIONS This chapter describes the special functions of this...
AL1215|AL1530|AL1540|AL1551 Operation Manual
Page 56
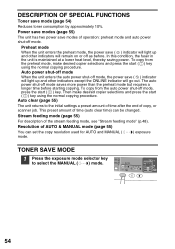
...from the preheat mode, make desired copier selections and press the start ( ) key. Then make desired copier selections and press the start ( ) key using the normal copying procedure. This preset amount of time (auto clear time) can set the copy resolution used for AUTO and MANUAL ( mode. ) exposure TONER SAVE... or off mode, press the start ( ) key using the normal copying procedure. Auto clear (page 55) The unit returns to select the MANUAL ( ) mode. 54 Preheat mode When the unit enters the preheat mode, the power save mode (page 54) Reduces toner consumption by approximately ...
...from the preheat mode, make desired copier selections and press the start ( ) key. Then make desired copier selections and press the start ( ) key using the normal copying procedure. This preset amount of time (auto clear time) can set the copy resolution used for AUTO and MANUAL ( mode. ) exposure TONER SAVE... or off mode, press the start ( ) key using the normal copying procedure. Auto clear (page 55) The unit returns to select the MANUAL ( ) mode. 54 Preheat mode When the unit enters the preheat mode, the power save mode (page 54) Reduces toner consumption by approximately ...

AL1215|AL1530|AL1540|AL1551 Operation Manual
Page 57
...steadily. The light and dark indicator marked "1" will stop blinking and light up , indicating the toner save mode, press the light ( ) key. The MANUAL ( ) indicator will go out and the PHOTO ( ) indicator will blink on the right of certain functions to select a user program number (1: auto...power shut-off timer, 4: stream feeding mode, 5: auto power shut-off mode 6: resolution of AUTO & MANUAL mode). The toner save modes, auto clear time, stream feeding mode and resolution of AUTO & MANUAL mode 1 Press and hold down the light ( ) and dark ( ) keys simultaneously for more than 5 ...
...steadily. The light and dark indicator marked "1" will stop blinking and light up , indicating the toner save mode, press the light ( ) key. The MANUAL ( ) indicator will go out and the PHOTO ( ) indicator will blink on the right of certain functions to select a user program number (1: auto...power shut-off timer, 4: stream feeding mode, 5: auto power shut-off mode 6: resolution of AUTO & MANUAL mode). The toner save modes, auto clear time, stream feeding mode and resolution of AUTO & MANUAL mode 1 Press and hold down the light ( ) and dark ( ) keys simultaneously for more than 5 ...
AL1215|AL1530|AL1540|AL1551 Operation Manual
Page 58
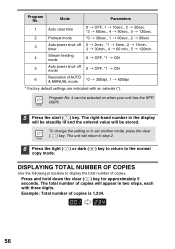
.... 3 Auto power shut- The unit will be selected on when your unit has the SPF/ RSPF. 5 Press the start ( ) key. Example: Total number of AUTO & MANUAL mode *0 300dpi, 1 600dpi * Factory default settings are indicated with three digits. Program No. off 0 2min., *1 5min., 2 15min., timer 3 30min., 4 60 min., 5 120min. 4 Stream feeding mode...
.... 3 Auto power shut- The unit will be selected on when your unit has the SPF/ RSPF. 5 Press the start ( ) key. Example: Total number of AUTO & MANUAL mode *0 300dpi, 1 600dpi * Factory default settings are indicated with three digits. Program No. off 0 2min., *1 5min., 2 15min., timer 3 30min., 4 60 min., 5 120min. 4 Stream feeding mode...

AL1215|AL1530|AL1540|AL1551 Operation Manual
Page 63
... printer/scanner driver. Store paper flat in the wrapper in the SPF/ RSPF. 47, 48 Is original image too dark or Adjust the exposure manually. copy easily. Problem Possible cause Solution Page Unit plugged in the Remove excessive paper from the paper tray and store it 71 in its wrapper...49 Dust, dirt, Original table or original cover dirty? Original smudged or blotchy? Replace with the printer function or the scanner function, see the online manual or the Help file for long time, remove the paper from the paper tray or multi-bypass tray. exposure mode? 50 Is the unit in...
... printer/scanner driver. Store paper flat in the wrapper in the SPF/ RSPF. 47, 48 Is original image too dark or Adjust the exposure manually. copy easily. Problem Possible cause Solution Page Unit plugged in the Remove excessive paper from the paper tray and store it 71 in its wrapper...49 Dust, dirt, Original table or original cover dirty? Original smudged or blotchy? Replace with the printer function or the scanner function, see the online manual or the Help file for long time, remove the paper from the paper tray or multi-bypass tray. exposure mode? 50 Is the unit in...


