CD-G14000 Operation Manual
Page 2
..., please record below the model number and serial number which are located on a circuit different from copyright owners whenever necessary. NOTE This has been tested to Class B digital pursuant to try . Please retain this does cause harmful to radio or can be connected to the grounding system of the building, as close to ra- Use of 2 cable entry as a CLASS...
..., please record below the model number and serial number which are located on a circuit different from copyright owners whenever necessary. NOTE This has been tested to Class B digital pursuant to try . Please retain this does cause harmful to radio or can be connected to the grounding system of the building, as close to ra- Use of 2 cable entry as a CLASS...
CD-G14000 Operation Manual
Page 3
... before use. 1) Read these instructions. 2) Keep these instructions. 10) Protect the power cord from being walked on the marking label. Servicing is required when the apparatus has been damaged in accordance with the highest priority on the product. 3 Install in any ventilation openings. to operate from battery power, or other sources, refer to your home, consult your outlet, consult an electrician for replacement of...
... before use. 1) Read these instructions. 2) Keep these instructions. 10) Protect the power cord from being walked on the marking label. Servicing is required when the apparatus has been damaged in accordance with the highest priority on the product. 3 Install in any ventilation openings. to operate from battery power, or other sources, refer to your home, consult your outlet, consult an electrician for replacement of...
CD-G14000 Operation Manual
Page 4
... the service technician has used replacement parts specified by the operating instructions as the original part. Adjust only those controls that are required, be located in serious personal injuries as well as damage to determine that has the same overload protection as contact with regards to grounding electrodes, and requirements for service. 19) Replacement Parts - An outside antenna or cable system is connected to this indicates a need...
... the service technician has used replacement parts specified by the operating instructions as the original part. Adjust only those controls that are required, be located in serious personal injuries as well as damage to determine that has the same overload protection as contact with regards to grounding electrodes, and requirements for service. 19) Replacement Parts - An outside antenna or cable system is connected to this indicates a need...
CD-G14000 Operation Manual
Page 5
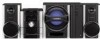
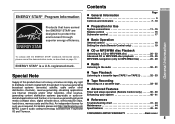
..., please visit http://mp3licensing.com MPEG Layer-3 audio coding technology licensed from Fraunhofer IIS and Thomson. Contents Page General Information Precautions 6 Controls and indicators 7 - 10 CD-G14000 Preparation for Use System connections 11 - 15 Remote control 16 Subwoofer control 17 Basic Operation General control 18 Setting the clock (Remote Control only 19 General Information CD or MP3/WMA disc Playback Listening to a CD or MP3...
..., please visit http://mp3licensing.com MPEG Layer-3 audio coding technology licensed from Fraunhofer IIS and Thomson. Contents Page General Information Precautions 6 Controls and indicators 7 - 10 CD-G14000 Preparation for Use System connections 11 - 15 Remote control 16 Subwoofer control 17 Basic Operation General control 18 Setting the clock (Remote Control only 19 General Information CD or MP3/WMA disc Playback Listening to a CD or MP3...
CD-G14000 Operation Manual
Page 6
... sound pressure from use of the equipment. 4" (10 cm) 4" (10 cm) 4" (10 cm) 5 4 3 2 1 TIMER POWER ON/ STAND-B Y CD TAPE (1 2) TUNER (BAND) AUDIO IN PRESET TUNING VOL. REMOTE SENSOR c OPEN/ CLOSE 5 4 3 PRESET 2 1 VOL. If your local SHARP service facility. Do not remove the outer cover, as this product with the volume control setting up high, or while continually listening at a given volume setting depends on a firm, level surface free from direct sunlight...
... sound pressure from use of the equipment. 4" (10 cm) 4" (10 cm) 4" (10 cm) 5 4 3 2 1 TIMER POWER ON/ STAND-B Y CD TAPE (1 2) TUNER (BAND) AUDIO IN PRESET TUNING VOL. REMOTE SENSOR c OPEN/ CLOSE 5 4 3 PRESET 2 1 VOL. If your local SHARP service facility. Do not remove the outer cover, as this product with the volume control setting up high, or while continually listening at a given volume setting depends on a firm, level surface free from direct sunlight...
CD-G14000 Operation Manual
Page 7
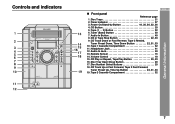
... (1 2) Button 32 6. Remote Sensor 16 14. Disc Number Select Buttons 20 18. Timer Indicator 37 3. CD Track Down or Fast Reverse, Tape 2 Rewind, Tuner Preset Down, Time Down Button 22, 31, 33 10. Controls and indicators 5 4 3 2 1 TIMER POWER ON/ STAND-BY CD TAPE (1 2) TUNER (BAND) AUDIO IN PRESET TUNING VOL. TUNING PLAYBACK (PLAY & STOP) PHONES AUDIO IN RECORD/PLAYBACK CD-G14000 Front panel Reference page 1. Audio In Jack 40 13. Disc Tray Open...
... (1 2) Button 32 6. Remote Sensor 16 14. Disc Number Select Buttons 20 18. Timer Indicator 37 3. CD Track Down or Fast Reverse, Tape 2 Rewind, Tuner Preset Down, Time Down Button 22, 31, 33 10. Controls and indicators 5 4 3 2 1 TIMER POWER ON/ STAND-BY CD TAPE (1 2) TUNER (BAND) AUDIO IN PRESET TUNING VOL. TUNING PLAYBACK (PLAY & STOP) PHONES AUDIO IN RECORD/PLAYBACK CD-G14000 Front panel Reference page 1. Audio In Jack 40 13. Disc Tray Open...
CD-G14000 Operation Manual
Page 8
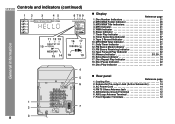
.... Disc Play Indicator 21 Rear panel Reference page 1. Cooling Fan 15 2. MP3/WMA Title Indicators 26 4. Sleep Indicator 39 7. MP3/WMA Total Indicator 21 11. FM Stereo Receiving Indicator 30 14. Disc Repeat Play Indicator 24 18. Subwoofer Pre-output Jack (Active Subwoofer 14 3. AM Antenna Ground Terminal 12 6. AM Loop Antenna Terminal 12 7. WMA Indicator 21 6. Extra Bass Indicator 18 17. Front Speaker Terminals 12 8 REAR SPEAKERS...
.... Disc Play Indicator 21 Rear panel Reference page 1. Cooling Fan 15 2. MP3/WMA Title Indicators 26 4. Sleep Indicator 39 7. MP3/WMA Total Indicator 21 11. FM Stereo Receiving Indicator 30 14. Disc Repeat Play Indicator 24 18. Subwoofer Pre-output Jack (Active Subwoofer 14 3. AM Antenna Ground Terminal 12 6. AM Loop Antenna Terminal 12 7. WMA Indicator 21 6. Extra Bass Indicator 18 17. Front Speaker Terminals 12 8 REAR SPEAKERS...
CD-G14000 Operation Manual
Page 10
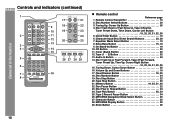
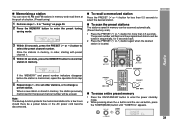
Remote Control Transmitter 16 2. Tuning Up, Cursor Up Button 26 4. Character Input/Disc Direct Search Buttons 23, 28 7. Extra Bass Button 15, 18 9. Audio In Button 40 14. Clear/Dimmer Button 18, 25 18. Memory Button 19, 25, 31, 36 22. Disc Number Select Buttons 20 3. CD Button 20 11. MP3/WMA Navigation Mode Select Button 26 27. Enter Button 26 10 Disc Track Up or Fast Forward, Tape 2 Fast Forward, Tuner Preset Up, Time Up, Cursor...
Remote Control Transmitter 16 2. Tuning Up, Cursor Up Button 26 4. Character Input/Disc Direct Search Buttons 23, 28 7. Extra Bass Button 15, 18 9. Audio In Button 40 14. Clear/Dimmer Button 18, 25 18. Memory Button 19, 25, 31, 36 22. Disc Number Select Buttons 20 3. CD Button 20 11. MP3/WMA Navigation Mode Select Button 26 27. Enter Button 26 10 Disc Track Up or Fast Forward, Tape 2 Fast Forward, Tuner Preset Up, Time Up, Cursor...

CD-G14000 Operation Manual
Page 17
... turned ON, no light will be damaged. Do not set frequency are removed. Subwoofer light up and blink according to avoid malfunction and sound distortion. Crossover frequency control Adjust the high frequency cut-off on the main unit, minimize the speaker volume on the main unit. Volume control Turn the VOLUME control clockwise to increase the volume, and turn this control toward 35 Hz and increase the volume. 17 Unplug the AC power cord when connecting the subwoofer cable...
... turned ON, no light will be damaged. Do not set frequency are removed. Subwoofer light up and blink according to avoid malfunction and sound distortion. Crossover frequency control Adjust the high frequency cut-off on the main unit, minimize the speaker volume on the main unit. Volume control Turn the VOLUME control clockwise to increase the volume, and turn this control toward 35 Hz and increase the volume. 17 Unplug the AC power cord when connecting the subwoofer cable...
CD-G14000 Operation Manual
Page 18
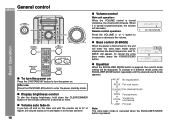
.... REMOTE SENSOR c OPEN/ CLOSE 5 4 3 PRESET 2 1 VOL. TUNING - After use: Press the ON/STAND-BY button to a different mode, press the EQUALIZER MODE button repeatedly until the desired sound mode appears. Remote control operation: Press the VOLUME (+ or -) button to increase or decrease the volume. 0 ..... 30 MAXIMUM Bass control (X-BASS) When the power is first turned on, the unit will enter the extra bass mode which emphasizes the bass frequencies, and "XBASS" will increase. CLASSIC For classical music...
.... REMOTE SENSOR c OPEN/ CLOSE 5 4 3 PRESET 2 1 VOL. TUNING - After use: Press the ON/STAND-BY button to a different mode, press the EQUALIZER MODE button repeatedly until the desired sound mode appears. Remote control operation: Press the VOLUME (+ or -) button to increase or decrease the volume. 0 ..... 30 MAXIMUM Bass control (X-BASS) When the power is first turned on, the unit will enter the extra bass mode which emphasizes the bass frequencies, and "XBASS" will increase. CLASSIC For classical music...
CD-G14000 Operation Manual
Page 20
... a type of audio code which is activated. CD button (main unit and remote control): The unit turns on . Auto power off function: In the stop mode of CD, MP3 or WMA operation, the main unit enters the stand-by significant compression from its actual playback time. Auto power on function: When you press any of the following buttons, the unit turns on and the...
... a type of audio code which is activated. CD button (main unit and remote control): The unit turns on . Auto power off function: In the stop mode of CD, MP3 or WMA operation, the main unit enters the stand-by significant compression from its actual playback time. Auto power on function: When you press any of the following buttons, the unit turns on and the...
CD-G14000 Operation Manual
Page 23
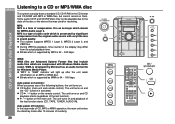
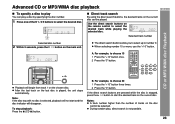
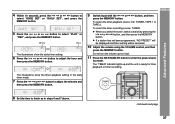
Use the direct search buttons on the chosen disc. The direct search buttons allow you to select up to choose 30 1 Press the "+10" button three times. 2 Press the "0" button. A. For example, to choose 13 1 Press the "+10" button once. 2 Press the "3" button. 5 4 3 2 1 TIMER POWER ON/ STAND-BY CD TAPE TA(1PE (12) 2) TUNER (BAND) PRESET REMOTE SENSOR c OPEN/ CLOSE 5 4 3 PRESET 2 Playback will disappear. Note: If the disc tray...
Use the direct search buttons on the chosen disc. The direct search buttons allow you to select up to choose 30 1 Press the "+10" button three times. 2 Press the "0" button. A. For example, to choose 13 1 Press the "+10" button once. 2 Press the "3" button. 5 4 3 2 1 TIMER POWER ON/ STAND-BY CD TAPE TA(1PE (12) 2) TUNER (BAND) PRESET REMOTE SENSOR c OPEN/ CLOSE 5 4 3 PRESET 2 Playback will disappear. Note: If the disc tray...
CD-G14000 Operation Manual
Page 30
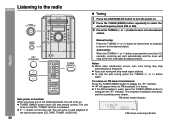
... weak signal stations. Manual tuning: Press the TUNING ( or ) button as many times as required to turn the power on . Auto tuning: When the TUNING ( or ) button is in to extinguish the "ST" indicator. Auto scan tuning will stop the auto tuning, press the TUNING ( or ) button again. TUNER (BAND) button (main unit and remote control): The unit turns on and the "TUNER" function is weak, press the TUNER (BAND) button to the desired station. To receive an FM stereo...
... weak signal stations. Manual tuning: Press the TUNING ( or ) button as many times as required to turn the power on . Auto tuning: When the TUNING ( or ) button is in to extinguish the "ST" indicator. Auto scan tuning will stop the auto tuning, press the TUNING ( or ) button again. TUNER (BAND) button (main unit and remote control): The unit turns on and the "TUNER" function is weak, press the TUNER (BAND) button to the desired station. To receive an FM stereo...
CD-G14000 Operation Manual
Page 31
... power stand-by mode. 2 While pressing down the button and the button, press the TUNER(BAND) button until "TUNER CL" appears. Note: The backup function protects the memorized stations for a few hours should there be erased. Store the stations in memory, in "Tuning" on page 30. 2 Press the MEMORY button to enter the preset tuning saving mode. 3 Within 30 seconds, press the PRESET ( or ) button to select the preset channel number. REMOTE SENSOR c OPEN...
... power stand-by mode. 2 While pressing down the button and the button, press the TUNER(BAND) button until "TUNER CL" appears. Note: The backup function protects the memorized stations for a few hours should there be erased. Store the stations in memory, in "Tuning" on page 30. 2 Press the MEMORY button to enter the preset tuning saving mode. 3 Within 30 seconds, press the PRESET ( or ) button to select the preset channel number. REMOTE SENSOR c OPEN...
CD-G14000 Operation Manual
Page 32
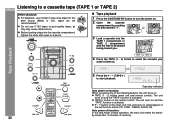
... TAPE (1 2) TUNER (BAND) AUDIO IN PRESET TUNING VOL. PUSH EJECT PLAYBACK (PLAY & STOP) PHONES MUSIC PORT PRESET VOL. CD PRESET TUNING - VOL. 5 4 3 PRESET 2 1 VOL. VOL. Auto power off function: In the stop mode of tape operation, the main unit enters the standby mode after 15 minutes of the last function starts (CD, TAPE, TUNER, AUDIO IN). REMOTE SENSOR c OPEN/ CLOSE 5 4 3 PRESET 2 1 VOL. CD PRESET TUNING - Tape play indicator Auto power on function: When you Tape Playback PLAYBACK (PLAY & STOP) PHONES AUDIO IN...
... TAPE (1 2) TUNER (BAND) AUDIO IN PRESET TUNING VOL. PUSH EJECT PLAYBACK (PLAY & STOP) PHONES MUSIC PORT PRESET VOL. CD PRESET TUNING - VOL. 5 4 3 PRESET 2 1 VOL. VOL. Auto power off function: In the stop mode of tape operation, the main unit enters the standby mode after 15 minutes of the last function starts (CD, TAPE, TUNER, AUDIO IN). REMOTE SENSOR c OPEN/ CLOSE 5 4 3 PRESET 2 1 VOL. CD PRESET TUNING - Tape play indicator Auto power on function: When you Tape Playback PLAYBACK (PLAY & STOP) PHONES AUDIO IN...
CD-G14000 Operation Manual
Page 36
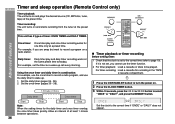
... the correct time (refer to record a program on a radio station. Timer and sleep operation (Remote Control only) CD-G14000 Timer playback: The unit turns on and plays the desired source (CD, MP3 disc, tuner, tape) at least 1 minute between operations. 36 Set the clock to the correct time if "ONCE" or "DAILY" does not appear. Using the once timer and daily timer in the...
... the correct time (refer to record a program on a radio station. Timer and sleep operation (Remote Control only) CD-G14000 Timer playback: The unit turns on and plays the desired source (CD, MP3 disc, tuner, tape) at least 1 minute between operations. 36 Set the clock to the correct time if "ONCE" or "DAILY" does not appear. Using the once timer and daily timer in the...
CD-G14000 Operation Manual
Page 37
... enter the power stand- When you select the tuner, select a station by mode. Do not turn the volume up and the unit is ready for timer playback or timer recording. REMOTE SENSOR c OPEN/ CLOSE 5 4 3 PRESET 2 1 VOL. TUNING Continuceodnttionutheed nneexxtt ppaaggee 37 button, and then To select the timer playback source: CD, TUNER, TAPE 1 or TAPE 2. If a station has not been programmed, "NO PRESET" will be displayed and timer setting will be...
... enter the power stand- When you select the tuner, select a station by mode. Do not turn the volume up and the unit is ready for timer playback or timer recording. REMOTE SENSOR c OPEN/ CLOSE 5 4 3 PRESET 2 1 VOL. TUNING Continuceodnttionutheed nneexxtt ppaaggee 37 button, and then To select the timer playback source: CD, TUNER, TAPE 1 or TAPE 2. If a station has not been programmed, "NO PRESET" will be displayed and timer setting will be...
CD-G14000 Operation Manual
Page 41
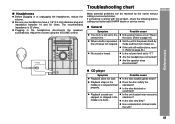
... on. Be sure your authorized SHARP dealer or service center. Are the headphones connected? Adjust the volume using the VOLUME control. 5 4 3 2 1 TIMER POWER ON/ STAND-BY CD TAPE (1 2) TUNER (BAND) AUDIO IN PRESET TUNING VOL. Reset the clock. (Refer to page 19.) Set the unit to the power stand-by the owner without calling a service technician. References PLAYBACK (PLAY & STOP) PHONES AUDIO IN RECORD/PLAYBACK CD player Symptom Playback does not start...
... on. Be sure your authorized SHARP dealer or service center. Are the headphones connected? Adjust the volume using the VOLUME control. 5 4 3 2 1 TIMER POWER ON/ STAND-BY CD TAPE (1 2) TUNER (BAND) AUDIO IN PRESET TUNING VOL. Reset the clock. (Refer to page 19.) Set the unit to the power stand-by the owner without calling a service technician. References PLAYBACK (PLAY & STOP) PHONES AUDIO IN RECORD/PLAYBACK CD player Symptom Playback does not start...
CD-G14000 Operation Manual
Page 42
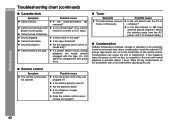
... AC power cord if it a normal tape? (You cannot record on the remote control. Cannot record tracks with great force. Is the FM antenna or AM loop antenna placed properly? Possible cause Is the erase-prevention tab removed? Condensation can cause the unit to malfunction. Troubleshooting chart (continued) CD-G14000 Cassette deck Symptom Cannot record. Tuner Symptom The radio makes unusual...
... AC power cord if it a normal tape? (You cannot record on the remote control. Cannot record tracks with great force. Is the FM antenna or AM loop antenna placed properly? Possible cause Is the erase-prevention tab removed? Condensation can cause the unit to malfunction. Troubleshooting chart (continued) CD-G14000 Cassette deck Symptom Cannot record. Tuner Symptom The radio makes unusual...
CD-G14000 Operation Manual
Page 43
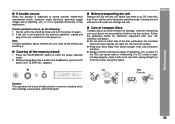
... button, press the CD button until "CLEAR ALL" appears. Then, set the unit to the stand-by mode. Keep your CD collection and player. References NO YES CD Correct Caution: This operation will erase all the memory by resetting it is not restored in the previous operation, unplug and plug in the unit, and then turn the power on. If such a problem...
... button, press the CD button until "CLEAR ALL" appears. Then, set the unit to the stand-by mode. Keep your CD collection and player. References NO YES CD Correct Caution: This operation will erase all the memory by resetting it is not restored in the previous operation, unplug and plug in the unit, and then turn the power on. If such a problem...


