
CV-P10RC Operation Manual
Page 3
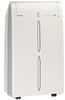
...Sharp Plaza, Mahwah, New Jersey 07495-1163 TEL: 1-800-BE-SHARP E-1 Responsible Party: SHARP ELECTRONICS CORPORATION. CONTENTS • FOR CUSTOMER ASSISTANCE (U.S E-2 • CONSUMER LIMITED WARRANTY (U.S E-3 • PRECAUTIONS E-4 • LOCATION E-7 • INCLUDED E-7 • PART NAMES E-8 • INSTALL WINDOW PANEL E-10 • INSTALLATION AND REMOVAL... • MAINTENANCE E-28 • BEFORE CALLING FOR SERVICE E-29 Declaration of Conformity SHARP ROOM AIR CONDITIONER CV-P10RC This device complies with Part 18 of your new air conditioner. ENGLISH ENGLISH This manual...
...Sharp Plaza, Mahwah, New Jersey 07495-1163 TEL: 1-800-BE-SHARP E-1 Responsible Party: SHARP ELECTRONICS CORPORATION. CONTENTS • FOR CUSTOMER ASSISTANCE (U.S E-2 • CONSUMER LIMITED WARRANTY (U.S E-3 • PRECAUTIONS E-4 • LOCATION E-7 • INCLUDED E-7 • PART NAMES E-8 • INSTALL WINDOW PANEL E-10 • INSTALLATION AND REMOVAL... • MAINTENANCE E-28 • BEFORE CALLING FOR SERVICE E-29 Declaration of Conformity SHARP ROOM AIR CONDITIONER CV-P10RC This device complies with Part 18 of your new air conditioner. ENGLISH ENGLISH This manual...

CV-P10RC Operation Manual
Page 7
... can cause electrical shock or equipment damage. • Drainage should be reduced or stop completely. Cooling performance may spill out while being moved. • Remove the window panel in through the openings. • To ensure proper drainage, the drainage hose must have no kinks or be on a different level during use of... electric shock. Water can result in the tank, it may be performed whenever moving the air conditioner. (See Page 27) If any circumstances cut or remove the round grounding pin from this plug.
... can cause electrical shock or equipment damage. • Drainage should be reduced or stop completely. Cooling performance may spill out while being moved. • Remove the window panel in through the openings. • To ensure proper drainage, the drainage hose must have no kinks or be on a different level during use of... electric shock. Water can result in the tank, it may be performed whenever moving the air conditioner. (See Page 27) If any circumstances cut or remove the round grounding pin from this plug.

CV-P10RC Operation Manual
Page 12
..., as indicated in the diagram. "A" Side "A" will now be unable to shut the exhaust cover. (1) Remove the adjustment panel from the window panel, and cut the window panel to the same width as indicated in the diagram. INSTALL WINDOW PANEL Installation in a double-hung sash window (See page 12 for installation in a sliding sash window...
..., as indicated in the diagram. "A" Side "A" will now be unable to shut the exhaust cover. (1) Remove the adjustment panel from the window panel, and cut the window panel to the same width as indicated in the diagram. INSTALL WINDOW PANEL Installation in a double-hung sash window (See page 12 for installation in a sliding sash window...

CV-P10RC Operation Manual
Page 14
... the window frame with 2 screws. Side "A" will now be unable to shut the exhaust cover. (1) Remove the adjustment panel from the window panel, and cut the window panel to the insect guard net. If the inner height of the window is installed in a double-hung window.) 1 Connect the rain guards to the... in the window. Projection 3 Cut the foam seal A (adhesive type) to the proper length and attach it to the window frame. 4 Install the window panel into the holes in windows less than 22" (559mm) high, as indicated in the diagram, when it is between 22" (559mm) and 24" (609mm)...
... the window frame with 2 screws. Side "A" will now be unable to shut the exhaust cover. (1) Remove the adjustment panel from the window panel, and cut the window panel to the insect guard net. If the inner height of the window is installed in a double-hung window.) 1 Connect the rain guards to the... in the window. Projection 3 Cut the foam seal A (adhesive type) to the proper length and attach it to the window frame. 4 Install the window panel into the holes in windows less than 22" (559mm) high, as indicated in the diagram, when it is between 22" (559mm) and 24" (609mm)...
CV-P10RC Operation Manual
Page 16
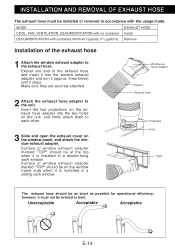
...adapter into the window exhaust adapter, and turn it stops. however, it must be installed or removed in a sliding sash window. Unacceptable Acceptable Acceptable E-14 INSTALLATION AND REMOVAL OF EXHAUST HOSE The exhaust hose must not be as short as possible for operational effi... the window frame side when it is installed in accordance with container(minimum capacity 31/2 gallons) Remove Installation of window exhaust adapter marked "TOP" should be on the window panel, and attach the window exhaust adapter. Make sure they are securely attached. 2 Attach the exhaust...
...adapter into the window exhaust adapter, and turn it stops. however, it must be installed or removed in a sliding sash window. Unacceptable Acceptable Acceptable E-14 INSTALLATION AND REMOVAL OF EXHAUST HOSE The exhaust hose must not be as short as possible for operational effi... the window frame side when it is installed in accordance with container(minimum capacity 31/2 gallons) Remove Installation of window exhaust adapter marked "TOP" should be on the window panel, and attach the window exhaust adapter. Make sure they are securely attached. 2 Attach the exhaust...
CV-P10RC Operation Manual
Page 17
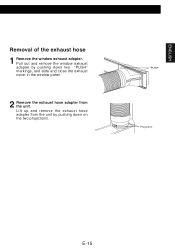
Pull out and remove the window exhaust adapter by pushing down two "PUSH" markings, and slide and close the exhaust cover in the window panel. 2 Remove the exhaust hose adapter from the unit. "PUSH" Projection E-15 ENGLISH Removal of the exhaust hose 1 Remove the window exhaust adapter. Lift up and remove the exhaust hose adapter from the unit by pushing down on the two projections.
Pull out and remove the window exhaust adapter by pushing down two "PUSH" markings, and slide and close the exhaust cover in the window panel. 2 Remove the exhaust hose adapter from the unit. "PUSH" Projection E-15 ENGLISH Removal of the exhaust hose 1 Remove the window exhaust adapter. Lift up and remove the exhaust hose adapter from the unit by pushing down on the two projections.

CV-P10RC Operation Manual
Page 30
...The cooling performance may result in the FAN or VENTILATION mode for a long time"). 2 Operate the unit in serious damage to the unit. Periodically remove the window exhaust adapter from the wall socket before reinstalling them. 3 REINSTALL THE FILTERS • Hold the filter handle and gently push the... filter back into place. MAINTENANCE Be sure to disconnect the power from the window panel and clean the insect guard net with dust, the airflow will be cleaned every two weeks. CLEANING THE FILTERS If the fi...
...The cooling performance may result in the FAN or VENTILATION mode for a long time"). 2 Operate the unit in serious damage to the unit. Periodically remove the window exhaust adapter from the wall socket before reinstalling them. 3 REINSTALL THE FILTERS • Hold the filter handle and gently push the... filter back into place. MAINTENANCE Be sure to disconnect the power from the window panel and clean the insect guard net with dust, the airflow will be cleaned every two weeks. CLEANING THE FILTERS If the fi...


