
User Manual
Page 3
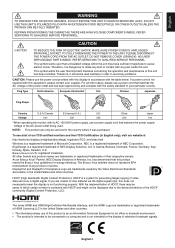
... the safety standard of the AC power outlet being used. English-1 REFER SERVICING TO QUALIFIED SERVICE PERSONNEL. DO NOT REMOVE COVER (OR BACK). Plug Type North America European Continental U.K. Chinese Japanese Plug Shape Country U.S.A./Canada EU (except U.K.) U.K. CAUTION CAUTION: TO REDUCE THE RISK OF ELECTRIC SHOCK, MAKE SURE POWER CORD IS UNPLUGGED FROM WALL SOCKET. HDCP (High-bandwidth Digital Content Protection): HDCP is a registered...
... the safety standard of the AC power outlet being used. English-1 REFER SERVICING TO QUALIFIED SERVICE PERSONNEL. DO NOT REMOVE COVER (OR BACK). Plug Type North America European Continental U.K. Chinese Japanese Plug Shape Country U.S.A./Canada EU (except U.K.) U.K. CAUTION CAUTION: TO REDUCE THE RISK OF ELECTRIC SHOCK, MAKE SURE POWER CORD IS UNPLUGGED FROM WALL SOCKET. HDCP (High-bandwidth Digital Content Protection): HDCP is a registered...
User Manual
Page 4
... attached specified cables with radio and television reception. (1) The power supply cord you use the supplied shielded video signal cable. This equipment has been tested and found to comply with the limits for a Class B digital device, pursuant to part 15 of Product: Display Monitor Equipment Classification: Class B Peripheral Model: MultiSync EA224WMi (L221VD/EA224WMi/EA224WMi-BK) MultiSync EA234WMi (L232QA/EA234WMi/EA234WMi-BK) We hereby declare that to which...
... attached specified cables with radio and television reception. (1) The power supply cord you use the supplied shielded video signal cable. This equipment has been tested and found to comply with the limits for a Class B digital device, pursuant to part 15 of Product: Display Monitor Equipment Classification: Class B Peripheral Model: MultiSync EA224WMi (L221VD/EA224WMi/EA224WMi-BK) MultiSync EA234WMi (L232QA/EA234WMi/EA234WMi-BK) We hereby declare that to which...
User Manual
Page 5
... touch LCD panel surface while transporting, mounting and setting. Refer all personal display devices, NEC DISPLAY SOLUTIONS recommends using a moving screen saver at regular intervals whenever the screen is broken, do not use the monitor outdoors. • Do not bend power cord. • Do not use Safety Precautions and Maintenance FOR OPTIMUM PERFORMANCE, PLEASE NOTE THE FOLLOWING WHEN SETTING UP AND USING THE LCD COLOR MONITOR: • DO NOT OPEN THE MONITOR...
... touch LCD panel surface while transporting, mounting and setting. Refer all personal display devices, NEC DISPLAY SOLUTIONS recommends using a moving screen saver at regular intervals whenever the screen is broken, do not use the monitor outdoors. • Do not bend power cord. • Do not use Safety Precautions and Maintenance FOR OPTIMUM PERFORMANCE, PLEASE NOTE THE FOLLOWING WHEN SETTING UP AND USING THE LCD COLOR MONITOR: • DO NOT OPEN THE MONITOR...
User Manual
Page 6
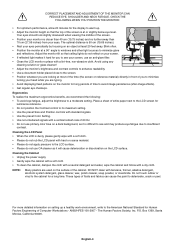
... monitor at least 20 feet away. Adjust the monitor tilt so that the top of you to minimize turning your eyes. Do not touch rubber or vinyl to a moderate setting. ANSI/HFES 100-2007 - Box 1369, Santa Monica, California 90406. English-4 The optimal distance is dusty, please gently wipe with a soft cloth. • Please do not rub the LCD panel with a vertical refresh rate...
... monitor at least 20 feet away. Adjust the monitor tilt so that the top of you to minimize turning your eyes. Do not touch rubber or vinyl to a moderate setting. ANSI/HFES 100-2007 - Box 1369, Santa Monica, California 90406. English-4 The optimal distance is dusty, please gently wipe with a soft cloth. • Please do not rub the LCD panel with a vertical refresh rate...
User Manual
Page 7
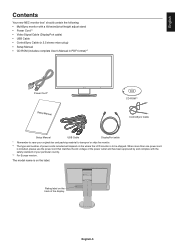
... by and complies with a tilt/swivel/pivot/height adjust stand • Power Cord*1 • Video Signal Cable (DisplayPort cable) • USB Cable • ControlSync Cable (ø 2.5 stereo micro plug) • Setup Manual • CD-ROM (includes complete User's Manual in PDF format)*2 Power Cord*1 Setup Manual CD-ROM*2 ControlSync Cable Setup Manual USB Cable DisplayPort cable * Remember to save your particular country. *2 For Europe version. English Contents Your new NEC monitor box* should contain the following: • MultiSync monitor with the safety standard of...
... by and complies with a tilt/swivel/pivot/height adjust stand • Power Cord*1 • Video Signal Cable (DisplayPort cable) • USB Cable • ControlSync Cable (ø 2.5 stereo micro plug) • Setup Manual • CD-ROM (includes complete User's Manual in PDF format)*2 Power Cord*1 Setup Manual CD-ROM*2 ControlSync Cable Setup Manual USB Cable DisplayPort cable * Remember to save your particular country. *2 For Europe version. English Contents Your new NEC monitor box* should contain the following: • MultiSync monitor with the safety standard of...
User Manual
Page 8
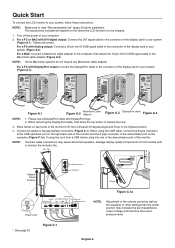
... a MAC: Connect a Macintosh cable adapter to the computer, then attach the 15-pin mini D-SUB signal cable to other settings than the center position may cause abnormal operation, damage display quality/components of LCD module and/ or shorten the module's life. 30° Tilt A Type A Type Highest Stand Position USB Downstream Headphone B Type B Type Audio Input D-SUB ControlSync IN/OUT* USB Upstream DisplayPort DVI HDMI USB Downstream Power cord Figure C.1a NOTE: Adjustment...
... a MAC: Connect a Macintosh cable adapter to the computer, then attach the 15-pin mini D-SUB signal cable to other settings than the center position may cause abnormal operation, damage display quality/components of LCD module and/ or shorten the module's life. 30° Tilt A Type A Type Highest Stand Position USB Downstream Headphone B Type B Type Audio Input D-SUB ControlSync IN/OUT* USB Upstream DisplayPort DVI HDMI USB Downstream Power cord Figure C.1a NOTE: Adjustment...
User Manual
Page 9
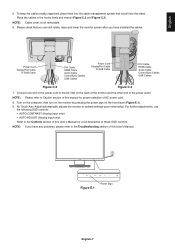
... section of these OSD controls. Turn on the computer, then turn on the monitor by pressing the power sign on the back of AC power cord. 8. Figure E.1 Power Sign English-7 Please check that is not removable. 6. NOTE: If you have any problems, please refer to Caution section of this User's Manual. Power Cord DisplayPort Cable D-SUB Cable DVI Cable HDMI Cable Audio Cable ControlSync Cables USB Cables Power Cord DisplayPort Cable D-SUB Cable DVI Cable HDMI Cable Audio Cable ControlSync Cables USB Cables Figure C.2 Figure C.3 7. To keep the cables neatly organized...
... section of these OSD controls. Turn on the computer, then turn on the monitor by pressing the power sign on the back of AC power cord. 8. Figure E.1 Power Sign English-7 Please check that is not removable. 6. NOTE: If you have any problems, please refer to Caution section of this User's Manual. Power Cord DisplayPort Cable D-SUB Cable DVI Cable HDMI Cable Audio Cable ControlSync Cables USB Cables Power Cord DisplayPort Cable D-SUB Cable DVI Cable HDMI Cable Audio Cable ControlSync Cables USB Cables Figure C.2 Figure C.3 7. To keep the cables neatly organized...
User Manual
Page 11
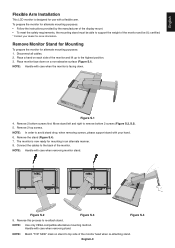
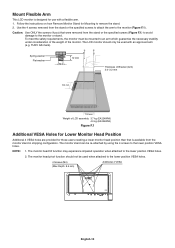
... now ready for alternate mounting purposes: 1. Connect the cables to the highest position. 3. Place a hand on a non-abrasive surface (Figure S.1). Disconnect all cables. 2. Remove 2 bottom screws first: Move stand left and right to support the weight of the display mount. • To meet the safety requirements, the mounting stand must be able to remove bottom 2 screws (Figure S.2, S.3). 5. English Flexible Arm Installation This LCD monitor is designed for more...
... now ready for alternate mounting purposes: 1. Connect the cables to the highest position. 3. Place a hand on a non-abrasive surface (Figure S.1). Disconnect all cables. 2. Remove 2 bottom screws first: Move stand left and right to support the weight of the display mount. • To meet the safety requirements, the mounting stand must be able to remove bottom 2 screws (Figure S.2, S.3). 5. English Flexible Arm Installation This LCD monitor is designed for more...
User Manual
Page 12
... the instructions on how Remove Monitor Stand for those users needing a lower monitor head position than that were removed from the stand or the specified screws to attach the arm to the monitor (Figure F.1). TUEV GS mark). The monitor head tilt function may experience impaired operation when attached to the lower position VESA holes. 4 Screws (M4) (Max Depth: 8.5 mm) Additional 4 VESA English-10 Spring washer Flat washer 12...
... the instructions on how Remove Monitor Stand for those users needing a lower monitor head position than that were removed from the stand or the specified screws to attach the arm to the monitor (Figure F.1). TUEV GS mark). The monitor head tilt function may experience impaired operation when attached to the lower position VESA holes. 4 Screws (M4) (Max Depth: 8.5 mm) Additional 4 VESA English-10 Spring washer Flat washer 12...
User Manual
Page 13
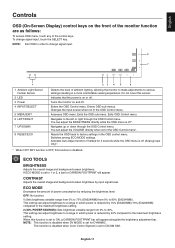
... the OSD Control menu. English-11 You can adjust brightness to a range in order to 40%. Switches among ECO MODE settings. ECO MODE Decreases the amount of power consumption by input signal level. OFF: No function. 1: Sets brightness variable range from 0% to 70% (EA224WMi)/from 0% to change signal input, touch the SELECT key. Turns the monitor on or off . Changes the input source when not in the OSD control menu. ECO TOOLS BRIGHTNESS Adjusts the overall image and background screen brightness. This setting can adjust the VOLUME directly...
... the OSD Control menu. English-11 You can adjust brightness to a range in order to 40%. Switches among ECO MODE settings. ECO MODE Decreases the amount of power consumption by input signal level. OFF: No function. 1: Sets brightness variable range from 0% to 70% (EA224WMi)/from 0% to change signal input, touch the SELECT key. Turns the monitor on or off . Changes the input source when not in the OSD control menu. ECO TOOLS BRIGHTNESS Adjusts the overall image and background screen brightness. This setting can adjust the VOLUME directly...
User Manual
Page 14
... time, the monitor shifts to low brightness mode automatically to reduce the power consumption. START TIME (OFF MODE SETTING) Adjusts the wait time to enter into power saving mode automatically when the input signal is no person after a period of surrounding light falls below the level determined by you to select from the power saving mode and displays the images. The OFF MODE has two settings: STANDARD: Monitor enters into to work. When...
... time, the monitor shifts to low brightness mode automatically to reduce the power consumption. START TIME (OFF MODE SETTING) Adjusts the wait time to enter into power saving mode automatically when the input signal is no person after a period of surrounding light falls below the level determined by you to select from the power saving mode and displays the images. The OFF MODE has two settings: STANDARD: Monitor enters into to work. When...
User Manual
Page 15
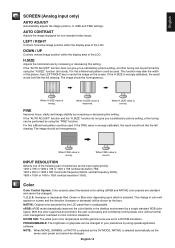
.... English SCREEN (Analog input only) AUTO ADJUST Automatically adjusts the image position, H. H.SIZE Adjusts the horizontal size by using the "FINE" function. Use LEFT/RIGHT key to a DICOM simulation. When H.SIZE value is selected. If the "AUTO ADJUST" function and the "H.SIZE" function do not give you a satisfactory picture setting, a fine tuning can be changed ). 1, 2, 3, 5: Increases or decreases Red, Green or Blue color depending upon which is wrong. Color Color Control System: Color presets select the desired color setting (sRGB and NATIVE color...
.... English SCREEN (Analog input only) AUTO ADJUST Automatically adjusts the image position, H. H.SIZE Adjusts the horizontal size by using the "FINE" function. Use LEFT/RIGHT key to a DICOM simulation. When H.SIZE value is selected. If the "AUTO ADJUST" function and the "H.SIZE" function do not give you a satisfactory picture setting, a fine tuning can be changed ). 1, 2, 3, 5: Increases or decreases Red, Green or Blue color depending upon which is wrong. Color Color Control System: Color presets select the desired color setting (sRGB and NATIVE color...
User Manual
Page 16
... power-down when you to reset all OSD control functions except for other video input port unless it is expanded without changing the aspect ratio. You can adjust the blue LED brightness. VIDEO LEVEL (HDMI input only) NORMAL: Disables the expanded feature. The whole image is present. DDC/CI This function allows the DDC/CI function ON or OFF. To activate the OSD Lock Out function, enter the OSD menu, select OSD LOCK...
... power-down when you to reset all OSD control functions except for other video input port unless it is expanded without changing the aspect ratio. You can adjust the blue LED brightness. VIDEO LEVEL (HDMI input only) NORMAL: Disables the expanded feature. The whole image is present. DDC/CI This function allows the DDC/CI function ON or OFF. To activate the OSD Lock Out function, enter the OSD menu, select OSD LOCK...
User Manual
Page 17
... initial setting is based on screen when the OSD control menu is default). If you select "OFF", monitor doesn't display "HUMAN SENSOR ON" message. You can toggle among ECO settings. Please check receipt of OECD (2007 Edition). The Left/Right key adjusts the brightness level. SENSOR INFORMATION If you select "ON", monitor displays "VIDEO INPUT MENU" after changing the input. A "PROCEEDING..." To restore settings: Hold "MENU" for 3 seconds or more while the OSD menu...
... initial setting is based on screen when the OSD control menu is default). If you select "OFF", monitor doesn't display "HUMAN SENSOR ON" message. You can toggle among ECO settings. Please check receipt of OECD (2007 Edition). The Left/Right key adjusts the brightness level. SENSOR INFORMATION If you select "ON", monitor displays "VIDEO INPUT MENU" after changing the input. A "PROCEEDING..." To restore settings: Hold "MENU" for 3 seconds or more while the OSD menu...
User Manual
Page 19
... Micro jack 2.5 φ Power Supply AC 100-240 V ~ 50/60 Hz Current Rating 0.75 - 0.40 A (with Standard V1.2, applicable to HDCP DVI: DVI-D 24pin: Digital RGB DVI (HDCP) VGA: 15pin Mini D-sub: Analog RGB Sync 0.7 Vp-p/75 ohm Separate sync.TTL level Positive/Negative Composite sync.TTL level Positive/Negative Sync on Green (Video 0.7 Vp-p and Sync Negative 0.3 Vp-p) HDMI: HDMI Connector: Digital YUV Digital RGB HDMI Display Colours 16,777,216 Depends on the screen is normal and...
... Micro jack 2.5 φ Power Supply AC 100-240 V ~ 50/60 Hz Current Rating 0.75 - 0.40 A (with Standard V1.2, applicable to HDCP DVI: DVI-D 24pin: Digital RGB DVI (HDCP) VGA: 15pin Mini D-sub: Analog RGB Sync 0.7 Vp-p/75 ohm Separate sync.TTL level Positive/Negative Composite sync.TTL level Positive/Negative Sync on Green (Video 0.7 Vp-p and Sync Negative 0.3 Vp-p) HDMI: HDMI Connector: Digital YUV Digital RGB HDMI Display Colours 16,777,216 Depends on the screen is normal and...
User Manual
Page 20
... x 1050*1 at panel technologies, each dot on display card used. English-18 This is actually one pixel, so to expand resolutions to 12,192 m *1 Interpolated Resolutions: When resolutions are shown that are subject to HDCP DVI: DVI-D 24pin: Digital RGB DVI (HDCP) VGA: 15pin Mini D-sub: Analog RGB Sync 0.7 Vp-p/75 ohm Separate sync.TTL level Positive/Negative Composite sync.TTL level Positive/Negative Sync on Green (Video 0.7 Vp-p and Sync Negative 0.3 Vp-p) HDMI: HDMI Connector: Digital YUV Digital RGB HDMI Display Colours 16...
... x 1050*1 at panel technologies, each dot on display card used. English-18 This is actually one pixel, so to expand resolutions to 12,192 m *1 Interpolated Resolutions: When resolutions are shown that are subject to HDCP DVI: DVI-D 24pin: Digital RGB DVI (HDCP) VGA: 15pin Mini D-sub: Analog RGB Sync 0.7 Vp-p/75 ohm Separate sync.TTL level Positive/Negative Composite sync.TTL level Positive/Negative Sync on Green (Video 0.7 Vp-p and Sync Negative 0.3 Vp-p) HDMI: HDMI Connector: Digital YUV Digital RGB HDMI Display Colours 16...
User Manual
Page 21
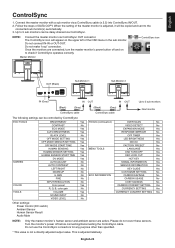
... be the future-ready and scalable solution for optimal color representation and backward compatibility with the Windows® operating system facilitates setup and installation by connecting the ControlSync cable. No Touch Auto Adjust (Analog input only): Automatically adjusts the monitor to the display card's scanning frequency, thus displaying the resolution required. The sRGB, which certain content is based on computer displays and other common color standards. With the implementation of HDCP, there may...
... be the future-ready and scalable solution for optimal color representation and backward compatibility with the Windows® operating system facilitates setup and installation by connecting the ControlSync cable. No Touch Auto Adjust (Analog input only): Automatically adjusts the monitor to the display card's scanning frequency, thus displaying the resolution required. The sRGB, which certain content is based on computer displays and other common color standards. With the implementation of HDCP, there may...
User Manual
Page 22
... being used . (Please consult display card or system manual to change graphics mode.) • Check the monitor and your display card with respect to compatibility and recommended signal timings. • If your display card with respect to compatibility and recommended settings. • Check the signal cable connector for bent or pushed-in pins. • Check the signal input, "DVI-D", "DISPLAYPORT", "HDMI" or "D-SUB". • If the front LED is dark blue, check the status of time should be turned...
... being used . (Please consult display card or system manual to change graphics mode.) • Check the monitor and your display card with respect to compatibility and recommended signal timings. • If your display card with respect to compatibility and recommended settings. • Check the signal cable connector for bent or pushed-in pins. • Check the signal input, "DVI-D", "DISPLAYPORT", "HDMI" or "D-SUB". • If the front LED is dark blue, check the status of time should be turned...
User Manual
Page 23
... the OSD menu. • Check selected OSD's Tools to "SOUND INPUT", when DisplayPort or HDMI is set to 5 sub monitors via ControlSync. No Sound • Make sure the speaker cable is proper connected. • Check to see if mute is activated. • Check the VOLUME in use up to DYNAMIC, the monitor automatically adjusts brightness. Brightness variations over time • Change AUTO BRIGHTNESS to OFF and adjust brightness. • Change DV MODE to your USB devise User's Manual. ControlSync does not work •...
... the OSD menu. • Check selected OSD's Tools to "SOUND INPUT", when DisplayPort or HDMI is set to 5 sub monitors via ControlSync. No Sound • Make sure the speaker cable is proper connected. • Check to see if mute is activated. • Check the VOLUME in use up to DYNAMIC, the monitor automatically adjusts brightness. Brightness variations over time • Change AUTO BRIGHTNESS to OFF and adjust brightness. • Change DV MODE to your USB devise User's Manual. ControlSync does not work •...
User Manual
Page 25
... R, G, B, color gain No VOLUME Yes SOUND INPUT No VIDEO LEVEL No Other settings: Power Control (DC switch) Ambient Sensor Human Sensor Result Audio Mute TOOLS (continuation) OVER SCAN No VIDEO DETECT No EXPANSION MODE Yes RESPONSE IMPROVE No OFF TIMER Yes LED BRIGHTNESS Yes DDC/CI Yes FACTORY PRESET No MENU TOOLS LANGUAGE Yes OSD TURN OFF Yes OSD LOCK OUT Yes HOT KEY Yes SIGNAL INFORMATION Yes SENSOR INFORMATION Yes KEY GUIDE...
... R, G, B, color gain No VOLUME Yes SOUND INPUT No VIDEO LEVEL No Other settings: Power Control (DC switch) Ambient Sensor Human Sensor Result Audio Mute TOOLS (continuation) OVER SCAN No VIDEO DETECT No EXPANSION MODE Yes RESPONSE IMPROVE No OFF TIMER Yes LED BRIGHTNESS Yes DDC/CI Yes FACTORY PRESET No MENU TOOLS LANGUAGE Yes OSD TURN OFF Yes OSD LOCK OUT Yes HOT KEY Yes SIGNAL INFORMATION Yes SENSOR INFORMATION Yes KEY GUIDE...


