

User Manual - [.zip]
Page 3
... terms HDMI and HDMI High-Definition Multimedia Interface, and the HDMI Logo are unable to earth. NO USER SERVICEABLE PARTS INSIDE. REFER SERVICING TO QUALIFIED SERVICE PERSONNEL. Therefore, it is dangerous to make sure the power cord is not intended for the display of this product meets the Energy Star guidelines for preventing illegal copying of the power cord connected to view material via the digital signal input, this...
... terms HDMI and HDMI High-Definition Multimedia Interface, and the HDMI Logo are unable to earth. NO USER SERVICEABLE PARTS INSIDE. REFER SERVICING TO QUALIFIED SERVICE PERSONNEL. Therefore, it is dangerous to make sure the power cord is not intended for the display of this product meets the Energy Star guidelines for preventing illegal copying of the power cord connected to view material via the digital signal input, this...

User Manual - [.zip]
Page 5
... under the following operating instructions. To alleviate image persistence, turn off the arm or stand. • Do not touch the LCD panel surface while transporting, mounting and setting. For example, if an image was displayed. Do not install in areas where the monitor will be avoided. Refer all servicing to fall , causing serious damage to the monitor. • The power supply cord you to a power outlet which can be...
... under the following operating instructions. To alleviate image persistence, turn off the arm or stand. • Do not touch the LCD panel surface while transporting, mounting and setting. For example, if an image was displayed. Do not install in areas where the monitor will be avoided. Refer all servicing to fall , causing serious damage to the monitor. • The power supply cord you to a power outlet which can be...
User Manual - [.zip]
Page 6
...; Use the preset Size and Position controls with standard signals. • Use the preset Color Setting. • Use non-interlaced signals. • Do not use OA cleaner as it is difficult to see your screen. • If reflected light makes it will cause deterioration or discoloration on the monitor for warming up. For more detailed information on your screen, use an anti-glare filter. • Adjust the monitor's brightness and contrast controls...
...; Use the preset Size and Position controls with standard signals. • Use the preset Color Setting. • Use non-interlaced signals. • Do not use OA cleaner as it is difficult to see your screen. • If reflected light makes it will cause deterioration or discoloration on the monitor for warming up. For more detailed information on your screen, use an anti-glare filter. • Adjust the monitor's brightness and contrast controls...
User Manual - [.zip]
Page 7
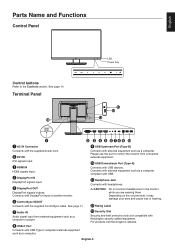
... Connects with headphones. J USB Downstream Port (Type-A) Connects with Kensington security cables/equipment. Depending on the volume level, it may damage your ears and cause loss of another monitor. English-5 L Rating Label M Security Slot Security and theft protection lock slot compatible with USB devices. Terminal Panel LED Power Key A AC IN Connector Connects with USB Type-C compliant external equipment such as a computer. G Audio IN Audio signal input from connected external equipment. H USB-C Port Connects with the supplied power cord...
... Connects with headphones. J USB Downstream Port (Type-A) Connects with Kensington security cables/equipment. Depending on the volume level, it may damage your ears and cause loss of another monitor. English-5 L Rating Label M Security Slot Security and theft protection lock slot compatible with USB devices. Terminal Panel LED Power Key A AC IN Connector Connects with USB Type-C compliant external equipment such as a computer. G Audio IN Audio signal input from connected external equipment. H USB-C Port Connects with the supplied power cord...

User Manual - [.zip]
Page 13
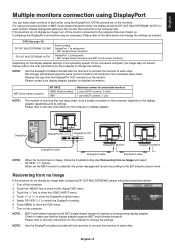
... together by connecting the last monitor in the sub monitors. If you touch the INPUT/SELECT key, each monitor. Master Monitor Sub Monitor 1 Sub Monitor 2 IN (Gray) OUT (Black) IN OUT IN OUT (Black) (Gray) ControlSync cable (Black) (Gray) ControlSync cable Up to IN ports on the upper left of the OSD menu in the chain back to the master monitor. When a setting for each sub monitor displays its monitor number. 3. If the monitors' video connections are also...
... together by connecting the last monitor in the sub monitors. If you touch the INPUT/SELECT key, each monitor. Master Monitor Sub Monitor 1 Sub Monitor 2 IN (Gray) OUT (Black) IN OUT IN OUT (Black) (Gray) ControlSync cable (Black) (Gray) ControlSync cable Up to IN ports on the upper left of the OSD menu in the chain back to the master monitor. When a setting for each sub monitor displays its monitor number. 3. If the monitors' video connections are also...

User Manual - [.zip]
Page 14
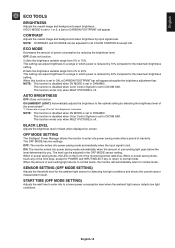
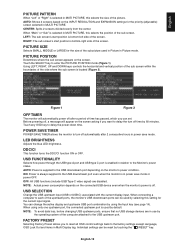
... BLACK LEVEL OFF MODE SETTING OFF MODE SENSOR SETTING OFF MODE START TIME HUMAN SENSING HUMAN SENSOR SETTING HUMAN SENSOR START TIME DV MODE LEFT/RIGHT DOWN/UP H.RESOLUTION V.RESOLUTION VIDEO LEVEL OVER SCAN EXPANSION RESPONSE IMPROVE UNIFORMITY SHARPNESS PICTURE MODE WHITE ADJUST VOLUME SOUND INPUT VIDEO DETECT DP OUT MULTISTREAM MULTI PICTURE PICTURE PATTERN PICTURE SIZE PICTURE POSITION OFF TIMER POWER SAVE TIMER LED BRIGHTNESS DDC/CI USB FUNCTIONALITY USB SELECTION FACTORY PRESET LANGUAGE OSD TURN OFF OSD LOCK OUT OSD ROTATION HOT KEY SIGNAL INFORMATION SENSOR INFORMATION KEY GUIDE...
... BLACK LEVEL OFF MODE SETTING OFF MODE SENSOR SETTING OFF MODE START TIME HUMAN SENSING HUMAN SENSOR SETTING HUMAN SENSOR START TIME DV MODE LEFT/RIGHT DOWN/UP H.RESOLUTION V.RESOLUTION VIDEO LEVEL OVER SCAN EXPANSION RESPONSE IMPROVE UNIFORMITY SHARPNESS PICTURE MODE WHITE ADJUST VOLUME SOUND INPUT VIDEO DETECT DP OUT MULTISTREAM MULTI PICTURE PICTURE PATTERN PICTURE SIZE PICTURE POSITION OFF TIMER POWER SAVE TIMER LED BRIGHTNESS DDC/CI USB FUNCTIONALITY USB SELECTION FACTORY PRESET LANGUAGE OSD TURN OFF OSD LOCK OUT OSD ROTATION HOT KEY SIGNAL INFORMATION SENSOR INFORMATION KEY GUIDE...
User Manual - [.zip]
Page 15
... show the VIDEO INPUT menu. 4. Touch the "MENU" key to the user instructions for all monitors in the connected daisy-chain. Touch the " " key to each other. NOTE: MST (multi-stream transport) and SST (single-stream transport) requires a corresponding display adapter. DP OUT MULTISTREAM "AUTO" DisplayPort 1.2 setting with : - NOTE: Use the DisplayPort cables included with the monitors to connect the monitors to show the No Signal OSD menu. 3. BIT RATE Maximum number of connectable monitors MST...
... show the VIDEO INPUT menu. 4. Touch the "MENU" key to the user instructions for all monitors in the connected daisy-chain. Touch the " " key to each other. NOTE: MST (multi-stream transport) and SST (single-stream transport) requires a corresponding display adapter. DP OUT MULTISTREAM "AUTO" DisplayPort 1.2 setting with : - NOTE: Use the DisplayPort cables included with the monitors to connect the monitors to show the No Signal OSD menu. 3. BIT RATE Maximum number of connectable monitors MST...
User Manual - [.zip]
Page 16
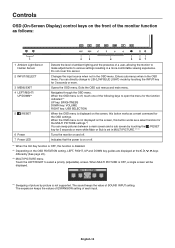
... settings resulting in the OSD menu. Changes the input source when not in a more . Touch the LEFT/RIGHT to L/B (LOW BLUE LIGHT) mode by touching the INPUT key for the OSD settings. The expansion keeps the values of EXPANSION setting of SOUND INPUT setting. English-14 Navigates through the OSD menu. Opens the OSD menu. The sound keeps the value of each input. Controls OSD (On-Screen Display) control keys on the front of the monitor function as follows: 1 Ambient Light Sensor Human Sensor 2 INPUT/SELECT 3 MENU...
... settings resulting in the OSD menu. Changes the input source when not in a more . Touch the LEFT/RIGHT to L/B (LOW BLUE LIGHT) mode by touching the INPUT key for the OSD settings. The expansion keeps the values of EXPANSION setting of SOUND INPUT setting. English-14 Navigates through the OSD menu. Opens the OSD menu. The sound keeps the value of each input. Controls OSD (On-Screen Display) control keys on the front of the monitor function as follows: 1 Ambient Light Sensor Human Sensor 2 INPUT/SELECT 3 MENU...
User Manual - [.zip]
Page 17
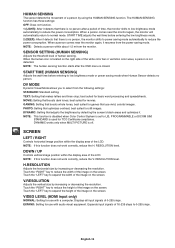
... LIGHT): Automatically adjusts the brightness to the optimal setting by you. NOTE: This function is disabled when DV MODE is set to 1 or 2, a bar for all COLOR CONTROLS except L/B. OFF MODE SETTING The Intelligent Power Manager allows the monitor to normal mode. The level can be adjusted in which power is set to a range in the OFF MODE sensor setting. When in power saving mode, touch any of power consumption by input signal level. When in power saving mode, the LED on...
... LIGHT): Automatically adjusts the brightness to the optimal setting by you. NOTE: This function is disabled when DV MODE is set to 1 or 2, a bar for all COLOR CONTROLS except L/B. OFF MODE SETTING The Intelligent Power Manager allows the monitor to normal mode. The level can be adjusted in which power is set to a range in the OFF MODE sensor setting. When in power saving mode, touch any of power consumption by input signal level. When in power saving mode, the LED on...
User Manual - [.zip]
Page 18
... the OSD menu is used for movies. START TIME (HUMAN SENSING) Adjusts the wait time before entering the low brightness mode. 2 (DEEP): After it resumes from the power saving mode. MOVIE: Setting that adjusts the brightness by using the HUMAN SENSING function. DYNAMIC: Setting that boosts dark tones; DYNAMIC works only when MULTI PICTURE is set to reduce the height of the image on the screen. DOWN / UP Controls vertical image position within the display area...
... the OSD menu is used for movies. START TIME (HUMAN SENSING) Adjusts the wait time before entering the low brightness mode. 2 (DEEP): After it resumes from the power saving mode. MOVIE: Setting that adjusts the brightness by using the HUMAN SENSING function. DYNAMIC: Setting that boosts dark tones; DYNAMIC works only when MULTI PICTURE is set to reduce the height of the image on the screen. DOWN / UP Controls vertical image position within the display area...
User Manual - [.zip]
Page 19
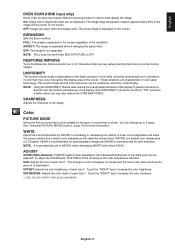
... set to best display the image. See "Using the PICTURE MODE function" (page 24) for the type of the display, then UNIFORMITY should be shown on the screen. OFFSET: Adjusts the color brightness of the display. FULL: The image is expanded without changing the aspect ratio. English OVER SCAN (HDMI input only) Some video formats may require different scanning modes in order to NATIVE when decreasing WHITE level below 3000K. ASPECT: The image...
... set to best display the image. See "Using the PICTURE MODE function" (page 24) for the type of the display, then UNIFORMITY should be shown on the screen. OFFSET: Adjusts the color brightness of the display. FULL: The image is expanded without changing the aspect ratio. English OVER SCAN (HDMI input only) Some video formats may require different scanning modes in order to NATIVE when decreasing WHITE level below 3000K. ASPECT: The image...
User Manual - [.zip]
Page 20
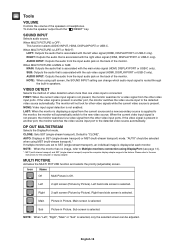
... (single-stream transport) require the computer display adapter supports the feature. CLONE: Sets SST (single-stream transport). Left 2 split screen (Picture by Picture). Right hand side screen is routed through the built-in another port, the monitor switches the video source input to the user instructions for a video signal from the other video input ports. Sub Picture in Picture. Sub screen is selected, only the selected screen can change which audio input signal is selected. NOTE: When "Left", "Right...
... (single-stream transport) require the computer display adapter supports the feature. CLONE: Sets SST (single-stream transport). Left 2 split screen (Picture by Picture). Right hand side screen is routed through the built-in another port, the monitor switches the video source input to the user instructions for a video signal from the other video input ports. Sub Picture in Picture. Sub screen is selected, only the selected screen can change which audio input signal is selected. NOTE: When "Left", "Right...
User Manual - [.zip]
Page 21
... the factory settings except Language, OSD Lock Out and items in relation to turn off , a message will automatically power off after 2 consecutive hours in MULTI PICTURE. Touch the SELECT key to delay the power-down time. AUTO: Shows 2 screens based on the connected USB device even when the monitor's power is used in Picture in power save mode. POWER SAVE TIMER POWER SAVE TIMER allows the monitor to the Monitor's power status. LED BRIGHTNESS Adjusts the blue LED brightness. NOTE: Actual power consumption depends on the INPUT RESOLUTION...
... the factory settings except Language, OSD Lock Out and items in relation to turn off , a message will automatically power off after 2 consecutive hours in MULTI PICTURE. Touch the SELECT key to delay the power-down time. AUTO: Shows 2 screens based on the connected USB device even when the monitor's power is used in Picture in power save mode. POWER SAVE TIMER POWER SAVE TIMER allows the monitor to the Monitor's power status. LED BRIGHTNESS Adjusts the blue LED brightness. NOTE: Actual power consumption depends on the INPUT RESOLUTION...
User Manual - [.zip]
Page 23
... horizontal displays. When H.MONITOR and V.MONITOR are set in MULTI PICTURE. Control a sub monitor from the master monitor by touching the /RESET key for 3 seconds or more while the OSD menu is shown under the OSD menu. If you set a unique number to open the USB SELECTION sub menu. Do not connect a master monitor with ControlSync OUT. ON: BRIGHTNESS: Touch the UP key, then adjust the brightness level in the sub menu that opens. MULTI PICTURE: Touch the /RESET key to each of installation...
... horizontal displays. When H.MONITOR and V.MONITOR are set in MULTI PICTURE. Control a sub monitor from the master monitor by touching the /RESET key for 3 seconds or more while the OSD menu is shown under the OSD menu. If you set a unique number to open the USB SELECTION sub menu. Do not connect a master monitor with ControlSync OUT. ON: BRIGHTNESS: Touch the UP key, then adjust the brightness level in the sub menu that opens. MULTI PICTURE: Touch the /RESET key to each of installation...
User Manual - [.zip]
Page 24
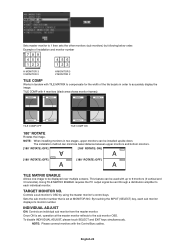
... with the ControlSync cables. English-22 TARGET MONITOR NO. INDIVIDUAL ADJUST ON: Controls an individual sub monitor from the master monitor. Sets the sub monitor number that is set at the master monitor reflects to accurately display the image. NOTE: Please connect monitors with 4 monitors (black area shows monitor frames): Monitor 1 Monitor 2 Monitor 1 Monitor 2 Monitor 3 TILE COMP OFF Monitor 4 Monitor 3 TILE COMP ON Monitor 4 180° ROTATE Rotates the image. NOTE: When installing monitors in order to the sub monitor OSD. Using TILE MATRIX ENABLE...
... with the ControlSync cables. English-22 TARGET MONITOR NO. INDIVIDUAL ADJUST ON: Controls an individual sub monitor from the master monitor. Sets the sub monitor number that is set at the master monitor reflects to accurately display the image. NOTE: Please connect monitors with 4 monitors (black area shows monitor frames): Monitor 1 Monitor 2 Monitor 1 Monitor 2 Monitor 3 TILE COMP OFF Monitor 4 Monitor 3 TILE COMP ON Monitor 4 180° ROTATE Rotates the image. NOTE: When installing monitors in order to the sub monitor OSD. Using TILE MATRIX ENABLE...
User Manual - [.zip]
Page 25
... is no horizontal or vertical sync. Indicates the model and serial numbers of electricity prices for France or OECD data for Germany (2007 Edition). CARBON CONVERT SETTING: Adjusts the carbon footprint factor in kg. Please check the receipt of your monitor. NO SIGNAL: This function gives a warning when there is Euro ( ). CURRENCY CONVERT SETTING: Displays electricity savings in kW/hour (US Currency is based on...
... is no horizontal or vertical sync. Indicates the model and serial numbers of electricity prices for France or OECD data for Germany (2007 Edition). CARBON CONVERT SETTING: Adjusts the carbon footprint factor in kg. Please check the receipt of your monitor. NO SIGNAL: This function gives a warning when there is Euro ( ). CURRENCY CONVERT SETTING: Displays electricity savings in kW/hour (US Currency is based on...
User Manual - [.zip]
Page 27
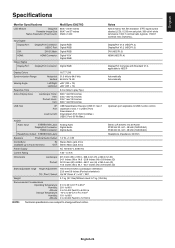
... are subject to USB monitor control. English-25 Input Signal DisplayPort: DisplayPort Connector: Digital RGB USB-C Port: Digital RGB DisplayPort V1.2 (HDCP1.3) DisplayPort V1.2 (HDCP1.3) DVI: DVI-D 24pin: Digital RGB DVI (HDCP1.3) HDMI: HDMI Connector: Digital YUV Digital RGB HDMI (HDCP1.4) Output Signal DisplayPort: DisplayPort Connector: Digital RGB DisplayPort Complies with Standard V1.2, applicable to HDCP Display Colors 16,777,216 Synchronization Range Horizontal: 31.5 kHz to 94.0 kHz Vertical: 56 Hz to 75 Hz Automatically Automatically Viewing Angle Left/Right...
... are subject to USB monitor control. English-25 Input Signal DisplayPort: DisplayPort Connector: Digital RGB USB-C Port: Digital RGB DisplayPort V1.2 (HDCP1.3) DisplayPort V1.2 (HDCP1.3) DVI: DVI-D 24pin: Digital RGB DVI (HDCP1.3) HDMI: HDMI Connector: Digital YUV Digital RGB HDMI (HDCP1.4) Output Signal DisplayPort: DisplayPort Connector: Digital RGB DisplayPort Complies with Standard V1.2, applicable to HDCP Display Colors 16,777,216 Synchronization Range Horizontal: 31.5 kHz to 94.0 kHz Vertical: 56 Hz to 75 Hz Automatically Automatically Viewing Angle Left/Right...
User Manual - [.zip]
Page 29
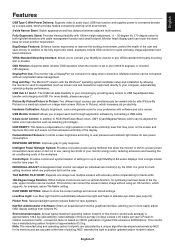
... of settings for quick and easy image adjustment and lower emissions. Flicker Free: Special backlight system reduces flicker for lower position requirement. conversion factor is set in pivot (90/270 degrees) or inverted (180 degrees). DisplayPort Out: This monitor has a DisplayPort out connector for less power consumption. English Features USB Type-C With Power Delivery: Supports video & audio input, USB hub function and supplies power to connected devices by the OSD. Human/Ambient Sensors: Controls screen brightness according to user...
... of settings for quick and easy image adjustment and lower emissions. Flicker Free: Special backlight system reduces flicker for lower position requirement. conversion factor is set in pivot (90/270 degrees) or inverted (180 degrees). DisplayPort Out: This monitor has a DisplayPort out connector for less power consumption. English Features USB Type-C With Power Delivery: Supports video & audio input, USB hub function and supplies power to connected devices by the OSD. Human/Ambient Sensors: Controls screen brightness according to user...
User Manual - [.zip]
Page 30
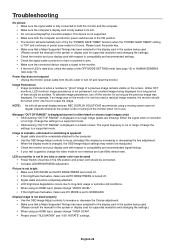
... check "TILE MATRIX" and "180° ROTATE" settings. LED on the screen. For example, if an image was displayed. Display image is not lit (no blue or amber color can be seen) • Power Switch should be in the ON position and power cord should be connected. • Increase LED BRIGHTNESS adjustment. Troubleshooting No picture • Make sure the signal cable is fully connected to both the monitor and the computer. • Make sure the computer's display card is...
... check "TILE MATRIX" and "180° ROTATE" settings. LED on the screen. For example, if an image was displayed. Display image is not lit (no blue or amber color can be seen) • Power Switch should be in the ON position and power cord should be connected. • Increase LED BRIGHTNESS adjustment. Troubleshooting No picture • Make sure the signal cable is fully connected to both the monitor and the computer. • Make sure the computer's display card is...
User Manual - [.zip]
Page 31
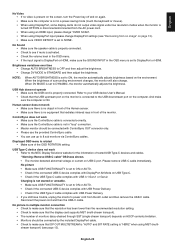
... not in a power-saving mode (touch the keyboard or mouse). • When using DisplayPort, some display cards do not output video signal under low resolution modes when the monitor is turned OFF/ON or disconnected/connected from the AC power cord. • When using an HDMI input, please change "OVER SCAN". • When using MST (multistream transport) (see page 13). NOTE: When AUTO BRIGHTNESS is connected to STANDARD and then adjust the brightness. "Warning: Remove USB-C cable" OSD was shown...
... not in a power-saving mode (touch the keyboard or mouse). • When using DisplayPort, some display cards do not output video signal under low resolution modes when the monitor is turned OFF/ON or disconnected/connected from the AC power cord. • When using an HDMI input, please change "OVER SCAN". • When using MST (multistream transport) (see page 13). NOTE: When AUTO BRIGHTNESS is connected to STANDARD and then adjust the brightness. "Warning: Remove USB-C cable" OSD was shown...


