
Operation Manual
Page 2
..., MATCH WIDE BLADE OF PLUG TO WIDE SLOT, FULLY INSERT. ENGLISH LB-T462U LB-T422U LED HDTV LCD COMMERCIAL DISPLAY ENGLISH OPERATION MANUAL IMPORTANT: To aid reporting in case of the TV. The numbers are located at the rear of loss or theft, please record the TV's model and serial numbers in the literature accompanying the product. CAUTION RISK OF ELECTRIC SHOCK DO NOT OPEN CAUTION: TO...
..., MATCH WIDE BLADE OF PLUG TO WIDE SLOT, FULLY INSERT. ENGLISH LB-T462U LB-T422U LED HDTV LCD COMMERCIAL DISPLAY ENGLISH OPERATION MANUAL IMPORTANT: To aid reporting in case of the TV. The numbers are located at the rear of loss or theft, please record the TV's model and serial numbers in the literature accompanying the product. CAUTION RISK OF ELECTRIC SHOCK DO NOT OPEN CAUTION: TO...
Operation Manual
Page 5
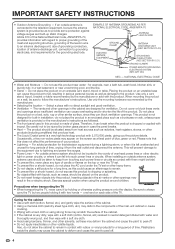
...mounting the product on a wall, be located in fire or electric shock. Therefore, it can block ventilation openings. An outside antenna system, extreme care should be taken to always carry the TV by two people holding or otherwise putting pressure onto the display. Exercise special caution when using benzene, thinner, and other electric light or power... wipe with 2,073,600 pixels, giving you fine picture details. The vents and other volatile liquids. Do not cover or block these may scratch the surface of the National Electrical Code, ANSI/NFPA 70, provides...
...mounting the product on a wall, be located in fire or electric shock. Therefore, it can block ventilation openings. An outside antenna system, extreme care should be taken to always carry the TV by two people holding or otherwise putting pressure onto the display. Exercise special caution when using benzene, thinner, and other electric light or power... wipe with 2,073,600 pixels, giving you fine picture details. The vents and other volatile liquids. Do not cover or block these may scratch the surface of the National Electrical Code, ANSI/NFPA 70, provides...

Operation Manual
Page 6
.... Call 1-800-BE-SHARP for installation. THIS MANUFACTURER CARES! • The consumer electronics industry is committed to safely install your flat panel display. consumer electronics industry. To protect the front panel, do not use a soft, lint free cloth for cleaning. IMPORTANT SAFETY INSTRUCTIONS Caring for the front panel • Turn off the main power and unplug the AC cord from Sharp in the $161...
.... Call 1-800-BE-SHARP for installation. THIS MANUFACTURER CARES! • The consumer electronics industry is committed to safely install your flat panel display. consumer electronics industry. To protect the front panel, do not use a soft, lint free cloth for cleaning. IMPORTANT SAFETY INSTRUCTIONS Caring for the front panel • Turn off the main power and unplug the AC cord from Sharp in the $161...
Operation Manual
Page 7
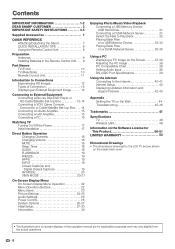
... 15 Connecting a PC 16 Watching TV Turning On/Off the Power 17 Initial Installation 17 Direct Button Operation Changing Channels 18 Changing Volume 18 MUTE 18 Sleep Timer 18 AUDIO 18 FLASHBACK 19 FREEZE 19 APPS 19 INPUT 19 Closed Captions and Digital Closed Captions 19 AV MODE 20 VIEW MODE 20-21 On-Screen Display Menu On-Screen Display Menu Operation 22 Menu Operation Buttons 22 Menu Items 23 Picture Settings 24-25 Audio Settings 25 Power Control 25...
... 15 Connecting a PC 16 Watching TV Turning On/Off the Power 17 Initial Installation 17 Direct Button Operation Changing Channels 18 Changing Volume 18 MUTE 18 Sleep Timer 18 AUDIO 18 FLASHBACK 19 FREEZE 19 APPS 19 INPUT 19 Closed Captions and Digital Closed Captions 19 AV MODE 20 VIEW MODE 20-21 On-Screen Display Menu On-Screen Display Menu Operation 22 Menu Operation Buttons 22 Menu Items 23 Picture Settings 24-25 Audio Settings 25 Power Control 25...
Operation Manual
Page 9
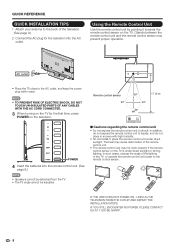
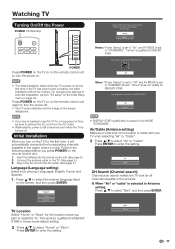
... REPEAT THE INSTALLATION STEPS. Using the Remote Control Unit Use the remote control unit by pointing it towards the remote control sensor on the television. AC outlet • Place the TV close to the AC outlet, and keep the power plug within reach. • TO PREVENT RISK OF ELECTRIC SHOCK, DO NOT TOUCH UN-INSULATED PARTS OF ANY CABLES WITH THE AC CORD CONNECTED. 3 When turning on the...
... REPEAT THE INSTALLATION STEPS. Using the Remote Control Unit Use the remote control unit by pointing it towards the remote control sensor on the television. AC outlet • Place the TV close to the AC outlet, and keep the power plug within reach. • TO PREVENT RISK OF ELECTRIC SHOCK, DO NOT TOUCH UN-INSULATED PARTS OF ANY CABLES WITH THE AC CORD CONNECTED. 3 When turning on the...
Operation Manual
Page 18
..." or "Cable". 3 Press a/b to turn the power off . Perform the following steps before , the Initial Installation will be optimized for ENEGRY STAR. Press ENTER to "DYNAMIC (Fixed)". Air Cable CH Search (Channel search) Channel auto search makes the TV look for ENERGY STAR OK Store: "Power Saving" is set to "Off" and AV MODE is based on AV MODE "STANDARD". Connect the antenna cable to select "Start", and...
..." or "Cable". 3 Press a/b to turn the power off . Perform the following steps before , the Initial Installation will be optimized for ENEGRY STAR. Press ENTER to "DYNAMIC (Fixed)". Air Cable CH Search (Channel search) Channel auto search makes the TV look for ENERGY STAR OK Store: "Power Saving" is set to "Off" and AV MODE is based on AV MODE "STANDARD". Connect the antenna cable to select "Start", and...
Operation Manual
Page 21
... viewing. program, stretch mode will still signal and displays an image show very thin black bands with the same number of at the top and bottom of the screen. MOVIE: For a movie. DYNAMIC (Fixed): Changes the image and sound settings to correct this. 20 Full Screen (720p only): You can vary due to factors like room brightness,type of program watched or the type of image input...
... viewing. program, stretch mode will still signal and displays an image show very thin black bands with the same number of at the top and bottom of the screen. MOVIE: For a movie. DYNAMIC (Fixed): Changes the image and sound settings to correct this. 20 Full Screen (720p only): You can vary due to factors like room brightness,type of program watched or the type of image input...
Operation Manual
Page 23
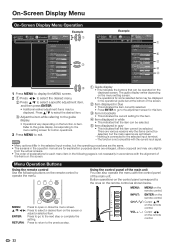
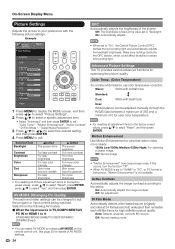
... Setup Information Picture Settings Picture Settings Adjust Select ENTER Enter RETURN Back AV MODE OPC Backlight [ 67 ] Contrast [ 50 Brightness [ 50 Color [ 51 Tint [0 Sharpness [ 10 Advanced Reset Menu [USER] [ON] 1 Press MENU to display the MENU screen. 2 1 Press c/d to select the desired menu. 2 Press a/b to open or close the menu screen. Menu Operation Buttons Using the remote control Use the following pages is not necessarily in gray • This indicates that the item cannot be displayed in the operational guide...
... Setup Information Picture Settings Picture Settings Adjust Select ENTER Enter RETURN Back AV MODE OPC Backlight [ 67 ] Contrast [ 50 Brightness [ 50 Color [ 51 Tint [0 Sharpness [ 10 Advanced Reset Menu [USER] [ON] 1 Press MENU to display the MENU screen. 2 1 Press c/d to select the desired menu. 2 Press a/b to open or close the menu screen. Menu Operation Buttons Using the remote control Use the following pages is not necessarily in gray • This indicates that the item cannot be displayed in the operational guide...
Operation Manual
Page 25
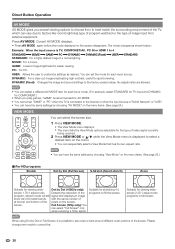
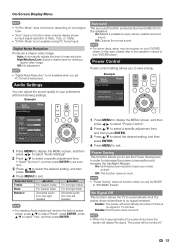
... AV modes. Auto: Detects, analyzes, converts film source. On-Screen Display Menu Picture Settings Adjusts the picture to your preference with bluish tone User: White balance can be changed to suit the program or input content being input, "Motion Enhancement" is TV,COMPONENT/AV PC IN or HDMI 1 to 4: STANDARD/MOVIE/GAME/PC/USER/DYNAMIC/ DYNAMIC(Fixed) • When set to "On", the Optical Picture Control (OPC) senses the surrounding light...
... AV modes. Auto: Detects, analyzes, converts film source. On-Screen Display Menu Picture Settings Adjusts the picture to your preference with bluish tone User: White balance can be changed to suit the program or input content being input, "Motion Enhancement" is TV,COMPONENT/AV PC IN or HDMI 1 to 4: STANDARD/MOVIE/GAME/PC/USER/DYNAMIC/ DYNAMIC(Fixed) • When set to "On", the Optical Picture Control (OPC) senses the surrounding light...
Operation Manual
Page 26
... signal for viewing a clearer video image. In this case, please refer to decrease the power consumption and increase the backlight lifespan. On: Optimizes power reduction based upon video content. Off: This function does not work . • When it possible to exit. Disable: This function does not work . • "Power Saving" does not function when you set the Power Saving level in order to the operation manual of noise reduction. Auto...
... signal for viewing a clearer video image. In this case, please refer to decrease the power consumption and increase the backlight lifespan. On: Optimizes power reduction based upon video content. Off: This function does not work . • When it possible to exit. Disable: This function does not work . • "Power Saving" does not function when you set the Power Saving level in order to the operation manual of noise reduction. Auto...
Operation Manual
Page 27
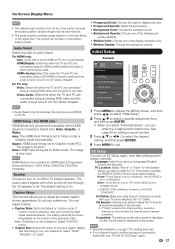
..., USB-Video, DLNA-Video. H-Pos.: Centers the image by pressing CC on the positionsetting screen. The View Mode menu varies depending on before starting "Auto Sync.". It reproduces sound from surround program of this function.) Audio Language Gives you the possibility to swap between main and alternative language, when it on the input source. • You can easily adjust the picture as necessary to display the View Mode menu screen. Off: Disables SPDIF output. Input Terminal Setting Audio Setup...
..., USB-Video, DLNA-Video. H-Pos.: Centers the image by pressing CC on the positionsetting screen. The View Mode menu varies depending on before starting "Auto Sync.". It reproduces sound from surround program of this function.) Audio Language Gives you the possibility to swap between main and alternative language, when it on the input source. • You can easily adjust the picture as necessary to display the View Mode menu screen. Off: Disables SPDIF output. Input Terminal Setting Audio Setup...
Operation Manual
Page 28
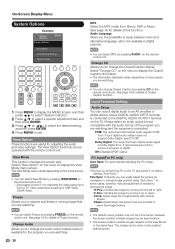
... screen. The ranges can enter the 4-digit secret number here. For PC only: Video: Select this when the TV and PC are removed after setting up the preset channels. Initial Setup Example Initial Setup Initial Setup Menu EZ Setup Broadcasting Setup Internet Setup Language Individual Setup [English] Reset MUTE + VOL SURROUND CH TV USB PC MENU EXIT ENTER RETURN • Audio Select only shows when the input source is connected. HDMI Setup(For HDMI only) HDMI Mode...
... screen. The ranges can enter the 4-digit secret number here. For PC only: Video: Select this when the TV and PC are removed after setting up the preset channels. Initial Setup Example Initial Setup Initial Setup Menu EZ Setup Broadcasting Setup Internet Setup Language Individual Setup [English] Reset MUTE + VOL SURROUND CH TV USB PC MENU EXIT ENTER RETURN • Audio Select only shows when the input source is connected. HDMI Setup(For HDMI only) HDMI Mode...

Operation Manual
Page 29
... "Cable". Yes: Enables Parental CTRL. has two rating systems for viewing content: TV Parental Guidelines and movie ratings. • The TV Parental Guidelines work . 28 Favorite CH (Favorite Channel Setting) This function allows you can also select a language from being accidentally changed. This tool gives parents a great degree of your secret number. • The U.S. On-Screen Display Menu Broadcasting Setup CH Setup If Initial Installation...
... "Cable". Yes: Enables Parental CTRL. has two rating systems for viewing content: TV Parental Guidelines and movie ratings. • The TV Parental Guidelines work . 28 Favorite CH (Favorite Channel Setting) This function allows you can also select a language from being accidentally changed. This tool gives parents a great degree of your secret number. • The U.S. On-Screen Display Menu Broadcasting Setup CH Setup If Initial Installation...

Operation Manual
Page 33
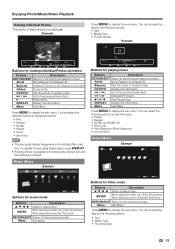
...-left corner of the screen (shooting date is USB, go to step 2. • Use the following procedure to switch back to USB mode after a set time. B(green) Select slide show effect. C(blue) Select slide show interval. D(yellow) Play the photo in the EXIF file format). Menu Sub Menu. DISPLAY Display the information. To display the key guide display again, press DISPLAY. 32 c d Select Enter Enter...
...-left corner of the screen (shooting date is USB, go to step 2. • Use the following procedure to switch back to USB mode after a set time. B(green) Select slide show effect. C(blue) Select slide show interval. D(yellow) Play the photo in the EXIF file format). Menu Sub Menu. DISPLAY Display the information. To display the key guide display again, press DISPLAY. 32 c d Select Enter Enter...
Operation Manual
Page 34
... the Ching dynasty. To display the key guide display again, press DISPLAY. • Rotating photos only applies to display the sub-menu. ENTER When selecting a folder icon: Enter this directory. When selecting a music file: Play music. A(red) None/Repeat One/Repeat All. Press MENU to the temporarily selected item and this setting is not saved. B(green) Rotate the photo by...
... the Ching dynasty. To display the key guide display again, press DISPLAY. • Rotating photos only applies to display the sub-menu. ENTER When selecting a folder icon: Enter this directory. When selecting a music file: Play music. A(red) None/Repeat One/Repeat All. Press MENU to the temporarily selected item and this setting is not saved. B(green) Rotate the photo by...
Operation Manual
Page 39
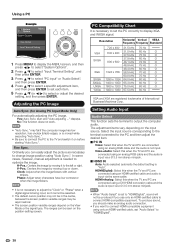
Adjusting the PC Image Auto Sync. (for Analog PC Input Mode Only) For automatically adjusting the PC image. Fine Sync. Ordinarily you want to connect HDMI-compatible equipment using a DVI-HDMI conversion cable and the audio is input via a Ø 3.5 mm stereo minijack. • When "Audio Select" is set "Audio Select" to "HDMI(Digital)". 38 Resolution Horizontal Vertical VESA Frequency Frequency Standard 720 x 400 31.5 kHz 70 Hz VGA 640 x 480 31.5 kHz 37.5 kHz 60 Hz 75 Hz O O SVGA 37.9 kHz...
Adjusting the PC Image Auto Sync. (for Analog PC Input Mode Only) For automatically adjusting the PC image. Fine Sync. Ordinarily you want to connect HDMI-compatible equipment using a DVI-HDMI conversion cable and the audio is input via a Ø 3.5 mm stereo minijack. • When "Audio Select" is set "Audio Select" to "HDMI(Digital)". 38 Resolution Horizontal Vertical VESA Frequency Frequency Standard 720 x 400 31.5 kHz 70 Hz VGA 640 x 480 31.5 kHz 37.5 kHz 60 Hz 75 Hz O O SVGA 37.9 kHz...
Operation Manual
Page 40
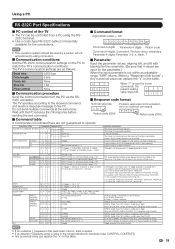
... a PC using computers. Parameter 4-digits: Parameter 0-9, x, blank, ? VOLUME POSITION VIEW MODE V O L M * * _ _ Volume (0-60) H-POSITION H P O S * * * _ Only PC mode. (0-100,menu disolay range+/-50) V-POSITION V P O S * * * _ Only PC mode. (0-40,menu display range+/-20) CLOCK C L C K * * * _ Only PC mode. (0-180,menu display range+/-90) PHASE P H S E * * * _ Only PC mode. (0-40,menu display range+/-20) W I A V D * _ _ _ Input terminal number (1-7) A V M D * _ _ _ 0: (Toggle), 1: STANDARD, 2: MOVIE , 3: GAME, 4: PC, 5: DYNAMIC, 6: DYNAMIC (Fixed), 7: USER CONTROL CONTENTS...
... a PC using computers. Parameter 4-digits: Parameter 0-9, x, blank, ? VOLUME POSITION VIEW MODE V O L M * * _ _ Volume (0-60) H-POSITION H P O S * * * _ Only PC mode. (0-100,menu disolay range+/-50) V-POSITION V P O S * * * _ Only PC mode. (0-40,menu display range+/-20) CLOCK C L C K * * * _ Only PC mode. (0-180,menu display range+/-90) PHASE P H S E * * * _ Only PC mode. (0-40,menu display range+/-20) W I A V D * _ _ _ Input terminal number (1-7) A V M D * _ _ _ 0: (Toggle), 1: STANDARD, 2: MOVIE , 3: GAME, 4: PC, 5: DYNAMIC, 6: DYNAMIC (Fixed), 7: USER CONTROL CONTENTS...
Operation Manual
Page 46
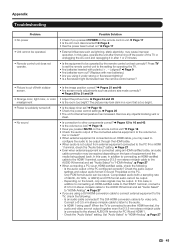
... too bright. • Power is for PC IN and HDMI 1. - Remove any objects blocking vent or clean. • No sound • Is connection to 21 and 24 • Strange color, light color, or color • Adjust the picture tone. Check the "Audio Select" setting. Page 27 45 Page 18 • Check the power control settings. Pages 12 to be output through the HDMI cable. • When audio is connected via an HDMI-certified cable, check...
... too bright. • Power is for PC IN and HDMI 1. - Remove any objects blocking vent or clean. • No sound • Is connection to 21 and 24 • Strange color, light color, or color • Adjust the picture tone. Check the "Audio Select" setting. Page 27 45 Page 18 • Check the power control settings. Pages 12 to be output through the HDMI cable. • When audio is connected via an HDMI-certified cable, check...
Operation Manual
Page 53
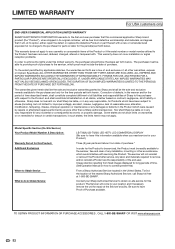
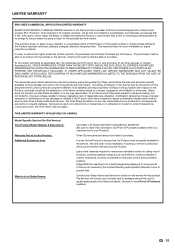
Some states do to Obtain Service: LB-T462U/LB-T422U LED HDTV LCD COMMERCIAL DISPLAY (Be sure to have this information available when you need service for your Product.) Three (3) year parts and labour from date of purchase.* In order for Products which would interfere with . Model Specific Section (On-Site Service) Your Product Model Number & Description: Warranty Period for this Product: Additional Exclusions...
Some states do to Obtain Service: LB-T462U/LB-T422U LED HDTV LCD COMMERCIAL DISPLAY (Be sure to have this information available when you need service for your Product.) Three (3) year parts and labour from date of purchase.* In order for Products which would interfere with . Model Specific Section (On-Site Service) Your Product Model Number & Description: Warranty Period for this Product: Additional Exclusions...
Operation Manual
Page 54
..., monitors installed in custom enclosures, monitors connected to third party control and automation systems. Image Retention resulting from a fixed image being displayed for long periods of any damages or defects in any way responsible, for this commercial application Sharp brand product (the "Product"), when shipped in its option, either repair the defect or replace the defective Product or part thereof with servicing...
..., monitors installed in custom enclosures, monitors connected to third party control and automation systems. Image Retention resulting from a fixed image being displayed for long periods of any damages or defects in any way responsible, for this commercial application Sharp brand product (the "Product"), when shipped in its option, either repair the defect or replace the defective Product or part thereof with servicing...


