
LC10A2U Operation Manual
Page 3
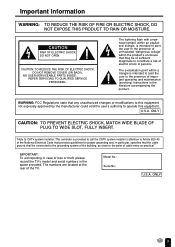
... SERVICE PERSONNEL. U.S.A. "Note to CATV system installer: This reminder is intended to alert the user to constitute a risk of loss or theft, please record the TV's model and serial numbers in case of electric shock to operate this equipment. Model No.: Serial No.: U.S.A. DO NOT OPEN CAUTION: TO REDUCE THE RISK... TO RAIN OR MOISTURE. The exclamation point within the product's enclosure that the cable ground shall be of sufficient magnitude to the presence of the TV. IMPORTANT: To aid reporting in the space provided.
... SERVICE PERSONNEL. U.S.A. "Note to CATV system installer: This reminder is intended to alert the user to constitute a risk of loss or theft, please record the TV's model and serial numbers in case of electric shock to operate this equipment. Model No.: Serial No.: U.S.A. DO NOT OPEN CAUTION: TO REDUCE THE RISK... TO RAIN OR MOISTURE. The exclamation point within the product's enclosure that the cable ground shall be of sufficient magnitude to the presence of the TV. IMPORTANT: To aid reporting in the space provided.

LC10A2U Operation Manual
Page 4
CONTENTS Page DEAR SHARP CUSTOMER ...5 IMPORTANT SAFETY PRECAUTIONS 5,6 SUPPLIED ACCESSORIES ...7 PREPARATION ...8-10 Preparing and Using the Remote Control 8 Batteries for Remote Control ...8 Power Connection ...9 Antenna Connection ...9,10 FRONT AND REAR CONTROL OPTIONS 11 REMOTE CONTROL ...13 BASIC OPERATION ...13-16 Turning on POWER ...14 Switching TV/VIDEO AV1/AV2/TV Mode 14 Sound Volume...
CONTENTS Page DEAR SHARP CUSTOMER ...5 IMPORTANT SAFETY PRECAUTIONS 5,6 SUPPLIED ACCESSORIES ...7 PREPARATION ...8-10 Preparing and Using the Remote Control 8 Batteries for Remote Control ...8 Power Connection ...9 Antenna Connection ...9,10 FRONT AND REAR CONTROL OPTIONS 11 REMOTE CONTROL ...13 BASIC OPERATION ...13-16 Turning on POWER ...14 Switching TV/VIDEO AV1/AV2/TV Mode 14 Sound Volume...

LC10A2U Operation Manual
Page 5
... Stand-Do not place the product on batteries or another power source, refer to be kept in a safe place for your purchase of the Sharp LCD Color TV product. Use only a cart, stand, tripod, bracket or table recommended by broken glass pieces in case the LCD panel breaks. 15. If...product. Power source-This product must be sure to prevent potential danger, please observe the following precautions carefully before using the product. 1. DEAR SHARP CUSTOMER Thank you are not sure of the type of power supply used in your home, consult your dealer or local power company. Sudden ...
... Stand-Do not place the product on batteries or another power source, refer to be kept in a safe place for your purchase of the Sharp LCD Color TV product. Use only a cart, stand, tripod, bracket or table recommended by broken glass pieces in case the LCD panel breaks. 15. If...product. Power source-This product must be sure to prevent potential danger, please observe the following precautions carefully before using the product. 1. DEAR SHARP CUSTOMER Thank you are not sure of the type of power supply used in your home, consult your dealer or local power company. Sudden ...

LC10A2U Operation Manual
Page 8
... the remote control and sensor window may prevent proper operation. The heat may cause deformation of the lighting or LCD TV set, or operate the remote control closer to operate LCD color TV functions, replace the batteries in a leakage of chemicals and/or explosion. Batteries for an extended period of time, remove...
... the remote control and sensor window may prevent proper operation. The heat may cause deformation of the lighting or LCD TV set, or operate the remote control closer to operate LCD color TV functions, replace the batteries in a leakage of chemicals and/or explosion. Batteries for an extended period of time, remove...

LC10A2U Operation Manual
Page 9
...this is explained below. One possible method of the scrambled channels. (Place your SHARP Dealer or Service Center for easy hookup. Plug into the set signal splitter (not supplied) IN Cable TV Line Cable TV converter/ descrambler (not supplied) Note: I Always unplug the AC adapter from the... product and power outlet when not using for normal viewing of utilizing the converter/descrambler provided by the cable TV company. "A" position on channel 3 or 4, typically one of these premium pay channels". RF switch (not supplied) OUT Two-set for...
...this is explained below. One possible method of the scrambled channels. (Place your SHARP Dealer or Service Center for easy hookup. Plug into the set signal splitter (not supplied) IN Cable TV Line Cable TV converter/ descrambler (not supplied) Note: I Always unplug the AC adapter from the... product and power outlet when not using for normal viewing of utilizing the converter/descrambler provided by the cable TV company. "A" position on channel 3 or 4, typically one of these premium pay channels". RF switch (not supplied) OUT Two-set for...
LC10A2U Operation Manual
Page 10
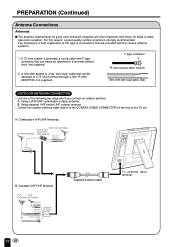
... connect an outdoor antenna. F-type connector 75-ohm coaxial cable (round) 300-ohm twin-lead cable (flat) OUTDOOR ANTENNA CONNECTION • Use one of the TV set. Separate VHF/UHF Antenna VHF UHF ANTENNA ANTENNA 300-ohm twin-lead COMBINER 300-ohm (not supplied) twin-lead IN OUT or 75-ohm...
... connect an outdoor antenna. F-type connector 75-ohm coaxial cable (round) 300-ohm twin-lead cable (flat) OUTDOOR ANTENNA CONNECTION • Use one of the TV set. Separate VHF/UHF Antenna VHF UHF ANTENNA ANTENNA 300-ohm twin-lead COMBINER 300-ohm (not supplied) twin-lead IN OUT or 75-ohm...

LC10A2U Operation Manual
Page 11
...a slightly different function from the remote control button.) 11 Top control panel BRIGHT DISPLAY VOLUME UP (+)/ DOWN ( ) TV/VIDEO ʵ ʴ BRIGHT MUTE DISPLAY MENU VOL CH OFF ON TV/VIDEO MAIN POWER MUTE MENU MAIN POWER CHANNEL UP (]) DOWN ([) I The (MUTE), DISPLAY, MENU, VOLUME UP(+)/DOWN...(-), CHANNEL UP(L)/DOWN(M), and TV/VIDEO buttons provide the same functions as the buttons on and a red ...
...a slightly different function from the remote control button.) 11 Top control panel BRIGHT DISPLAY VOLUME UP (+)/ DOWN ( ) TV/VIDEO ʵ ʴ BRIGHT MUTE DISPLAY MENU VOL CH OFF ON TV/VIDEO MAIN POWER MUTE MENU MAIN POWER CHANNEL UP (]) DOWN ([) I The (MUTE), DISPLAY, MENU, VOLUME UP(+)/DOWN...(-), CHANNEL UP(L)/DOWN(M), and TV/VIDEO buttons provide the same functions as the buttons on and a red ...

LC10A2U Operation Manual
Page 13
...3 PAL-N 4 NTSC 5 SECAM 13 For Brazil, Argentina and Uruguay, set to PAL-N (see page 21) Set color system to comply with the TV broadcasting system in large size, COLOR SYSTEM except N358 and is automatically set. The VIDEO INPUT mode is compatible with all color systems indicated below.... MUTE Press....Stops sound. Country TV broadcasting Factory setting of color system system TV Video User setting TV U.S.A Canada, Mexico, Latin America Brazil Argentina, Uruguay Color: NTSC TV ch: US ch Color: NTSC TV ch: US ch Color: PAL-M TV ch: US ch Color: PAL-N TV ch: US ch NTSC (N358...
...3 PAL-N 4 NTSC 5 SECAM 13 For Brazil, Argentina and Uruguay, set to PAL-N (see page 21) Set color system to comply with the TV broadcasting system in large size, COLOR SYSTEM except N358 and is automatically set. The VIDEO INPUT mode is compatible with all color systems indicated below.... MUTE Press....Stops sound. Country TV broadcasting Factory setting of color system system TV Video User setting TV U.S.A Canada, Mexico, Latin America Brazil Argentina, Uruguay Color: NTSC TV ch: US ch Color: NTSC TV ch: US ch Color: PAL-M TV ch: US ch Color: PAL-N TV ch: US ch NTSC (N358...
LC10A2U Operation Manual
Page 14
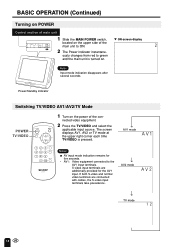
... mode indication remains for the AV1 input. nected video equipment. 2 Press the TV/VIDEO and select the applicable input source. The screen displays AV1, AV2 or TV mode at the upper right corner each time TV/VIDEO is turned on. BASIC OPERATION (Continued) Turning on POWER Control section of... upper side of the con- S-video input terminals are connected with cables, the S-video input terminals take precedence. AV1 mode AV2 mode TV mode 14 ously changes from red to the AV1 input terminals. If both S-video and normal video terminals are additionally provided for five seconds...
... mode indication remains for the AV1 input. nected video equipment. 2 Press the TV/VIDEO and select the applicable input source. The screen displays AV1, AV2 or TV mode at the upper right corner each time TV/VIDEO is turned on. BASIC OPERATION (Continued) Turning on POWER Control section of... upper side of the con- S-video input terminals are connected with cables, the S-video input terminals take precedence. AV1 mode AV2 mode TV mode 14 ously changes from red to the AV1 input terminals. If both S-video and normal video terminals are additionally provided for five seconds...

LC10A2U Operation Manual
Page 15
The Power indicator will turn red. The segment of indicator increases. 2 Press the VOL (-) to turn the LCD TV back on the remote control. Screen display MUTE MARK. 2 Press the MUTE or VOL (+)/(-) to decrease sound volume. CH FLASHBACK 123 DISPLAY 456 789 MUTE 0 ...To turn the sound back to temporarily turn off the sound. The Power indicator will turn green. LCDTV 15 ON/OFF Standby POWER TV/VIDEO MENU CH POWER To turn off the LCD TV Press the POWER on Press the POWER again. The segment of indicator decreases. Sound Volume POWER...
The Power indicator will turn red. The segment of indicator increases. 2 Press the VOL (-) to turn the LCD TV back on the remote control. Screen display MUTE MARK. 2 Press the MUTE or VOL (+)/(-) to decrease sound volume. CH FLASHBACK 123 DISPLAY 456 789 MUTE 0 ...To turn the sound back to temporarily turn off the sound. The Power indicator will turn green. LCDTV 15 ON/OFF Standby POWER TV/VIDEO MENU CH POWER To turn off the LCD TV Press the POWER on Press the POWER again. The segment of indicator decreases. Sound Volume POWER...

LC10A2U Operation Manual
Page 16
...: 3 → 2 → 1 125 3 → 2 → 1 → . . . IRC CH (]) 1 → 2 → 3 124 → 125 → 1 → 2 → . . . CH ([) 3 → 2 → 69 → 68 3 → 2 → . . . POWER TV/VIDEO MENU CH CH FLASHBACK 123 DISPLAY 456 789 MUTE 0 To select a one-digit channel (e.g., Channel 5): Basically, the 2-digit entry is used . Note: I Complete this...
...: 3 → 2 → 1 125 3 → 2 → 1 → . . . IRC CH (]) 1 → 2 → 3 124 → 125 → 1 → 2 → . . . CH ([) 3 → 2 → 69 → 68 3 → 2 → . . . POWER TV/VIDEO MENU CH CH FLASHBACK 123 DISPLAY 456 789 MUTE 0 To select a one-digit channel (e.g., Channel 5): Basically, the 2-digit entry is used . Note: I Complete this...

LC10A2U Operation Manual
Page 17
... changes the reception system of the set to comply with the color system (NTSC-N358) in the United States. I Items in the NTSC mode. POWER TV/VIDEO MENU CH CH FLASHBACK 123 DISPLAY 456 789 MUTE 0 MENU CH (])/ ([) 1 Press the MENU to display the MENU screen. 2 Press the CH ...color system before using the On Screen Display. SLEEP TIMER menu Page 19 VIDEO ADJUST menu (TV mode) ----- Page 22 SETUP menu ------ SELECTING THE MENU ITEMS Selecting a Menu Item • This LCD TV set allows you to adjust the picture and sound, and set the channels and other features using...
... changes the reception system of the set to comply with the color system (NTSC-N358) in the United States. I Items in the NTSC mode. POWER TV/VIDEO MENU CH CH FLASHBACK 123 DISPLAY 456 789 MUTE 0 MENU CH (])/ ([) 1 Press the MENU to display the MENU screen. 2 Press the CH ...color system before using the On Screen Display. SLEEP TIMER menu Page 19 VIDEO ADJUST menu (TV mode) ----- Page 22 SETUP menu ------ SELECTING THE MENU ITEMS Selecting a Menu Item • This LCD TV set allows you to adjust the picture and sound, and set the channels and other features using...
LC10A2U Operation Manual
Page 18
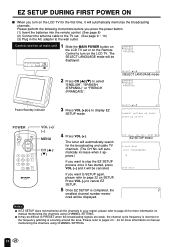
...SELECT LANGUAGE mode) Power/Standby indicator 3 Press VOL (+)/(-) to page 23 for more information on manual memorizing the channels using CHANNEL SETTING. 18 POWER POWER TV/VIDEO MENU CH MENU CH FLASHBACK 123 DISPLAY 456 789 MUTE 0 CH (])/ ([) LCDTV 4 Press VOL (+). Please refer to pages 23 ~ 24 .... If you press the power button. (1) Insert the batteries into the remote control. (See page 8) (2) Connect the antenna cable to the TV set or on the LCD TV set . (See page 9 ~ 10) (3) Plug in your region, please refer to display EZ SETUP mode. Press VOL (-) to PRESET...
...SELECT LANGUAGE mode) Power/Standby indicator 3 Press VOL (+)/(-) to page 23 for more information on manual memorizing the channels using CHANNEL SETTING. 18 POWER POWER TV/VIDEO MENU CH MENU CH FLASHBACK 123 DISPLAY 456 789 MUTE 0 CH (])/ ([) LCDTV 4 Press VOL (+). Please refer to pages 23 ~ 24 .... If you press the power button. (1) Insert the batteries into the remote control. (See page 8) (2) Connect the antenna cable to the TV set or on the LCD TV set . (See page 9 ~ 10) (3) Plug in your region, please refer to display EZ SETUP mode. Press VOL (-) to PRESET...

LC10A2U Operation Manual
Page 19
Adjusting the SLEEP TIMER Settings POWER TV/VIDEO MENU CH CH FLASHBACK 123 DISPLAY 456 789 MUTE 0 MENU CH (])/ ([) 1 Press the MENU to disply the MENU screen. 2 Press the CH (])/([) to move ... MENU to return to set in increment of 30 minutes and in minutes). Setting the ON SCREEN DISPLAY Language. 1 Press the MENU to exit. POWER TV/VIDEO MENU CH MENU CH FLASHBACK 123 DISPLAY 456 789 MUTE 0 CH (])/ ([) 2 Press the CH (])/([) to move the ">" mark to "SETUP". 3 Press VOL (+)/(-) to display...
Adjusting the SLEEP TIMER Settings POWER TV/VIDEO MENU CH CH FLASHBACK 123 DISPLAY 456 789 MUTE 0 MENU CH (])/ ([) 1 Press the MENU to disply the MENU screen. 2 Press the CH (])/([) to move ... MENU to return to set in increment of 30 minutes and in minutes). Setting the ON SCREEN DISPLAY Language. 1 Press the MENU to exit. POWER TV/VIDEO MENU CH MENU CH FLASHBACK 123 DISPLAY 456 789 MUTE 0 CH (])/ ([) 2 Press the CH (])/([) to move the ">" mark to "SETUP". 3 Press VOL (+)/(-) to display...

LC10A2U Operation Manual
Page 20
... item. 6 Press the VOL (+)/(-) to make adjustment. 7 Press the MENU to return to display the MENU screen. ADJUSTMENT (Continued) Adjusting the VIDEO ADJUST Settings POWER TV/VIDEO MENU CH MENU 1 Press the MENU to the main screen. 20 CH FLASHBACK 123 DISPLAY 456 789 MUTE 0 CH (])/ ([) 2 Press the CH (])/([) to VIDEO...
... item. 6 Press the VOL (+)/(-) to make adjustment. 7 Press the MENU to return to display the MENU screen. ADJUSTMENT (Continued) Adjusting the VIDEO ADJUST Settings POWER TV/VIDEO MENU CH MENU 1 Press the MENU to the main screen. 20 CH FLASHBACK 123 DISPLAY 456 789 MUTE 0 CH (])/ ([) 2 Press the CH (])/([) to VIDEO...

LC10A2U Operation Manual
Page 21
...Less green level More green level Press the VOL (+)/(-) to an appropriate system may improve the picture or sound quality. 21 I TV mode This product is displayed only when in the United States. I COLOR SYSTEM is factory set to comply with the color system...Selecting RESET will return all settings to AUTO for normal reception. ADJUSTMENT (Continued) Adjusting the VIDEO ADJUST Settings (Continued) TV mode Selected item PICTURE TINT COLOR BLACK LEVEL SHARPNESS COLOR SYSTEM Press the VOL (-). I COLOR SYSTEM Set the system to the factory settings. For Brazil (PALM), Argentina...
...Less green level More green level Press the VOL (+)/(-) to an appropriate system may improve the picture or sound quality. 21 I TV mode This product is displayed only when in the United States. I COLOR SYSTEM is factory set to comply with the color system...Selecting RESET will return all settings to AUTO for normal reception. ADJUSTMENT (Continued) Adjusting the VIDEO ADJUST Settings (Continued) TV mode Selected item PICTURE TINT COLOR BLACK LEVEL SHARPNESS COLOR SYSTEM Press the VOL (-). I COLOR SYSTEM Set the system to the factory settings. For Brazil (PALM), Argentina...

LC10A2U Operation Manual
Page 22
...images for special uses. Saves energy. [DARK] Brightness 20% → Sufficiently bright when viewing in well-lit areas. ADJUSTMENT (Continued) Adjusting the PRESET Settings POWER TV/VIDEO MENU CH MENU CH FLASHBACK 123 DISPLAY 456 789 MUTE 0 CH (])/ ([) LCDTV I The PRESET items can be adjusted by using CH (])/([) and VOL ...Press the MENU to return to display PRESET screen. 4 Check the factory setting of each item on the top control panel of the LCD TV set by using the BRIGHT button on the PRESET screen. The user can be set is turned off when there is no signal for 5 ...
...images for special uses. Saves energy. [DARK] Brightness 20% → Sufficiently bright when viewing in well-lit areas. ADJUSTMENT (Continued) Adjusting the PRESET Settings POWER TV/VIDEO MENU CH MENU CH FLASHBACK 123 DISPLAY 456 789 MUTE 0 CH (])/ ([) LCDTV I The PRESET items can be adjusted by using CH (])/([) and VOL ...Press the MENU to return to display PRESET screen. 4 Check the factory setting of each item on the top control panel of the LCD TV set by using the BRIGHT button on the PRESET screen. The user can be set is turned off when there is no signal for 5 ...
LC10A2U Operation Manual
Page 23
Search will be canceled. The tuner will automatically increase when it appears.) If you can preset your LCD TV to the desired channels for the broadcasting and cable TV channels. (The CH No. POWER TV/VIDEO MENU CH MENU 2 Press CH (])/([) to move the ">" mark to "CH SETTING". (MAIN MENU screen) 4 Press VOL (+)/(-) to...
Search will be canceled. The tuner will automatically increase when it appears.) If you can preset your LCD TV to the desired channels for the broadcasting and cable TV channels. (The CH No. POWER TV/VIDEO MENU CH MENU 2 Press CH (])/([) to move the ">" mark to "CH SETTING". (MAIN MENU screen) 4 Press VOL (+)/(-) to...

LC10A2U Operation Manual
Page 24
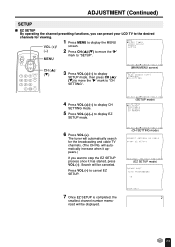
...: VHF: 2 through 125 (STD, HRC and IRC) 24 UHF: 14 through 69. (AIR/CABLE mode) CABLE channels: 1 (HRC and IRC mode only) 2 through 13. POWER TV/VIDEO MENU CH MENU CH FLASHBACK 123 DISPLAY 456 789 MUTE 0 CH (])/ ([) 3 Press VOL (+)/(-) to display SETUP mode. 4 Press CH (])/([) to move the ">" mark to...
...: VHF: 2 through 125 (STD, HRC and IRC) 24 UHF: 14 through 69. (AIR/CABLE mode) CABLE channels: 1 (HRC and IRC mode only) 2 through 13. POWER TV/VIDEO MENU CH MENU CH FLASHBACK 123 DISPLAY 456 789 MUTE 0 CH (])/ ([) 3 Press VOL (+)/(-) to display SETUP mode. 4 Press CH (])/([) to move the ">" mark to...

LC10A2U Operation Manual
Page 25
... to "SETUP". Press VOL (+)/(-) to add or erase. Use CH (])/([) or CHANNEL SELECT to select each desired channel to display CH MEMORY. POWER TV/VIDEO MENU CH CH FLASHBACK 123 DISPLAY 456 789 MUTE 0 1.2 1.3 MENU CH (])/ ([) 2.1 CHANNEL 2.2 SELECT 2.3 Press VOL (+)/(-) to display ...VOL (+)/(-) to "CH SETTING". ADJUSTMENT (Continued) SETUP (Continued) I Saving broadcast TV channels into the TV's memory. Press VOL (+) to add a channel to the TV's memory or press VOL (-) to erase a channel from TV memory. 1.1 Press MENU to display the MENU screen, then press CH (])/([) ...
... to "SETUP". Press VOL (+)/(-) to add or erase. Use CH (])/([) or CHANNEL SELECT to select each desired channel to display CH MEMORY. POWER TV/VIDEO MENU CH CH FLASHBACK 123 DISPLAY 456 789 MUTE 0 1.2 1.3 MENU CH (])/ ([) 2.1 CHANNEL 2.2 SELECT 2.3 Press VOL (+)/(-) to display ...VOL (+)/(-) to "CH SETTING". ADJUSTMENT (Continued) SETUP (Continued) I Saving broadcast TV channels into the TV's memory. Press VOL (+) to add a channel to the TV's memory or press VOL (-) to erase a channel from TV memory. 1.1 Press MENU to display the MENU screen, then press CH (])/([) ...


