

LC-20B8U-S Operation Manual
Page 3
... relocate the receiving antenna. -Increase the separation between the equipment and receiver. -Connect the equipment into an outlet on , the user is connected. -Consult the dealer or an experienced radio/TV technician for help. ONLY This product utilizes tin-lead solder, and fluorescent lamp containing a small amount of the FCC Rules. USE ONLY WITH A CART, STAND, TRIPOD, BRACKET, OR TABLE RECOMMENDED...
... relocate the receiving antenna. -Increase the separation between the equipment and receiver. -Connect the equipment into an outlet on , the user is connected. -Consult the dealer or an experienced radio/TV technician for help. ONLY This product utilizes tin-lead solder, and fluorescent lamp containing a small amount of the FCC Rules. USE ONLY WITH A CART, STAND, TRIPOD, BRACKET, OR TABLE RECOMMENDED...

LC-20B8U-S Operation Manual
Page 4
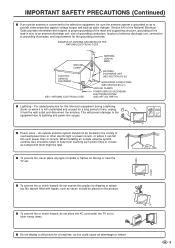
... the following precautions carefully before the product is used to perform many years of trouble-free operation of power supply used in the instructions can cause damage, which often requires extensive adjustment work , request the service technician to perform safety checks to ensure that the service person uses replacement parts specified by the manufacturer. ■ Polarization-This AC cord may be routed properly to prevent people...
... the following precautions carefully before the product is used to perform many years of trouble-free operation of power supply used in the instructions can cause damage, which often requires extensive adjustment work , request the service technician to perform safety checks to ensure that the service person uses replacement parts specified by the manufacturer. ■ Polarization-This AC cord may be routed properly to prevent people...
LC-20B8U-S Operation Manual
Page 6
... proper grounding of the mast and supporting structure, grounding of the lead-in wire to an antenna discharge unit, size of grounding conductors, location of antenna-discharge unit, connection to grounding electrodes, and requirements for a long period of overhead power lines or other heavy items. ■ Do not display a still picture for a long time, as to provide some protection against...
... proper grounding of the mast and supporting structure, grounding of the lead-in wire to an antenna discharge unit, size of grounding conductors, location of antenna-discharge unit, connection to grounding electrodes, and requirements for a long period of overhead power lines or other heavy items. ■ Do not display a still picture for a long time, as to provide some protection against...

LC-20B8U-S Operation Manual
Page 7
... AUTO CLOCK Setting 14 MANUAL CLOCK Setting 14 TIME DISPLAY 15 Basic Operation 15 Turning On and Off the Main Power 15 Standby 15 Switching the Input Modes (INPUT1/INPUT2/INPUT3/INPUT4/INPUT5(PC)/TV) ... 16 Sound Volume 16 Changing Channels 17 Selecting Menu Items 17 Basic Adjustment Settings 19 AV MODE 19 OPC 19 BACKLIGHT 20 PICTURE Adjustments 20 COLOR TEMPERATURE 21 I/P SETTING 21 NOISE CLEAN 21 Supplied Accessories FILM MODE 22 QUICK SHOOT 22 AUDIO Adjustments 22 PC SOUND...
... AUTO CLOCK Setting 14 MANUAL CLOCK Setting 14 TIME DISPLAY 15 Basic Operation 15 Turning On and Off the Main Power 15 Standby 15 Switching the Input Modes (INPUT1/INPUT2/INPUT3/INPUT4/INPUT5(PC)/TV) ... 16 Sound Volume 16 Changing Channels 17 Selecting Menu Items 17 Basic Adjustment Settings 19 AV MODE 19 OPC 19 BACKLIGHT 20 PICTURE Adjustments 20 COLOR TEMPERATURE 21 I/P SETTING 21 NOISE CLEAN 21 Supplied Accessories FILM MODE 22 QUICK SHOOT 22 AUDIO Adjustments 22 PC SOUND...
LC-20B8U-S Operation Manual
Page 10
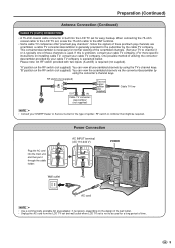
... possible method of splitter, RF switch or combiner that might be used . Power Connection AC INPUT terminal (AC 110-240 V) POWER Wall outlet AC cord A • Use a commercially available AC plug adapter, if necessary, depending on the RF switch (not supplied): You can view the scrambled channels via the converter/descrambler by the cable TV company. "B" position on installing cable TV, consult your cable TV company is explained below...
... possible method of splitter, RF switch or combiner that might be used . Power Connection AC INPUT terminal (AC 110-240 V) POWER Wall outlet AC cord A • Use a commercially available AC plug adapter, if necessary, depending on the RF switch (not supplied): You can view the scrambled channels via the converter/descrambler by the cable TV company. "B" position on installing cable TV, consult your cable TV company is explained below...
LC-20B8U-S Operation Manual
Page 11
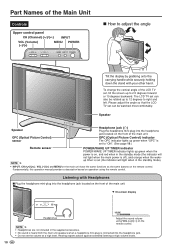
... operation manual provides a description based on operation using VOL on the remote control. Part Names of the Main Unit Controls Upper control panel CH (Channel) ( )/( ) INPUT VOL (Volume) (-)/(+) MENU POWER How to adjust the angle Tilt the display by grabbing onto the carrying handle while securely holding down the stand with Headphones ■ Plug the headphone mini-plug into the headphone jack located on the front of the main unit. To change the...
... operation manual provides a description based on operation using VOL on the remote control. Part Names of the Main Unit Controls Upper control panel CH (Channel) ( )/( ) INPUT VOL (Volume) (-)/(+) MENU POWER How to adjust the angle Tilt the display by grabbing onto the carrying handle while securely holding down the stand with Headphones ■ Plug the headphone mini-plug into the headphone jack located on the front of the main unit. To change the...
LC-20B8U-S Operation Manual
Page 12
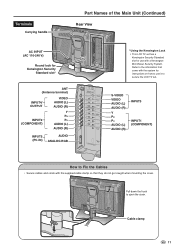
... (Antenna terminal) INPUT4/ OUTPUT VIDEO AUDIO (L) AUDIO (R) INPUT2 (COMPONENT) Y PB PR AUDIO (L) AUDIO (R) INPUT5 (PC-IN) AUDIO ANALOG RGB * Using the Kensington Lock • This LCD TV set . Cable clamp 11 Pull down the hook to Fix the Cables • Secure cables and cords with the supplied cable clamp so that came with a Kensington MicroSaver Security System. Refer to the information that they do not get caught when mounting the cover. S-VIDEO VIDEO AUDIO (L) AUDIO (R) Y PB PR AUDIO (L) AUDIO...
... (Antenna terminal) INPUT4/ OUTPUT VIDEO AUDIO (L) AUDIO (R) INPUT2 (COMPONENT) Y PB PR AUDIO (L) AUDIO (R) INPUT5 (PC-IN) AUDIO ANALOG RGB * Using the Kensington Lock • This LCD TV set . Cable clamp 11 Pull down the hook to Fix the Cables • Secure cables and cords with the supplied cable clamp so that came with a Kensington MicroSaver Security System. Refer to the information that they do not get caught when mounting the cover. S-VIDEO VIDEO AUDIO (L) AUDIO (R) Y PB PR AUDIO (L) AUDIO...

LC-20B8U-S Operation Manual
Page 13
... ch Color: PAL-N TV ch: US ch Factory setting of the Remote Control POWER (p. 15) Switches the Liquid Crystal Television power on the screen. MENU RETURN (p. 17) Returns to the previous channel. INPUT (p. 16) Switches the input source between INPUT1, INPUT2, INPUT3, INPUT4, INPUT5 (PC) and TV mode. Country U.S.A. ENTER Executes a command. BACKLIGHT (p. 20) Adjusts the brightness of the picture. AUDIO ONLY (p. 30) Outputs audio without screen image. Part Names of color system TV Video NTSC...
... ch Color: PAL-N TV ch: US ch Factory setting of the Remote Control POWER (p. 15) Switches the Liquid Crystal Television power on the screen. MENU RETURN (p. 17) Returns to the previous channel. INPUT (p. 16) Switches the input source between INPUT1, INPUT2, INPUT3, INPUT4, INPUT5 (PC) and TV mode. Country U.S.A. ENTER Executes a command. BACKLIGHT (p. 20) Adjusts the brightness of the picture. AUDIO ONLY (p. 30) Outputs audio without screen image. Part Names of color system TV Video NTSC...
LC-20B8U-S Operation Manual
Page 14
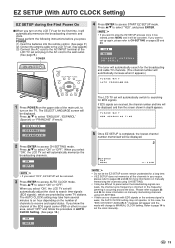
... SETUP will be canceled. The AUTO CLOCK setting may take from several minutes to an hour depending on manually memorizing channels using CH-SETTING. • It may not operate. Please perform the following instructions before you press POWER. (1) Insert the batteries into the remote control. (See page 7.) (2) Connect the antenna cable to the LCD TV set. (See page 8.) (3) Connect the AC cord to the AC INPUT terminal of the LCD TV set...
... SETUP will be canceled. The AUTO CLOCK setting may take from several minutes to an hour depending on manually memorizing channels using CH-SETTING. • It may not operate. Please perform the following instructions before you press POWER. (1) Insert the batteries into the remote control. (See page 7.) (2) Connect the antenna cable to the LCD TV set. (See page 8.) (3) Connect the AC cord to the AC INPUT terminal of the LCD TV set...
LC-20B8U-S Operation Manual
Page 15
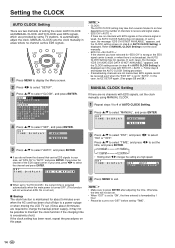
..., the message "EDS CH IS NOT AVAILABLE." SETUP OPTION CH-SETTING MTS CLOCK INPUT4 SELECT V-CHIP BLOCK CLOSED CAPTION COLOR SYSTEM PC SETTING LANGUAGE 4 Press '/" to select "ON" or "OFF". In this page. 4 Press MENU to exit. SET TIME DISPLAY AUTO MANUAL 5 Press '/" to select "AUTO", and press ENTER. ● If you know the channel that carries EDS signals in your area, press \/| to select...
..., the message "EDS CH IS NOT AVAILABLE." SETUP OPTION CH-SETTING MTS CLOCK INPUT4 SELECT V-CHIP BLOCK CLOSED CAPTION COLOR SYSTEM PC SETTING LANGUAGE 4 Press '/" to select "ON" or "OFF". In this page. 4 Press MENU to exit. SET TIME DISPLAY AUTO MANUAL 5 Press '/" to select "AUTO", and press ENTER. ● If you know the channel that carries EDS signals in your area, press \/| to select...
LC-20B8U-S Operation Manual
Page 18
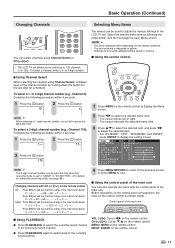
... the remote control INPUT: ENTER on setting the receiving mode, see page 23.) Changing channels with the control panel of the main unit. Select the desired menu item by holding down the button for the last digit for each Menu screen. A • The items displayed differ depending on the setting conditions. • The item selected is set . Basic Operation (Continued) Changing Channels Selecting Menu Items You can select channels using Channel Select, complete input of the channel number...
... the remote control INPUT: ENTER on setting the receiving mode, see page 23.) Changing channels with the control panel of the main unit. Select the desired menu item by holding down the button for the last digit for each Menu screen. A • The items displayed differ depending on the setting conditions. • The item selected is set . Basic Operation (Continued) Changing Channels Selecting Menu Items You can select channels using Channel Select, complete input of the channel number...
LC-20B8U-S Operation Manual
Page 19
... BLOCK 25-28 CLOSED CAPTION 29 COLOR SYSTEM 12, 24 PC SETTING (for PC mode 34 LANGUAGE 13, 24 Page VIEW MODE 30 AUDIO ONLY 30 BLUE SCREEN 30 SLEEP TIMER 31 WAKE-UP TIMER 31 NO SIGNAL OFF 32 NO OPERATION OFF 32 POWER MANAGEMENT (for the remote control. PICTURE M E N U [ PICTURE] PICTURE S AUDIO SETUP OPTION AV MODE [DYNAMIC] OPC [OFF] B A C K L I G H T [ BRIGHT ] CONTRAST [ 40] BRIGHTNESS[ 0 ]- + COLOR [+ 5]- + TINT [ 0] SHARPNESS [ 0 ]- + ADVANCED RESET Page AV MODE 19 OPC 19 BACKLIGHT...
... BLOCK 25-28 CLOSED CAPTION 29 COLOR SYSTEM 12, 24 PC SETTING (for PC mode 34 LANGUAGE 13, 24 Page VIEW MODE 30 AUDIO ONLY 30 BLUE SCREEN 30 SLEEP TIMER 31 WAKE-UP TIMER 31 NO SIGNAL OFF 32 NO OPERATION OFF 32 POWER MANAGEMENT (for the remote control. PICTURE M E N U [ PICTURE] PICTURE S AUDIO SETUP OPTION AV MODE [DYNAMIC] OPC [OFF] B A C K L I G H T [ BRIGHT ] CONTRAST [ 40] BRIGHTNESS[ 0 ]- + COLOR [+ 5]- + TINT [ 0] SHARPNESS [ 0 ]- + ADVANCED RESET Page AV MODE 19 OPC 19 BACKLIGHT...
LC-20B8U-S Operation Manual
Page 20
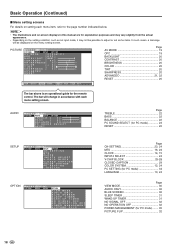
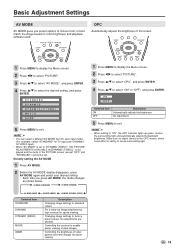
... MODE [STANDARD] AV MODE [DYNAMIC] 1 Press MENU to display the Menu screen. 2 Press \/| to select "PICTURE". 3 Press '/" to select "OPC", and press ENTER. 4 Press '/" to sense surrounding light. AV MODE [GAME] AV MODE [MOVIE] AV MODE [DYNAMIC (FIXED)] Selected item STANDARD DYNAMIC DYNAMIC (FIXED) MOVIE GAME Description Changing image settings to enable easier viewing of video games and other images for sports viewing. Controlling the contrast to standard values. Basic Adjustment Settings AV MODE AV MODE...
... MODE [STANDARD] AV MODE [DYNAMIC] 1 Press MENU to display the Menu screen. 2 Press \/| to select "PICTURE". 3 Press '/" to select "OPC", and press ENTER. 4 Press '/" to sense surrounding light. AV MODE [GAME] AV MODE [MOVIE] AV MODE [DYNAMIC (FIXED)] Selected item STANDARD DYNAMIC DYNAMIC (FIXED) MOVIE GAME Description Changing image settings to enable easier viewing of video games and other images for sports viewing. Controlling the contrast to standard values. Basic Adjustment Settings AV MODE AV MODE...
LC-20B8U-S Operation Manual
Page 21
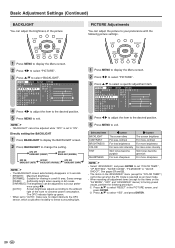
... "ADVANCED" menus) to factory preset values, perform the following picture settings. 1 Press MENU to display the Menu screen. 2 Press \/| to select "PICTURE". 3 Press '/" to select "BACKLIGHT". The OPC indicator lights up green. • When set "COLOR TEMP.", "I/P SETTING", "NOISE CLEAN", "FILM MODE" or "QUICK SHOOT". Saves energy. [DARK]: Sufficiently bright when viewing in a well-lit area. Selected item BACKLIGHT CONTRAST BRIGHTNESS COLOR TINT SHARPNESS \ button The screen dims For less...
... "ADVANCED" menus) to factory preset values, perform the following picture settings. 1 Press MENU to display the Menu screen. 2 Press \/| to select "PICTURE". 3 Press '/" to select "BACKLIGHT". The OPC indicator lights up green. • When set "COLOR TEMP.", "I/P SETTING", "NOISE CLEAN", "FILM MODE" or "QUICK SHOOT". Saves energy. [DARK]: Sufficiently bright when viewing in a well-lit area. Selected item BACKLIGHT CONTRAST BRIGHTNESS COLOR TINT SHARPNESS \ button The screen dims For less...
LC-20B8U-S Operation Manual
Page 22
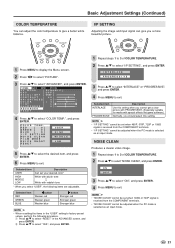
... "RESET" in the "USER" setting to factory preset values, perform the following items are adjustable. A • "I/P SETTING" cannot be set when 480P, 576P, 720P or 1080I signal is received from the COMPONENT terminals. • "NOISE CLEAN" cannot be adjusted when the PC mode is selected as an input mode. A • "NOISE CLEAN" cannot be set your desired color* White with bluish tone White with special effects like game software.) Normally...
... "RESET" in the "USER" setting to factory preset values, perform the following items are adjustable. A • "I/P SETTING" cannot be set when 480P, 576P, 720P or 1080I signal is received from the COMPONENT terminals. • "NOISE CLEAN" cannot be adjusted when the PC mode is selected as an input mode. A • "NOISE CLEAN" cannot be set your desired color* White with bluish tone White with special effects like game software.) Normally...

LC-20B8U-S Operation Manual
Page 23
... speaker A • The items on the AUDIO menu cannot be adjusted when the PC mode is selected as a sports program. 1 Repeat steps 1 to 3 of 60 Hz (e.g. PAL, SECAM). QUICK SHOOT Provides sharp pictures suitable for cinematic picture quality. You can adjust the sound quality to your preference with the following procedure. 1 Press '/" to select "RESET" in the AUDIO screen, and press ENTER. 2 Press '/" to select a specific adjustment...
... speaker A • The items on the AUDIO menu cannot be adjusted when the PC mode is selected as a sports program. 1 Repeat steps 1 to 3 of 60 Hz (e.g. PAL, SECAM). QUICK SHOOT Provides sharp pictures suitable for cinematic picture quality. You can adjust the sound quality to your preference with the following procedure. 1 Press '/" to select "RESET" in the AUDIO screen, and press ENTER. 2 Press '/" to select a specific adjustment...
LC-20B8U-S Operation Manual
Page 30
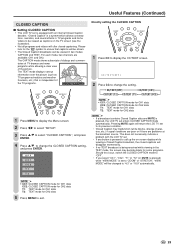
... mode, two channels are problems at the broadcast source. The TEXT mode displays various information over the picture (such as captions on -screen display while viewing a Closed Caption broadcast, the closed captioning. The CAPTION mode shows subscripts of dialogs and commentaries of TV dramas and news programs while allowing a clear view of the TV programs. 1 Press MENU to display the Menu screen. 2 Press \/| to select "SETUP". 3 Press '/" to select "CLOSED CAPTION ", and press ENTER. 4 Press '/" to change the setting...
... mode, two channels are problems at the broadcast source. The TEXT mode displays various information over the picture (such as captions on -screen display while viewing a Closed Caption broadcast, the closed captioning. The CAPTION mode shows subscripts of dialogs and commentaries of TV dramas and news programs while allowing a clear view of the TV programs. 1 Press MENU to display the Menu screen. 2 Press \/| to select "SETUP". 3 Press '/" to select "CLOSED CAPTION ", and press ENTER. 4 Press '/" to change the setting...
LC-20B8U-S Operation Manual
Page 39
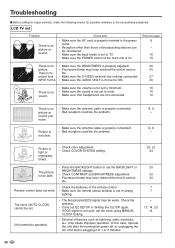
... light or improperly tinted. • Check color adjustment. • Check COLOR SYSTEM setting. 20, 21 24 The picture is not in 1 or 2 minutes. 20 20 40 7 7 - 13, 14, 23 14 - 38 In this case, operate the unit after first turning the power off, or unplugging the AC cord and re-plugging it in strong lighting. Remote control does not work. • Check the batteries of service...
... light or improperly tinted. • Check color adjustment. • Check COLOR SYSTEM setting. 20, 21 24 The picture is not in 1 or 2 minutes. 20 20 40 7 7 - 13, 14, 23 14 - 38 In this case, operate the unit after first turning the power off, or unplugging the AC cord and re-plugging it in strong lighting. Remote control does not work. • Check the batteries of service...

LC-20B8U-S Operation Manual
Page 42
... time described herein, shall constitute complete fulfillment of all liabilities and responsibilities of Sharp to the purchaser with a new or remanufactured equivalent at 1-800-BE-SHARP. Ship prepaid or carry in the United States. If you . Model Specific Section Your Product Model Number & Description: LC-20B8U LCD Color Television Warranty Period for the period(s) set forth below nor to any ): Where to Obtain Service...
... time described herein, shall constitute complete fulfillment of all liabilities and responsibilities of Sharp to the purchaser with a new or remanufactured equivalent at 1-800-BE-SHARP. Ship prepaid or carry in the United States. If you . Model Specific Section Your Product Model Number & Description: LC-20B8U LCD Color Television Warranty Period for the period(s) set forth below nor to any ): Where to Obtain Service...

LC-20B8U-S Operation Manual
Page 43
... to operate during the warranty period, warranty service may be obtained upon delivery of the Sharp product together with the screen size of 27" or larger and on any Sharp television with proof of purchase and a copy of this LIMITED WARRANTY statement to transmission line/power line voltage or liquid spillage. (g) Any product received without appropriate model, serial number and CSA/cUL markings. (h) Any products used...
... to operate during the warranty period, warranty service may be obtained upon delivery of the Sharp product together with the screen size of 27" or larger and on any Sharp television with proof of purchase and a copy of this LIMITED WARRANTY statement to transmission line/power line voltage or liquid spillage. (g) Any product received without appropriate model, serial number and CSA/cUL markings. (h) Any products used...


