

LC-20M4U Operation Manual
Page 2
... LC-20M4U LCD AV MONITOR ENGLISH OPERATION MANUAL IMPORTANT INFORMATION WARNING: TO REDUCE THE RISK OF FIRE OR ELECTRIC SHOCK, DO NOT EXPOSE THIS PRODUCT TO RAIN OR MOISTURE. NO USER-SERVICEABLE PARTS INSIDE. CAUTION RISK OF ELECTRIC SHOCK. DO NOT OPEN. The lightning flash with...the user to the presence of electric shock to constitute a risk of important operating and maintenance (servicing) instructions in the literature accompanying the product. CAUTION: TO REDUCE THE RISK OF ELECTRIC SHOCK, DO NOT REMOVE COVER (OR BACK). REFER SERVICING TO QUALIFIED SERVICE PERSONNEL....
... LC-20M4U LCD AV MONITOR ENGLISH OPERATION MANUAL IMPORTANT INFORMATION WARNING: TO REDUCE THE RISK OF FIRE OR ELECTRIC SHOCK, DO NOT EXPOSE THIS PRODUCT TO RAIN OR MOISTURE. NO USER-SERVICEABLE PARTS INSIDE. CAUTION RISK OF ELECTRIC SHOCK. DO NOT OPEN. The lightning flash with...the user to the presence of electric shock to constitute a risk of important operating and maintenance (servicing) instructions in the literature accompanying the product. CAUTION: TO REDUCE THE RISK OF ELECTRIC SHOCK, DO NOT REMOVE COVER (OR BACK). REFER SERVICING TO QUALIFIED SERVICE PERSONNEL....
LC-20M4U Operation Manual
Page 3
... may cause undesired operation. However, there is . U.S.A. This equipment generates, uses, and can be determined by turning the equipment off and on a circuit different from the AC cord, and do not change the way of winding cables around the core part. These limits are designed to radio communications. IMPORTANT INFORMATION Declaration of Conformity SHARP LCD AV MONITOR MODEL LC-20M4U This device complies...
... may cause undesired operation. However, there is . U.S.A. This equipment generates, uses, and can be determined by turning the equipment off and on a circuit different from the AC cord, and do not change the way of winding cables around the core part. These limits are designed to radio communications. IMPORTANT INFORMATION Declaration of Conformity SHARP LCD AV MONITOR MODEL LC-20M4U This device complies...
LC-20M4U Operation Manual
Page 5
... place for built-in accidents. 7. Keep this manual in a safe place-These safety and operating instructions must be observed closely. 4. Follow instructions-All operating instructions must be followed. 5. Attachments-Do not use can result in installation; Stand-Do not place the product on batteries or another power source, refer to fall from a SHARP service center or your LCD product, please read the Safety Precautions carefully...
... place for built-in accidents. 7. Keep this manual in a safe place-These safety and operating instructions must be observed closely. 4. Follow instructions-All operating instructions must be followed. 5. Attachments-Do not use can result in installation; Stand-Do not place the product on batteries or another power source, refer to fall from a SHARP service center or your LCD product, please read the Safety Precautions carefully...

LC-20M4U Operation Manual
Page 6
... AC outlet, and request a qualified service person to ensure that the service person uses replacement parts specified by a qualified technician. This is damaged. Do not defeat the safety purpose of your electrician to rain or water. Please note that the product needs servicing. 20. Repair-If any of blue, green or red. Polarization-This AC adapter may appear on the product...
... AC outlet, and request a qualified service person to ensure that the service person uses replacement parts specified by a qualified technician. This is damaged. Do not defeat the safety purpose of your electrician to rain or water. Please note that the product needs servicing. 20. Repair-If any of blue, green or red. Polarization-This AC adapter may appear on the product...
LC-20M4U Operation Manual
Page 7
... MAIN POWER ...12 Switching the AV INPUT [AV1/AV2] Mode 12 Sound Volume ...13 ON/OFF Standby ...13 SELECTING THE MENU ITEMS ...14 ADJUSTMENT ...15 Adjusting the LANGUAGE Settings 15 Adjusting the PICTURE Settings 16 Adjusting the SET UP Settings 18 Adjusting the SLEEP TIMER Settings 19 CONNECTING TO EXTERNAL DEVICES 20 Connecting to a VCR, a DVD player etc. (AV 1/2 IN 20 Connecting to a DVD player (COMPONENT terminal 21 Outputting video and audio (video output 22 Listening with Headphones ...22 Fixing the Cables ...22 Watching TV ...23 TROUBLESHOOTING ...24 SPECIFICATIONS...
... MAIN POWER ...12 Switching the AV INPUT [AV1/AV2] Mode 12 Sound Volume ...13 ON/OFF Standby ...13 SELECTING THE MENU ITEMS ...14 ADJUSTMENT ...15 Adjusting the LANGUAGE Settings 15 Adjusting the PICTURE Settings 16 Adjusting the SET UP Settings 18 Adjusting the SLEEP TIMER Settings 19 CONNECTING TO EXTERNAL DEVICES 20 Connecting to a VCR, a DVD player etc. (AV 1/2 IN 20 Connecting to a DVD player (COMPONENT terminal 21 Outputting video and audio (video output 22 Listening with Headphones ...22 Fixing the Cables ...22 Watching TV ...23 TROUBLESHOOTING ...24 SPECIFICATIONS...
LC-20M4U Operation Manual
Page 8
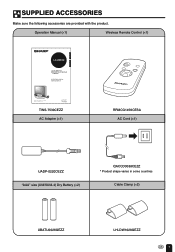
SUPPLIED ACCESSORIES Make sure the following accessories are provided with the product. Operation Manual (×1) Wireless Remote Control (×1) ENGLISH LC-20M4U LCD AV MONITOR MONITEUR AV Á CRISTAUX LIQUIDES OPERATION MANUAL MODE D'EMPLOI Printed on post-consumer recycled paper. Printed in Japan Imprimé au Japon TINS-7530CEZZ 01P11-JKK TINS-7530CEZZ AC Adapter (×1) FRANÇAIS RRMCG1459CESA AC Cord (×1) UADP-0220CEZZ "AAA...
SUPPLIED ACCESSORIES Make sure the following accessories are provided with the product. Operation Manual (×1) Wireless Remote Control (×1) ENGLISH LC-20M4U LCD AV MONITOR MONITEUR AV Á CRISTAUX LIQUIDES OPERATION MANUAL MODE D'EMPLOI Printed on post-consumer recycled paper. Printed in Japan Imprimé au Japon TINS-7530CEZZ 01P11-JKK TINS-7530CEZZ AC Adapter (×1) FRANÇAIS RRMCG1459CESA AC Cord (×1) UADP-0220CEZZ "AAA...
LC-20M4U Operation Manual
Page 9
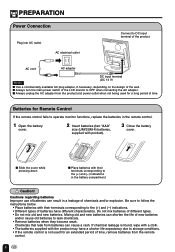
... input terminal of the wall. Be sure to follow the instructions below. • Place batteries with product). 3 Close the battery cover. Mixing old and new batteries can result in the remote control. 1 Open the battery cover. 2 Insert batteries (two "AAA" size (UM/SUM-4) batteries, supplied with their terminals corresponding to operate monitor functions, replace the batteries in a leakage of time. AC cord AC adapter...
... input terminal of the wall. Be sure to follow the instructions below. • Place batteries with product). 3 Close the battery cover. Mixing old and new batteries can result in the remote control. 1 Open the battery cover. 2 Insert batteries (two "AAA" size (UM/SUM-4) batteries, supplied with their terminals corresponding to operate monitor functions, replace the batteries in a leakage of time. AC cord AC adapter...
LC-20M4U Operation Manual
Page 10
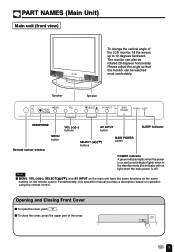
... on operation using the remote control. I MENU, VOL (+)/(-), SELECT(])/([), and AV INPUT on the main unit have the same functions as the same buttons on the remote control. The monitor can be rotated 20 degrees horizontally. Fundamentally, this operation manual provides a description based on and a red indicator lights when in the standby mode (the indicator will not light when the main power is off). Speaker Speaker MENU HEAD PHONE - MAIN POWER 9 Note: I To close...
... on operation using the remote control. I MENU, VOL (+)/(-), SELECT(])/([), and AV INPUT on the main unit have the same functions as the same buttons on the remote control. The monitor can be rotated 20 degrees horizontally. Fundamentally, this operation manual provides a description based on and a red indicator lights when in the standby mode (the indicator will not light when the main power is off). Speaker Speaker MENU HEAD PHONE - MAIN POWER 9 Note: I To close...

LC-20M4U Operation Manual
Page 11
.... AUDIO R L VIDEO AV 1 IN S-VIDEO Y COMPONENT PB(CB) PR(CR) POWER INPUT DC13V AUDIO VIDEO AUDIO S-VIDEO VIDEO AV 2 IN/OUT AV 1 IN COMPONENT POWER INPUT DC13V Removing Back Cover I To replace the back cover, first fit the four top clips (1) into the corresponding slots of the cover lock in place with the corresponding slots. PART NAMES (Main Unit) (Continued) Main unit (rear view) Rear Speaker (woofer) Rear terminal section Stand AV 2 IN/OUT AUDIO R L VIDEO...
.... AUDIO R L VIDEO AV 1 IN S-VIDEO Y COMPONENT PB(CB) PR(CR) POWER INPUT DC13V AUDIO VIDEO AUDIO S-VIDEO VIDEO AV 2 IN/OUT AV 1 IN COMPONENT POWER INPUT DC13V Removing Back Cover I To replace the back cover, first fit the four top clips (1) into the corresponding slots of the cover lock in place with the corresponding slots. PART NAMES (Main Unit) (Continued) Main unit (rear view) Rear Speaker (woofer) Rear terminal section Stand AV 2 IN/OUT AUDIO R L VIDEO...
LC-20M4U Operation Manual
Page 13
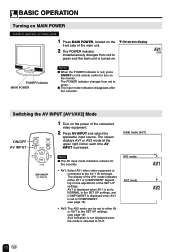
... remote control to turn on the monitor. BASIC OPERATION Turning on MAIN POWER Control section of main unit 1 Press MAIN POWER, located on the front side of the main unit. 2 The POWER indicator instantaneously changes from red to either AV1 or COMPONENT depending on the adjustment of the connected video equipment. 2 Press AV INPUT and select the applicable input source. AV1 is displayed when AV1 is set to NORMAL in the SET UP settings...
... remote control to turn on the monitor. BASIC OPERATION Turning on MAIN POWER Control section of main unit 1 Press MAIN POWER, located on the front side of the main unit. 2 The POWER indicator instantaneously changes from red to either AV1 or COMPONENT depending on the adjustment of the connected video equipment. 2 Press AV INPUT and select the applicable input source. AV1 is displayed when AV1 is set to NORMAL in the SET UP settings...

LC-20M4U Operation Manual
Page 15
.... (Pages 16 and 17) PICTURE(AV1) CONTRAST [ 30] TINT [ 0] COLOR [ 0] BLACK LEVEL [ 0] SHARPNESS [ 0] RED-BLUE [ 0] GREEN [ 0] COLOR SYSTEM [ N358] RESET SELECT: ENTER: -VOL+ EXIT: MENU (Pages 18 and 19) SET UP BRIGHTNESS UPSIDE RIGHT/LEFT BLUE SCREEN AV1 AV2 IN/OUT SLEEP TIMER [BRIGHT ] [NORMAL] [NORMAL] [OFF ] [NORMAL] [IN ] [ - - - I The original screen is highlighted in yellow. REMAIN] SELECT: ADJUST: -VOL+ EXIT: MENU (Page 15) LANGUAGE ENGLISH...
.... (Pages 16 and 17) PICTURE(AV1) CONTRAST [ 30] TINT [ 0] COLOR [ 0] BLACK LEVEL [ 0] SHARPNESS [ 0] RED-BLUE [ 0] GREEN [ 0] COLOR SYSTEM [ N358] RESET SELECT: ENTER: -VOL+ EXIT: MENU (Pages 18 and 19) SET UP BRIGHTNESS UPSIDE RIGHT/LEFT BLUE SCREEN AV1 AV2 IN/OUT SLEEP TIMER [BRIGHT ] [NORMAL] [NORMAL] [OFF ] [NORMAL] [IN ] [ - - - I The original screen is highlighted in yellow. REMAIN] SELECT: ADJUST: -VOL+ EXIT: MENU (Page 15) LANGUAGE ENGLISH...

LC-20M4U Operation Manual
Page 19
... AV INPUT MENU SELECT VOL (+)/( ) MENU 1 Press MENU to display the MENU screen. 2 Press SELECT (])/([) to move the cursor to exit. REMAIN] [ON] The screen is turned blue when there is no signal. [COMPONENT] [OUT [OUT ] Line Output is selected, Output volume is fixed, Speaker output is available. ] Line Output is selected, Output volume is variable, Speaker output is inactive. [NORMAL] [IN] [ - - - The user can be set by the user. BLUE SCREEN AV1 AV2 IN/OUT SLEEP TIMER...
... AV INPUT MENU SELECT VOL (+)/( ) MENU 1 Press MENU to display the MENU screen. 2 Press SELECT (])/([) to move the cursor to exit. REMAIN] [ON] The screen is turned blue when there is no signal. [COMPONENT] [OUT [OUT ] Line Output is selected, Output volume is fixed, Speaker output is available. ] Line Output is selected, Output volume is variable, Speaker output is inactive. [NORMAL] [IN] [ - - - The user can be set by the user. BLUE SCREEN AV1 AV2 IN/OUT SLEEP TIMER...
LC-20M4U Operation Manual
Page 20
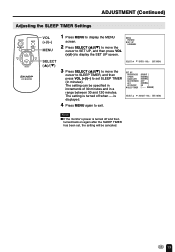
... after the SLEEP TIMER has been set SLEEP TIMER (in a range between 30 and 120 minutes. ADJUSTMENT (Continued) Adjusting the SLEEP TIMER Settings ON/OFF MUTE AV INPUT MENU SELECT VOL VOL SELECT LCD MONITOR VOL (+)/( ) MENU 1 Press MENU to display the MENU screen. 2 Press SELECT (])/([) to move the cursor to SLEEP TIMER, and then press VOL (+)/(-) to display the SET UP screen. REMAIN] SELECT: ADJUST: -VOL+ EXIT: MENU Note: I If the monitor's power is displayed. 4 Press MENU again to...
... after the SLEEP TIMER has been set SLEEP TIMER (in a range between 30 and 120 minutes. ADJUSTMENT (Continued) Adjusting the SLEEP TIMER Settings ON/OFF MUTE AV INPUT MENU SELECT VOL VOL SELECT LCD MONITOR VOL (+)/( ) MENU 1 Press MENU to display the MENU screen. 2 Press SELECT (])/([) to move the cursor to SLEEP TIMER, and then press VOL (+)/(-) to display the SET UP screen. REMAIN] SELECT: ADJUST: -VOL+ EXIT: MENU Note: I If the monitor's power is displayed. 4 Press MENU again to...

LC-20M4U Operation Manual
Page 21
... the audio cable. CONNECTING TO EXTERNAL DEVICES Connecting to a VCR, a DVD Player, etc. (AV 1/2 IN) This LCD monitor can be connected to AV 1/2 IN terminals. I PC connection is given to the S-VIDEO input terminal. AV 2 IN/OUT AUDIO R L VIDEO AUDIO R L AV 1 IN VIDEO S-VIDEO COMPONENT Y PB PR POWER INPUT DC13V Audio cord To AUDIO input terminal Video cord (BNC TYPE) To VIDEO input terminal S-video cord To S-VIDEO input terminal To AUDIO input terminal Audio cord To audio output terminal To VIDEO input terminal Video cord (BNC TYPE) To video output terminal To audio...
... the audio cable. CONNECTING TO EXTERNAL DEVICES Connecting to a VCR, a DVD Player, etc. (AV 1/2 IN) This LCD monitor can be connected to AV 1/2 IN terminals. I PC connection is given to the S-VIDEO input terminal. AV 2 IN/OUT AUDIO R L VIDEO AUDIO R L AV 1 IN VIDEO S-VIDEO COMPONENT Y PB PR POWER INPUT DC13V Audio cord To AUDIO input terminal Video cord (BNC TYPE) To VIDEO input terminal S-video cord To S-VIDEO input terminal To AUDIO input terminal Audio cord To audio output terminal To VIDEO input terminal Video cord (BNC TYPE) To video output terminal To audio...
LC-20M4U Operation Manual
Page 22
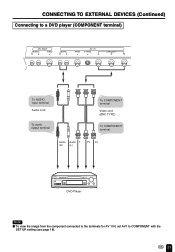
CONNECTING TO EXTERNAL DEVICES (Continued) Connecting to a DVD player (COMPONENT terminal) AV 2 IN/OUT AUDIO R L VIDEO AUDIO R L AV 1 IN VIDEO S-VIDEO COMPONENT Y PB PR POWER INPUT DC13V To AUDIO input terminal Audio cord To audio output terminal To COMPONENT terminal Video cord (BNC TYPE) To COMPONENT terminal Audio Audio Y (R) (L) PB PR DVD TUNER/BAND AUX 1 AUX 2 AUX 3 SURROUND ON/OFF DVD Player Note: I To view the image from the component connected to the terminals for AV 1 IN, set AV1 to COMPONENT with the SET UP setting (see page 18). 21
CONNECTING TO EXTERNAL DEVICES (Continued) Connecting to a DVD player (COMPONENT terminal) AV 2 IN/OUT AUDIO R L VIDEO AUDIO R L AV 1 IN VIDEO S-VIDEO COMPONENT Y PB PR POWER INPUT DC13V To AUDIO input terminal Audio cord To audio output terminal To COMPONENT terminal Video cord (BNC TYPE) To COMPONENT terminal Audio Audio Y (R) (L) PB PR DVD TUNER/BAND AUX 1 AUX 2 AUX 3 SURROUND ON/OFF DVD Player Note: I To view the image from the component connected to the terminals for AV 1 IN, set AV1 to COMPONENT with the SET UP setting (see page 18). 21

LC-20M4U Operation Manual
Page 23
.... Fixing the Cables • Secure cables and cords with Headphones I Plug the headphone mini-plug into the headphone jack located on the front side of the set to output video, but it is not possible to input or output. CONNECTING TO EXTERNAL DEVICES (Continued) Outputting video and audio (video output) It is possible to the AUDIO input terminal and the POWER INPUT terminal. M On-screen display Headphones Mini-plug MENU HEAD PHONE HEADPHONE jack VOLUME 60 Notes: I No sound...
.... Fixing the Cables • Secure cables and cords with Headphones I Plug the headphone mini-plug into the headphone jack located on the front side of the set to output video, but it is not possible to input or output. CONNECTING TO EXTERNAL DEVICES (Continued) Outputting video and audio (video output) It is possible to the AUDIO input terminal and the POWER INPUT terminal. M On-screen display Headphones Mini-plug MENU HEAD PHONE HEADPHONE jack VOLUME 60 Notes: I No sound...

LC-20M4U Operation Manual
Page 25
.... (Contact an authorized Sharp service facility for replacement lamp(s).) • Check COLOR adjustment. 17 • Check the color system setting. 17 • Make sure that the remote sensor window is red). Image is too light or improperly tinted. Remote control does not work. 24 TROUBLESHOOTING Problem No image on screen, and no sound from speakers. Image is on screen. Check item • Make sure that the AC power cord plug is securely inserted...
.... (Contact an authorized Sharp service facility for replacement lamp(s).) • Check COLOR adjustment. 17 • Check the color system setting. 17 • Make sure that the remote sensor window is red). Image is too light or improperly tinted. Remote control does not work. 24 TROUBLESHOOTING Problem No image on screen, and no sound from speakers. Image is on screen. Check item • Make sure that the AC power cord plug is securely inserted...
LC-20M4U Operation Manual
Page 26
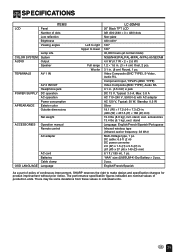
... COLOR SYSTEM AUDIO Lamp Life System Output Speaker TERMINALS AV 1 IN POWER SUPPLY APPEARANCE AV 2 IN/OUT Headphone jack DC operation AC operation Power consumption Exterior color Outside dimensions Net weight ACCESSORIES Operation manual Remote control AC adapter OSD LANGUAGE AC cord Batteries Cable clamp Language Left to right Upper to make design and specification changes for product improvement without prior notice. English/French/Spanish As a part of policy of production units. stand...
... COLOR SYSTEM AUDIO Lamp Life System Output Speaker TERMINALS AV 1 IN POWER SUPPLY APPEARANCE AV 2 IN/OUT Headphone jack DC operation AC operation Power consumption Exterior color Outside dimensions Net weight ACCESSORIES Operation manual Remote control AC adapter OSD LANGUAGE AC cord Batteries Cable clamp Language Left to right Upper to make design and specification changes for product improvement without prior notice. English/French/Spanish As a part of policy of production units. stand...

LC-20M4U Operation Manual
Page 28
... the period(s) set forth below . LIMITED WARRANTY END-USER LIMITED WARRANTY SHARP ELECTRONICS CORPORATION warrants to the servicer. In order to enforce the rights under applicable state law, implied warranties may not apply. If you need service for your Product to the purchaser for parts or labor for breach in the United States. Some states do to Obtain Service: LC-20M4U LCD AV MONITOR (Be...
... the period(s) set forth below . LIMITED WARRANTY END-USER LIMITED WARRANTY SHARP ELECTRONICS CORPORATION warrants to the servicer. In order to enforce the rights under applicable state law, implied warranties may not apply. If you need service for your Product to the purchaser for parts or labor for breach in the United States. Some states do to Obtain Service: LC-20M4U LCD AV MONITOR (Be...

LC-20M4U Operation Manual
Page 29
... to operate during the warranty period, warranty service may be obtained upon delivery of the Sharp product together with respect to transmission line/power line voltage or liquid spillage. (g) Any product received without appropriate model, serial number and CSA/cUL markings. (h) Any products used for any removal, reinstallation, transportation and insurance costs incurred. The purchaser will be found in the owner's manual. (b) Any Sharp product...
... to operate during the warranty period, warranty service may be obtained upon delivery of the Sharp product together with respect to transmission line/power line voltage or liquid spillage. (g) Any product received without appropriate model, serial number and CSA/cUL markings. (h) Any products used for any removal, reinstallation, transportation and insurance costs incurred. The purchaser will be found in the owner's manual. (b) Any Sharp product...


