

LC30HV2U Operation Manual
Page 7
.... Contents IMPORTANT INFORMATION 1 DEAR SHARP CUSTOMER 3 IMPORTANT SAFETY PRECAUTIONS 3 Contents 6 Supplied accessories 7 Preparation 8 Setting the system 8 Inserting the batteries 9 Using the remote control unit 9 Cautions regarding remote control unit ...... 9 Part names 10 Display 10 AVC System 11 Remote control unit 12 Watching TV 13... button operations for changing channels 18 Simple button operations for changing volume/sound 19 Using FRONT SURROUND on the remote control unit 20 Setting MTS/SAP stereo mode 21 Basic adjustment settings 22 TV/VIDEO mode menu items 22...
.... Contents IMPORTANT INFORMATION 1 DEAR SHARP CUSTOMER 3 IMPORTANT SAFETY PRECAUTIONS 3 Contents 6 Supplied accessories 7 Preparation 8 Setting the system 8 Inserting the batteries 9 Using the remote control unit 9 Cautions regarding remote control unit ...... 9 Part names 10 Display 10 AVC System 11 Remote control unit 12 Watching TV 13... button operations for changing channels 18 Simple button operations for changing volume/sound 19 Using FRONT SURROUND on the remote control unit 20 Setting MTS/SAP stereo mode 21 Basic adjustment settings 22 TV/VIDEO mode menu items 22...

LC30HV2U Operation Manual
Page 8
... with the AVC System for each respective unit. • AC cord enclosed in this product is an object for 110-125V. SHARP ELECTRONICS CORPORATION 1300 Naperville Drive, Romeoville, Illinois 60446-1091, U.S.A. Remote control unit (g1) "AA" size (UM/SUM-3) Alkaline battery (g2) TV POWER TV CBL VCR DVD /SAT /LD /DTV ANT...
... with the AVC System for each respective unit. • AC cord enclosed in this product is an object for 110-125V. SHARP ELECTRONICS CORPORATION 1300 Naperville Drive, Romeoville, Illinois 60446-1091, U.S.A. Remote control unit (g1) "AA" size (UM/SUM-3) Alkaline battery (g2) TV POWER TV CBL VCR DVD /SAT /LD /DTV ANT...
LC30HV2U Operation Manual
Page 10
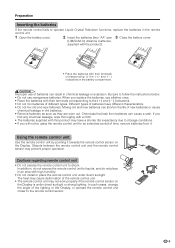
.... • If you replace the batteries, use manganese batteries. Using the remote control unit Use the remote control unit by pointing it . Cautions regarding remote control unit • Do not expose the remote control unit to liquids, and do not place in an area with high humidity...batteries. • Remove batteries as soon as they are worn out. Preparation Inserting the batteries If the remote control fails to operate Liquid Crystal Television functions, replace the batteries in the remote control unit. 1 Open the battery cover. 2 Insert the batteries (two "AA" size 3 Close...
.... • If you replace the batteries, use manganese batteries. Using the remote control unit Use the remote control unit by pointing it . Cautions regarding remote control unit • Do not expose the remote control unit to liquids, and do not place in an area with high humidity...batteries. • Remove batteries as soon as they are worn out. Preparation Inserting the batteries If the remote control fails to operate Liquid Crystal Television functions, replace the batteries in the remote control unit. 1 Open the battery cover. 2 Insert the batteries (two "AA" size 3 Close...

LC30HV2U Operation Manual
Page 13
... an input source of sub screen. 18 0 - 9: Set the channel. 19 100 ENT: Select the three digit mode. Part names Remote control unit 2 3 4 5 6 7 8 9 10 11 24 Mode switch 1 12 13 14 TV POWER TV CBL VCR DVD ...8235; 15 16 17 18 19 20 21 22 23 A • When using the remote control unit, point it at the Liquid Crystal Television. • See pages 62 to 69 for operating buttons not ...listed on the remote control unit will turn off . 2 FRONT SURROUND: Set SRS* and FOCUS* Sound System mode. 3 AV...
... an input source of sub screen. 18 0 - 9: Set the channel. 19 100 ENT: Select the three digit mode. Part names Remote control unit 2 3 4 5 6 7 8 9 10 11 24 Mode switch 1 12 13 14 TV POWER TV CBL VCR DVD ...8235; 15 16 17 18 19 20 21 22 23 A • When using the remote control unit, point it at the Liquid Crystal Television. • See pages 62 to 69 for operating buttons not ...listed on the remote control unit will turn off . 2 FRONT SURROUND: Set SRS* and FOCUS* Sound System mode. 3 AV...
LC30HV2U Operation Manual
Page 14
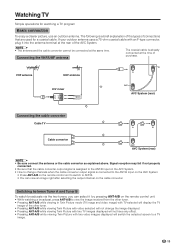
Connecting the VHF/UHF antenna The coaxial cable is connected to the ANT-B input on the AVC System. • Press ANT-A/B on the remote control unit to switch to ANT-B. • You can select it by pressing ANT-A/B on the cable converter. VHF antenna UHF antenna B A U/V ... Switching between Tuner A and Tuner B To watch broadcasts via the two tuners, you can view an image right after selecting the output channel on the remote control unit. • While watching a broadcast, press ANT-A/B to view the image received from the other tuner. • Pressing ANT-A/B while viewing in...
Connecting the VHF/UHF antenna The coaxial cable is connected to the ANT-B input on the AVC System. • Press ANT-A/B on the remote control unit to switch to ANT-B. • You can select it by pressing ANT-A/B on the cable converter. VHF antenna UHF antenna B A U/V ... Switching between Tuner A and Tuner B To watch broadcasts via the two tuners, you can view an image right after selecting the output channel on the remote control unit. • While watching a broadcast, press ANT-A/B to view the image received from the other tuner. • Pressing ANT-A/B while viewing in...

LC30HV2U Operation Manual
Page 17
... the power on . Green The System turns the power on . 16 AVC System status indicator Off Power off the power 1 Press TV POWER on the remote control unit or POWER button on the Display. • The System enters standby mode and the image on the screen disappears. • Both the STANDBY...; If the STANDBY/ON indicator on the AVC System and the POWER indicator on the Display still light up red, press TV POWER on the remote control unit or POWER button on the Display to turn the System on or its AC cord is disconnected. Off Power off after approximately 5 seconds...
... the power on . Green The System turns the power on . 16 AVC System status indicator Off Power off the power 1 Press TV POWER on the remote control unit or POWER button on the Display. • The System enters standby mode and the image on the screen disappears. • Both the STANDBY...; If the STANDBY/ON indicator on the AVC System and the POWER indicator on the Display still light up red, press TV POWER on the remote control unit or POWER button on the Display to turn the System on or its AC cord is disconnected. Off Power off after approximately 5 seconds...
LC30HV2U Operation Manual
Page 18
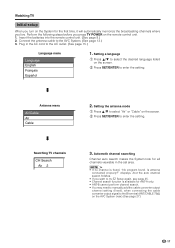
...a/b to select the desired language listed on the screen. 2 Press SET/ENTER to the AVC System. (See page 13.) 3. Insert the batteries into the remote control unit. (See page 9.) 2. Watching TV Initial setup When you turn on the System for the first time, it will automatically memorize the broadcasting channels... where you press TV POWER on the remote control unit. 1. Antenna menu Air/Cable Air Cable 2. And the auto channel search finishes. • If you want to try EZ Setup ...
...a/b to select the desired language listed on the screen. 2 Press SET/ENTER to the AVC System. (See page 13.) 3. Insert the batteries into the remote control unit. (See page 9.) 2. Watching TV Initial setup When you turn on the System for the first time, it will automatically memorize the broadcasting channels... where you press TV POWER on the remote control unit. 1. Antenna menu Air/Cable Air Cable 2. And the auto channel search finishes. • If you want to try EZ Setup ...
LC30HV2U Operation Manual
Page 19
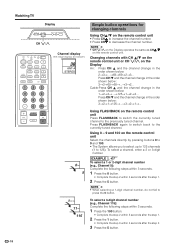
...switch back to decrease the channel number. A • When selecting a 1-digit channel number, do not fail to 125). Using FLASHBACK on the remote control unit Select the channels directly by pressing buttons 0 to 9 and 100. • The System allows you to select up to 125 channels (1... the step 2 within 3 seconds after the step 1. 2 Press the 5 button. A • CH s/r on the Display operates the same as CHa/b on the remote control unit • Press CHa to increase the channel number. • Press CHb to the currently tuned channel. Watching TV Display CH s/r TV POWER TV...
...switch back to decrease the channel number. A • When selecting a 1-digit channel number, do not fail to 125). Using FLASHBACK on the remote control unit Select the channels directly by pressing buttons 0 to 9 and 100. • The System allows you to select up to 125 channels (1... the step 2 within 3 seconds after the step 1. 2 Press the 5 button. A • CH s/r on the Display operates the same as CHa/b on the remote control unit • Press CHa to increase the channel number. • Press CHb to the currently tuned channel. Watching TV Display CH s/r TV POWER TV...
LC30HV2U Operation Manual
Page 20
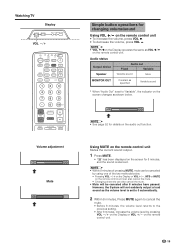
... returns to "Variable", the indicator on the screen changes as shown below . • Pressing VOL l/k on the Display or VOL k/l, MTS or MUTE on the remote control unit • To increase the volume, press VOL k. • To decrease the volume, press VOL l. Using MUTE on the... unit Mutes the current sound output. 1 Press MUTE. • "M" has been displayed on the screen for changing volume/sound Using VOL k/l on the remote control unit can also cancel the mute. • Changing channels can be canceled after 8 minutes have passed. Audio status Output device Speaker Audio out Fixed ...
... returns to "Variable", the indicator on the screen changes as shown below . • Pressing VOL l/k on the Display or VOL k/l, MTS or MUTE on the remote control unit • To increase the volume, press VOL k. • To decrease the volume, press VOL l. Using MUTE on the... unit Mutes the current sound output. 1 Press MUTE. • "M" has been displayed on the screen for changing volume/sound Using VOL k/l on the remote control unit can also cancel the mute. • Changing channels can be canceled after 8 minutes have passed. Audio status Output device Speaker Audio out Fixed ...
LC30HV2U Operation Manual
Page 21
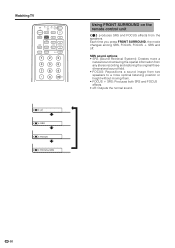
... press FRONT SURROUND, the mode changes among SRS, FOCUS, FOCUS e SRS and off : SRS : FOCUS : FOCUSSRS Using FRONT SURROUND on the remote control unit h produces SRS and FOCUS effects from two speakers to a more optimal listening position or height without moving them. • FOCUS e SRS: Produces both...
... press FRONT SURROUND, the mode changes among SRS, FOCUS, FOCUS e SRS and off : SRS : FOCUS : FOCUSSRS Using FRONT SURROUND on the remote control unit h produces SRS and FOCUS effects from two speakers to a more optimal listening position or height without moving them. • FOCUS e SRS: Produces both...
LC30HV2U Operation Manual
Page 30
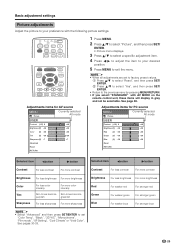
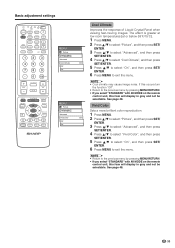
... for AV source MENU Picture Currently selected AV mode USER Contrast [+25] 0 +40 Brightness [0] -30 +30 Color [0] -30 +30 Tint [0] -30 +30 Sharpness [0] -7 +7 Advanced Reset RETURN 1 Press MENU. 2 Press a/b to select "Picture", and then press SET/ ENTER. • Picture menu displays. 3 Press a/b... to select a specific adjustment item. 4 Press c/d to adjust the item to your preference with AV MODE on the remote control unit, these items will display in gray and not be selectable. Basic adjustment settings Picture adjustments Adjust the picture to your desired ...
... for AV source MENU Picture Currently selected AV mode USER Contrast [+25] 0 +40 Brightness [0] -30 +30 Color [0] -30 +30 Tint [0] -30 +30 Sharpness [0] -7 +7 Advanced Reset RETURN 1 Press MENU. 2 Press a/b to select "Picture", and then press SET/ ENTER. • Picture menu displays. 3 Press a/b... to select a specific adjustment item. 4 Press c/d to adjust the item to your preference with AV MODE on the remote control unit, these items will display in gray and not be selectable. Basic adjustment settings Picture adjustments Adjust the picture to your desired ...
LC30HV2U Operation Manual
Page 31
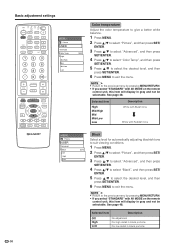
... MENU to exit the menu. Selected item High Mid-High Mid Mid-Low Low Description White with Bluish tone White with AV MODE on the remote control unit, this item will display in gray and not be selectable. See page 48. A • Return to exit the menu. Basic adjustment settings TV..., and then press SET/ENTER. 6 Press MENU to the previous menu by pressing MENU RETURN. • If you select "STANDARD" with AV MODE on the remote control unit, this item will display in black portions 30 See page 48. Selected item Description Off High Low No adjustment For high detail in...
... MENU to exit the menu. Selected item High Mid-High Mid Mid-Low Low Description White with Bluish tone White with AV MODE on the remote control unit, this item will display in gray and not be selectable. See page 48. A • Return to exit the menu. Basic adjustment settings TV..., and then press SET/ENTER. 6 Press MENU to the previous menu by pressing MENU RETURN. • If you select "STANDARD" with AV MODE on the remote control unit, this item will display in black portions 30 See page 48. Selected item Description Off High Low No adjustment For high detail in...

LC30HV2U Operation Manual
Page 32
...Advanced 3D-Y/C Standard Fast Slow [Standard] MENU Picture USER Advanced Monochrome [Off] Off On 3D-Y/C Provides high quality images with AV MODE on the remote control unit, this item will display in gray and not be selectable. A • Return to the previous menu by pressing MENU RETURN. •...; If you select "STANDARD" with AV MODE on the remote control unit, this item will display in gray and not be selectable. See page 48. See page 48. Selected item Description Standard Fast Slow ...
...Advanced 3D-Y/C Standard Fast Slow [Standard] MENU Picture USER Advanced Monochrome [Off] Off On 3D-Y/C Provides high quality images with AV MODE on the remote control unit, this item will display in gray and not be selectable. A • Return to the previous menu by pressing MENU RETURN. •...; If you select "STANDARD" with AV MODE on the remote control unit, this item will display in gray and not be selectable. See page 48. See page 48. Selected item Description Standard Fast Slow ...

LC30HV2U Operation Manual
Page 33
MENU Interlace Progressive Description Use this setting when you select "STANDARD" with AV MODE on the remote control unit, or input sources with 1080I, 720P or 480P component signals, this item will display in gray and not be selectable. See page 48. .../ENTER. 5 Press a/b to select "On", and then press SET/ ENTER. 6 Press MENU to exit the menu. Normally, you select "STANDARD" with AV MODE on the remote control unit, this setting. 32 Selected item Description Off Normal viewing mode On Detects, analyzes, converts film source I /P Setting", and then press SET/ENTER. 5 Press...
MENU Interlace Progressive Description Use this setting when you select "STANDARD" with AV MODE on the remote control unit, or input sources with 1080I, 720P or 480P component signals, this item will display in gray and not be selectable. See page 48. .../ENTER. 5 Press a/b to select "On", and then press SET/ ENTER. 6 Press MENU to exit the menu. Normally, you select "STANDARD" with AV MODE on the remote control unit, this setting. 32 Selected item Description Off Normal viewing mode On Detects, analyzes, converts film source I /P Setting", and then press SET/ENTER. 5 Press...
LC30HV2U Operation Manual
Page 34
... MENU. See page 48. 33 A • Return to the previous menu by pressing MENU RETURN. • If you select "STANDARD" with AV MODE on the remote control unit, this item will display in gray and not be selectable. The effect is greater at low room temperatures (at or below 59˚... occurs turn the function "Off". • Return to the previous menu by pressing MENU RETURN. • If you select "STANDARD" with AV MODE on the remote control unit, this item will display in gray and not be selectable.
... MENU. See page 48. 33 A • Return to the previous menu by pressing MENU RETURN. • If you select "STANDARD" with AV MODE on the remote control unit, this item will display in gray and not be selectable. The effect is greater at low room temperatures (at or below 59˚... occurs turn the function "Off". • Return to the previous menu by pressing MENU RETURN. • If you select "STANDARD" with AV MODE on the remote control unit, this item will display in gray and not be selectable.
LC30HV2U Operation Manual
Page 35
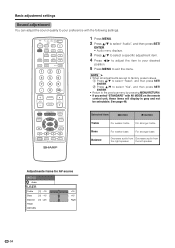
... SET/ ENTER. • Audio menu displays. 3 Press a/b to select a specific adjustment item. 4 Press c/d to adjust the item to your preference with AV MODE on the remote control unit, these items will display in gray and not be selectable. Basic adjustment settings Sound adjustment You can adjust the sound quality to your...
... SET/ ENTER. • Audio menu displays. 3 Press a/b to select a specific adjustment item. 4 Press c/d to adjust the item to your preference with AV MODE on the remote control unit, these items will display in gray and not be selectable. Basic adjustment settings Sound adjustment You can adjust the sound quality to your...
LC30HV2U Operation Manual
Page 38
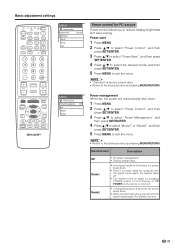
A • Return to the previous menu by pressing POWER button on the Display or TV POWER on the remote control unit. • If no signal inputs for PC source Power control allows you start using the computer and the signal inputs again, the System ...
A • Return to the previous menu by pressing POWER button on the Display or TV POWER on the remote control unit. • If no signal inputs for PC source Power control allows you start using the computer and the signal inputs again, the System ...
LC30HV2U Operation Manual
Page 39
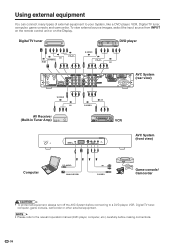
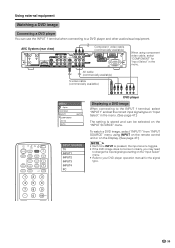
..., like a DVD player, VCR, Digital TV tuner, computer, game console and camcorder. To view external source images, select the input source from INPUT on the remote control unit or on the Display. Digital TV tuner DVD player AV S-VIDEO RGB Y/PB/PR S-VIDEO Y/PB/PR AV ANT-A ANT-B INPUT 3 COMPONENT Y PB...
..., like a DVD player, VCR, Digital TV tuner, computer, game console and camcorder. To view external source images, select the input source from INPUT on the remote control unit or on the Display. Digital TV tuner DVD player AV S-VIDEO RGB Y/PB/PR S-VIDEO Y/PB/PR AV ANT-A ANT-B INPUT 3 COMPONENT Y PB...
LC30HV2U Operation Manual
Page 40
... video cable (commercially available) RS-232C DISPLAY OUTPUT-1 DISPLAY OUTPUT-2 AC INPUT AV cable (commercially available) S-video cable (commercially available) When using INPUT on the remote control unit or on the Display. (See page 47.) A • Each time INPUT is stored and can use the INPUT 1 terminal when connecting to your...
... video cable (commercially available) RS-232C DISPLAY OUTPUT-1 DISPLAY OUTPUT-2 AC INPUT AV cable (commercially available) S-video cable (commercially available) When using INPUT on the remote control unit or on the Display. (See page 47.) A • Each time INPUT is stored and can use the INPUT 1 terminal when connecting to your...

LC30HV2U Operation Manual
Page 41
... to your VCR operation manual for the signal type. 40 To watch a VCR image, select "INPUT2" from the "INPUT SOURCE" menu using INPUT on the remote control unit or on the "INPUT SOURCE" menu. You only need to select the input source on the Display. (See page 47.) A • Each time...
... to your VCR operation manual for the signal type. 40 To watch a VCR image, select "INPUT2" from the "INPUT SOURCE" menu using INPUT on the remote control unit or on the "INPUT SOURCE" menu. You only need to select the input source on the Display. (See page 47.) A • Each time...


