

LC-32D47UN Operation Manual
Page 1
Remote control unit (g1) Page 8 "AA" size battery (g2) Page 9 AC cord (g1) Page 8 Stand unit (g1) Page 7 Operation manual (g3 languages) • Always use a soft, lint free cloth for ordering, or VISIT www.sharpusa.com/SharpDirect. 1 Call 1-800-BE-SHARP for cleaning. Approved ...cleaning cloths are provided with the TV. To avoid scratching the frame or screen, please use the AC cord supplied with the product. LC-32D47UN LIQUID CRYSTAL TELEVISION OPERATION MANUAL ENGLISH IMPORTANT : Please read...
Remote control unit (g1) Page 8 "AA" size battery (g2) Page 9 AC cord (g1) Page 8 Stand unit (g1) Page 7 Operation manual (g3 languages) • Always use a soft, lint free cloth for ordering, or VISIT www.sharpusa.com/SharpDirect. 1 Call 1-800-BE-SHARP for cleaning. Approved ...cleaning cloths are provided with the TV. To avoid scratching the frame or screen, please use the AC cord supplied with the product. LC-32D47UN LIQUID CRYSTAL TELEVISION OPERATION MANUAL ENGLISH IMPORTANT : Please read...

LC-32D47UN Operation Manual
Page 8
... with high humidity. • Do not install or place the remote control unit under direct sunlight or strong lighting. IMPORTANT: IF THE UNIT DOES NOT POWER ON - IF YOU STILL ENCOUNTER NO POWER, PLEASE CONTACT US AT 1-800-BE-SHARP. 8 A) Press POWER on the front of the television lights ...GREEN. In such cases, change the angle of the lighting or the TV, or operate the remote control unit closer to the back of the remote control unit. • The remote control unit may prevent proper operation...
... with high humidity. • Do not install or place the remote control unit under direct sunlight or strong lighting. IMPORTANT: IF THE UNIT DOES NOT POWER ON - IF YOU STILL ENCOUNTER NO POWER, PLEASE CONTACT US AT 1-800-BE-SHARP. 8 A) Press POWER on the front of the television lights ...GREEN. In such cases, change the angle of the lighting or the TV, or operate the remote control unit closer to the back of the remote control unit. • The remote control unit may prevent proper operation...

LC-32D47UN Operation Manual
Page 9
... circuit, etc.) 75-ohm coaxial cable Connecting Antenna Cable • Connect the antenna cable to operate TV functions, replace the batteries in the remote control unit. 1 Open the battery cover. 2 Insert two "AA" size batteries 3 Close the battery cover. (supplied with the product). ...adapter (commercially available) IN OUT Combiner (commercially available) To TV antenna terminal Installing Batteries in the Remote Control Unit If the remote control fails to the TV using the remote control unit for a coaxial cable. If tools are worn out. If you find any chemical...
... circuit, etc.) 75-ohm coaxial cable Connecting Antenna Cable • Connect the antenna cable to operate TV functions, replace the batteries in the remote control unit. 1 Open the battery cover. 2 Insert two "AA" size batteries 3 Close the battery cover. (supplied with the product). ...adapter (commercially available) IN OUT Combiner (commercially available) To TV antenna terminal Installing Batteries in the Remote Control Unit If the remote control fails to the TV using the remote control unit for a coaxial cable. If tools are worn out. If you find any chemical...

LC-32D47UN Operation Manual
Page 10
... Names TV (Front) *OPC: Optical Picture Control TV (Rear/Side) *2 POWER button MENU button INPUT button Channel buttons (CHU/V) Volume buttons (VOLk/l) *1 INPUT 7 terminal (HDMI) Remote control sensor OPC sensor* (See page 18.) POWER indicator (See page 12.) *3 AC INPUT terminal *1 INPUT 6 terminal (HDMI) DIGITAL AUDIO OUTPUT terminal AUDIO OUTPUT terminals...
... Names TV (Front) *OPC: Optical Picture Control TV (Rear/Side) *2 POWER button MENU button INPUT button Channel buttons (CHU/V) Volume buttons (VOLk/l) *1 INPUT 7 terminal (HDMI) Remote control sensor OPC sensor* (See page 18.) POWER indicator (See page 12.) *3 AC INPUT terminal *1 INPUT 6 terminal (HDMI) DIGITAL AUDIO OUTPUT terminal AUDIO OUTPUT terminals...

LC-32D47UN Operation Manual
Page 11
... input the audio signal via the AUDIO terminal with the TV. 11 To view external source images, select the input source from INPUT on the remote control unit or on the TV. (See page 15.) CAUTION • To protect equipment, always turn off the TV before connecting any external equipment. •...
... input the audio signal via the AUDIO terminal with the TV. 11 To view external source images, select the input source from INPUT on the remote control unit or on the TV. (See page 15.) CAUTION • To protect equipment, always turn off the TV before connecting any external equipment. •...

LC-32D47UN Operation Manual
Page 12
...64257;es for a long period of connection is highlighted. Picture Reset: AV MODE will start automatically. Press POWER on the TV or on the remote control unit again to turn on the screen, and then press ENTER. Connect the antenna cable to "DYNAMIC (Fixed)" • The Channel search... set to "Off" and AV MODE is "On" or "Off". Press ENTER. Initial Setup When you plan to "DYNAMIC (Fixed)". Insert the batteries into the remote control unit. (See page 9.) 2. Language CH Search 2 Press a/b to select "Analog & Digital" to search both analog and digital broadcasts or "Digital" to...
...64257;es for a long period of connection is highlighted. Picture Reset: AV MODE will start automatically. Press POWER on the TV or on the remote control unit again to turn on the screen, and then press ENTER. Connect the antenna cable to "DYNAMIC (Fixed)" • The Channel search... set to "Off" and AV MODE is "On" or "Off". Press ENTER. Initial Setup When you plan to "DYNAMIC (Fixed)". Insert the batteries into the remote control unit. (See page 9.) 2. Language CH Search 2 Press a/b to select "Analog & Digital" to search both analog and digital broadcasts or "Digital" to...
LC-32D47UN Operation Manual
Page 13
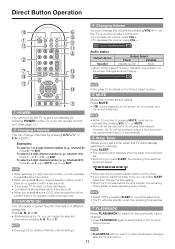
... timer, you can press SLEEP twice then change the time setting. • When it on standby by pressing POWER on the TV or on the remote control unit. (See page 12.) Changing Channels You can change the volume by pressing VOLk/l on the TV or on the... remote control unit. • To increase the volume, press VOLk. • To decrease the volume, press VOLl. 20 Audio status Output device Speaker Output Select Fixed ...
... timer, you can press SLEEP twice then change the time setting. • When it on standby by pressing POWER on the TV or on the remote control unit. (See page 12.) Changing Channels You can change the volume by pressing VOLk/l on the TV or on the... remote control unit. • To increase the volume, press VOLk. • To decrease the volume, press VOLl. 20 Audio status Output device Speaker Output Select Fixed ...
LC-32D47UN Operation Manual
Page 15
... icon appears on the channel information window. In the Closed Caption system, there can operate the on-screen display menu by using INPUT on the remote control unit or on digital TV programs (also at the discretion of the program provider. Closed Captions are potentially available, but a broadcast may contain none...
... icon appears on the channel information window. In the Closed Caption system, there can operate the on-screen display menu by using INPUT on the remote control unit or on digital TV programs (also at the discretion of the program provider. Closed Captions are potentially available, but a broadcast may contain none...

LC-32D47UN Operation Manual
Page 17
... Contrast [ 30] 0 b40 Brightness [ 0] a30 b30 Color [ b2] a30 b30 Tint [ 0] a30 b30 Sharpness [ 4] 0 b20 Advanced Reset : Select ENTER : Enter RETURN : Back MENU : Exit The bar above is connected to exit. Button operations on the control panel correspond to the ones on the remote control to open or close the menu screen.
... Contrast [ 30] 0 b40 Brightness [ 0] a30 b30 Color [ b2] a30 b30 Tint [ 0] a30 b30 Sharpness [ 4] 0 b20 Advanced Reset : Select ENTER : Enter RETURN : Back MENU : Exit The bar above is connected to exit. Button operations on the control panel correspond to the ones on the remote control to open or close the menu screen.

LC-32D47UN Operation Manual
Page 21
... set "PC Audio Select" to adjust the "Clock" or "Phase" when a digital signal is input via the INPUT 4 (PC-IN) terminal using INPUT on the remote control unit or on signal recognition, including an HDMI signal. failed. • Auto Sync. On-Screen Display Menu Position For adjusting a picture's horizontal and vertical...
... set "PC Audio Select" to adjust the "Clock" or "Phase" when a digital signal is input via the INPUT 4 (PC-IN) terminal using INPUT on the remote control unit or on signal recognition, including an HDMI signal. failed. • Auto Sync. On-Screen Display Menu Position For adjusting a picture's horizontal and vertical...

LC-32D47UN Operation Manual
Page 25
...", and then press ENTER. • The default value depends on the TV. Type 2: Proportionally spaced with VOLk/l on the remote control unit or VOLk/l on the TV. Digital Caption Info. (Digital Caption Information) This function allows viewing of digital closed caption... are displayed without screen image. Sound via speaker is pressed. Color System Select the video signal system compatible with VOLk/l on the remote control unit or VOLk/l on the broadcasting station. Example: Selectable items available for digital broadcasting. Type 1: Monospaced with serifs. Type...
...", and then press ENTER. • The default value depends on the TV. Type 2: Proportionally spaced with VOLk/l on the remote control unit or VOLk/l on the TV. Digital Caption Info. (Digital Caption Information) This function allows viewing of digital closed caption... are displayed without screen image. Sound via speaker is pressed. Color System Select the video signal system compatible with VOLk/l on the remote control unit or VOLk/l on the broadcasting station. Example: Selectable items available for digital broadcasting. Type 1: Monospaced with serifs. Type...

LC-32D47UN Operation Manual
Page 26
...to select "Option". 3 Press a/b to select "Software Update", and then press ENTER. • If you have any questions, please call 1-800-BE-SHARP (800-237-4277). Use SERVICE port near the INPUT3. Insert the USB memory device containing the software update file. By setting the favorite channels... in the category, and then press ENTER to register. Operation Lock Out This function locks the operation buttons on the remote control are locked. Demo Mode Select to delete, and then press ENTER. Off: No adjustment. CAUTION • Do not remove the USB...
...to select "Option". 3 Press a/b to select "Software Update", and then press ENTER. • If you have any questions, please call 1-800-BE-SHARP (800-237-4277). Use SERVICE port near the INPUT3. Insert the USB memory device containing the software update file. By setting the favorite channels... in the category, and then press ENTER to register. Operation Lock Out This function locks the operation buttons on the remote control are locked. Demo Mode Select to delete, and then press ENTER. Off: No adjustment. CAUTION • Do not remove the USB...

LC-32D47UN Operation Manual
Page 28
...picture • Is connection to other components correct? (See page 11.) • Is correct input signal source selected after 1 or 2 minutes. • Remote control unit does not operate. • Are batteries inserted with polarity (e, f) aligned? (See page 9.) • Are batteries worn out? (Replace with...or appear slightly delayed. Troubleshooting-Digital Broadcasting The error message about reception of broadcast The example of an error message displayed on the remote control unit? (See page 13.) • The TV sometimes makes a cracking sound. • This is not a malfunction,...
...picture • Is connection to other components correct? (See page 11.) • Is correct input signal source selected after 1 or 2 minutes. • Remote control unit does not operate. • Are batteries inserted with polarity (e, f) aligned? (See page 9.) • Are batteries worn out? (Replace with...or appear slightly delayed. Troubleshooting-Digital Broadcasting The error message about reception of broadcast The example of an error message displayed on the remote control unit? (See page 13.) • The TV sometimes makes a cracking sound. • This is not a malfunction,...


