LC-32D50U Operation Manual
Page 2
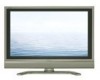
... COVER (OR BACK). NO USER-SERVICEABLE PARTS INSIDE. REFER SERVICING TO QUALIFIED SERVICE PERSONNEL. ENGLISH LC-32D50U LIQUID CRYSTAL TELEVISION ENGLISH OPERATION MANUAL • The illustrations and on-screen displays in this operation manual are for explanation purposes and may be of sufficient magnitude to constitute a ...8226; Menu items that are not selectable are located at the rear of loss or theft, please record the TV's model and serial numbers in case of the TV. IMPORTANT: To aid reporting in the space provided. The numbers are grayed out. The lightning flash with arrow...
... COVER (OR BACK). NO USER-SERVICEABLE PARTS INSIDE. REFER SERVICING TO QUALIFIED SERVICE PERSONNEL. ENGLISH LC-32D50U LIQUID CRYSTAL TELEVISION ENGLISH OPERATION MANUAL • The illustrations and on-screen displays in this operation manual are for explanation purposes and may be of sufficient magnitude to constitute a ...8226; Menu items that are not selectable are located at the rear of loss or theft, please record the TV's model and serial numbers in case of the TV. IMPORTANT: To aid reporting in the space provided. The numbers are grayed out. The lightning flash with arrow...
LC-32D50U Operation Manual
Page 6
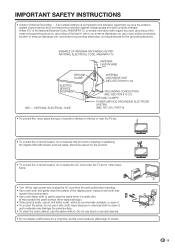
... antenna is connected to the television equipment, be placed on the top or near the TV set or other heavy items. • Turn off the main power and unplug the AC..., grounding of the lead-in wire to an antenna discharge unit, size of grounding conductors, location of the display panel. Article 810 of candle or flames on the product. • To prevent fire or... shock hazard, do not place the AC cord under the TV set . • To prevent fire or shock hazard, do not use a dirty cloth, liquid cleaners or chemical...
... antenna is connected to the television equipment, be placed on the top or near the TV set or other heavy items. • Turn off the main power and unplug the AC..., grounding of the lead-in wire to an antenna discharge unit, size of grounding conductors, location of the display panel. Article 810 of candle or flames on the product. • To prevent fire or... shock hazard, do not place the AC cord under the TV set . • To prevent fire or shock hazard, do not use a dirty cloth, liquid cleaners or chemical...

LC-32D50U Operation Manual
Page 10
... only 44 Auto Sync. Contents IMPORTANT INFORMATION 1 Trademarks 2 DEAR SHARP CUSTOMER 3 IMPORTANT SAFETY INSTRUCTIONS 3 Supplied accessories 6 QUICK REFERENCE 6 Attaching the stand 6 Contents 9 Part names 10 TV (Front 10 TV (Rear 11 Remote control unit 12 Preparation 13 Using the remote ... Displaying an external equipment image 29 Connecting a DVD player or a Digital TV STB (Air or Cable 30 Connecting HDMI equipment 31 Displaying an image from HDMI equipment ........ 31 Connecting a PC 32 Connecting a VCR, game console or camcorder 32 Using Digital Audio Output 32 Connecting...
... only 44 Auto Sync. Contents IMPORTANT INFORMATION 1 Trademarks 2 DEAR SHARP CUSTOMER 3 IMPORTANT SAFETY INSTRUCTIONS 3 Supplied accessories 6 QUICK REFERENCE 6 Attaching the stand 6 Contents 9 Part names 10 TV (Front 10 TV (Rear 11 Remote control unit 12 Preparation 13 Using the remote ... Displaying an external equipment image 29 Connecting a DVD player or a Digital TV STB (Air or Cable 30 Connecting HDMI equipment 31 Displaying an image from HDMI equipment ........ 31 Connecting a PC 32 Connecting a VCR, game console or camcorder 32 Using Digital Audio Output 32 Connecting...
LC-32D50U Operation Manual
Page 13
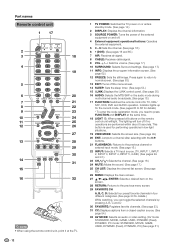
...32 AV MODE: Selects an audio or video setting. (AV mode: STANDARD, MOVIE, GAME, USER, DYNAMIC (Fixed), DYNAMIC. PC mode: STANDARD, MOVIE, GAME, USER, DYNAMIC (Fixed), DYNAMIC, PC) (See page 51.) Indicator lights up for the current mode. (See pages 63 to press FUNCTION and DISPLAY at the TV. 12 1 TV POWER: Switches the TV... power on or enters standby mode. (See page 14.) 2 DISPLAY: Displays the channel information. 3 SOURCE POWER: Turns the power of the external equipment ...
...32 AV MODE: Selects an audio or video setting. (AV mode: STANDARD, MOVIE, GAME, USER, DYNAMIC (Fixed), DYNAMIC. PC mode: STANDARD, MOVIE, GAME, USER, DYNAMIC (Fixed), DYNAMIC, PC) (See page 51.) Indicator lights up for the current mode. (See pages 63 to press FUNCTION and DISPLAY at the TV. 12 1 TV POWER: Switches the TV... power on or enters standby mode. (See page 14.) 2 DISPLAY: Displays the channel information. 3 SOURCE POWER: Turns the power of the external equipment ...

LC-32D50U Operation Manual
Page 15
... been turned on before, the EZ Setup will not be sure to use this TV for a long period of time, be invoked. Lights off TV status indicator (OPC) "Off" is selected in OPC setting "On" or "On: Display" is selected in OPC setting • See page 24 for details. See page 21 for... performing EZ Setup from the power outlet. • Weak electric power is still consumed even when POWER is turned off. TV status indicator (POWER) ON OFF/Standby Lighting (Blue...
... been turned on before, the EZ Setup will not be sure to use this TV for a long period of time, be invoked. Lights off TV status indicator (OPC) "Off" is selected in OPC setting "On" or "On: Display" is selected in OPC setting • See page 24 for details. See page 21 for... performing EZ Setup from the power outlet. • Weak electric power is still consumed even when POWER is turned off. TV status indicator (POWER) ON OFF/Standby Lighting (Blue...

LC-32D50U Operation Manual
Page 18
... using one of the methods below . Mute will cancel if you press SURROUND, the mode changes between On and Off. However, the TV will be displayed on the screen for 30 minutes, and the sound is set to "Variable", the indicator on the screen changes as VOL k/l on ... on the remote control unit Mutes the current sound output. Surround sound options On: Makes it possible to enjoy natural, realistic surround sound. Watching TV Simple button operations for details on the Output Select function. Changing the volume You can have passed. Press MUTE. • M will not suddenly...
... using one of the methods below . Mute will cancel if you press SURROUND, the mode changes between On and Off. However, the TV will be displayed on the screen for 30 minutes, and the sound is set to "Variable", the indicator on the screen changes as VOL k/l on ... on the remote control unit Mutes the current sound output. Surround sound options On: Makes it possible to enjoy natural, realistic surround sound. Watching TV Simple button operations for details on the Output Select function. Changing the volume You can have passed. Press MUTE. • M will not suddenly...

LC-32D50U Operation Manual
Page 20
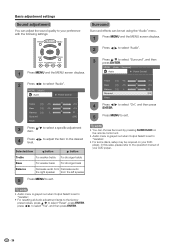
...Noise Reduction [Off] Input Select [VIDEO] Output select [Fixed] 1 Quick Shoot [On] Color System [Auto] 2 Caption Setup Program Title Display [No] Favorite CH 3 4 1 Item displayed in accordance with the current input signal. RETURN: Press to return to open or close the menu screen. On-Screen...go to the selected input terminal. 2 The function is an operational guide for the item. 3 Item displayed in white • This indicates an item can be selected. 4 Item displayed in grey • This indicates that the item cannot be selected. *There are various reasons why ...
...Noise Reduction [Off] Input Select [VIDEO] Output select [Fixed] 1 Quick Shoot [On] Color System [Auto] 2 Caption Setup Program Title Display [No] Favorite CH 3 4 1 Item displayed in accordance with the current input signal. RETURN: Press to return to open or close the menu screen. On-Screen...go to the selected input terminal. 2 The function is an operational guide for the item. 3 Item displayed in white • This indicates an item can be selected. 4 Item displayed in grey • This indicates that the item cannot be selected. *There are various reasons why ...
LC-32D50U Operation Manual
Page 21
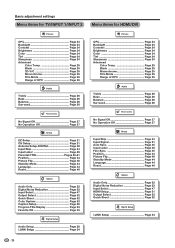
Basic adjustment settings Menu items for TV/INPUT 1/INPUT 2 Picture OPC Page 24 Backlight Page 24 Contrast Page 24 Brightness Page 24 Color Page 24 Tint Page 24 Sharpness Page 24 Advanced Color Temp Page 25 ...Select Page 52 Quick Shoot Page 52 Color System Page 53 Caption Setup Page 55 Program Title Display Page 53 Favorite CH Page 23 Digital Setup Audio Setup Page 28 i.LINK Setup Page 34 ...Page 24 Backlight Page 24 Contrast Page 24 Brightness Page 24 Color Page 24 Tint Page 24 Sharpness Page 24 Advanced Color Temp Page 25 Black Page 25 Monochrome Page 25 Film Mode Page ...
Basic adjustment settings Menu items for TV/INPUT 1/INPUT 2 Picture OPC Page 24 Backlight Page 24 Contrast Page 24 Brightness Page 24 Color Page 24 Tint Page 24 Sharpness Page 24 Advanced Color Temp Page 25 ...Select Page 52 Quick Shoot Page 52 Color System Page 53 Caption Setup Page 55 Program Title Display Page 53 Favorite CH Page 23 Digital Setup Audio Setup Page 28 i.LINK Setup Page 34 ...Page 24 Backlight Page 24 Contrast Page 24 Brightness Page 24 Color Page 24 Tint Page 24 Sharpness Page 24 Advanced Color Temp Page 25 Black Page 25 Monochrome Page 25 Film Mode Page ...

LC-32D50U Operation Manual
Page 22
..., select "Yes" for CABLE Digital will be deleted. Language setting Select from among 3 languages: English, French and Spanish. 1 Press MENU and the MENU screen displays. 2 Press c/d to select "Setup". 3 Press a/b to move down . If not, skip to step 5. 4 Input the 4-digit secret number by using ...0-9. 5 Press a/b to move down . Channel search Channel auto search makes the TV look for CABLE Analog. Press c/d to select "Yes" or "No" for AIR Analog & Digital, then press b to step 4. Channel search Channel...
..., select "Yes" for CABLE Digital will be deleted. Language setting Select from among 3 languages: English, French and Spanish. 1 Press MENU and the MENU screen displays. 2 Press c/d to select "Setup". 3 Press a/b to move down . If not, skip to step 5. 4 Input the 4-digit secret number by using ...0-9. 5 Press a/b to move down . Channel search Channel auto search makes the TV look for CABLE Analog. Press c/d to select "Yes" or "No" for AIR Analog & Digital, then press b to step 4. Channel search Channel...

LC-32D50U Operation Manual
Page 23
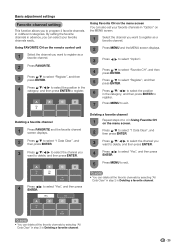
... skip, and then press b to move down. 2 Press c/d to exit. NOTE • This function is displayed. Basic adjustment settings Channel memory setting 1 Press MENU and the MENU screen displays. 2 Press c/d to select "Setup". 3 Press a/b to select "CH Setup", and then press ENTER. &#...configuration through the "Antenna Setup - Signal Strength 1 Press MENU and the MENU screen displays. 4 Press MENU to exit. NOTE • Make sure what kind of connection is made with your TV. 3 Press a/b to select "Antenna Setup DIGITAL", and then press ENTER. 4 Press a/b...
... skip, and then press b to move down. 2 Press c/d to exit. NOTE • This function is displayed. Basic adjustment settings Channel memory setting 1 Press MENU and the MENU screen displays. 2 Press c/d to select "Setup". 3 Press a/b to select "CH Setup", and then press ENTER. &#...configuration through the "Antenna Setup - Signal Strength 1 Press MENU and the MENU screen displays. 4 Press MENU to exit. NOTE • Make sure what kind of connection is made with your TV. 3 Press a/b to select "Antenna Setup DIGITAL", and then press ENTER. 4 Press a/b...
LC-32D50U Operation Manual
Page 24
...Deleting a favorite channel. A B C D Air Air 3 18 Air 10.1 4 Press c/d to exit. A B C D Air 3 2 Press MENU and the MENU screen displays. 3 Press c/d to select "Option". 4 Press a/b to select "Favorite CH", and then press ENTER. 5 Press a/b to select "Register", and then press ENTER. 6 ...categories. NOTE • You can also set your favorite channels in "Option" on the menu screen. 1 Press FAVORITE and the favorite channel screen displays. 2 Press a/b to select "1 Data Clear", and then press ENTER. 2 Press a/b to select "1 Data Clear", and then press ENTER. ...
...Deleting a favorite channel. A B C D Air Air 3 18 Air 10.1 4 Press c/d to exit. A B C D Air 3 2 Press MENU and the MENU screen displays. 3 Press c/d to select "Option". 4 Press a/b to select "Favorite CH", and then press ENTER. 5 Press a/b to select "Register", and then press ENTER. 6 ...categories. NOTE • You can also set your favorite channels in "Option" on the menu screen. 1 Press FAVORITE and the favorite channel screen displays. 2 Press a/b to select "1 Data Clear", and then press ENTER. 2 Press a/b to select "1 Data Clear", and then press ENTER. ...
LC-32D50U Operation Manual
Page 25
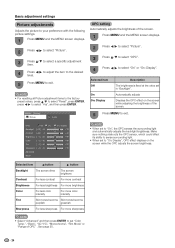
...color intensity Tint Skin tones become Skin tones become purplish greenish Sharpness For less sharpness For more sharpness NOTE • Select "Advanced" and then press ENTER to set to exit. Selected item Off On On: Display Description The brightness is fixed at the value set...and then press ENTER. OPC Off On Backlight [b12] a16 Contrast [b30] 0 Brightness [ 0] a30 Color [ 0] a30 Tint [ 0] a30 Sharpness [ b2] a10 Advanced Reset On : Display b16 b40 b30 b30 b30 b10 NOTE • When set "Color Temp.", "Black", "3D-Y/C", "Monochrome", "Film Mode" or "Range of the...
...color intensity Tint Skin tones become Skin tones become purplish greenish Sharpness For less sharpness For more sharpness NOTE • Select "Advanced" and then press ENTER to set to exit. Selected item Off On On: Display Description The brightness is fixed at the value set...and then press ENTER. OPC Off On Backlight [b12] a16 Contrast [b30] 0 Brightness [ 0] a30 Color [ 0] a30 Tint [ 0] a30 Sharpness [ b2] a10 Advanced Reset On : Display b16 b40 b30 b30 b30 b10 NOTE • When set "Color Temp.", "Black", "3D-Y/C", "Monochrome", "Film Mode" or "Range of the...
LC-32D50U Operation Manual
Page 26
... operate if the adjustment range is available for easier viewing. Min. Basic adjustment settings Advanced picture adjustments This TV provides various advanced functions for optimizing the picture quality. 1 Press MENU and the MENU screen displays. 2 Press c/d to select "Picture". 3 Press a/b to select "Advanced", and then press ENTER. 4 Press a/b to select a specifi...
... operate if the adjustment range is available for easier viewing. Min. Basic adjustment settings Advanced picture adjustments This TV provides various advanced functions for optimizing the picture quality. 1 Press MENU and the MENU screen displays. 2 Press c/d to select "Picture". 3 Press a/b to select "Advanced", and then press ENTER. 4 Press a/b to select a specifi...
LC-32D50U Operation Manual
Page 27
...; Audio menu is grayed out when Output Select is set using the "Audio" menu. 1 Press MENU and the MENU screen displays. 2 Press c/d to select "Audio". 1 Press MENU and the MENU screen displays. 3 Press a/b to select "Surround", and then press ENTER. NOTE • Audio menu is grayed out when Output Select is set...
...; Audio menu is grayed out when Output Select is set using the "Audio" menu. 1 Press MENU and the MENU screen displays. 2 Press c/d to select "Audio". 1 Press MENU and the MENU screen displays. 3 Press a/b to select "Surround", and then press ENTER. NOTE • Audio menu is grayed out when Output Select is set...
LC-32D50U Operation Manual
Page 28
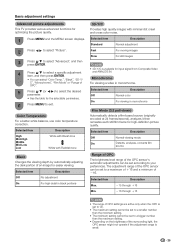
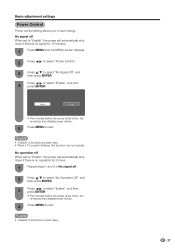
... then press ENTER. • Five minutes before the power shuts down if there is no operation for 15 minutes. 1 Press MENU and the MENU screen displays. 2 Press c/d to select "Power Control". 3 Press a/b to select "No Signal Off", and then press ENTER. 4 Press c/d to save energy. NOTE &#...8226; "Disable" is the factory preset value. • When a TV program finishes, this function may not operate. NOTE • "Disable" is the factory preset value. 27 No signal off When set to "Enable", the...
... then press ENTER. • Five minutes before the power shuts down if there is no operation for 15 minutes. 1 Press MENU and the MENU screen displays. 2 Press c/d to select "Power Control". 3 Press a/b to select "No Signal Off", and then press ENTER. 4 Press c/d to save energy. NOTE &#...8226; "Disable" is the factory preset value. • When a TV program finishes, this function may not operate. NOTE • "Disable" is the factory preset value. 27 No signal off When set to "Enable", the...
LC-32D50U Operation Manual
Page 29
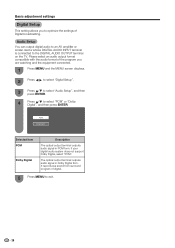
... optimize the settings of the program you to the DIGITAL AUDIO OUTPUT terminal on the TV. Basic adjustment settings Digital Setup This setting allows you are watching and the equipment connected. 1 Press MENU and the MENU screen displays. 2 Press c/d to select "Digital Setup". 3 Press a/b to select "Audio Setup", and then press ENTER...
... optimize the settings of the program you to the DIGITAL AUDIO OUTPUT terminal on the TV. Basic adjustment settings Digital Setup This setting allows you are watching and the equipment connected. 1 Press MENU and the MENU screen displays. 2 Press c/d to select "Digital Setup". 3 Press a/b to select "Audio Setup", and then press ENTER...
LC-32D50U Operation Manual
Page 30
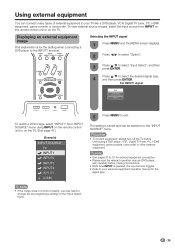
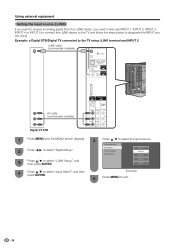
... input signal type setting on the TV. (See page 47.) (Example) INPUT SOURCE TV INPUT1 INPUT2 INPUT3 INPUT4 INPUT5 i.LINK 5 Press MENU to your TV like a DVD player, VCR, Digital TV tuner, PC, HDMI equipment, game console or camcorder. Displaying an external equipment image This explanation is... the remote control unit or on the "INPUT SOURCE" menu. Using external equipment You can be selected on the TV. Selecting the INPUT signal 1 Press MENU and the MENU screen displays. 2 Press c/d to select "Option". 3 Press a/b to select the desired signal type, 4 and then press...
... input signal type setting on the TV. (See page 47.) (Example) INPUT SOURCE TV INPUT1 INPUT2 INPUT3 INPUT4 INPUT5 i.LINK 5 Press MENU to your TV like a DVD player, VCR, Digital TV tuner, PC, HDMI equipment, game console or camcorder. Displaying an external equipment image This explanation is... the remote control unit or on the "INPUT SOURCE" menu. Using external equipment You can be selected on the TV. Selecting the INPUT signal 1 Press MENU and the MENU screen displays. 2 Press c/d to select "Option". 3 Press a/b to select the desired signal type, 4 and then press...

LC-32D50U Operation Manual
Page 32
... signal to select the desired setting, and then press ENTER. Using external equipment Connecting HDMI equipment You can use View Mode based on the TV. (See page 47.) INPUT SOURCE 5 Press a/b to select the desired item, and then press ENTER. 6 Press a/b/c/d to AUDIO terminal... of INPUT 4. Audio Digital/Analog 2 Press MENU and the MENU screen displays. Select "Analog" for INPUT 4. HDMI Setup] Option Audio Only Digital Noise Reduction [Low] • Refer to select "HDMI Setup", and then press...
... signal to select the desired setting, and then press ENTER. Using external equipment Connecting HDMI equipment You can use View Mode based on the TV. (See page 47.) INPUT SOURCE 5 Press a/b to select the desired item, and then press ENTER. 6 Press a/b/c/d to AUDIO terminal... of INPUT 4. Audio Digital/Analog 2 Press MENU and the MENU screen displays. Select "Analog" for INPUT 4. HDMI Setup] Option Audio Only Digital Noise Reduction [Low] • Refer to select "HDMI Setup", and then press...
LC-32D50U Operation Manual
Page 35
... the i.LINK device, you need to also use INPUT 1, INPUT 2, INPUT 3, INPUT 4 or INPUT 5 to connect the i.LINK device to the TV and follow the steps below to exit. 34 i.LINK Autoswitch Input Select INPUT 1 Recording Mode Standby Mode INPUT 2 INPUT 3 INPUT 4 INPUT 5 (...MENU to designate the INPUT you are using i.LINK terminal and INPUT 2 i.LINK cable (commercially available) AV cable (commercially available) Digital TV STB 1 Press MENU and the MENU screen displays. 2 Press c/d to select "Digital Setup". 3 Press a/b to select "i.LINK Setup", and then press ENTER. 4 Press a/b to ...
... the i.LINK device, you need to also use INPUT 1, INPUT 2, INPUT 3, INPUT 4 or INPUT 5 to connect the i.LINK device to the TV and follow the steps below to exit. 34 i.LINK Autoswitch Input Select INPUT 1 Recording Mode Standby Mode INPUT 2 INPUT 3 INPUT 4 INPUT 5 (...MENU to designate the INPUT you are using i.LINK terminal and INPUT 2 i.LINK cable (commercially available) AV cable (commercially available) Digital TV STB 1 Press MENU and the MENU screen displays. 2 Press c/d to select "Digital Setup". 3 Press a/b to select "i.LINK Setup", and then press ENTER. 4 Press a/b to ...

LC-32D50U Operation Manual
Page 36
... Since most of the currently available i.LINK devices automatically recognize the transfer rates of the pictures and sound being recorded, this TV may not adjust the recording mode properly. Depending on the i.LINK devices used and the type of broadcast being recorded and ..."Pass through ", and then press ENTER. • Normally, this case, please set the "Recording Mode" to "Pass through". 1 Press MENU and the MENU screen displays. 2 Press c/d to select "Digital Setup". 3 Press a/b to select "i.LINK Setup", and then press ENTER. 4 Press a/b to select "Recording Mode", and then ...
... Since most of the currently available i.LINK devices automatically recognize the transfer rates of the pictures and sound being recorded, this TV may not adjust the recording mode properly. Depending on the i.LINK devices used and the type of broadcast being recorded and ..."Pass through ", and then press ENTER. • Normally, this case, please set the "Recording Mode" to "Pass through". 1 Press MENU and the MENU screen displays. 2 Press c/d to select "Digital Setup". 3 Press a/b to select "i.LINK Setup", and then press ENTER. 4 Press a/b to select "Recording Mode", and then ...


