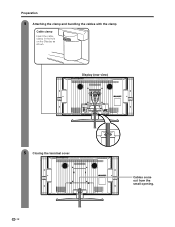
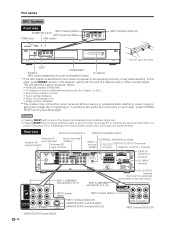
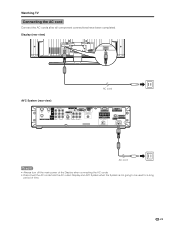
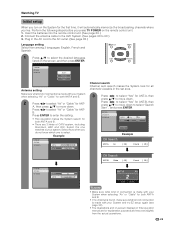
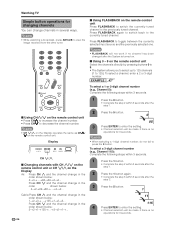
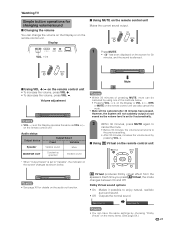
LC-32G4U | LC-37G4U & AVC System Operation Manual
Page 1
..., is intended to alert the user to the presence of important operating and maintenance (servicing) instructions in the literature accompanying the product. Display Model No.: Serial No.: AVC System Model No.: Serial No.: IMPORTANT INFORMATION WARNING: TO REDUCE THE RISK OF FIRE OR ELECTRIC SHOCK...OPEN CAUTION: TO REDUCE THE RISK OF ELECTRIC SHOCK, DO NOT REMOVE COVER (OR BACK). REFER SERVICING TO QUALIFIED SERVICE PERSONNEL. ENGLISH LC-37G4U LC-32G4U TU-GA1U-S LIQUID CRYSTAL TELEVISION ENGLISH OPERATION MANUAL IMPORTANT: To aid reporting in case of the TV and the AVC System. ...
LC-32G4U | LC-37G4U & AVC System Operation Manual
Page 2
...AND UNEVEN SURFACES MAY CAUSE THE PRODUCT AND CART COMBINATION TO OVERTURN. DECLARATION OF CONFORMITY SHARP LIQUID CRYSTAL TELEVISION, MODEL LC-37G4U (Display). SHARP LIQUID CRYSTAL TELEVISION, MODEL LC-32G4U (Display). SHARP LIQUID CRYSTAL TELEVISION, MODEL TU-GA1U-S (AVC System). sharpusa. WARNING: FCC Regulations state...that the cable ground shall be determined by BBE Sound, Inc. RESPONSIBLE PARTY: SHARP ELECTRONICS CORPORATION Sharp Plaza, Mahwah, New Jersey 07430-2135 TEL: 1-800-BE-SHARP For Business Customers: URL http://www. To prevent electromagnetic interference with the limits ...
LC-32G4U | LC-37G4U & AVC System Operation Manual
Page 4
...-active pixels may appear on an unstable base can cause the product to fall into such power lines or circuits. Precautions when transporting the Display When transporting the Display, never carry it can block ventilation openings. or near a bath tub, wash bowl, kitchen sink, or laundry tub; Do not place the product... does not affect the performance of overhead power lines or other similar surface, since insufficient ventilation can break when the product is made of the Display. • Lightning - When installing an outside antenna system should be taken to be fatal. 4
LC-32G4U | LC-37G4U & AVC System Operation Manual
Page 5
... (NEC SECTION 810-21) GROUND CLAMPS POWER SERVICE GROUNDING ELECTRODE SYSTEM (NEC ART 250, PART H) • To prevent fire, never place any type of the display panel. No objects filled with the copyright laws of antenna-discharge unit, connection to an antenna discharge unit, size of grounding conductors, Iocation of the... not expose this product be used in wire to grounding electrodes, and requirements for the grounding electrode. If an outside antenna is the intent of Sharp that this product to dripping or splashing.
LC-32G4U | LC-37G4U & AVC System Operation Manual
Page 6
... DVD player XX Connecting a VCR XX Connecting a game console or camcorder XX Connecting a Digital TV STB XX Connecting HDMI equipment XX Displaying an image from HDMI equipment XX Connecting a PC XX Useful adjustment settings XX Image position (AV input mode only) ......... XX Fine... Sync. adjustment (PC input mode only) ... Contents IMPORTANT INFORMATION XX Trademarks XX DEAR SHARP CUSTOMER XX IMPORTANT SAFETY INSTRUCTIONS XX Contents XX Supplied accessories XX Preparation XX Attaching speakers XX Where to temporarily release the V-CHIP...
LC-32G4U | LC-37G4U & AVC System Operation Manual
Page 8
Supplied accessories Make sure the following accessories are provided with the product. Display: LC-37G4U AC cord (g1) Cable clamp (g1) Bracket unit (g1) QACCDA019WJPZ Page XX LHLDW0110CEZZ Page XX Speaker unit (g1) CHLDZA331WJ02 Page XX Left speaker DSP-ZA053UJ03 Page XX Display: LC-32G4U AC cord (g1) Right speaker DSP-ZA053UJ04 Page XX Cable clamp (g1) QACCDA019WJPZ Page XX LHLDW0110CEZZ Page XX 8
LC-32G4U | LC-37G4U & AVC System Operation Manual
Page 9
...the speaker terminals as shown in reverse order. 9 Display. 3 7 Turn the speaker to the front of the Display Align the nub of the bracket into the groove and (direction of the Fix the speaker terminal cover. Preparation Attaching speakers LC-37G4U 1 5 Peel off the tape holding the ends... of the cables, and move cables towards behind the display. 2 Fasten the ...
LC-32G4U | LC-37G4U & AVC System Operation Manual
Page 10
... System 2 Setting the System in malfunction. CAUTION Adjust the screen with two or more There is an exhaust fan on the sides of the Display, not the speaker. First select the location where to mount it. • Keep enough space above and on the right side. 10 Put...(5 cm) or more 2 inches (5 cm) or more people. • When you want to place the System "System" means the Display and AVC System. Preparation Where to keep a longer distance between the Display and AVC System, please purchase the optional system cable AN-07SC2 (about XX kg (LC-37G4U) and XX kg (LC32G4U).
LC-32G4U | LC-37G4U & AVC System Operation Manual
Page 11
...OF ELECTRIC SHOCK, DO NOT TOUCH UN-INSULATED PARTS OF ANY CABLES WITH THE AC CORD CONNECTED. 11 Preparation Setting the System After putting the Display and the AVC System in place, connect the system cables and AC cords. Use the cable clamps for bundling the cables. 1 Removing the ...terminal cover Display (rear view) Press the two hooks toward the center of the Display and remove the cover toward you . AC cord (with ferrite core) (BLACK) Connect the plug System cable completely. ...
LC-32G4U | LC-37G4U & AVC System Operation Manual
Page 12
Preparation 4 Attaching the clamp and bundling the cables with the clamp Cable clamp Insert the cable clamp in the hole on the Display as shown. Display (rear view) 5 Closing the terminal cover 12 Cables come out from the small opening.
LC-32G4U | LC-37G4U & AVC System Operation Manual
Page 14
NOTE • Perform the same steps for right speaker. • To attach the speakers, perform the steps in reverse order. 14 Disconnect the cable from the Display unless using an optional bracket to secure the speaker bracket. 2 Take off the speaker cable cover. 5 Take off the speaker terminal cover. 3 Unfasten the screws. Preparation Removing speakers LC-32G4U 1 4 Unfasten the screw used to mount it. CAUTION • Do not remove the stand and speaker from the speaker.
LC-32G4U | LC-37G4U & AVC System Operation Manual
Page 15
... not attempt to mount it. Detach the stand from the Display. (Hold the stand so it . Before attaching/detaching stand • Before performing work make sure to turn off the System. • Before performing work themselves. SHARP bears no responsibility for details.) LC-37G4U • You can set the angle outside those ranges. Preparation...
LC-32G4U | LC-37G4U & AVC System Operation Manual
Page 16
...can shorten the life of the remote control unit. • The remote control unit may not work properly if the remote control sensor on the Display. Cautions regarding remote control unit • Do not expose the remote control unit to the remote control sensor. 16 Be sure to follow the ... install or place the remote control unit under direct sunlight or strong lighting. Chemicals that leak from it towards the remote control sensor on the Display is under direct sunlight. In addition, do not expose the remote control unit to liquids, and do not place in an area with their...
LC-32G4U | LC-37G4U & AVC System Operation Manual
Page 18
...-I) CENTER CHANNEL INPUT Antenna (A) Input 5 terminal Antenna (A) input terminal (AUDIO) output terminal Antenna (B) input terminal EXTERNAL SPEAKER terminals INPUT 4 terminal RS-232C DISPLAY OUTPUT 3 terminal (HDMI) terminal DISPLAY OUTPUT 1 terminal DISPLAY OUTPUT 2 terminal AC INPUT terminal INPUT 1 COMPONENT video terminals (Y, PB, PR) INPUT 2 COMPONENT video terminals (Y, PB, PR) DC OUTPUT terminal (Terminal for...
LC-32G4U | LC-37G4U & AVC System Operation Manual
Page 19
.... (See page XX to XX for details.) 16 : When pressed all buttons on the remote control unit will turn off . (See page XX.) 2 DISPLAY: Display the channel information. 3 SOURSE POWER: Turns the power of the AVC System. Indicator lights up to normal screen. (See page XX.) 13 SLEEP: Set...3, INPUT 4, INPUT 5, Card) (See pages XX-XX and XX.) 20 CH r/s: Select the channel. 21 MUTE: Mute the sound. (See page XX.) 22 MENU: Display the menu screen. 23 a/b/c/d: Select a desired item on the screen. 24 RETURN: Return to the previous menu screen. 25 FAVORITE CH A, B, C, D: Select four preset ...
LC-32G4U | LC-37G4U & AVC System Operation Manual
Page 23
Watching TV Connecting the AC cord Connect the AC cords after all component connections have been completed. Display (rear view) AVC System (rear view) AC cord AC cord NOTE • Always turn off the main power of the Display when connecting the AC cords. • Disconnect the AC cords from the AC outlet, Display and AVC System when the System is not going to be used for a long period of time. 23
LC-32G4U | LC-37G4U & AVC System Operation Manual
Page 24
...green. • If the STANDBY/ON indicator on the AVC System and the POWER indicator on the Display still light up red, press TV POWER on the remote control unit or POWER on the AVC System...indicator Off Power off the power Press TV POWER on the remote control unit or POWER button on the Display. • The System enters standby mode and the image on the screen disappears. • Both the ...STANDBY/ON indicator on the AVC System and the POWER indicator on the Display change from green to turn the System on. NOTE • Check if the system cable is on . ...
LC-32G4U | LC-37G4U & AVC System Operation Manual
Page 25
... XX.) 2. B. Press ENTER to enter the setting. • This operation makes the System search for ANT- Watching TV Initial setup When you turn on -screen displays in this operation manual are 3 kinds of connection is made with your system. A, then press a/b to move down to select "Search Start" , and press ENTER...
LC-32G4U | LC-37G4U & AVC System Operation Manual
Page 26
...will be made if there is no operations for 3 seconds. Press CH s and the channel change in the order shown below: 2s3s...s68s69s2s3... Display CH s/r ■ Changing channels with CH r/s on the remote control unit or CH s/r on the remote control unit Select the channels directly by... • Press CHs to 125). NOTE • FLASHBACK will be made if there is turned on. ■ Using 0 - 9 on the Display Air: Press CH r and the channel change in the order shown below: 3s2s69s68s...s3s2... Watching TV Simple button operations for changing channels You can change...
LC-32G4U | LC-37G4U & AVC System Operation Manual
Page 27
... status Output device Speaker Output Select Fixed Variable Variable sound Mute MONITOR OUT Constant as shown below . • Pressing VOL l/k on the Display or VOL k/l, MTS or MUTE on the remote control unit can also cancel the mute. • Mute will be canceled after 30 minutes... • To decrease the volume, press VOL l. Virtual produces Dolby virtual effect from the speakers. VOL l/k 1 Press MUTE. • "M" has been displayed on the screen for changing volume/sound ■ Changing the volume You can have passed. Dolby Virtual sound options • On: Makes it possible to...