
LC-37HV6U Operation Manual
Page 7
... 68 Using the TV remote control unit to control other devices 70 Appendix 76 Troubleshooting 76 PC compatibility chart 77 RS-232C port specifications 78 Specifications 80 Optional accessories 80 Dimensional drawings 81 6 Contents IMPORTANT INFORMATION 1 Trademarks 2 DEAR SHARP CUSTOMER 3 IMPORTANT SAFETY PRECAUTIONS 3 Contents 6 Supplied accessories 7 Preparation 8 Where to place the System 8 Setting the...
... 68 Using the TV remote control unit to control other devices 70 Appendix 76 Troubleshooting 76 PC compatibility chart 77 RS-232C port specifications 78 Specifications 80 Optional accessories 80 Dimensional drawings 81 6 Contents IMPORTANT INFORMATION 1 Trademarks 2 DEAR SHARP CUSTOMER 3 IMPORTANT SAFETY PRECAUTIONS 3 Contents 6 Supplied accessories 7 Preparation 8 Where to place the System 8 Setting the...
LC-37HV6U Operation Manual
Page 8
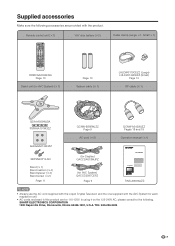
SHARP ELECTRONICS CORPORATION 1300 Naperville Drive, Romeoville, Illinois 60446-1091, U.S.A. Supplied accessories Make sure the following . Remote control unit (g1) TV POWER AV MODE VIEW MODE TV CBL VCR DVD /SAT /LD /DTV ANT-A/B INPUT Virtual MTS CC TWIN PICTURE... XBPSN40P14JS0 Stand (g1) Stand cushion (g4) Stand spacer (g4) Stand screw (g2) Page 11 (for Display) QACCDA019WJPZ (for AVC System) QACCD3097CEPZ Page 9 LC-37HV6U TINS-A904WJZZ NOTE • Always use the AC cord supplied with the Liquid Crystal Television and the one supplied with the AVC System for each...
SHARP ELECTRONICS CORPORATION 1300 Naperville Drive, Romeoville, Illinois 60446-1091, U.S.A. Supplied accessories Make sure the following . Remote control unit (g1) TV POWER AV MODE VIEW MODE TV CBL VCR DVD /SAT /LD /DTV ANT-A/B INPUT Virtual MTS CC TWIN PICTURE... XBPSN40P14JS0 Stand (g1) Stand cushion (g4) Stand spacer (g4) Stand screw (g2) Page 11 (for Display) QACCDA019WJPZ (for AVC System) QACCD3097CEPZ Page 9 LC-37HV6U TINS-A904WJZZ NOTE • Always use the AC cord supplied with the Liquid Crystal Television and the one supplied with the AVC System for each...

LC-37HV6U Operation Manual
Page 14
...; The batteries supplied with their terminals corresponding to the (e) and (f) indications. • Do not mix batteries of different types. In addition, do not expose the remote control unit to liquids, and do not place in chemical leakage or explosion. CAUTION Improper use of time, remove batteries from batteries can result in an...
...; The batteries supplied with their terminals corresponding to the (e) and (f) indications. • Do not mix batteries of different types. In addition, do not expose the remote control unit to liquids, and do not place in chemical leakage or explosion. CAUTION Improper use of time, remove batteries from batteries can result in an...

LC-37HV6U Operation Manual
Page 17
... on or off if no operations are performed within about 5 seconds. Press again to return to 16 channels can be assigned in A, B, C and D. Part names Remote control unit 2 3 4 5 6 7 8 9 10 11 24 25 1 12 13 14 TV POWER TV CBL VCR DVD /SAT /LD /DTV ANT-A/B INPUT AV Virtual ... Television. • See pages 68 to 75 for operating buttons not listed on this page. 1 TV POWER: Switch the Liquid Crystal Television power on the remote control unit will turn off . (See page 21.) 2 Virtual: Select Virtual Dolby Surround settings. (See page 24.) 3 AV MODE: Select an audio or ...
... on or off if no operations are performed within about 5 seconds. Press again to return to 16 channels can be assigned in A, B, C and D. Part names Remote control unit 2 3 4 5 6 7 8 9 10 11 24 25 1 12 13 14 TV POWER TV CBL VCR DVD /SAT /LD /DTV ANT-A/B INPUT AV Virtual ... Television. • See pages 68 to 75 for operating buttons not listed on this page. 1 TV POWER: Switch the Liquid Crystal Television power on the remote control unit will turn off . (See page 21.) 2 Virtual: Select Virtual Dolby Surround settings. (See page 24.) 3 AV MODE: Select an audio or ...

LC-37HV6U Operation Manual
Page 19
... connection is recommended. Connecting with cable converter using AUX terminals for your System. • Shown here is possible by pressing the ANT-A/B button on the remote control. • A good color picture depends on how to install your outdoor antenna to receive the best possible signal. • If you subscribe to connect it...
... connection is recommended. Connecting with cable converter using AUX terminals for your System. • Shown here is possible by pressing the ANT-A/B button on the remote control. • A good color picture depends on how to install your outdoor antenna to receive the best possible signal. • If you subscribe to connect it...

LC-37HV6U Operation Manual
Page 22
... remove the AC cords from the power outlet. If the System has been turned on . 21 Turning off the power 1 Press TV POWER on the remote control unit or POWER button on the Display. • The System enters standby mode and the image on the screen disappears. • Both the STANDBY/ON...; If the STANDBY/ON indicator on the AVC System and the POWER indicator on the Display still light up red, press TV POWER on the remote control unit or POWER button on the Display to turn the System on . First time turning on the AVC System AVC System MAIN STANDBY/ON indicator...
... remove the AC cords from the power outlet. If the System has been turned on . 21 Turning off the power 1 Press TV POWER on the remote control unit or POWER button on the Display. • The System enters standby mode and the image on the screen disappears. • Both the STANDBY/ON...; If the STANDBY/ON indicator on the AVC System and the POWER indicator on the Display still light up red, press TV POWER on the remote control unit or POWER button on the Display to turn the System on . First time turning on the AVC System AVC System MAIN STANDBY/ON indicator...
LC-37HV6U Operation Manual
Page 23
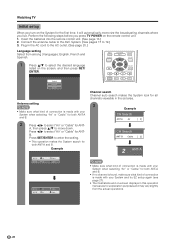
... illustrations and on the screen, and then press SET/ ENTER. A, then press a/b to select "Air" or "Cable" for ANT- Insert the batteries into the remote control unit. (See page 13.) 2. Connect the antenna cable to the AVC System. (See pages 17 to select "Air" or "Cable" for ANT- Watching TV ... setup When you turn on the System for the first time, it will automatically memorize the broadcasting channels where you press TV POWER on the remote control unit. 1. English Français Español Antenna setting NOTE • Make sure what kind of connection is made with your System...
... illustrations and on the screen, and then press SET/ ENTER. A, then press a/b to select "Air" or "Cable" for ANT- Insert the batteries into the remote control unit. (See page 13.) 2. Connect the antenna cable to the AVC System. (See pages 17 to select "Air" or "Cable" for ANT- Watching TV ... setup When you turn on the System for the first time, it will automatically memorize the broadcasting channels where you press TV POWER on the remote control unit. 1. English Français Español Antenna setting NOTE • Make sure what kind of connection is made with your System...

LC-37HV6U Operation Manual
Page 24
... again to switch back to press the 0 button. NOTE • CH s/r on the Display operates the same as CHa/b on the remote control unit Press FLASHBACK to switch the currently tuned channel to view the image received from the other tuner. Display 5 NOTE • When selecting...; Complete the step 3 within 3 seconds after the step 2. 3 Press the 5 button. 1-- 11 - 115 NOTE • The 100 button is turned on the remote control unit Select the channels directly by pressing buttons 0 to 9 and 100. • The System allows you to select up to 125 channels (1 to decrease the...
... again to switch back to press the 0 button. NOTE • CH s/r on the Display operates the same as CHa/b on the remote control unit Press FLASHBACK to switch the currently tuned channel to view the image received from the other tuner. Display 5 NOTE • When selecting...; Complete the step 3 within 3 seconds after the step 2. 3 Press the 5 button. 1-- 11 - 115 NOTE • The 100 button is turned on the remote control unit Select the channels directly by pressing buttons 0 to 9 and 100. • The System allows you to select up to 125 channels (1 to decrease the...

LC-37HV6U Operation Manual
Page 25
.... Dolby Virtual sound options • On: Makes it possible to "Variable", the indicator on the screen changes as VOL k/l on the remote control unit. Watching TV Simple button operations for changing volume/sound I Changing the volume You can also cancel the mute. • Mute will ... • After 30 minutes, increase the volume level by pressing VOL k. However, the System will be canceled by choosing "Dolby Virtual" on the remote control unit Mutes the current sound output. I Using MUTE on the menu items. (See page 38.) 24 Dolby Virtual : Off Dolby Virtual : On ...
.... Dolby Virtual sound options • On: Makes it possible to "Variable", the indicator on the screen changes as VOL k/l on the remote control unit. Watching TV Simple button operations for changing volume/sound I Changing the volume You can also cancel the mute. • Mute will ... • After 30 minutes, increase the volume level by pressing VOL k. However, the System will be canceled by choosing "Dolby Virtual" on the remote control unit Mutes the current sound output. I Using MUTE on the menu items. (See page 38.) 24 Dolby Virtual : Off Dolby Virtual : On ...

LC-37HV6U Operation Manual
Page 39
...; Audio menu is greyed out when Audio Out is set to "On". • For some discs, setup may be required on the remote control unit. MENU RETURN SOURCE POWER TV/SAT/DVD MENU SET/ ENTER FAVORITE CH DTV/DVD TOP MENU DTV/SAT GUIDE DTV/SAT INFO VCR ... MENU) screen displays. 2 Press c/d to select "Audio". 3 Press a/b to the operation manual of being surrounded by pressing Virtual on your DVD player. Treble] Audio Power Control USER TV Treble [0] -15 +15 Bass [0] -15 +15 Balance [0] L R Dolby Virtual [Off] Reset 3 Press a/b to select a specific adjustment item. 4 Press ...
...; Audio menu is greyed out when Audio Out is set to "On". • For some discs, setup may be required on the remote control unit. MENU RETURN SOURCE POWER TV/SAT/DVD MENU SET/ ENTER FAVORITE CH DTV/DVD TOP MENU DTV/SAT GUIDE DTV/SAT INFO VCR ... MENU) screen displays. 2 Press c/d to select "Audio". 3 Press a/b to the operation manual of being surrounded by pressing Virtual on your DVD player. Treble] Audio Power Control USER TV Treble [0] -15 +15 Bass [0] -15 +15 Balance [0] L R Dolby Virtual [Off] Reset 3 Press a/b to select a specific adjustment item. 4 Press ...

LC-37HV6U Operation Manual
Page 41
...; The System turns on again by pressing POWER button on the Display or TV POWER on the remote control unit. (See page 21). • If no signal inputs for PC source Power control setting allows you start using the PC and the signal inputs again, the System turns on. 40... Basic adjustment settings Power control for 8 seconds, the power shuts down . 1 Press MENU and the PC MENU screen displays. 2 Press c/d to select "Power Control". 3 Press a/b to select "Power Management", and then press SET/ENTER. Power Management] ...
...; The System turns on again by pressing POWER button on the Display or TV POWER on the remote control unit. (See page 21). • If no signal inputs for PC source Power control setting allows you start using the PC and the signal inputs again, the System turns on. 40... Basic adjustment settings Power control for 8 seconds, the power shuts down . 1 Press MENU and the PC MENU screen displays. 2 Press c/d to select "Power Control". 3 Press a/b to select "Power Management", and then press SET/ENTER. Power Management] ...

LC-37HV6U Operation Manual
Page 42
... relevant operation manual (DVD player, PC, etc.) carefully before making connections. 41 To view external source images, select the input source from INPUT on the remote control unit or on the Display. NOTE • Please refer to a DVD player, VCR, Digital TV tuner, PC, game console, camcorder or other external equipment. Using...
... relevant operation manual (DVD player, PC, etc.) carefully before making connections. 41 To view external source images, select the input source from INPUT on the remote control unit or on the Display. NOTE • Please refer to a DVD player, VCR, Digital TV tuner, PC, game console, camcorder or other external equipment. Using...

LC-37HV6U Operation Manual
Page 43
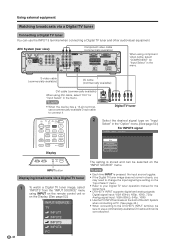
AVC System (rear view) Component video cable (commercially available) When using INPUT on the remote control unit or on the Display. (See page 52.) INPUT SOURCE TV INPUT1 INPUT2 INPUT3 INPUT4 PC The setting is pressed, the input source toggles. • ...
AVC System (rear view) Component video cable (commercially available) When using INPUT on the remote control unit or on the Display. (See page 52.) INPUT SOURCE TV INPUT1 INPUT2 INPUT3 INPUT4 PC The setting is pressed, the input source toggles. • ...

LC-37HV6U Operation Manual
Page 44
... (commercially available) S-VIDEO cable (commercially available) VCR Displaying a VCR image To watch a VCR image, select "INPUT2" from the "INPUT SOURCE" menu using INPUT on the remote control unit or on the "INPUT SOURCE" menu. INPUT SOURCE TV INPUT1 INPUT2 INPUT3 INPUT4 PC You only need to select the input source on the...
... (commercially available) S-VIDEO cable (commercially available) VCR Displaying a VCR image To watch a VCR image, select "INPUT2" from the "INPUT SOURCE" menu using INPUT on the remote control unit or on the "INPUT SOURCE" menu. INPUT SOURCE TV INPUT1 INPUT2 INPUT3 INPUT4 PC You only need to select the input source on the...
LC-37HV6U Operation Manual
Page 45
... equipment Watching broadcasts via a Digital TV tuner 1 44 To watch a Digital TV tuner image, select "INPUT3" from the "INPUT SOURCE" menu using INPUT on the remote control unit or on the Display. (See page 52.) INPUT SOURCE TV INPUT1 INPUT2 INPUT3 INPUT4 PC The setting is pressed, the input source toggles. •...
... equipment Watching broadcasts via a Digital TV tuner 1 44 To watch a Digital TV tuner image, select "INPUT3" from the "INPUT SOURCE" menu using INPUT on the remote control unit or on the Display. (See page 52.) INPUT SOURCE TV INPUT1 INPUT2 INPUT3 INPUT4 PC The setting is pressed, the input source toggles. •...

LC-37HV6U Operation Manual
Page 46
... console or viewing camcorder images Connecting a game console or camcorder A game console, camcorder and some other audiovisual equipment are conveniently connected using INPUT on the remote control unit or on the Display. (See page 52.) When connecting to select the input source on the "INPUT SOURCE" menu.
... console or viewing camcorder images Connecting a game console or camcorder A game console, camcorder and some other audiovisual equipment are conveniently connected using INPUT on the remote control unit or on the Display. (See page 52.) When connecting to select the input source on the "INPUT SOURCE" menu.

LC-37HV6U Operation Manual
Page 47
... INPUT4 PC You only need to set the Auto Sync. Using external equipment Viewing an image from the "INPUT SOURCE" menu using INPUT on the remote control unit or on the Display. (See page 52.) When connecting to a PC, the correct input signal type is pressed, the input source toggles. NOTE •...
... INPUT4 PC You only need to set the Auto Sync. Using external equipment Viewing an image from the "INPUT SOURCE" menu using INPUT on the remote control unit or on the Display. (See page 52.) When connecting to a PC, the correct input signal type is pressed, the input source toggles. NOTE •...

LC-37HV6U Operation Manual
Page 53
...is connected will result in the following the steps as explained in the menu). COMPONENT VIDEO 2. DVI 52 1 Press INPUT on the remote control unit or on the Display to select the input source. • An image from the selected source automatically displays. • You can...input source by pressing a/b. INPUT button Input selection Can use for selecting the input source. 1 Press INPUT on the remote control unit or on the Display. 2 Press INPUT on the remote control unit or on the Display and select "INPUT3", as explained in Input selection. 2 Select "Auto" or "DVI" ...
...is connected will result in the following the steps as explained in the menu). COMPONENT VIDEO 2. DVI 52 1 Press INPUT on the remote control unit or on the Display to select the input source. • An image from the selected source automatically displays. • You can...input source by pressing a/b. INPUT button Input selection Can use for selecting the input source. 1 Press INPUT on the remote control unit or on the Display. 2 Press INPUT on the remote control unit or on the Display and select "INPUT3", as explained in Input selection. 2 Select "Auto" or "DVI" ...

LC-37HV6U Operation Manual
Page 58
...Off Both screen images and audio are output. Useful adjustment settings Audio only When listening to music from a music program, you to select what controls the audio output. Audio Only] Option Audio Only Input Select [Auto] DNR [Low] Audio Out [Fixed] Quick Shoot [Off] (On-... Variable (On-screen display for AV input mode.) Selected item Description Fixed Variable • Sound via speaker is adjusted with VOL k/l on the remote control unit or VOL l/ k on the Display. • Sound via the MONITOR OUTPUT terminal is not adjustable and constantly outputs. • Sound via...
...Off Both screen images and audio are output. Useful adjustment settings Audio only When listening to music from a music program, you to select what controls the audio output. Audio Only] Option Audio Only Input Select [Auto] DNR [Low] Audio Out [Fixed] Quick Shoot [Off] (On-... Variable (On-screen display for AV input mode.) Selected item Description Fixed Variable • Sound via speaker is adjusted with VOL k/l on the remote control unit or VOL l/ k on the Display. • Sound via the MONITOR OUTPUT terminal is not adjustable and constantly outputs. • Sound via...

LC-37HV6U Operation Manual
Page 69
... in EDIT mode, EDIT mode will be canceled. • If there is no operation for your desired manufacturer or the remote control does not work, you want to preset the remote control signal. 2 Press EDIT/LEARN and 1 at the same time. • LED flashes continuously. 3 Press a button for... running (LED flashes continuously, step 2 above), the learning codes of AV product 1 Be sure to slide the Mode switch to match the device whose remote control signal you want to be learned. 2 Press EDIT/LEARN and 2 at the same time. • LED flashes continuously. 3 Press 0 - 9 ...
... in EDIT mode, EDIT mode will be canceled. • If there is no operation for your desired manufacturer or the remote control does not work, you want to preset the remote control signal. 2 Press EDIT/LEARN and 1 at the same time. • LED flashes continuously. 3 Press a button for... running (LED flashes continuously, step 2 above), the learning codes of AV product 1 Be sure to slide the Mode switch to match the device whose remote control signal you want to be learned. 2 Press EDIT/LEARN and 2 at the same time. • LED flashes continuously. 3 Press 0 - 9 ...


