

LC-40E67UN | LC-40E77UN Operation Manual
Page 11
... ..........37 Selecting Media Type for AQUOS LINK-Compatible Recorder ...........37 Listening with the AQUOS AUDIO Speaker System 37 Manually Changing AQUOS AUDIO Speaker System's Sound Mode 37 Displaying the Setup Menu of AQUOS LINK-Compatible Equipment ........37 HDMI Device Selection 37 Appendix 38 Removing the Stand 38 Setting the TV on the Wall 38 Troubleshooting...
... ..........37 Selecting Media Type for AQUOS LINK-Compatible Recorder ...........37 Listening with the AQUOS AUDIO Speaker System 37 Manually Changing AQUOS AUDIO Speaker System's Sound Mode 37 Displaying the Setup Menu of AQUOS LINK-Compatible Equipment ........37 HDMI Device Selection 37 Appendix 38 Removing the Stand 38 Setting the TV on the Wall 38 Troubleshooting...

LC-40E67UN | LC-40E77UN Operation Manual
Page 13
...: Switch the TV power on or enter standby. (See page 14.) 2 DISPLAY: Display the channel information. 3 SOURCE POWER: Turns the power of the external equipment on the remote control unit will 26 light. This button will function only when AQUOS LINK is used. (See pages 34 to normal screen. (...See page 15.) 11 EXIT: Turn off the menu screen. 12 OPTION: Display the AQUOS LINK MENU screen. When the input source is TV, INPUT 1, 2 or 3: STANDARD, MOVIE, GAME, USER, DYNAMIC (Fixed), DYNAMIC. This button is used . (See pages 34 to press ...
...: Switch the TV power on or enter standby. (See page 14.) 2 DISPLAY: Display the channel information. 3 SOURCE POWER: Turns the power of the external equipment on the remote control unit will 26 light. This button will function only when AQUOS LINK is used. (See pages 34 to normal screen. (...See page 15.) 11 EXIT: Turn off the menu screen. 12 OPTION: Display the AQUOS LINK MENU screen. When the input source is TV, INPUT 1, 2 or 3: STANDARD, MOVIE, GAME, USER, DYNAMIC (Fixed), DYNAMIC. This button is used . (See pages 34 to press ...

LC-40E67UN | LC-40E77UN Operation Manual
Page 14
...available) VIDEO (Yellow) AUDIO-L (White) AUDIO-R (Red) When using component cable (INPUT 1 or 2): Blu-ray disc player/ DVD player/Digital TV STB Component video cable (commercially available) Audio cable (commercially available) AUDIO-L (White) AUDIO-R (Red) When using S-VIDEO cable (INPUT 2): VCR/...available) Audio cable (commercially available) AUDIO-L (White) AUDIO-R (Red) Y (Green) PB (Blue) PR (Red) • To enjoy the AQUOS 1080p display capability, connect your external equipment using a component cable and set the equipment to 1080p output. • See page 13 for connecting a ...
...available) VIDEO (Yellow) AUDIO-L (White) AUDIO-R (Red) When using component cable (INPUT 1 or 2): Blu-ray disc player/ DVD player/Digital TV STB Component video cable (commercially available) Audio cable (commercially available) AUDIO-L (White) AUDIO-R (Red) When using S-VIDEO cable (INPUT 2): VCR/...available) Audio cable (commercially available) AUDIO-L (White) AUDIO-R (Red) Y (Green) PB (Blue) PR (Red) • To enjoy the AQUOS 1080p display capability, connect your external equipment using a component cable and set the equipment to 1080p output. • See page 13 for connecting a ...

LC-40E67UN | LC-40E77UN Operation Manual
Page 15
When you input the audio signal via the AUDIO terminal with the TV. 13 Connecting a PC When connecting to a PC with an analog RGB terminal (INPUT 4): Ø 3.5 mm stereo minijack cable (commercially available) RGB cable (commercially available) PC .... (See page 25 for a list of PC signals compatible with INPUT 6, set "PC Audio Select" to "Input 6 (HDMI)". (See page 25.) • To enjoy the AQUOS 1080p display capability, connect your Blu-ray disc player or other external equipment using an HDMI-DVI conversion cable, input the audio signal to the...
When you input the audio signal via the AUDIO terminal with the TV. 13 Connecting a PC When connecting to a PC with an analog RGB terminal (INPUT 4): Ø 3.5 mm stereo minijack cable (commercially available) RGB cable (commercially available) PC .... (See page 25 for a list of PC signals compatible with INPUT 6, set "PC Audio Select" to "Input 6 (HDMI)". (See page 25.) • To enjoy the AQUOS 1080p display capability, connect your Blu-ray disc player or other external equipment using an HDMI-DVI conversion cable, input the audio signal to the...

LC-40E67UN | LC-40E77UN Operation Manual
Page 21
...Items For TV/INPUT 1/2/3 Mode Picture Menu OPC Page 21 Backlight Page 21 Contrast Page 21 Brightness Page 21 Color Page 21 Tint Page 21 Sharpness Page 21 Advanced C.M.S.-Hue Page 21 C.M.S.-Saturation Page 21 C.M.S.-Value Page 21 Color Temp Page 21 Active Contrast Page 21 Fine Motion Enhanced (LC-40E77UN only Page... Input Label Page 24 Parental CTRL Pages 26-28 Position Page 25 Audio Setup Page 25 Language Page 25 Reset Page 25 Option Menu AQUOS LINK Setup Page 35 Audio Only Page 29 Input Select Page 29 Output Select Page 29 Color System Page 29 Digital Caption Setup Page...
...Items For TV/INPUT 1/2/3 Mode Picture Menu OPC Page 21 Backlight Page 21 Contrast Page 21 Brightness Page 21 Color Page 21 Tint Page 21 Sharpness Page 21 Advanced C.M.S.-Hue Page 21 C.M.S.-Saturation Page 21 C.M.S.-Value Page 21 Color Temp Page 21 Active Contrast Page 21 Fine Motion Enhanced (LC-40E77UN only Page... Input Label Page 24 Parental CTRL Pages 26-28 Position Page 25 Audio Setup Page 25 Language Page 25 Reset Page 25 Option Menu AQUOS LINK Setup Page 35 Audio Only Page 29 Input Select Page 29 Output Select Page 29 Color System Page 29 Digital Caption Setup Page...

LC-40E67UN | LC-40E77UN Operation Manual
Page 31
...number here. Type 2: Proportionally spaced with serifs. Type 3: Monospaced without serifs. On-Screen Display Menu Option Menu Example Option AQUOS LINK Setup Audio Only Input Select Output Select Color System Digital Caption Setup Digital Caption Info. Fixed: Sound via the AUDIO OUTPUT...station or default font. Audio Only When listening to select "Reset", and then press ENTER. • The default value depends on the TV. Type 4: Proportionally spaced without serifs. Type 7: Small capitals. • For resetting adjustments to the factory preset values, press a/b to ...
...number here. Type 2: Proportionally spaced with serifs. Type 3: Monospaced without serifs. On-Screen Display Menu Option Menu Example Option AQUOS LINK Setup Audio Only Input Select Output Select Color System Digital Caption Setup Digital Caption Info. Fixed: Sound via the AUDIO OUTPUT...station or default font. Audio Only When listening to select "Reset", and then press ENTER. • The default value depends on the TV. Type 4: Proportionally spaced without serifs. Type 7: Small capitals. • For resetting adjustments to the factory preset values, press a/b to ...

LC-40E67UN | LC-40E77UN Operation Manual
Page 32
... the Secret No., go to step 4. Button Control Lock: All buttons on . ■ For LC-40E77UN You can select your favorite channels easily. Otherwise, for the availability of demo mode. 120Hz Demo: 120Hz... "Software Update", and then press ENTER. • If you have any questions, please call 1-800-BE-SHARP (800-237-4277). • Before setting the channel, select the channel you want to play the Demo Mode...buttons on the TV and the remote control. CAUTION • Do not remove the USB memory device or unplug the AC cord while the software is displayed. Option AQUOS LINK Setup Demo ...
... the Secret No., go to step 4. Button Control Lock: All buttons on . ■ For LC-40E77UN You can select your favorite channels easily. Otherwise, for the availability of demo mode. 120Hz Demo: 120Hz... "Software Update", and then press ENTER. • If you have any questions, please call 1-800-BE-SHARP (800-237-4277). • Before setting the channel, select the channel you want to play the Demo Mode...buttons on the TV and the remote control. CAUTION • Do not remove the USB memory device or unplug the AC cord while the software is displayed. Option AQUOS LINK Setup Demo ...

LC-40E67UN | LC-40E77UN Operation Manual
Page 36
... REC STOP and OPTION buttons will function only when AQUOS LINK is used. ˙ One Touch Play While the TV is set to TV. Make sure to use the INPUT 5, 6, 7 or 8 terminal. Using AQUOS LINK Controlling HDMI Equipment Using AQUOS LINK What's AQUOS LINK? • Using the HDMI CEC (Consumer Electronics...er can use an HDMI-certified cable. • Up to this TV. 34 AQUOS BD Player Connecting AQUOS BD Player via AQUOS LINK-compatible Audio system TV • Point the remote control toward the TV, not to connected HDMI equipment. • Video noise may occur depending on the...
... REC STOP and OPTION buttons will function only when AQUOS LINK is used. ˙ One Touch Play While the TV is set to TV. Make sure to use the INPUT 5, 6, 7 or 8 terminal. Using AQUOS LINK Controlling HDMI Equipment Using AQUOS LINK What's AQUOS LINK? • Using the HDMI CEC (Consumer Electronics...er can use an HDMI-certified cable. • Up to this TV. 34 AQUOS BD Player Connecting AQUOS BD Player via AQUOS LINK-compatible Audio system TV • Point the remote control toward the TV, not to connected HDMI equipment. • Video noise may occur depending on the...
LC-40E67UN | LC-40E77UN Operation Manual
Page 37
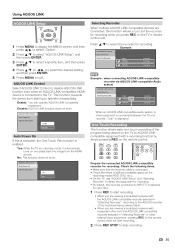
...-compatible recorder selected in standby mode, it automatically turns on the recording media (HDD, DVD, etc.). • On the TV, use "AQUOS LINK Setup" and "Selecting Recorder" to select the equipment for recording. • By default, the recorder connected to INPUT 5 is selected ...-compatible audio system or other external input equipment, pressing REC on the TV to select the recorder for recording. AQUOS LINK Control Select AQUOS LINK Control to disable AQUOS LINK function even when an AQUOS LINK-compatible HDMI device is in "Selecting Recorder", recording to set the recorder for ...
...-compatible recorder selected in standby mode, it automatically turns on the recording media (HDD, DVD, etc.). • On the TV, use "AQUOS LINK Setup" and "Selecting Recorder" to select the equipment for recording. • By default, the recorder connected to INPUT 5 is selected ...-compatible audio system or other external input equipment, pressing REC on the TV to select the recorder for recording. AQUOS LINK Control Select AQUOS LINK Control to disable AQUOS LINK function even when an AQUOS LINK-compatible HDMI device is in "Selecting Recorder", recording to set the recorder for ...

LC-40E67UN | LC-40E77UN Operation Manual
Page 38
... Sound mode change Setup menu Model select Timer Recording You can call up the AQUOS LINK-compatible recorder's EPG and preset timer recordings using the TV's remote control. 1 Press OPTION to display the AQUOS LINK MENU screen. 2 Press a/b to select "Recorder EPG", and then press ENTER. • The recorder's EPG is displayed. 3 Select...
... Sound mode change Setup menu Model select Timer Recording You can call up the AQUOS LINK-compatible recorder's EPG and preset timer recordings using the TV's remote control. 1 Press OPTION to display the AQUOS LINK MENU screen. 2 Press a/b to select "Recorder EPG", and then press ENTER. • The recorder's EPG is displayed. 3 Select...

LC-40E67UN | LC-40E77UN Operation Manual
Page 39
...change its sound mode. 1 Press OPTION to display the AQUOS LINK MENU screen. 2 Press a/b to select "By AQUOS AUDIO SP", and then press ENTER. • The sound from the TV speaker is muted and only the sound from the AQUOS LINK-compatible audio system is audible. • You can...Select the title with the player BD-HP20U currently available. Listening with the AQUOS AUDIO Speaker System You can select to listen to the TV sound only from the connected AQUOS LINK-compatible equipment. 1 Press OPTION to display the AQUOS LINK MENU screen. 2 Press a/b to be displayed with a/b/c/d, and then ...
...change its sound mode. 1 Press OPTION to display the AQUOS LINK MENU screen. 2 Press a/b to select "By AQUOS AUDIO SP", and then press ENTER. • The sound from the TV speaker is muted and only the sound from the AQUOS LINK-compatible audio system is audible. • You can...Select the title with the player BD-HP20U currently available. Listening with the AQUOS AUDIO Speaker System You can select to listen to the TV sound only from the connected AQUOS LINK-compatible equipment. 1 Press OPTION to display the AQUOS LINK MENU screen. 2 Press a/b to be displayed with a/b/c/d, and then ...


