

Operation Manual
Page 9
... damages when you turn the TV for the most comfortable viewing angle. • When you are for explanation purposes and may result in reverse order. 7 Remote control unit ( X 1) Page 8 "AAA" size battery ( X 2) Page 10 x4 Stand ( X 1) with Screws Page 7 Operation manual ( X 1) Connection guide ( X 1) • Always use the AC cord supplied with...
... damages when you turn the TV for the most comfortable viewing angle. • When you are for explanation purposes and may result in reverse order. 7 Remote control unit ( X 1) Page 8 "AAA" size battery ( X 2) Page 10 x4 Stand ( X 1) with Screws Page 7 Operation manual ( X 1) Connection guide ( X 1) • Always use the AC cord supplied with...

Operation Manual
Page 10
...remote control unit and the remote control sensor may not work properly if the remote control sensor on the TV is attached. ■ Cautions regarding the remote control unit • Do not expose the remote... it towar ds the remote control sensor on the ...remote control sensor. QUICK REFERENCE Quick Installation Tips 1. Connect the AC plug for the first time. Remote...remote control unit to liquids,...Remote Control Unit Use the remote control unit by pointing it to turn on the front of the remote control unit. • The remote...for the television into the remote control unit. (See page...
...remote control unit and the remote control sensor may not work properly if the remote control sensor on the TV is attached. ■ Cautions regarding the remote control unit • Do not expose the remote... it towar ds the remote control sensor on the ...remote control sensor. QUICK REFERENCE Quick Installation Tips 1. Connect the AC plug for the first time. Remote...remote control unit to liquids,...Remote Control Unit Use the remote control unit by pointing it to turn on the front of the remote control unit. • The remote...for the television into the remote control unit. (See page...
Operation Manual
Page 12
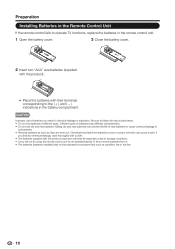
... unit for an extended period of different types. Preparation Installing Batteries in the Remote Control Unit If the remote control fails to operate TV functions, replace the batteries in the remote control unit. 1 Open the battery cover. 3 Close the battery cover. 2 Insert two "AAA" size batteries (supplied with the product). • Place the...
... unit for an extended period of different types. Preparation Installing Batteries in the Remote Control Unit If the remote control fails to operate TV functions, replace the batteries in the remote control unit. 1 Open the battery cover. 3 Close the battery cover. 2 Insert two "AAA" size batteries (supplied with the product). • Place the...

Operation Manual
Page 13
... REFERENCE ...7 Supplied Accessories ...7 Attaching/Detaching the Stand 7 Quick Installation Tips ...8 Using the Remote Control Unit 8 Antennas ...9 Connecting Antenna Cable ...9 Installing Batteries in the Remote Control Unit 10 Contents ...11 Part Names ...12 TV (Front) ...12 TV (Side/Rear) ...12 Remote Control Unit ...13 Introduction to Connections ...14 Experiencing HD Images ...14 Types of...
... REFERENCE ...7 Supplied Accessories ...7 Attaching/Detaching the Stand 7 Quick Installation Tips ...8 Using the Remote Control Unit 8 Antennas ...9 Connecting Antenna Cable ...9 Installing Batteries in the Remote Control Unit 10 Contents ...11 Part Names ...12 TV (Front) ...12 TV (Side/Rear) ...12 Remote Control Unit ...13 Introduction to Connections ...14 Experiencing HD Images ...14 Types of...
Operation Manual
Page 14
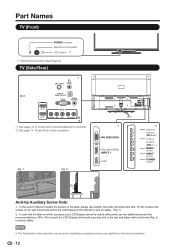
Part Names TV (Front) POWER indicator Remote control sensor OPC sensor *1 *1: Optical Picture Control (See Page 27) TV (Side/Rear) *1 ANT./CABLE DIGITAL AUDIO OUTPUT PC IN AUDIO PC/HDMI INPUT 2 INPUT 4 ...
Part Names TV (Front) POWER indicator Remote control sensor OPC sensor *1 *1: Optical Picture Control (See Page 27) TV (Side/Rear) *1 ANT./CABLE DIGITAL AUDIO OUTPUT PC IN AUDIO PC/HDMI INPUT 2 INPUT 4 ...

Operation Manual
Page 15
..., Movie,Game, PC, Dynamic, Dynamic(Fixed). (See page 22.) 14. MUTE: Mute the sound. (See page 21.) 7. TV: Direct switch TV source. 23. Part Names Remote Control Unit 16 17 18 19 20 21 22 23 24 25 26 POWER INPUT 1 1 2 3 4 5 6 2 7 8 9 0 ENT 3 DIS P LAY F RE E Z E AUDIO FLASHBACK 4 MUTE + 5 6 VOL SURROUND CH... PC MENU 8 9 EXIT ENTER RETURN A SLEEP FAVORITE CH B C D CC VIEW MODE AV MODE 10 11 12 13 14 15 LCDTV GJ221 • When using the remote control unit, point it at the TV. 1.
..., Movie,Game, PC, Dynamic, Dynamic(Fixed). (See page 22.) 14. MUTE: Mute the sound. (See page 21.) 7. TV: Direct switch TV source. 23. Part Names Remote Control Unit 16 17 18 19 20 21 22 23 24 25 26 POWER INPUT 1 1 2 3 4 5 6 2 7 8 9 0 ENT 3 DIS P LAY F RE E Z E AUDIO FLASHBACK 4 MUTE + 5 6 VOL SURROUND CH... PC MENU 8 9 EXIT ENTER RETURN A SLEEP FAVORITE CH B C D CC VIEW MODE AV MODE 10 11 12 13 14 15 LCDTV GJ221 • When using the remote control unit, point it at the TV. 1.

Operation Manual
Page 16
... by pressing INPUT. For connecting the TV to select the input source. • You can also select the input source by pressing INPUT on the remote control unit or on updating to Connections Experiencing HD Images An HDTV without an HD source is pressed, the input source toggles. Press / to external...
... by pressing INPUT. For connecting the TV to select the input source. • You can also select the input source by pressing INPUT on the remote control unit or on updating to Connections Experiencing HD Images An HDTV without an HD source is pressed, the input source toggles. Press / to external...
Operation Manual
Page 17
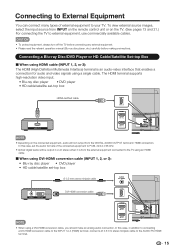
... can connect many types of the connected equipment to PCM, 32/44.1/48 kHz. • Optical digital audio will not output from INPUT on the remote control unit or on the connected equipment, audio will be output in HDMI connection.
... can connect many types of the connected equipment to PCM, 32/44.1/48 kHz. • Optical digital audio will not output from INPUT on the remote control unit or on the connected equipment, audio will be output in HDMI connection.

Operation Manual
Page 21
...minutes, the power will be placed. Language setting • Select the OSD menu language from the AC outlet. • Small amount of our SHARP Liquid Crystal Television Please press [Enter] to standby mode automatically. Initial Setup • The Initial Setup screen display at the first use this ...the screen disappears. TV EZ Setup TV Location Select where the TV will guide you are not going to use . Insert the batteries into the remote control unit. (See page 10.) 2. POWER • If you through the setup process. Home Store Select Enter Enter Return Back EXIT Exit...
...minutes, the power will be placed. Language setting • Select the OSD menu language from the AC outlet. • Small amount of our SHARP Liquid Crystal Television Please press [Enter] to standby mode automatically. Initial Setup • The Initial Setup screen display at the first use this ...the screen disappears. TV EZ Setup TV Location Select where the TV will guide you are not going to use . Insert the batteries into the remote control unit. (See page 10.) 2. POWER • If you through the setup process. Home Store Select Enter Enter Return Back EXIT Exit...

Operation Manual
Page 23
... you want to adjust the sleep timer, you can press SLEEP twice then change the volume by pressing VOL / on the TV or on the remote control unit. • To increase the volume, press VOL . • To decrease the volume, press VOL . FLASHBACK Press FLASHBACK to switch to the previously ... the time setting. • Select "Off" by pressing SLEEP to cancel the sleep timer. • The TV will be canceled by using INPUT on the remote control unit or INPUT on the TV. 1. or MUTE. Mute will enter standby mode (power indicator lights red) when the remaining time reaches zero. g., Channel...
... you want to adjust the sleep timer, you can press SLEEP twice then change the volume by pressing VOL / on the TV or on the remote control unit. • To increase the volume, press VOL . • To decrease the volume, press VOL . FLASHBACK Press FLASHBACK to switch to the previously ... the time setting. • Select "Off" by pressing SLEEP to cancel the sleep timer. • The TV will be canceled by using INPUT on the remote control unit or INPUT on the TV. 1. or MUTE. Mute will enter standby mode (power indicator lights red) when the remaining time reaches zero. g., Channel...

Operation Manual
Page 28
...RETURN: Press to return to adjust the setting. 4. VOL / : Cursor / on the remote control. Example Picture Settings Picture Settings AV MODE OPC Backlight [ 80] Contrast [ 50] Brightness [ 50] Color [ 50] Tint [ 0] Sharpness [ 10] Advanced Reset Menu STANDARD [STANDARD] [On] TV USB PC MENU EXIT ENTER...For more color intensity intensity Tint Skin tones Skin tones become reddish become greenish Sharpness For less sharpness For more sharpness • Backlight control is disabled when OPC is on the remote control while OSD menu is "On". 26 ENTER: Press to go to enter...
...RETURN: Press to return to adjust the setting. 4. VOL / : Cursor / on the remote control. Example Picture Settings Picture Settings AV MODE OPC Backlight [ 80] Contrast [ 50] Brightness [ 50] Color [ 50] Tint [ 0] Sharpness [ 10] Advanced Reset Menu STANDARD [STANDARD] [On] TV USB PC MENU EXIT ENTER...For more color intensity intensity Tint Skin tones Skin tones become reddish become greenish Sharpness For less sharpness For more sharpness • Backlight control is disabled when OPC is on the remote control while OSD menu is "On". 26 ENTER: Press to go to enter...

Operation Manual
Page 29
... Automatically adjusts the image contrast according to customize settings as desired. Off: Normal viewing mode. • "DI Film Mode" does not function depending on the remote control unit. Select from the following AV modes. PC: For PC. Advanced This TV provides various advanced functions for viewing a clearer video image. High/Medium...
... Automatically adjusts the image contrast according to customize settings as desired. Off: Normal viewing mode. • "DI Film Mode" does not function depending on the remote control unit. Select from the following AV modes. PC: For PC. Advanced This TV provides various advanced functions for viewing a clearer video image. High/Medium...

Operation Manual
Page 31
...tracks to match the television broadcast signal. Press MENU to select "System Options". 2. The View Mode menu varies depending on the remote control unit. This feature is possible for adjusting the video being input from a TV, PC, other information, which could be operated... switching to broadcast other audiovisual equipment, USB-Video. Audio Language Gives you to hear. • Obtain a clearer sound by pressing CC on the remote control unit. The SAP feature allows a TV station to fixed mono-sound mode. On-Screen Display Menu System Options Example DIS P LAY...
...tracks to match the television broadcast signal. Press MENU to select "System Options". 2. The View Mode menu varies depending on the remote control unit. This feature is possible for adjusting the video being input from a TV, PC, other information, which could be operated... switching to broadcast other audiovisual equipment, USB-Video. Audio Language Gives you to hear. • Obtain a clearer sound by pressing CC on the remote control unit. The SAP feature allows a TV station to fixed mono-sound mode. On-Screen Display Menu System Options Example DIS P LAY...

Operation Manual
Page 34
... Air/Cable: Make sure what kind of connection is selected for Antenna setting, scrambled channels are made with the number buttons on the remote control and select "Initial Setup"/"Broadcasting Setup"/ "Favorite CH". 2. Broadcasting Setup CH Setup If Initial Installation does not memorize all channels ...disable the parental control function. Air/Cable: Make sure what kind of connection made with your secret No. . Press MENU on the remote control to change your TV and try channel search again. • If you to manually memorize the channels. To register your favorite ...
... Air/Cable: Make sure what kind of connection is selected for Antenna setting, scrambled channels are made with the number buttons on the remote control and select "Initial Setup"/"Broadcasting Setup"/ "Favorite CH". 2. Broadcasting Setup CH Setup If Initial Installation does not memorize all channels ...disable the parental control function. Air/Cable: Make sure what kind of connection made with your secret No. . Press MENU on the remote control to change your TV and try channel search again. • If you to manually memorize the channels. To register your favorite ...

Operation Manual
Page 40
... 21.) • This is not a malfunction. This happens when the cabinet slightly expands and contracts according to direct sunlight or near the remote control sensor? • Are screen mode adjustments such as picture size made correctly? (See page 23.) • Adjust the picture tone....page 26 and 27.) • Is the room too bright? Appendix Troubleshooting Problem • No power • Unit cannot be operated. • Remote control unit does not operate. • Picture is cut it in a location exposed to change in a low temperature space (e.g. Enter new password &#...
... 21.) • This is not a malfunction. This happens when the cabinet slightly expands and contracts according to direct sunlight or near the remote control sensor? • Are screen mode adjustments such as picture size made correctly? (See page 23.) • Adjust the picture tone....page 26 and 27.) • Is the room too bright? Appendix Troubleshooting Problem • No power • Unit cannot be operated. • Remote control unit does not operate. • Picture is cut it in a location exposed to change in a low temperature space (e.g. Enter new password &#...

Operation Manual
Page 43
..., 1280x1024, 1400x1050, 1600x1200, 1920x1080 (*2)1360x768, 1366x768, 1280x720, 1920x1080 MUTE SURROUND AUDIO SELECTION SLEEP TIMER CHANNEL DIRECT CHANNEL (ANALOG) DIRECT CHANNEL (DIGITAL) CH UP CH DOWN REMOTE CONTROL BUTTONS CC MUTE*_ _ 0: (Toggle), 1: On, 2: Off A CS U * 0: (Toggle), 1: On, 2: Off A C H A x _ _ _ (...- 30 MIN., 2: OFF TIMER - 60 MIN., 3: OFF TIMER - 90 MIN., 4: OFF TIMER - 120 MIN. In Air, 2-69ch is effective. C LC P x (Toggle) Toggle operation of TV -1 If it is not TV display, it is toggle operation in available items. 1: Available in [AV] SD timing and...
..., 1280x1024, 1400x1050, 1600x1200, 1920x1080 (*2)1360x768, 1366x768, 1280x720, 1920x1080 MUTE SURROUND AUDIO SELECTION SLEEP TIMER CHANNEL DIRECT CHANNEL (ANALOG) DIRECT CHANNEL (DIGITAL) CH UP CH DOWN REMOTE CONTROL BUTTONS CC MUTE*_ _ 0: (Toggle), 1: On, 2: Off A CS U * 0: (Toggle), 1: On, 2: Off A C H A x _ _ _ (...- 30 MIN., 2: OFF TIMER - 60 MIN., 3: OFF TIMER - 90 MIN., 4: OFF TIMER - 120 MIN. In Air, 2-69ch is effective. C LC P x (Toggle) Toggle operation of TV -1 If it is not TV display, it is toggle operation in available items. 1: Available in [AV] SD timing and...


