

Operation Manual
Page 3
...REDUCE THE RISK OF ELECTRIC SHOCK, DO NOT REMOVE COVER (OR BACK). ENGLISH LC-40LE550U LIQUID CRYSTAL TELEVISION ENGLISH OPERATION MANUAL IMPORTANT: To aid reporting in case of loss or theft, please record the TV's model and serial numbers in the literature accompanying the product . 1 The lightning... an equilateral triangle,is intended to alert the user to the presence of uninsulated"dangerous voltage"within a triangle presence of the TV. The numbers are located at the rear of important operating and maintenance(servicing)instruction in the space provided. REFER SERVICING TO QUALIFIED...
...REDUCE THE RISK OF ELECTRIC SHOCK, DO NOT REMOVE COVER (OR BACK). ENGLISH LC-40LE550U LIQUID CRYSTAL TELEVISION ENGLISH OPERATION MANUAL IMPORTANT: To aid reporting in case of loss or theft, please record the TV's model and serial numbers in the literature accompanying the product . 1 The lightning... an equilateral triangle,is intended to alert the user to the presence of uninsulated"dangerous voltage"within a triangle presence of the TV. The numbers are located at the rear of important operating and maintenance(servicing)instruction in the space provided. REFER SERVICING TO QUALIFIED...

Operation Manual
Page 4
... FCC Rules. Reorient or relocate the receiving antenna. - Setting "TV Location" to "Home" allows the TV to achieve an energy-saving status for a Class B digital device, pursuant to comply with electric appliances such as practical. DECLARATION OF CONFORMITY: SHARP LIQUID CRYSTAL TELEVISION, MODEL LC-40LE550U This device complies with the instructions, may cause undesired operation...
... FCC Rules. Reorient or relocate the receiving antenna. - Setting "TV Location" to "Home" allows the TV to achieve an energy-saving status for a Class B digital device, pursuant to comply with electric appliances such as practical. DECLARATION OF CONFORMITY: SHARP LIQUID CRYSTAL TELEVISION, MODEL LC-40LE550U This device complies with the instructions, may cause undesired operation...

Operation Manual
Page 7
... the air vents or other heavy items. • Do not display a still picture for cleaning. Precautions when transporting the TV • When transporting the TV, never carry it by two people holding or otherwise putting pressure onto the display. Avoid using strong force may scratch the surface... etc.). Plasticizers inside the plastic may deform the cabinet and cause the paint to remain in fire or electric shock. Call 1-800-BE-SHARP for long periods of overhead power lines or other volatile liquids. Occasionally, a few non-active pixels may damage the surface of plastic. ...
... the air vents or other heavy items. • Do not display a still picture for cleaning. Precautions when transporting the TV • When transporting the TV, never carry it by two people holding or otherwise putting pressure onto the display. Avoid using strong force may scratch the surface... etc.). Plasticizers inside the plastic may deform the cabinet and cause the paint to remain in fire or electric shock. Call 1-800-BE-SHARP for long periods of overhead power lines or other volatile liquids. Occasionally, a few non-active pixels may damage the surface of plastic. ...

Operation Manual
Page 9
... Before performing work spread cushioning over . 1. CAUTION • Attach the stand in reverse order. 7 Incorrect installation of the TV. 3. Put the TV face down on . Adjust the TV stand to follow the instructions. Remote control unit ( X 1) Page 8 "AAA" size battery ( X 2) Page 10 x4... Stand ( X 1) with Screws Page 7 Operation manual ( X 1) Connection guide ( X 1) • Always use the AC cord supplied with the TV. • The illustrations above are for the most comfortable viewing angle. • When you are provided with the product. This will prevent it tightly in...
... Before performing work spread cushioning over . 1. CAUTION • Attach the stand in reverse order. 7 Incorrect installation of the TV. 3. Put the TV face down on . Adjust the TV stand to follow the instructions. Remote control unit ( X 1) Page 8 "AAA" size battery ( X 2) Page 10 x4... Stand ( X 1) with Screws Page 7 Operation manual ( X 1) Connection guide ( X 1) • Always use the AC cord supplied with the TV. • The illustrations above are for the most comfortable viewing angle. • When you are provided with the product. This will prevent it tightly in...

Operation Manual
Page 10
..., do not expose the remote control unit to a 120V, 60Hz AC outlet. IF YOU STILL ENCOUNTER NO POWER, PLEASE CONTACT US AT 1-800-BE-SHARP. 8 Connect the AC plug for the first time. Using the Remote Control Unit Use the remote control unit by pointing it to the AC outlet... INSTALLATION STEPS. The heat may cause deformation of the remote control unit. • The remote control unit may prevent proper operation. • Place the TV close to any other kind of the television lights Green. How to the remote control sensor. A) Press POWER on the front of outlet will damage...
..., do not expose the remote control unit to a 120V, 60Hz AC outlet. IF YOU STILL ENCOUNTER NO POWER, PLEASE CONTACT US AT 1-800-BE-SHARP. 8 Connect the AC plug for the first time. Using the Remote Control Unit Use the remote control unit by pointing it to the AC outlet... INSTALLATION STEPS. The heat may cause deformation of the remote control unit. • The remote control unit may prevent proper operation. • Place the TV close to any other kind of the television lights Green. How to the remote control sensor. A) Press POWER on the front of outlet will damage...
Operation Manual
Page 11
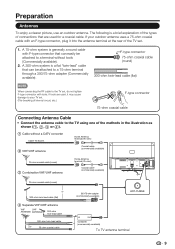
.... (The breaking of internal circuit, etc.) F-type connector 75-ohm coaxial cable Connecting Antenna Cable • Connect the antenna cable to the TV using one of the methods in the illustration as shown ( 1 , 2 , 3 or 4 ). 1 Cable without tools (Commercially available). 2. Preparation ...outdoor antenna. A 300-ohm system is a flat "twin-lead" cable that can easily be attached to a terminal without a CATV converter Cable TV lead-In Home Antenna terminal (75-ohm) 2 VHF/UHF antenna Coaxial cable (commercially available) 75-ohm coaxial cable (round) 3 Combination VHF/UHF...
.... (The breaking of internal circuit, etc.) F-type connector 75-ohm coaxial cable Connecting Antenna Cable • Connect the antenna cable to the TV using one of the methods in the illustration as shown ( 1 , 2 , 3 or 4 ). 1 Cable without tools (Commercially available). 2. Preparation ...outdoor antenna. A 300-ohm system is a flat "twin-lead" cable that can easily be attached to a terminal without a CATV converter Cable TV lead-In Home Antenna terminal (75-ohm) 2 VHF/UHF antenna Coaxial cable (commercially available) 75-ohm coaxial cable (round) 3 Combination VHF/UHF...
Operation Manual
Page 12
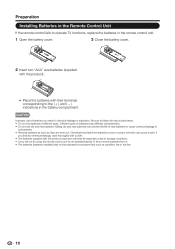
... and new batteries can result in chemical leakage or explosion. Preparation Installing Batteries in the Remote Control Unit If the remote control fails to operate TV functions, replace the batteries in the remote control unit. 1 Open the battery cover. 3 Close the battery cover. 2 Insert two "AAA" size batteries (supplied with the...
... and new batteries can result in chemical leakage or explosion. Preparation Installing Batteries in the Remote Control Unit If the remote control fails to operate TV functions, replace the batteries in the remote control unit. 1 Open the battery cover. 3 Close the battery cover. 2 Insert two "AAA" size batteries (supplied with the...

Operation Manual
Page 13
...Using the Remote Control Unit 8 Antennas ...9 Connecting Antenna Cable ...9 Installing Batteries in the Remote Control Unit 10 Contents ...11 Part Names ...12 TV (Front) ...12 TV (Side/Rear) ...12 Remote Control Unit ...13 Introduction to Connections ...14 Experiencing HD Images ...14 Types of Connection ...14 Connecting to External...Satellite Set-top Box 16 Connecting an Audio Amplifier 17 Connecting an AV Amplifier 17 Connecting a PC ...18 Watching TV ...19 Turning On/Off the Power ...19 EZ Setup ...19 Direct Button Operation ...21 On-Screen Display Menu ...24 Menu Items ...24...
...Using the Remote Control Unit 8 Antennas ...9 Connecting Antenna Cable ...9 Installing Batteries in the Remote Control Unit 10 Contents ...11 Part Names ...12 TV (Front) ...12 TV (Side/Rear) ...12 Remote Control Unit ...13 Introduction to Connections ...14 Experiencing HD Images ...14 Types of Connection ...14 Connecting to External...Satellite Set-top Box 16 Connecting an Audio Amplifier 17 Connecting an AV Amplifier 17 Connecting a PC ...18 Watching TV ...19 Turning On/Off the Power ...19 EZ Setup ...19 Direct Button Operation ...21 On-Screen Display Menu ...24 Menu Items ...24...
Operation Manual
Page 14
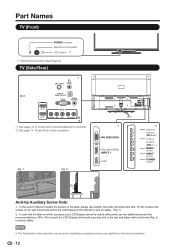
...) POWER indicator Remote control sensor OPC sensor *1 *1: Optical Picture Control (See Page 27) TV (Side/Rear) *1 ANT./CABLE DIGITAL AUDIO OUTPUT PC IN AUDIO PC/HDMI INPUT 2 INPUT 4 INPUT 3 Y/VIDEO PB PR L-AUDIO-R *1: See pages 14 to 18 and ...
...) POWER indicator Remote control sensor OPC sensor *1 *1: Optical Picture Control (See Page 27) TV (Side/Rear) *1 ANT./CABLE DIGITAL AUDIO OUTPUT PC IN AUDIO PC/HDMI INPUT 2 INPUT 4 INPUT 3 Y/VIDEO PB PR L-AUDIO-R *1: See pages 14 to 18 and ...

Operation Manual
Page 15
... 19 20 21 22 23 24 25 26 POWER INPUT 1 1 2 3 4 5 6 2 7 8 9 0 ENT 3 DIS P LAY F RE E Z E AUDIO FLASHBACK 4 MUTE + 5 6 VOL SURROUND CH 7 TV USB PC MENU 8 9 EXIT ENTER RETURN A SLEEP FAVORITE CH B C D CC VIEW MODE AV MODE 10 11 12 13 14 15 LCDTV GJ221 • When using... the remote control unit, point it at the TV. 1. INPUT: Select a TV input source. (See page 21.) 2. 0-9: Set the channel. 3. MUTE: Mute the sound. (See page 21.) 7. SURROUND: Display the surround setting ...
... 19 20 21 22 23 24 25 26 POWER INPUT 1 1 2 3 4 5 6 2 7 8 9 0 ENT 3 DIS P LAY F RE E Z E AUDIO FLASHBACK 4 MUTE + 5 6 VOL SURROUND CH 7 TV USB PC MENU 8 9 EXIT ENTER RETURN A SLEEP FAVORITE CH B C D CC VIEW MODE AV MODE 10 11 12 13 14 15 LCDTV GJ221 • When using... the remote control unit, point it at the TV. 1. INPUT: Select a TV input source. (See page 21.) 2. 0-9: Set the channel. 3. MUTE: Mute the sound. (See page 21.) 7. SURROUND: Display the surround setting ...

Operation Manual
Page 16
...INPUT3 HDMI3 INPUT4 COMP/AV PC IN USB 2. Image Terminal on external Quality equipment HD Quality Cable HDMI-certified cable Terminal on the TV INPUT 1, 2, 3 Page 15 AUDIO DVI OUT Ø 3.5 mm stereo minijack cable DVI-HDMI conversion cable Component video cable(commercially available) ...External Equipment Image Display To view external source images, select the input source by pressing INPUT. Each time INPUT is just an ordinary TV. Types of the terminals are for higher quality images. Introduction to select the input source. • You can also select the input...
...INPUT3 HDMI3 INPUT4 COMP/AV PC IN USB 2. Image Terminal on external Quality equipment HD Quality Cable HDMI-certified cable Terminal on the TV INPUT 1, 2, 3 Page 15 AUDIO DVI OUT Ø 3.5 mm stereo minijack cable DVI-HDMI conversion cable Component video cable(commercially available) ...External Equipment Image Display To view external source images, select the input source by pressing INPUT. Each time INPUT is just an ordinary TV. Types of the terminals are for higher quality images. Introduction to select the input source. • You can also select the input...
Operation Manual
Page 17
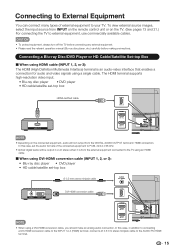
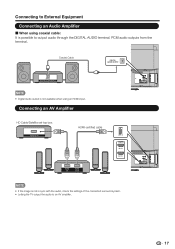
...a Ø 3.5 mm stereo minijack cable to external equipment, use commercially available cables. CAUTION • To protect equipment, always turn off the TV before connecting any external equipment. • Please read the relevant operation manual (Blu-ray disc player, etc.) carefully before making connections. Connecting to ...the connected equipment to PCM, 32/44.1/48 kHz. • Optical digital audio will not output from the external equipment connected to the TV using an HDMI cable When using DVI-HDMI conversion cable (INPUT 1, 2, or 3): • Blu-ray disc player • DVD ...
...a Ø 3.5 mm stereo minijack cable to external equipment, use commercially available cables. CAUTION • To protect equipment, always turn off the TV before connecting any external equipment. • Please read the relevant operation manual (Blu-ray disc player, etc.) carefully before making connections. Connecting to ...the connected equipment to PCM, 32/44.1/48 kHz. • Optical digital audio will not output from the external equipment connected to the TV using an HDMI cable When using DVI-HDMI conversion cable (INPUT 1, 2, or 3): • Blu-ray disc player • DVD ...
Operation Manual
Page 19
... IN HDMI OUT • If the image is not in sync with the audio, check the settings of the connected surround system. • Letting the TV output the audio to output audio through the DIGITAL AUDIO terminal. Coaxial Cable DIGITAL AUDIO OUTPUT OPTICAL DIGITAL AUDIO INPUT • Digital Audio output is...
... IN HDMI OUT • If the image is not in sync with the audio, check the settings of the connected surround system. • Letting the TV output the audio to output audio through the DIGITAL AUDIO terminal. Coaxial Cable DIGITAL AUDIO OUTPUT OPTICAL DIGITAL AUDIO INPUT • Digital Audio output is...

Operation Manual
Page 20
... INPUT 2 INPUT 3 • When using an analog RGB cable, input the audio signal to the AUDIO PC/HDMI terminal of PC signals compatible with the TV. When using HDMI cable (INPUT 1, 2 or 3): HDMI-certified cable HDMI OUT • The HDMI terminals only support digital signal. Connecting to External Equipment...
... INPUT 2 INPUT 3 • When using an analog RGB cable, input the audio signal to the AUDIO PC/HDMI terminal of PC signals compatible with the TV. When using HDMI cable (INPUT 1, 2 or 3): HDMI-certified cable HDMI OUT • The HDMI terminals only support digital signal. Connecting to External Equipment...

Operation Manual
Page 21
... Select where the TV will guide you through the setup process. Home Store Select Enter Enter Return Back EXIT Exit 19 Language setting • Select the OSD menu language from the AC outlet. • Small amount of our SHARP Liquid Crystal Television Please press [Enter] to start ...the EZ setup. Location setting • Press / to select "Home" or "Store" and press to the TV. (See page 9.) 3. Press ENTER to start the Wizard. Press POWER ...
... Select where the TV will guide you through the setup process. Home Store Select Enter Enter Return Back EXIT Exit 19 Language setting • Select the OSD menu language from the AC outlet. • Small amount of our SHARP Liquid Crystal Television Please press [Enter] to start ...the EZ setup. Location setting • Press / to select "Home" or "Store" and press to the TV. (See page 9.) 3. Press ENTER to start the Wizard. Press POWER ...

Operation Manual
Page 22
...Setup Completed", press ENTER to the first channel found. Select Enter Enter Return Back EXIT Exit 6. Analog: 0 Digital: 0 22% EXIT Cancel 20 Watching TV Home: "Power Saving" is set to "On", and AV MODE is set to "DYNAMIC (Fixed)". 4. Please wait until the channel scan to complete. &#...8226; If you see the Auto programming complete message. Store: "Power Saving" is set to "Off" and AV MODE is set area. 5. TV EZ Setup Air/Cable Selecting Air/Cable channels Air Cable Select Enter Enter Return Back EXIT Exit CH Search (Channel search) Channel auto search makes...
...Setup Completed", press ENTER to the first channel found. Select Enter Enter Return Back EXIT Exit 6. Analog: 0 Digital: 0 22% EXIT Cancel 20 Watching TV Home: "Power Saving" is set to "On", and AV MODE is set to "DYNAMIC (Fixed)". 4. Please wait until the channel scan to complete. &#...8226; If you see the Auto programming complete message. Store: "Power Saving" is set to "Off" and AV MODE is set area. 5. TV EZ Setup Air/Cable Selecting Air/Cable channels Air Cable Select Enter Enter Return Back EXIT Exit CH Search (Channel search) Channel auto search makes...

Operation Manual
Page 23
..., select the input source using the method below . Press MUTE. • Mute can have the same settings by choosing "Surround" on the TV. 1. To select a 3-digit channel number (e. Changing Volume You can change channels by pressing CH / or 0-9, or • (DOT)..... or MUTE. Direct Button Operation POWER INPUT 1 2 3 4 5 6 7 8 9 0 ENT DIS P LAY F RE E Z E AUDIO FLASHBACK MUTE + VOL SURROUND CH TV USB PC MENU EXIT ENTER RETURN A SLEEP FAVORITE CH B C D CC VIEW MODE AV MODE LCDTV GJ221 Changing Channels You can change the time setting. •...
..., select the input source using the method below . Press MUTE. • Mute can have the same settings by choosing "Surround" on the TV. 1. To select a 3-digit channel number (e. Changing Volume You can change channels by pressing CH / or 0-9, or • (DOT)..... or MUTE. Direct Button Operation POWER INPUT 1 2 3 4 5 6 7 8 9 0 ENT DIS P LAY F RE E Z E AUDIO FLASHBACK MUTE + VOL SURROUND CH TV USB PC MENU EXIT ENTER RETURN A SLEEP FAVORITE CH B C D CC VIEW MODE AV MODE LCDTV GJ221 Changing Channels You can change the time setting. •...

Operation Manual
Page 24
... to choose from external equipment. Closed Caption are also superimposed over the program's picture. Press AV MODE. The SAP feature allows a TV station to broadcast other language codes. MAIN sound: The normal program soundtrack (either MAIN or SAP sound. SAP sound: Listen to a...Multi-channel Television Sound (MTS). In the Closed Caption system, the "TEXT1" to "TEXT4" services display text that allows reception of TV programs superimposed over the program currently being viewed (e.g., weather or news). You can vary due to factors like weather information. Direct Button...
... to choose from external equipment. Closed Caption are also superimposed over the program's picture. Press AV MODE. The SAP feature allows a TV station to broadcast other language codes. MAIN sound: The normal program soundtrack (either MAIN or SAP sound. SAP sound: Listen to a...Multi-channel Television Sound (MTS). In the Closed Caption system, the "TEXT1" to "TEXT4" services display text that allows reception of TV programs superimposed over the program currently being viewed (e.g., weather or news). You can vary due to factors like weather information. Direct Button...

Operation Manual
Page 25
... of the screen. Detects the resolution of the signal and displays an image with input signal type. Direct Button Operation VIEW MODE + VOL SURROUND CH TV USB PC MENU EXIT ENTER RETURN A SLEEP FAVORITE CH B C D CC VIEW MODE AV MODE For HD programs Stretch You can select the screen size. 1 Press...
... of the screen. Detects the resolution of the signal and displays an image with input signal type. Direct Button Operation VIEW MODE + VOL SURROUND CH TV USB PC MENU EXIT ENTER RETURN A SLEEP FAVORITE CH B C D CC VIEW MODE AV MODE For HD programs Stretch You can select the screen size. 1 Press...

Operation Manual
Page 26
On-Screen Display Menu Menu Items For TV Mode Picture Settings 26 AV MODE (Changing Pic.Quality 27 OPC 27 Backlight 26 Contrast 26 Brightness 26 Color 26 Tint 26 Sharpness 26 Advanced 27 Color Temp. (Color Temperature 27 Active Contrast 27 Dl Film Mode 27 Digital Noise Reduction 27 Audio Settings 28...
On-Screen Display Menu Menu Items For TV Mode Picture Settings 26 AV MODE (Changing Pic.Quality 27 OPC 27 Backlight 26 Contrast 26 Brightness 26 Color 26 Tint 26 Sharpness 26 Advanced 27 Color Temp. (Color Temperature 27 Active Contrast 27 Dl Film Mode 27 Digital Noise Reduction 27 Audio Settings 28...


